PG-M20X Operation Manual
Page 5
... take adequate measures. -1 ONLY WARNING: High brightness light source. CAUTION: TO REDUCE THE RISK OF ELECTRIC SHOCK, DO NOT REMOVE COVER. The exclamation point within a triangle is to assure that SHARP may be required to the presence of light, or view directly. U.S.A. CAUTION RISK OF ELECTRIC SHOCK. DO NOT REMOVE SCREWS EXCEPT SPECIFIED USER SERVICE SCREWS. ONLY The enclosed computer cable must be required to...
... take adequate measures. -1 ONLY WARNING: High brightness light source. CAUTION: TO REDUCE THE RISK OF ELECTRIC SHOCK, DO NOT REMOVE COVER. The exclamation point within a triangle is to assure that SHARP may be required to the presence of light, or view directly. U.S.A. CAUTION RISK OF ELECTRIC SHOCK. DO NOT REMOVE SCREWS EXCEPT SPECIFIED USER SERVICE SCREWS. ONLY The enclosed computer cable must be required to...

PG-M20X Operation Manual
Page 6
... projector is turned off always use the POWER button on the projector or on page 71. ALLOW 1 HOUR TO COOL BEFORE REPLACING THE LAMP. REPLACE WITH SAME SHARP LAMP UNIT TYPE BQC-PGM20X//1 ONLY. TURN OFF LAMP BEFORE SERVICING. PRECAUTIONS A OBSERVER LORS DU REMPLACEMENT DE LA LAMPE. RAYONS ULTRAVIOLETS : PEUVENT ENDOMMAGER LES YEUX. During normal operation, when turning the power off . Ensure the cooling fan has stopped before disconnecting the power cord...
... projector is turned off always use the POWER button on the projector or on page 71. ALLOW 1 HOUR TO COOL BEFORE REPLACING THE LAMP. REPLACE WITH SAME SHARP LAMP UNIT TYPE BQC-PGM20X//1 ONLY. TURN OFF LAMP BEFORE SERVICING. PRECAUTIONS A OBSERVER LORS DU REMPLACEMENT DE LA LAMPE. RAYONS ULTRAVIOLETS : PEUVENT ENDOMMAGER LES YEUX. During normal operation, when turning the power off . Ensure the cooling fan has stopped before disconnecting the power cord...
PG-M20X Operation Manual
Page 7
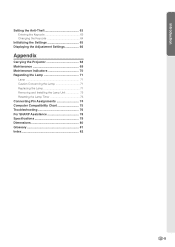
... of slanted lines, enabling sharper quality images. -3 Introduction Outstanding Features 1. Advanced Computer & Video lntegrated Composer Technology • Realizes vivid images using the latest high image quality circuitry. • New I/P conversion algorithm enhances the performance of UXGA (1,600 # 1,200) resolution can be displayed with Fujinon™ optical lens system • Newly developed DDR (Double Data Rate) chip eliminates Color Break- cal efficiency and excellent...
... of slanted lines, enabling sharper quality images. -3 Introduction Outstanding Features 1. Advanced Computer & Video lntegrated Composer Technology • Realizes vivid images using the latest high image quality circuitry. • New I/P conversion algorithm enhances the performance of UXGA (1,600 # 1,200) resolution can be displayed with Fujinon™ optical lens system • Newly developed DDR (Double Data Rate) chip eliminates Color Break- cal efficiency and excellent...

PG-M20X Operation Manual
Page 8
... the PDF Operation Manuals ..... 9 Part Names 10 Projector (Front and Top View 10 Projector (Side View 11 Remote Control 12 Using the Remote Control 13 Available Range of the Remote Control 13 Inserting the Batteries 13 Accessories 14 Setup and Connections Setup 16 Using the Adjustment Feet 16 Setting up the Screen 17 Screen Size and Projection Distance 18 Projecting a Reversed/Inverted Image 19 Connecting the Projector to Other Devices .... 20 Before Connecting 20 This projector can be connected to 20 Connecting the Power Cord 20 Connecting the Projector...
... the PDF Operation Manuals ..... 9 Part Names 10 Projector (Front and Top View 10 Projector (Side View 11 Remote Control 12 Using the Remote Control 13 Available Range of the Remote Control 13 Inserting the Batteries 13 Accessories 14 Setup and Connections Setup 16 Using the Adjustment Feet 16 Setting up the Screen 17 Screen Size and Projection Distance 18 Projecting a Reversed/Inverted Image 19 Connecting the Projector to Other Devices .... 20 Before Connecting 20 This projector can be connected to 20 Connecting the Power Cord 20 Connecting the Projector...
PG-M20X Operation Manual
Page 9
Introduction Setting the Anti-Theft 63 Entering the Keycode 63 Changing the Keycode 64 Initializing the Settings 65 Displaying the Adjustment Settings 66 Appendix Carrying the Projector 68 Maintenance 69 Maintenance Indicators 70 Regarding the Lamp 71 Lamp 71 Caution Concerning the Lamp 71 Replacing the Lamp 71 Removing and Installing the Lamp Unit 72 Resetting the Lamp Timer 73 Connecting Pin Assignments 74 Computer Compatibility Chart 75 Troubleshooting 76 For SHARP Assistance 78 Specifications 79 Dimensions 80 Glossary 81 Index 82 -5
Introduction Setting the Anti-Theft 63 Entering the Keycode 63 Changing the Keycode 64 Initializing the Settings 65 Displaying the Adjustment Settings 66 Appendix Carrying the Projector 68 Maintenance 69 Maintenance Indicators 70 Regarding the Lamp 71 Lamp 71 Caution Concerning the Lamp 71 Replacing the Lamp 71 Removing and Installing the Lamp Unit 72 Resetting the Lamp Timer 73 Connecting Pin Assignments 74 Computer Compatibility Chart 75 Troubleshooting 76 For SHARP Assistance 78 Specifications 79 Dimensions 80 Glossary 81 Index 82 -5
PG-M20X Operation Manual
Page 11
...- When the product exhibits a distinct change in damage and will provide source code for service. 19. in fire, electric shock, or other intellectual property laws and treaties. ments. Wall or Ceiling Mounting This product should be mounted to a wall or ceiling only as an improper adjustment of other company or product names are covered by the operating instructions, as recommended by a qualified...
...- When the product exhibits a distinct change in damage and will provide source code for service. 19. in fire, electric shock, or other intellectual property laws and treaties. ments. Wall or Ceiling Mounting This product should be mounted to a wall or ceiling only as an improper adjustment of other company or product names are covered by the operating instructions, as recommended by a qualified...
PG-M20X Operation Manual
Page 12
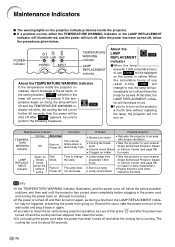
... cables connected to it is automatically controlled. Temperature monitor function I For minimal servicing and to rise, the lamp will blink, and after a 90- ity, SHARP recommends that it . Internal cleaning should be performed by a Sharp Authorized Projector Dealer or Service Center. I The power supply voltage and the shape of the picture. If the temperature continues to maintain high image qual- See "Replacing the Lamp" on the projector will turn off , the TEMPERATURE WARN- When using...
... cables connected to it is automatically controlled. Temperature monitor function I For minimal servicing and to rise, the lamp will blink, and after a 90- ity, SHARP recommends that it . Internal cleaning should be performed by a Sharp Authorized Projector Dealer or Service Center. I The power supply voltage and the shape of the picture. If the temperature continues to maintain high image qual- See "Replacing the Lamp" on the projector will turn off , the TEMPERATURE WARN- When using...
PG-M20X Operation Manual
Page 14
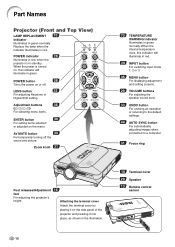
... turned on the side panel of the projector and pressing it into place, as shown in green normally. When the internal temperature rises, this indicator will illuminate in red. 29 INPUT button For switching input mode 1, 2 or 3. 36 MENU button For displaying adjustment and setting screens. 29 VOLUME buttons For adjusting the speaker sound level. 33 UNDO button For undoing an operation or returning to the default settings. 44 AUTO SYNC button For automatically adjusting images when connected to a computer. 31 Focus...
... turned on the side panel of the projector and pressing it into place, as shown in green normally. When the internal temperature rises, this indicator will illuminate in red. 29 INPUT button For switching input mode 1, 2 or 3. 36 MENU button For displaying adjustment and setting screens. 29 VOLUME buttons For adjusting the speaker sound level. 33 UNDO button For undoing an operation or returning to the default settings. 44 AUTO SYNC button For automatically adjusting images when connected to a computer. 31 Focus...
PG-M20X Operation Manual
Page 21
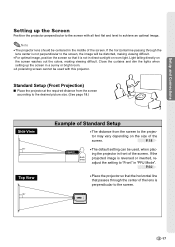
... desired picture size. (See page 18.) Side View 90° Top View 90° Example of Standard Setup • The distance from the screen to the screen, the image will be used , when plac- P.18 • The default setting can be centered in the middle of the screen. ing the projector in direct sunlight or room light. adjust the setting to achieve an optimal image. Note • The projector lens...
... desired picture size. (See page 18.) Side View 90° Top View 90° Example of Standard Setup • The distance from the screen to the screen, the image will be used , when plac- P.18 • The default setting can be centered in the middle of the screen. ing the projector in direct sunlight or room light. adjust the setting to achieve an optimal image. Note • The projector lens...
PG-M20X Operation Manual
Page 32
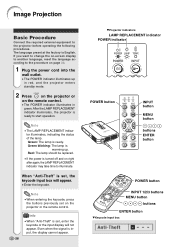
Image Projection Basic Procedure Connect the required external equipment to start operation. If you want to change the on-screen display to another language, reset the language according to illuminate. Green: The lamp is input, the display cannot appear. -28 MProjector indicators LAMP REPLACEMENT indicator POWER indicator POWER button INPUT button MENU button buttons ENTER button POWER button INPUT 1/2/3 buttons MENU button buttons ENTER button MKeycode input box When "Anti-Theft" is set , the keycode input box will not appear. Info • When "Anti-Theft" is set , ...
Image Projection Basic Procedure Connect the required external equipment to start operation. If you want to change the on-screen display to another language, reset the language according to illuminate. Green: The lamp is input, the display cannot appear. -28 MProjector indicators LAMP REPLACEMENT indicator POWER indicator POWER button INPUT button MENU button buttons ENTER button POWER button INPUT 1/2/3 buttons MENU button buttons ENTER button MKeycode input box When "Anti-Theft" is set , the keycode input box will not appear. Info • When "Anti-Theft" is set , ...

PG-M20X Operation Manual
Page 38
... be used. • When the signal type is set as "Component", in the "Picture" menu of INPUT 1 "Color", "Tint" and "Sharp" are for example purposes only. • When DVI digital signals have been entered into INPUT 1, in "Picture" only "CLR Temp", "Red" and "Blue" can be adjusted and in "Fine Sync" only "Signal Info", "Auto Sync" and "Auto Sync Disp" can be reset, even when "All Reset" in the projector. I INPUT 1 Mode Main menu Picture Page 40 Sub menu Contrast...
... be used. • When the signal type is set as "Component", in the "Picture" menu of INPUT 1 "Color", "Tint" and "Sharp" are for example purposes only. • When DVI digital signals have been entered into INPUT 1, in "Picture" only "CLR Temp", "Red" and "Blue" can be adjusted and in "Fine Sync" only "Signal Info", "Auto Sync" and "Auto Sync Disp" can be reset, even when "All Reset" in the projector. I INPUT 1 Mode Main menu Picture Page 40 Sub menu Contrast...
PG-M20X Operation Manual
Page 66
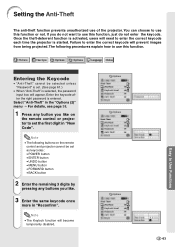
... function is started. Entering the Keycode • "Anti-Theft" cannot be set . (See page 61.) • When "Anti-Theft" is selected, the password input box will need to use of the projector. Note • The following procedures explain how to enter the correct keycode each time the projector is activated, users will appear. The following buttons on the remote control and projector cannot...
... function is started. Entering the Keycode • "Anti-Theft" cannot be set . (See page 61.) • When "Anti-Theft" is selected, the password input box will need to use of the projector. Note • The following procedures explain how to enter the correct keycode each time the projector is activated, users will appear. The following buttons on the remote control and projector cannot...
PG-M20X Operation Manual
Page 73
... the air vents, or the setting location, " " will not turn on the projector a fourth time without replacing the lamp, the projector will blink in the lower left corner of use reach 2,000, " " will change the lamp Red on/ The lamp does Power off not illuminate. • Lamp usage time exceeded 1,900 hours • Burnt-out lamp • Lamp circuit failure • Take the projector to red, the lamp will be displayed on the screen in yellow. MENT indicator Green on Green blinks...
... the air vents, or the setting location, " " will not turn on the projector a fourth time without replacing the lamp, the projector will blink in the lower left corner of use reach 2,000, " " will change the lamp Red on/ The lamp does Power off not illuminate. • Lamp usage time exceeded 1,900 hours • Burnt-out lamp • Lamp circuit failure • Take the projector to red, the lamp will be displayed on the screen in yellow. MENT indicator Green on Green blinks...

PG-M20X Operation Manual
Page 74
... Lamp I For lamp replacement, please consult your projector to remove the damaged lamp and assure safe operation. The period of time up to failure largely varies depending on -screen display icon are illuminated or flash, it is recommended that failure can lead to burn or injury. • Wait at your nearest Sharp Authorized Projector Dealer or Service Center to the nearest Sharp Authorized Projector Dealer or Service Center for repair...
... Lamp I For lamp replacement, please consult your projector to remove the damaged lamp and assure safe operation. The period of time up to failure largely varies depending on -screen display icon are illuminated or flash, it is recommended that failure can lead to burn or injury. • Wait at your nearest Sharp Authorized Projector Dealer or Service Center to the nearest Sharp Authorized Projector Dealer or Service Center for repair...
PG-M20X Operation Manual
Page 76
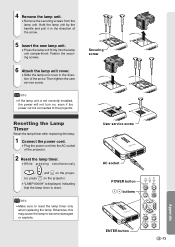
... explode. User service screw AC socket POWER button buttons ENTER button -73 Appendix Info • If the lamp unit is not correctly installed, the power will not turn on the projector. • "LAMP 0000H" is displayed, indicating that the lamp timer is connected to the projector. 4 Remove the lamp unit. • Remove the securing screws from the lamp unit. Then tighten the user service screw. Securing screw Resetting the Lamp Timer Reset the lamp timer after replacing the lamp. 1 Connect the power cord. • Plug the power cord into the lamp unit...
... explode. User service screw AC socket POWER button buttons ENTER button -73 Appendix Info • If the lamp unit is not correctly installed, the power will not turn on the projector. • "LAMP 0000H" is displayed, indicating that the lamp timer is connected to the projector. 4 Remove the lamp unit. • Remove the securing screws from the lamp unit. Then tighten the user service screw. Securing screw Resetting the Lamp Timer Reset the lamp timer after replacing the lamp. 1 Connect the power cord. • Plug the power cord into the lamp unit...

PG-M20X Operation Manual
Page 80
... connected to Level A, only the INPUT, VOLUME and AV MUTE buttons work. • Change the input signal type setting. • The LAMP REPLACEMENT indicator is working • during Enlarge (More than double size) • a dot by dot screen resolution larger the panel resolution. Page 60 40 72·73 58 58 40 - If the Keylock level is set . Appendix -77 Problem Power cannot be turned on or off using the POWER button on the projector Picture is green on INPUT...
... connected to Level A, only the INPUT, VOLUME and AV MUTE buttons work. • Change the input signal type setting. • The LAMP REPLACEMENT indicator is working • during Enlarge (More than double size) • a dot by dot screen resolution larger the panel resolution. Page 60 40 72·73 58 58 40 - If the Keylock level is set . Appendix -77 Problem Power cannot be turned on or off using the POWER button on the projector Picture is green on INPUT...
PG-M20X Operation Manual
Page 81
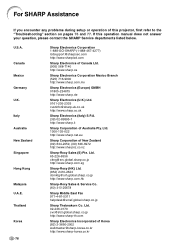
...://www.sharp.com.hk Sharp-Roxy Sales & Service Co. (60) 3-5125678 Sharp Middle East Fze 971-4-81-5311 [email protected].sharp.co.jp Sharp Thebnakorn Co. For SHARP Assistance If you encounter any problems during setup or operation of Korea (82) 2-3660-2002 webmaster@sharp-korea.co.kr http://www.sharp-korea.co.kr If this projector, first refer to the "Troubleshooting" section...
...://www.sharp.com.hk Sharp-Roxy Sales & Service Co. (60) 3-5125678 Sharp Middle East Fze 971-4-81-5311 [email protected].sharp.co.jp Sharp Thebnakorn Co. For SHARP Assistance If you encounter any problems during setup or operation of Korea (82) 2-3660-2002 webmaster@sharp-korea.co.kr http://www.sharp-korea.co.kr If this projector, first refer to the "Troubleshooting" section...
PG-M20X Operation Manual
Page 82
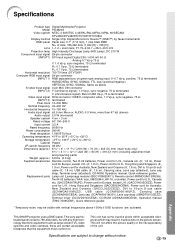
... tolerances which may be visible with any high technology electronic equipment such as large screen TVs, video systems and video cameras, there are subject to . Specifications Product type Digital Multimedia Projector Model PG-M20X Video system NTSC 3.58/NTSC 4.43/PAL/PAL-M/PAL-N/PAL 60/SECAM/ DTV480I/DTV480P/DTV720P/DTV1080I Display method Single Chip Digital Micromirror Device™ (DMD™) by Texas Instruments DMD panel Panel size: 0.7" (17.8 mm), 1 chip XGA DMD No.
... tolerances which may be visible with any high technology electronic equipment such as large screen TVs, video systems and video cameras, there are subject to . Specifications Product type Digital Multimedia Projector Model PG-M20X Video system NTSC 3.58/NTSC 4.43/PAL/PAL-M/PAL-N/PAL 60/SECAM/ DTV480I/DTV480P/DTV720P/DTV1080I Display method Single Chip Digital Micromirror Device™ (DMD™) by Texas Instruments DMD panel Panel size: 0.7" (17.8 mm), 1 chip XGA DMD No.

PG-M20X Operation Manual
Page 84
... images for a brighter picture. Keylock Level Mode that can lock the operation of projector buttons to create cooler, bluish images for natural flesh tones, or increase to prevent mischief. Smart Stretch Projects the image fully in the middle part of the image at 4:3. Stretch Mode that changes cannot be used to display it fully on . The normal aspect ratio of a computer and video image is being output. Auto Sync Optimizes projected...
... images for a brighter picture. Keylock Level Mode that can lock the operation of projector buttons to create cooler, bluish images for natural flesh tones, or increase to prevent mischief. Smart Stretch Projects the image fully in the middle part of the image at 4:3. Stretch Mode that changes cannot be used to display it fully on . The normal aspect ratio of a computer and video image is being output. Auto Sync Optimizes projected...
PG-M20X Operation Manual
Page 85
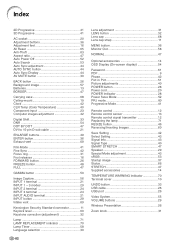
... Keystone correction (adjustment 32 Lamp 71 LAMP REPLACEMENT indicator 70 Lamp Timer 58 Language selection 30 -82 Lens adjustment 31 LENS button 32 Lens cap 68 Lens cap strap 11 MENU button 36 Monitor Out 58 NORMAL 47 Optional accessories 14 OSD Display (On-screen display 54 Password 61 PDF 9 Phase 42 Pict in Pict 51 Picture adjustments 40 POWER button 28 Power cord 20 POWER indicator 28 Power Save Mode 52 PRJ mode 60 Progressive Mode 41 Remote control 12 Remote control sensor 13 Remote control signal transmitter 12 Replacing...
... Keystone correction (adjustment 32 Lamp 71 LAMP REPLACEMENT indicator 70 Lamp Timer 58 Language selection 30 -82 Lens adjustment 31 LENS button 32 Lens cap 68 Lens cap strap 11 MENU button 36 Monitor Out 58 NORMAL 47 Optional accessories 14 OSD Display (On-screen display 54 Password 61 PDF 9 Phase 42 Pict in Pict 51 Picture adjustments 40 POWER button 28 Power cord 20 POWER indicator 28 Power Save Mode 52 PRJ mode 60 Progressive Mode 41 Remote control 12 Remote control sensor 13 Remote control signal transmitter 12 Replacing...


