
PG-F212X-L | PG-F262X | PG-F312X | PG-F317X Brochure
Page 2
... RGB input when coupled with six color segments including yellow and cyan added to red, green, blue and white. DLP Digital Image Using a DLP chip, the image is no disturbance, even in or remaining afterimage, the projectors are ideal for intermediate colors, providing natural, detailed images. Long-Life High-Performance DLP Picture With DLP technology, the projectors maintain a uniform color reproduction capability for the high-speed rotating color wheel axle have an extremely long lifespan. With Sharp's unique color matching...
... RGB input when coupled with six color segments including yellow and cyan added to red, green, blue and white. DLP Digital Image Using a DLP chip, the image is no disturbance, even in or remaining afterimage, the projectors are ideal for intermediate colors, providing natural, detailed images. Long-Life High-Performance DLP Picture With DLP technology, the projectors maintain a uniform color reproduction capability for the high-speed rotating color wheel axle have an extremely long lifespan. With Sharp's unique color matching...
PG-F212X-L | PG-F262X | PG-F312X | PG-F317X Brochure
Page 3
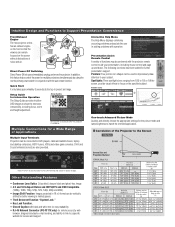
... Help Menu The Help Menu displays commonly occurring problems and assists the user in conjunction with black and white text for easy readability. • RJ-45 Network Connector (PG-F317X only) for service and support. Pointers: Five pointer icon shapes can be used to impressively draw attention to project an image. In addition, this feature helps control the power for further presentation support. Exhaust air Direct Power Off Switching Direct Power Off lets users immediately...
... Help Menu The Help Menu displays commonly occurring problems and assists the user in conjunction with black and white text for easy readability. • RJ-45 Network Connector (PG-F317X only) for service and support. Pointers: Five pointer icon shapes can be used to impressively draw attention to project an image. In addition, this feature helps control the power for further presentation support. Exhaust air Direct Power Off Switching Direct Power Off lets users immediately...
PG-F212X-L | PG-F262X | PG-F312X | PG-F317X Brochure
Page 4
... in low power ("eco+quiet") mode; AN-XRCM30 Ceiling Mounting Bracket; AN-CMCSS46: 46" Security Cable Kit; AN-A1RS: RS-232C Adapter; Specifications Models PG-F312X / PG-F317X PG-F262X PG-F212X-L Display device 0.55" DLP® chip x 1 Resolution XGA (1,024 x 768) Brightness 3,000 ANSI lumens 2,600 ANSI lumens 2,400 ANSI lumens Contrast ratio 2,200:1 F number F2.5-2.6 Lens Zoom Manual, x1.15 (f=20.4-23.5 mm) Focus Manual Picture size 40" to 300" Projector distance 40...
... in low power ("eco+quiet") mode; AN-XRCM30 Ceiling Mounting Bracket; AN-CMCSS46: 46" Security Cable Kit; AN-A1RS: RS-232C Adapter; Specifications Models PG-F312X / PG-F317X PG-F262X PG-F212X-L Display device 0.55" DLP® chip x 1 Resolution XGA (1,024 x 768) Brightness 3,000 ANSI lumens 2,600 ANSI lumens 2,400 ANSI lumens Contrast ratio 2,200:1 F number F2.5-2.6 Lens Zoom Manual, x1.15 (f=20.4-23.5 mm) Focus Manual Picture size 40" to 300" Projector distance 40...
PG-F317X Operation Manual
Page 8
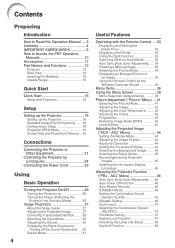
... 24 Connecting the Power Cord 25 Using Basic Operation Turning the Projector On/Off 26 Turning the Projector on 26 Turning the Power off (Putting the Projector into Standby Mode 26 Image Projection 27 About the Setup Guide 27 Adjusting the Projected Image 27 Correcting Trapezoidal Distortion ........ 29 Switching the Input Mode 30 Adjusting the Volume 30 Displaying the Black Screen and Turning off the Sound Temporarily .... 30 Resize Mode 31 4 Useful Features Operating with the Remote Control .... 33 Displaying and Setting the Break Timer 33 Displaying the...
... 24 Connecting the Power Cord 25 Using Basic Operation Turning the Projector On/Off 26 Turning the Projector on 26 Turning the Power off (Putting the Projector into Standby Mode 26 Image Projection 27 About the Setup Guide 27 Adjusting the Projected Image 27 Correcting Trapezoidal Distortion ........ 29 Switching the Input Mode 30 Adjusting the Volume 30 Displaying the Black Screen and Turning off the Sound Temporarily .... 30 Resize Mode 31 4 Useful Features Operating with the Remote Control .... 33 Displaying and Setting the Break Timer 33 Displaying the...
PG-F317X Operation Manual
Page 9
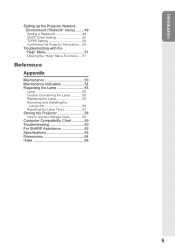
Introduction Setting up the Projector Network Environment ("Network" menu) ........ 49 Setting a Password 49 DHCP Client Setting 50 TCP/IP Setting 50 Confirming the Projector Information ... 50 Troubleshooting with the "Help" Menu 51 Utilizing the "Help" Menu Functions .... 51 Reference Appendix Maintenance 53 Maintenance Indicators 54 Regarding the Lamp 55 Lamp 55 Caution Concerning the Lamp 55 Replacing the Lamp 55 Removing and Installing the Lamp Unit 56 Resetting the Lamp Timer 57 Storing the Projector 58 How to Use the...
Introduction Setting up the Projector Network Environment ("Network" menu) ........ 49 Setting a Password 49 DHCP Client Setting 50 TCP/IP Setting 50 Confirming the Projector Information ... 50 Troubleshooting with the "Help" Menu 51 Utilizing the "Help" Menu Functions .... 51 Reference Appendix Maintenance 53 Maintenance Indicators 54 Regarding the Lamp 55 Lamp 55 Caution Concerning the Lamp 55 Replacing the Lamp 55 Removing and Installing the Lamp Unit 56 Resetting the Lamp Timer 57 Storing the Projector 58 How to Use the...
PG-F317X Operation Manual
Page 12
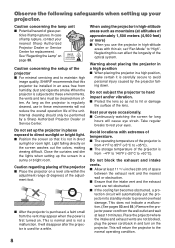
... 53 and 54.) Remove the projector power cord from the vent may appear when the power is first turned on a level site within the adjustment range (9 degrees) of the projector ■ Place the projector on . Do not set "Fan Mode" to rest your nearest Sharp Authorized Projector Dealer or Service Center for replacement. Warning about placing the projector in a high position ■ When placing the projector in a high position, make certain...
... 53 and 54.) Remove the projector power cord from the vent may appear when the power is first turned on a level site within the adjustment range (9 degrees) of the projector ■ Place the projector on . Do not set "Fan Mode" to rest your nearest Sharp Authorized Projector Dealer or Service Center for replacement. Warning about placing the projector in a high position ■ When placing the projector in a high position, make certain...
PG-F317X Operation Manual
Page 13
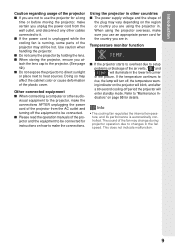
... rise, the lamp will enter standby mode. ing indicator on how to make sure you attach the lens cap to the projector. (See page 12.) ■ Do not expose the projector to direct sunlight or place next to it. ■ If the power cord is unplugged while the cooling fan is automatically controlled. The sound of the picture. Using the projector in other audio- dicators" on...
... rise, the lamp will enter standby mode. ing indicator on how to make sure you attach the lens cap to the projector. (See page 12.) ■ Do not expose the projector to direct sunlight or place next to it. ■ If the power cord is unplugged while the cooling fan is automatically controlled. The sound of the picture. Using the projector in other audio- dicators" on...
PG-F317X Operation Manual
Page 14
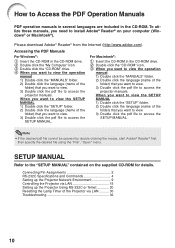
... CD-ROM. Connecting Pin Assignments 2 RS-232C Specifications and Commands 4 Setting up the Projector Network Environment 9 Controlling the Projector via LAN 15 Setting up the Projector Using RS-232C or Telnet 20 Resetting the Lamp Timer of the Projector via LAN .......... 30 Troubleshooting 32 10 To utilize these manuals, you need to install Adobe® Reader® on the supplied CD-ROM for details. When you want to view the SETUP MANUAL 1) Double click...
... CD-ROM. Connecting Pin Assignments 2 RS-232C Specifications and Commands 4 Setting up the Projector Network Environment 9 Controlling the Projector via LAN 15 Setting up the Projector Using RS-232C or Telnet 20 Resetting the Lamp Timer of the Projector via LAN .......... 30 Troubleshooting 32 10 To utilize these manuals, you need to install Adobe® Reader® on the supplied CD-ROM for details. When you want to view the SETUP MANUAL 1) Double click...
PG-F317X Operation Manual
Page 18
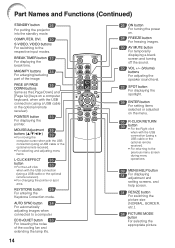
... USB connection (using a USB cable or the optional remote receiver). • For changing the pointer or spot area. KEYSTONE button 29 For entering the Keystone Correction mode. BREAK TIMER button 33 For displaying the break time. MAGNIFY buttons 34 For enlarging/reducing part of the cooling fan and extending the lamp life. 14 26 ON button For turning the power on. 34 FREEZE button For freezing images. 30 AV MUTE button For temporarily displaying a black screen and turning off the sound...
... USB connection (using a USB cable or the optional remote receiver). • For changing the pointer or spot area. KEYSTONE button 29 For entering the Keystone Correction mode. BREAK TIMER button 33 For displaying the break time. MAGNIFY buttons 34 For enlarging/reducing part of the cooling fan and extending the lamp life. 14 26 ON button For turning the power on. 34 FREEZE button For freezing images. 30 AV MUTE button For temporarily displaying a black screen and turning off the sound...
PG-F317X Operation Manual
Page 30
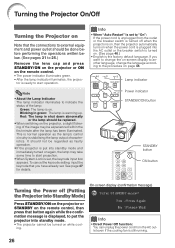
.... 26 Power indicator STANDBY/ON button STANDBY button ON button On-screen display (confirmation message) Turning the Power off when the projector is on, then the projector automatically turns on when the power cord is plugged into the AC outlet or the breaker switch is turned on . Blinking in green: The lamp is ready to start projection. • When System Lock is shut down abnormally or the lamp should be replaced. • When switching on the projector, a slight flickering of the lamp...
.... 26 Power indicator STANDBY/ON button STANDBY button ON button On-screen display (confirmation message) Turning the Power off when the projector is on, then the projector automatically turns on when the power cord is plugged into the AC outlet or the breaker switch is turned on . Blinking in green: The lamp is ready to start projection. • When System Lock is shut down abnormally or the lamp should be replaced. • When switching on the projector, a slight flickering of the lamp...
PG-F317X Operation Manual
Page 50
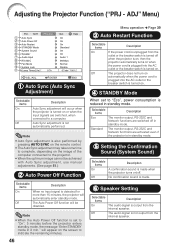
... 1 Auto Sync 2 Auto Power Off 3 Auto Restart 4 STANDBY Mode 5 System Sound 6 Speaker 7 Audio Input 8 RS-232C 9 Fan Mode 0 System Lock Lamp Timer(Life) 0h Net. The projector does not turn on automatically when the power cord is plugged into the AC outlet or the breaker switch is turned on /off in X min." ENTER END 1 Auto Sync (Auto Sync Adjustment) Selectable items On Off Description Auto Sync adjustment will appear on the screen to "On", 5 minutes before the projector enters standby mode, the message "Enter STANDBY mode in standby mode...
... 1 Auto Sync 2 Auto Power Off 3 Auto Restart 4 STANDBY Mode 5 System Sound 6 Speaker 7 Audio Input 8 RS-232C 9 Fan Mode 0 System Lock Lamp Timer(Life) 0h Net. The projector does not turn on automatically when the power cord is plugged into the AC outlet or the breaker switch is turned on /off in X min." ENTER END 1 Auto Sync (Auto Sync Adjustment) Selectable items On Off Description Auto Sync adjustment will appear on the screen to "On", 5 minutes before the projector enters standby mode, the message "Enter STANDBY mode in standby mode...
PG-F317X Operation Manual
Page 52
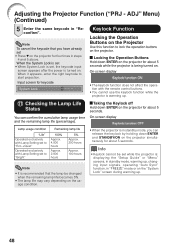
... , changing input signals, operating "Auto Sync" function, in "Reconfirm". Checking the Lamp Life Status You can release the keylock by holding down ENTER on . Adjusting the Projector Function ("PRJ - When it appears, enter the right keycode to lock the operation buttons on the Projector Use this function to start projection. Keylock Function Locking the Operation Buttons on the projector. On-screen display Lamp usage condition "Life" Operated exclusively with Lamp Setting set to "Eco +Quiet" Operated exclusively with the remote control buttons. • You cannot use...
... , changing input signals, operating "Auto Sync" function, in "Reconfirm". Checking the Lamp Life Status You can release the keylock by holding down ENTER on . Adjusting the Projector Function ("PRJ - When it appears, enter the right keycode to lock the operation buttons on the Projector Use this function to start projection. Keylock Function Locking the Operation Buttons on the projector. On-screen display Lamp usage condition "Life" Operated exclusively with Lamp Setting set to "Eco +Quiet" Operated exclusively with the remote control buttons. • You cannot use...

PG-F317X Operation Manual
Page 54
... Description Factory default setting: 192.168.150.002 Enter an IP address appropriate for the network. The projector name is not used in the supplied CD-ROM. 50 "Obtaining IP Address..." Sets the TCP/IP manually. If the DHCP server is displayed. Setting up the Projector Network Environment ("Network" menu) (Continued) Menu operation n Page 39 2 DHCP Client Setting Connect the LAN cable before turning the projector on how to change the projector name, see "SETUP MANUAL" contained in a network with...
... Description Factory default setting: 192.168.150.002 Enter an IP address appropriate for the network. The projector name is not used in the supplied CD-ROM. 50 "Obtaining IP Address..." Sets the TCP/IP manually. If the DHCP server is displayed. Setting up the Projector Network Environment ("Network" menu) (Continued) Menu operation n Page 39 2 DHCP Client Setting Connect the LAN cable before turning the projector on how to change the projector name, see "SETUP MANUAL" contained in a network with...
PG-F317X Operation Manual
Page 58
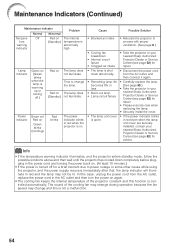
...; Remaining lamp life becomes 5% or less. • Burnt-out lamp • Lamp circuit failure • The lamp unit cover is open. The power indicator blinks in red even when the lamp unit cover are securely installed, contact your nearest Sharp Authorized Projector Dealer or Service Center (see page 62) for advice. Time to change and this function is controlled automatically. Maintenance Indicators (Continued) Maintenance indicator Temperature warning indicator Normal Off Abnormal Red on (Standby) Lamp indicator Green on (Green blinks when the lamp is...
...; Remaining lamp life becomes 5% or less. • Burnt-out lamp • Lamp circuit failure • The lamp unit cover is open. The power indicator blinks in red even when the lamp unit cover are securely installed, contact your nearest Sharp Authorized Projector Dealer or Service Center (see page 62) for advice. Time to change and this function is controlled automatically. Maintenance Indicators (Continued) Maintenance indicator Temperature warning indicator Normal Off Abnormal Red on (Standby) Lamp indicator Green on (Green blinks when the lamp is...
PG-F317X Operation Manual
Page 59
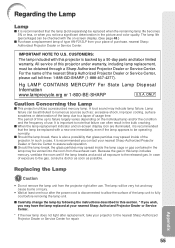
..., it is disconnected to allow the surface of the projector. In case of use . CUSTOMERS: The lamp included with a new one hour after the power cord is recommended that failure can be obtained through a Sharp Authorized Projector Dealer or Service Center. The period of time up to failure largely varies depending on the individual lamp and/or the condition and the frequency of exposure...
..., it is disconnected to allow the surface of the projector. In case of use . CUSTOMERS: The lamp included with a new one hour after the power cord is recommended that failure can be obtained through a Sharp Authorized Projector Dealer or Service Center. The period of time up to failure largely varies depending on the individual lamp and/or the condition and the frequency of exposure...
PG-F317X Operation Manual
Page 61
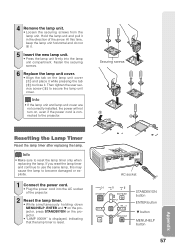
Fasten the securing screws. 6 Replace the lamp unit cover. • Align the tab on , even if the power cord is reset. Then tighten the user service screw (3) to reset the lamp timer only when replacing the lamp. If you reset the lamp timer and continue to the projector. AC socket STANDBY/ON button ENTER button R button MENU/HELP button 57 Appendix Securing screws Resetting the Lamp Timer Reset the lamp timer after replacing the lamp. At this may cause the lamp to close it. Info • Make...
Fasten the securing screws. 6 Replace the lamp unit cover. • Align the tab on , even if the power cord is reset. Then tighten the user service screw (3) to reset the lamp timer only when replacing the lamp. If you reset the lamp timer and continue to the projector. AC socket STANDBY/ON button ENTER button R button MENU/HELP button 57 Appendix Securing screws Resetting the Lamp Timer Reset the lamp timer after replacing the lamp. At this may cause the lamp to close it. Info • Make...

PG-F317X Operation Manual
Page 64
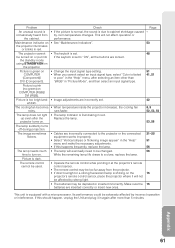
Troubleshooting Problem No picture and no sound is heard. Check • Projector power cord is not plugged into a warm room, or if it is incorrectly set to minimum position. • Depending on the projector before the "DVI-D" input mode is to be projected unless the signal output setting of "Color" and "Tint" in the "Help" menu and make the 51 necessary adjustments. • Depending on the computer you are using , the...
Troubleshooting Problem No picture and no sound is heard. Check • Projector power cord is not plugged into a warm room, or if it is incorrectly set to minimum position. • Depending on the projector before the "DVI-D" input mode is to be projected unless the signal output setting of "Color" and "Tint" in the "Help" menu and make the 51 necessary adjustments. • Depending on the computer you are using , the...
PG-F317X Operation Manual
Page 65
... connected equipment works improperly. • Select "Vertical stripes or flickering image appear" in the "Help" menu, after the Replace the lamp. Picture is dark. occasionally heard from the projector. • If direct sunlight or a strong fluorescent lamp is shining on COMPUTER (RGB)/ DVI (RGB). the standby mode using STANDBY/ON on . This will eventually need to be turned on COMPUTER (Component)/ DVI (Component). • Change the input signal type setting...
... connected equipment works improperly. • Select "Vertical stripes or flickering image appear" in the "Help" menu, after the Replace the lamp. Picture is dark. occasionally heard from the projector. • If direct sunlight or a strong fluorescent lamp is shining on COMPUTER (RGB)/ DVI (RGB). the standby mode using STANDBY/ON on . This will eventually need to be turned on COMPUTER (Component)/ DVI (Component). • Change the input signal type setting...
PG-F317X Operation Manual
Page 66
... this projector, first refer to the "Troubleshooting" section on pages 60 and 61. Ltd. 02-236-0170 [email protected].sharp.co.jp http://www.sharp-th.com Korea Sharp Electronics Incorporated of this operation manual does not answer your question, please contact the SHARP Service departments listed below. Ltd. 1300-135-022 http://www.sharp.net.au New Zealand Sharp Corporation...
... this projector, first refer to the "Troubleshooting" section on pages 60 and 61. Ltd. 02-236-0170 [email protected].sharp.co.jp http://www.sharp-th.com Korea Sharp Electronics Incorporated of this operation manual does not answer your question, please contact the SHARP Service departments listed below. Ltd. 1300-135-022 http://www.sharp.net.au New Zealand Sharp Corporation...
PG-F317X Operation Manual
Page 69
... Image shift 44 INPUT modes 30 Intake vent 12, 52 Kensington Security Standard connector 13 Keycode 47 Keylock 48 KEYSTONE button 29 Keystone Correction 29, 44 Lamp 55 Lamp indicator 53 Lamp Setting 43 Lamp Timer (Life 48 Lamp unit 56 Language (on-screen display language 45 LAN terminal 25 L-CLICK/EFFECT button 33, 35 Lens Cap 12 MAC Address 50 MAGNIFY buttons 34 MENU/HELP button 39, 51 MONITOR OUT terminal 23 MOUSE/Adjustment buttons 35, 39 Network...
... Image shift 44 INPUT modes 30 Intake vent 12, 52 Kensington Security Standard connector 13 Keycode 47 Keylock 48 KEYSTONE button 29 Keystone Correction 29, 44 Lamp 55 Lamp indicator 53 Lamp Setting 43 Lamp Timer (Life 48 Lamp unit 56 Language (on-screen display language 45 LAN terminal 25 L-CLICK/EFFECT button 33, 35 Lens Cap 12 MAC Address 50 MAGNIFY buttons 34 MENU/HELP button 39, 51 MONITOR OUT terminal 23 MOUSE/Adjustment buttons 35, 39 Network...


