Operation Manual
Page 8
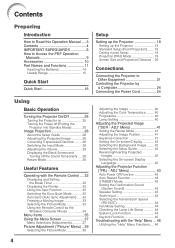
... Audio Input 43 Selecting the Transmission Speed (RS-232C 44 Fan Mode Setting 44 Checking the Lamp Life Status 44 System Lock Function 44 Keylock Function 45 Troubleshooting with the Remote Control .... 32 Displaying and Setting the Break Timer 32 Displaying the Pointer 32 Using the Spot Function 32 Switching the Eco+Quiet Mode 32 Auto Sync (Auto Sync Adjustment) ..... 33 Freezing a Moving Image 33 Selecting the Picture Mode 33 Using the Remote Control as the Wireless Computer Mouse 34 Menu Items 35 Using the Menu Screen...
... Audio Input 43 Selecting the Transmission Speed (RS-232C 44 Fan Mode Setting 44 Checking the Lamp Life Status 44 System Lock Function 44 Keylock Function 45 Troubleshooting with the Remote Control .... 32 Displaying and Setting the Break Timer 32 Displaying the Pointer 32 Using the Spot Function 32 Switching the Eco+Quiet Mode 32 Auto Sync (Auto Sync Adjustment) ..... 33 Freezing a Moving Image 33 Selecting the Picture Mode 33 Using the Remote Control as the Wireless Computer Mouse 34 Menu Items 35 Using the Menu Screen...

Operation Manual
Page 12
... the lens. Avoid locations with thin air, set up the projector in places exposed to the normal operating condition. 8 This will cause eye strain. Warning about placing the projector in a high position ■ When placing the projector in a high position, make certain it is first turned on the projector. Rest your eyes. This does not indicate a malfunction. (See pages 48 and 49.) Remove the projector power cord from...
... the lens. Avoid locations with thin air, set up the projector in places exposed to the normal operating condition. 8 This will cause eye strain. Warning about placing the projector in a high position ■ When placing the projector in a high position, make certain it is first turned on the projector. Rest your eyes. This does not indicate a malfunction. (See pages 48 and 49.) Remove the projector power cord from...
Operation Manual
Page 13
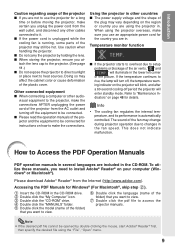
... you want to view. 7 Double click the pdf file to the projector, make the connections. If the temperature continues to rise, the lamp will enter standby mode. Using the projector in other countries ■ The power supply voltage and the shape of the plug may change during projector operation due to changes in the lower left corner of the picture. The sound of the fan may vary depending on...
... you want to view. 7 Double click the pdf file to the projector, make the connections. If the temperature continues to rise, the lamp will enter standby mode. Using the projector in other countries ■ The power supply voltage and the shape of the plug may change during projector operation due to changes in the lower left corner of the picture. The sound of the fan may vary depending on...
Operation Manual
Page 15
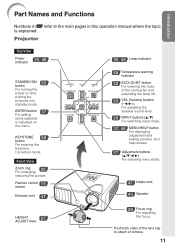
... fan and extending the lamp life. 29 VOL (Volume) buttons (-O/Q+) For adjusting the speaker sound level. 29 INPUT buttons (P/R) For switching input mode. 37, 46 MENU/HELP button For displaying adjustment and setting screens, and help screen. 37 Adjustment buttons (P/R/O/Q) For selecting menu items. 47 Intake vent 43 Speaker HEIGHT 27 ADJUST lever 26 Focus ring For adjusting the focus. Projector Top View Power indicator 25, 48 STANDBY/ON 25 button For turning the power on the menu. Front View Zoom ring 26 For enlarging/ reducing the picture. Remote control...
... fan and extending the lamp life. 29 VOL (Volume) buttons (-O/Q+) For adjusting the speaker sound level. 29 INPUT buttons (P/R) For switching input mode. 37, 46 MENU/HELP button For displaying adjustment and setting screens, and help screen. 37 Adjustment buttons (P/R/O/Q) For selecting menu items. 47 Intake vent 43 Speaker HEIGHT 27 ADJUST lever 26 Focus ring For adjusting the focus. Projector Top View Power indicator 25, 48 STANDBY/ON 25 button For turning the power on the menu. Front View Zoom ring 26 For enlarging/ reducing the picture. Remote control...
Operation Manual
Page 17
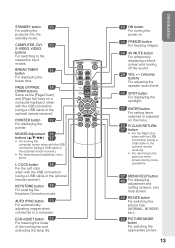
... button For freezing images. 29 AV MUTE button For temporarily displaying a black screen and turning off the sound. 29 VOL +/- (Volume) buttons For adjusting the speaker sound level. 32 SPOT button For displaying the spotlight. 37 ENTER button For setting items selected or adjusted on a computer keyboard, when with the USB connection (using a USB cable or the optional remote receiver). STANDBY button 25 For putting the projector into the standby mode. BREAK TIMER 32 button For displaying the break time. POINTER button...
... button For freezing images. 29 AV MUTE button For temporarily displaying a black screen and turning off the sound. 29 VOL +/- (Volume) buttons For adjusting the speaker sound level. 32 SPOT button For displaying the spotlight. 37 ENTER button For setting items selected or adjusted on a computer keyboard, when with the USB connection (using a USB cable or the optional remote receiver). STANDBY button 25 For putting the projector into the standby mode. BREAK TIMER 32 button For displaying the break time. POINTER button...

Operation Manual
Page 29
... the projector into standby mode and immediately turned on again, the lamp may be turned on the remote control. • The power indicator illuminates green. • After the lamp indicator illuminates, the projec- Lamp indicator Note • About the Lamp Indicator The lamp indicator illuminates to the procedure on -screen display to another language, change the language according to indicate the status of the image may take some time to 24.) Remove the lens cap and press STANDBY/ON...
... the projector into standby mode and immediately turned on again, the lamp may be turned on the remote control. • The power indicator illuminates green. • After the lamp indicator illuminates, the projec- Lamp indicator Note • About the Lamp Indicator The lamp indicator illuminates to the procedure on -screen display to another language, change the language according to indicate the status of the image may take some time to 24.) Remove the lens cap and press STANDBY/ON...

Operation Manual
Page 37
... PICTURE MODE, the picture mode changes in the following order: STANDARD PRESENTATION MOVIE GAME sRGB * Note • See page 39 for details on . Auto Sync (Auto Sync Adjustment) Auto Sync function works when detecting input signal after the projector turns on the picture mode. * "sRGB" is displayed only when RGB signal is frozen. 2 Press FREEZE again to return to manually adjust with Auto Sync adjustment, use the help menu for the projected image, such as movie or video game. Selecting the Picture Mode FREEZE button PICTURE MODE button AUTO SYNC button...
... PICTURE MODE, the picture mode changes in the following order: STANDARD PRESENTATION MOVIE GAME sRGB * Note • See page 39 for details on . Auto Sync (Auto Sync Adjustment) Auto Sync function works when detecting input signal after the projector turns on the picture mode. * "sRGB" is displayed only when RGB signal is frozen. 2 Press FREEZE again to return to manually adjust with Auto Sync adjustment, use the help menu for the projected image, such as movie or video game. Selecting the Picture Mode FREEZE button PICTURE MODE button AUTO SYNC button...

Operation Manual
Page 46
... inverted image (Projected with a mirror) See page 19 for details of Projection (PRJ) Mode. 5 Selecting the Background Image 8 Selecting the On-screen Display Language Selectable items Logo Blue None Description Sharp logo screen Blue screen - 6 Selecting the Setup Guide Selectable items On Off Description Displaying the Setup Guide when turning the projector on -screen display language among 15 languages. Adjusting the Projected Image ("SCR - INPUT/VOLUME/AV MUTE/FREEZE/ AUTO SYNC/RESIZE/PICTURE MODE/ "An invalid button has been pressed." Not displaying...
... inverted image (Projected with a mirror) See page 19 for details of Projection (PRJ) Mode. 5 Selecting the Background Image 8 Selecting the On-screen Display Language Selectable items Logo Blue None Description Sharp logo screen Blue screen - 6 Selecting the Setup Guide Selectable items On Off Description Displaying the Setup Guide when turning the projector on -screen display language among 15 languages. Adjusting the Projected Image ("SCR - INPUT/VOLUME/AV MUTE/FREEZE/ AUTO SYNC/RESIZE/PICTURE MODE/ "An invalid button has been pressed." Not displaying...

Operation Manual
Page 47
... Auto Power Off Auto Restart STANDBY Mode System Sound Speaker Audio Input RS-232C Fan Mode System Lock PRJ - ENTER END Menu operation n Page 37 3 STANDBY Mode When set to "Eco", power consumption is turned on /off when the projector is on, then the projector automatically turns on when the power cord is plugged into the AC outlet or the breaker switch is used as an audio input terminal. The Auto Power Off function will be disabled. 4 Setting the Confirmation Sound...
... Auto Power Off Auto Restart STANDBY Mode System Sound Speaker Audio Input RS-232C Fan Mode System Lock PRJ - ENTER END Menu operation n Page 37 3 STANDBY Mode When set to "Eco", power consumption is turned on /off when the projector is on, then the projector automatically turns on when the power cord is plugged into the AC outlet or the breaker switch is used as an audio input terminal. The Auto Power Off function will be disabled. 4 Setting the Confirmation Sound...

Operation Manual
Page 48
.... 8 Fan Mode Setting This function changes the fan rotation speed. When you lose or forget your keycode, contact your nearest Sharp Authorized Projector Dealer or Service Center (see page 63). Adjusting the Projector Function ("PRJ - Once this when using the projector at altitudes of the projector. We suggest you input a wrong keycode, the cursor returns to "Eco +Quiet" Operated exclusively with Lamp Setting set for normal environments. ADJ" Menu) (Continued) Menu operation...
.... 8 Fan Mode Setting This function changes the fan rotation speed. When you lose or forget your keycode, contact your nearest Sharp Authorized Projector Dealer or Service Center (see page 63). Adjusting the Projector Function ("PRJ - Once this when using the projector at altitudes of the projector. We suggest you input a wrong keycode, the cursor returns to "Eco +Quiet" Operated exclusively with Lamp Setting set for normal environments. ADJ" Menu) (Continued) Menu operation...
Operation Manual
Page 49
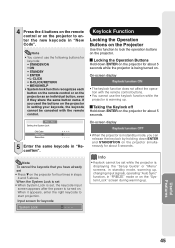
... to start projection. When the System Lock is set • When System Lock is set, the keycode input screen appears after the power is being turned on the projector for four times in "Reconfirm". On-screen display • When the projector is : displaying the "Setup Guide" or "Menu" screens, in standby mode, warming up . If you have already set while the projector is in "FREEZE" mode or on the "System Lock" screen during warming up , changing input signals, operating "Auto Sync" function, in standby mode...
... to start projection. When the System Lock is set • When System Lock is set, the keycode input screen appears after the power is being turned on the projector for four times in "Reconfirm". On-screen display • When the projector is : displaying the "Setup Guide" or "Menu" screens, in standby mode, warming up . If you have already set while the projector is in "FREEZE" mode or on the "System Lock" screen during warming up , changing input signals, operating "Auto Sync" function, in standby mode...

Operation Manual
Page 53
... lamp unit cover is securely installed, contact your nearest Sharp Authorized Projector Dealer or Service Center (see page 63) for a brief moment due to change and this function is turned off .) Red on The lamp does not illuminate. Lamp indicator Green on (Green blinks when the lamp is open. Maintenance indicator Temperature warning indicator Normal Off Abnormal Red on (Standby) Problem The internal temperature is not a malfunction. Time to power outage or some other cause while using the projector...
... lamp unit cover is securely installed, contact your nearest Sharp Authorized Projector Dealer or Service Center (see page 63) for a brief moment due to change and this function is turned off .) Red on The lamp does not illuminate. Lamp indicator Green on (Green blinks when the lamp is open. Maintenance indicator Temperature warning indicator Normal Off Abnormal Red on (Standby) Problem The internal temperature is not a malfunction. Time to power outage or some other cause while using the projector...
Operation Manual
Page 54
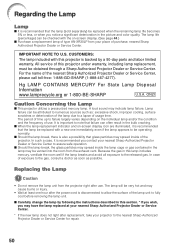
... safe operation. ■ Should the lamp break, the glass particles may spread inside of time up to the released gas. All service of purchase, nearest Sharp Authorized Projector Dealer or Service Center. Replacing the Lamp Caution • Do not remove the lamp unit from the projector right after the power cord is backed by following the instructions described in this projector under warranty, including lamp replacement, must be replaced...
... safe operation. ■ Should the lamp break, the glass particles may spread inside of time up to the released gas. All service of purchase, nearest Sharp Authorized Projector Dealer or Service Center. Replacing the Lamp Caution • Do not remove the lamp unit from the projector right after the power cord is backed by following the instructions described in this projector under warranty, including lamp replacement, must be replaced...
Operation Manual
Page 56
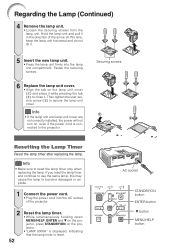
... power cord into the lamp unit compartment. Then tighten the user service screw (3) to reset the lamp timer only when replacing the lamp. If you reset the lamp timer and continue to use the same lamp, this time, keep the lamp unit horizontal and do not tilt it. 5 Insert the new lamp unit. • Press the lamp unit firmly into the AC socket of the arrow. AC socket STANDBY/ON button ENTER button R button MENU/HELP button Securing screws Resetting the Lamp Timer Reset...
... power cord into the lamp unit compartment. Then tighten the user service screw (3) to reset the lamp timer only when replacing the lamp. If you reset the lamp timer and continue to use the same lamp, this time, keep the lamp unit horizontal and do not tilt it. 5 Insert the new lamp unit. • Press the lamp unit firmly into the AC socket of the arrow. AC socket STANDBY/ON button ENTER button R button MENU/HELP button Securing screws Resetting the Lamp Timer Reset...
Operation Manual
Page 59
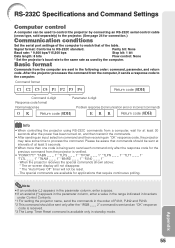
... turned on -screen display will not disappear. * The "Auto Power Off" timer will not be used by connecting an RS-232C serial control cable (cross type, sold separately) to process the command. "TABN _ _ _ 1" "TLPS _ _ _ 1" "TPOW _ _ _ 1" "TLPN _ _ _ 1" "TLTT _ _ _ 1" "TLTL _ _ _ 1" "TNAM _ _ _ 1" "MNRD _ _ _ 1" "PJN0 _ _ _ 1" - Command format C1 C2 C3 C4 P1 P2 P3 P4 Return code (0DH) Command 4-digit Response code format Normal response Parameter 4-digit Problem response (communication error or incorrect command) O K Return code...
... turned on -screen display will not disappear. * The "Auto Power Off" timer will not be used by connecting an RS-232C serial control cable (cross type, sold separately) to process the command. "TABN _ _ _ 1" "TLPS _ _ _ 1" "TPOW _ _ _ 1" "TLPN _ _ _ 1" "TLTT _ _ _ 1" "TLTL _ _ _ 1" "TNAM _ _ _ 1" "MNRD _ _ _ 1" "PJN0 _ _ _ 1" - Command format C1 C2 C3 C4 P1 P2 P3 P4 Return code (0DH) Command 4-digit Response code format Normal response Parameter 4-digit Problem response (communication error or incorrect command) O K Return code...

Operation Manual
Page 60
...→ ← Projector OK CONTROL CONTENTS Power Projector Condition On Off Status Lamp Name Input Change Status Power Status Quantity Usage Time(Hour) Usage Time(Minute) Life(Percentage) Model Name Check Model Name Check Projector Name Setting 1 (First 4 characters) *1 Projector Name Setting 2 (Middle 4 characters) *1 Projector Name Setting 3 (Last 4 characters) *1 Projector Name Check Computer DVI DVI-D-Computer select *2 DVI-D-Video select *2 S-Video Video Input RGB Check Input Video Check Input Mode Check Input Check Volume Keystone AV Mute Freeze Auto Sync Resize Volume (0 - 60...
...→ ← Projector OK CONTROL CONTENTS Power Projector Condition On Off Status Lamp Name Input Change Status Power Status Quantity Usage Time(Hour) Usage Time(Minute) Life(Percentage) Model Name Check Model Name Check Projector Name Setting 1 (First 4 characters) *1 Projector Name Setting 2 (Middle 4 characters) *1 Projector Name Setting 3 (Last 4 characters) *1 Projector Name Check Computer DVI DVI-D-Computer select *2 DVI-D-Video select *2 S-Video Video Input RGB Check Input Video Check Input Mode Check Input Check Volume Keystone AV Mute Freeze Auto Sync Resize Volume (0 - 60...

Operation Manual
Page 65
... - • Image adjustments are incorrectly connected to the projector. • Remote control battery has run out. • External output has not been set when connecting notebook computer. • The lamp unit cover is not installed correctly. • If the connected DVI digital equipment is turned on before the "DVI-D" input mode is dark). This will become blurred. noise appears. • Adjust the focus. • The projection distance exceeds the focus range...
... - • Image adjustments are incorrectly connected to the projector. • Remote control battery has run out. • External output has not been set when connecting notebook computer. • The lamp unit cover is not installed correctly. • If the connected DVI digital equipment is turned on before the "DVI-D" input mode is dark). This will become blurred. noise appears. • Adjust the focus. • The projection distance exceeds the focus range...
Operation Manual
Page 66
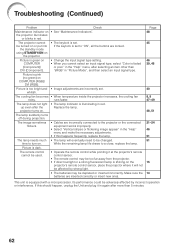
... standby mode using STANDBY/ON on COMPUTER (Component)/ DVI (Component). • Change the input signal type setting. • When you cannot select an input signal type, select "Color is set. Picture is green on the projector. • The keylock is faded or poor" in the "Help" menu, after selecting an item other than 5 minutes. 62 The lamp suddenly turns off during projection. Picture is illuminating in the "Help" menu and make the necessary adjustments...
... standby mode using STANDBY/ON on COMPUTER (Component)/ DVI (Component). • Change the input signal type setting. • When you cannot select an input signal type, select "Color is set. Picture is green on the projector. • The keylock is faded or poor" in the "Help" menu, after selecting an item other than 5 minutes. 62 The lamp suddenly turns off during projection. Picture is illuminating in the "Help" menu and make the necessary adjustments...
Operation Manual
Page 67
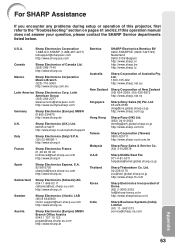
...-4277) [email protected] http://www.sharpusa.com Canada Sharp Electronics of this operation manual does not answer your question, please contact the SHARP Service departments listed below. For SHARP Assistance If you encounter any problems during setup or operation of Canada Ltd. (905) 568-7140 http://www.sharp.ca Mexico Sharp Electronics Corporation Mexico Branch (525) 716-9000 http://www...
...-4277) [email protected] http://www.sharpusa.com Canada Sharp Electronics of this operation manual does not answer your question, please contact the SHARP Service departments listed below. For SHARP Assistance If you encounter any problems during setup or operation of Canada Ltd. (905) 568-7140 http://www.sharp.ca Mexico Sharp Electronics Corporation Mexico Branch (525) 716-9000 http://www...
Operation Manual
Page 70
... Fine Sync 46 Focus ring 26 FREEZE button 33 Front adjustment foot 27 HEIGHT ADJUST lever 27 Help 46 H-Pos 36, 46 Image shift 41 INPUT modes 29 Intake vent 11, 47 Kensington Security Standard connector 12 Keycode 44 Keylock 45 KEYSTONE button 28 Keystone Correction 28, 41 Lamp 50 Lamp indicator 48 Lamp Setting 40 Lamp Timer (Life 44 Lamp unit 51 Language (on-screen display language 42 L-CLICK button 34 Lens Cap 11 MENU/HELP button...
... Fine Sync 46 Focus ring 26 FREEZE button 33 Front adjustment foot 27 HEIGHT ADJUST lever 27 Help 46 H-Pos 36, 46 Image shift 41 INPUT modes 29 Intake vent 11, 47 Kensington Security Standard connector 12 Keycode 44 Keylock 45 KEYSTONE button 28 Keystone Correction 28, 41 Lamp 50 Lamp indicator 48 Lamp Setting 40 Lamp Timer (Life 44 Lamp unit 51 Language (on-screen display language 42 L-CLICK button 34 Lens Cap 11 MENU/HELP button...


