
MX-C402SC Operation Manual
Page 39
... displayed before the current page. (5) Adobe Reader Help button Opens Adobe Reader Help. (6) Contents button Displays the contents of each chapter. HOW TO USE THIS MANUAL Click a button below to move to the page that you wish to view. (1) (2) (3) (4) (5) (6) (1) Return to top page button If an operation does not proceed as...
... displayed before the current page. (5) Adobe Reader Help button Opens Adobe Reader Help. (6) Contents button Displays the contents of each chapter. HOW TO USE THIS MANUAL Click a button below to move to the page that you wish to view. (1) (2) (3) (4) (5) (6) (1) Return to top page button If an operation does not proceed as...

MX-C402SC Operation Manual
Page 40
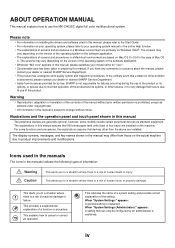
...each mode. iii DOCUMENT FILING This chapter provides detailed explanations of the machine and its peripheral devices. Printed manuals Manual name Start Guide Contents This manual contains instructions for using the machine safely, describes preparations that must be made before using the machine, and.... 6. COPIER This chapter provides detailed explanations of a print job, as basic operation procedures and how to this manual) The manuals in PDF format provide detailed explanations of the machine in each mode. The document filing function allows you have difficulty using...
...each mode. iii DOCUMENT FILING This chapter provides detailed explanations of the machine and its peripheral devices. Printed manuals Manual name Start Guide Contents This manual contains instructions for using the machine safely, describes preparations that must be made before using the machine, and.... 6. COPIER This chapter provides detailed explanations of a print job, as basic operation procedures and how to this manual) The manuals in PDF format provide detailed explanations of the machine in each mode. The document filing function allows you have difficulty using...
MX-C402SC Operation Manual
Page 41
...prior written permission is a risk of Mac OS X. For some functions and procedures, the explanations assume that occurs due to use the MX-C402SC digital full color multifunctional system. This indicates the name of a system setting and provides a brief explanation of a function or procedure. ...system or the software application. • Wherever "MX-xxxx" appears in this manual The peripheral devices are installed. This alerts you have any damage that devices other problem is discovered, please contact your dealer or nearest SHARP Service Department. • Aside from those on ...
...prior written permission is a risk of Mac OS X. For some functions and procedures, the explanations assume that occurs due to use the MX-C402SC digital full color multifunctional system. This indicates the name of a system setting and provides a brief explanation of a function or procedure. ...system or the software application. • Wherever "MX-xxxx" appears in this manual The peripheral devices are installed. This alerts you have any damage that devices other problem is discovered, please contact your dealer or nearest SHARP Service Department. • Aside from those on ...

MX-C402SC Operation Manual
Page 44
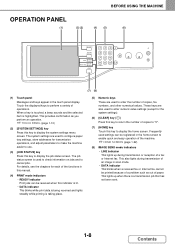
... number of copies. ☞ OPERATION PANEL (page 1-8) (4) Output tray (center tray) Output is delivered to this tray. (5) Finisher* This can be sure to feed paper manually. When lifting the main unit, grasp the handles on each side firm (8) Bypass tray Use this switch in the "on the machine. BEFORE USING THE...
... number of copies. ☞ OPERATION PANEL (page 1-8) (4) Output tray (center tray) Output is delivered to this tray. (5) Finisher* This can be sure to feed paper manually. When lifting the main unit, grasp the handles on each side firm (8) Bypass tray Use this switch in the "on the machine. BEFORE USING THE...
MX-C402SC Operation Manual
Page 49
... of paper. For details, see the chapters for transmission operations, and adjust parameters to make the machine easier to use. (3) [JOB STATUS] key Press this manual. (4) PRINT mode indicators • READY indicator Print jobs can be registered in this key to enable quick and easy operation of a problem such as you...
... of paper. For details, see the chapters for transmission operations, and adjust parameters to make the machine easier to use. (3) [JOB STATUS] key Press this manual. (4) PRINT mode indicators • READY indicator Print jobs can be registered in this key to enable quick and easy operation of a problem such as you...

MX-C402SC Operation Manual
Page 52
... the numeric keys to directly enter a value with the numeric keys. System Settings (Administrator): Keys Touch Sound This is selected, the key appears in this manual is slightly different.
... the numeric keys to directly enter a value with the numeric keys. System Settings (Administrator): Keys Touch Sound This is selected, the key appears in this manual is slightly different.

MX-C402SC Operation Manual
Page 53
... Status". (2) "Job Status" display This shows the first 4 print jobs in the print queue (the job in this screen. Ready to be manipulated in this manual. (2) (3) (3) "MFP Status" display This shows machine system information. If the job status screen is explained below. The type of job, the set number of copies...
... Status". (2) "Job Status" display This shows the first 4 print jobs in the print queue (the job in this screen. Ready to be manipulated in this manual. (2) (3) (3) "MFP Status" display This shows machine system information. If the job status screen is explained below. The type of job, the set number of copies...

MX-C402SC Operation Manual
Page 64
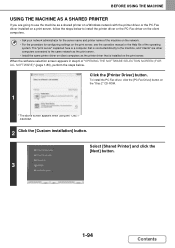
Your computer The machine Operate the machine using this function is as the operation panel screen appears on your computer. The procedure for using this manual. System Settings (Administrator): Remote Operation Settings Set the operation authority for each of the functions in this function is added, the same screen as follows: ...
Your computer The machine Operate the machine using this function is as the operation panel screen appears on your computer. The procedure for using this manual. System Settings (Administrator): Remote Operation Settings Set the operation authority for each of the functions in this function is added, the same screen as follows: ...

MX-C402SC Operation Manual
Page 77
... Maximum original size Standard sizes 5-1/2" (height) x 8-1/2" (width) A5: 148 mm (height) x 210 mm (width) Non-standard sizes (Minimum size that can be specified manually) 2" (height) x 3-1/4" (width) (51 mm (height) x 85 mm (width)) Standard sizes 8-1/2" (height) x 14" (width) A4: 210 mm (height) ...x 297 mm (width) Non-standard sizes (Maximum size that can be specified manually) Copy mode: 8-1/2" (height) x 14" (width) 216 mm (height) x 356 mm (width) Image send mode: 8-1/2" (height) x 19-5/8" (width) 216 mm ...
... Maximum original size Standard sizes 5-1/2" (height) x 8-1/2" (width) A5: 148 mm (height) x 210 mm (width) Non-standard sizes (Minimum size that can be specified manually) 2" (height) x 3-1/4" (width) (51 mm (height) x 85 mm (width)) Standard sizes 8-1/2" (height) x 14" (width) A4: 210 mm (height) ...x 297 mm (width) Non-standard sizes (Maximum size that can be specified manually) Copy mode: 8-1/2" (height) x 14" (width) 216 mm (height) x 356 mm (width) Image send mode: 8-1/2" (height) x 19-5/8" (width) 216 mm ...
MX-C402SC Operation Manual
Page 135
... server name and printer name of the machine on the network. • For the procedure for configuring settings on the print server, see the operation manual or the Help file of "OPENING THE SOFTWARE SELECTION SCREEN (FOR ALL SOFTWARE)" (page 1-80), perform the steps below to the same network as the...
... server name and printer name of the machine on the network. • For the procedure for configuring settings on the print server, see the operation manual or the Help file of "OPENING THE SOFTWARE SELECTION SCREEN (FOR ALL SOFTWARE)" (page 1-80), perform the steps below to the same network as the...
MX-C402SC Operation Manual
Page 137
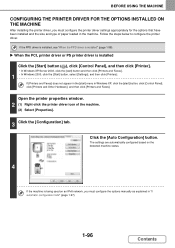
... and Faxes]. If the PPD driver is installed, see "When the PPD driver is being used on an IPv6 network, you must configure the options manually as explained in "If automatic configuration fails" (page 1-97). 1-96 Contents Open the printer properties window. 2 (1) Right-click the printer driver icon of paper loaded...
... and Faxes]. If the PPD driver is installed, see "When the PPD driver is being used on an IPv6 network, you must configure the options manually as explained in "If automatic configuration fails" (page 1-97). 1-96 Contents Open the printer properties window. 2 (1) Right-click the printer driver icon of paper loaded...

MX-C402SC Operation Manual
Page 154
.... (2) 9 • If the above dialog box does not appear and you return to the "Chooser" dialog box, follow these steps to select the PPD file manually. (1) Make sure that the machine is installed in the [Printer Descriptions] folder in the "Select a PostScript Printer" list 10 and then click the [Setup] button...
.... (2) 9 • If the above dialog box does not appear and you return to the "Chooser" dialog box, follow these steps to select the PPD file manually. (1) Make sure that the machine is installed in the [Printer Descriptions] folder in the "Select a PostScript Printer" list 10 and then click the [Setup] button...

MX-C402SC Operation Manual
Page 156
To show the printer list, see the manual for the operating system or Help. 4 Restart your computer. Delete the PPD file. 2 The PPD file has been copied to delete. Mac OS 9.0 - 9.2.2 After deleting ... [Settings], and click [Control Panel]. In Windows 2000, click the [Start] button, point to the following folder on the startup disk. [Library] - [Receipts] Delete the [MX-PBX1.pkg] file from this folder. Windows 1 Click the [start] button and then click [Control Panel].
To show the printer list, see the manual for the operating system or Help. 4 Restart your computer. Delete the PPD file. 2 The PPD file has been copied to delete. Mac OS 9.0 - 9.2.2 After deleting ... [Settings], and click [Control Panel]. In Windows 2000, click the [Start] button, point to the following folder on the startup disk. [Library] - [Receipts] Delete the [MX-PBX1.pkg] file from this folder. Windows 1 Click the [start] button and then click [Control Panel].

MX-C402SC Operation Manual
Page 158
...COPY MODES 2-22 CHANGING THE EXPOSURE AND ORIGINAL IMAGE TYPE 2-24 • AUTOMATIC ADJUSTMENT OF THE EXPOSURE AND ORIGINAL TYPE 2-24 • MANUAL ADJUSTMENT OF THE EXPOSURE AND ORIGINAL TYPE 2-24 REDUCTION/ENLARGEMENT/ZOOM 2-26 • AUTOMATIC RATIO SELECTION (Auto Image 2-26 •...; MANUAL RATIO SELECTION (Preset ratios/Zoom 2-27 • ENLARGING/REDUCING THE LENGTH AND WIDTH SEPARATELY (XY Zoom) . . . . . 2-29 ORIGINAL SIZES 2-30 • ...
...COPY MODES 2-22 CHANGING THE EXPOSURE AND ORIGINAL IMAGE TYPE 2-24 • AUTOMATIC ADJUSTMENT OF THE EXPOSURE AND ORIGINAL TYPE 2-24 • MANUAL ADJUSTMENT OF THE EXPOSURE AND ORIGINAL TYPE 2-24 REDUCTION/ENLARGEMENT/ZOOM 2-26 • AUTOMATIC RATIO SELECTION (Auto Image 2-26 •...; MANUAL RATIO SELECTION (Preset ratios/Zoom 2-27 • ENLARGING/REDUCING THE LENGTH AND WIDTH SEPARATELY (XY Zoom) . . . . . 2-29 ORIGINAL SIZES 2-30 • ...

MX-C402SC Operation Manual
Page 167
... Auto 8½x11 Plain Special Modes 2-Sided Copy Output File Quick File Preview Touch the [Paper Select] key. 1 You can select the paper tray manually. You will return to the base screen and the selected tray will be automatically selected and the copy job will be highlighted. To return to...) Use this setting to change the tray that is set to change the paper size, you want to automatic paper tray selection after selecting a tray manually, press the [CLEAR ALL] key ( ). If the correct paper size is another tray that has the same size and type of the placed original ...
... Auto 8½x11 Plain Special Modes 2-Sided Copy Output File Quick File Preview Touch the [Paper Select] key. 1 You can select the paper tray manually. You will return to the base screen and the selected tray will be automatically selected and the copy job will be highlighted. To return to...) Use this setting to change the tray that is set to change the paper size, you want to automatic paper tray selection after selecting a tray manually, press the [CLEAR ALL] key ( ). If the correct paper size is another tray that has the same size and type of the placed original ...

MX-C402SC Operation Manual
Page 169
... selected. To cancel scanning of copies. Press the [CLEAR] key ( ) and then enter the correct number. Press the [STOP] key ( ). 2-12 Contents In this case, manually change the color mode, touch the [Color Mode] key. 100% 8½x11 Upper Exit Auto 8½x11 Plain Preview ☞ COLOR COPY MODES (page 2-22...
... selected. To cancel scanning of copies. Press the [CLEAR] key ( ) and then enter the correct number. Press the [STOP] key ( ). 2-12 Contents In this case, manually change the color mode, touch the [Color Mode] key. 100% 8½x11 Upper Exit Auto 8½x11 Plain Preview ☞ COLOR COPY MODES (page 2-22...

MX-C402SC Operation Manual
Page 171
... step. Depending on the copy settings (2-sided copying, etc.), copying may not be used and the Full Color 2-Sided Copy color mode. In this case, manually change the color mode, touch the [Color Mode] key. 100% 8½x11 Upper Exit Auto 8½x11 Plain Preview ☞ COLOR COPY MODES (page 2-22...
... step. Depending on the copy settings (2-sided copying, etc.), copying may not be used and the Full Color 2-Sided Copy color mode. In this case, manually change the color mode, touch the [Color Mode] key. 100% 8½x11 Upper Exit Auto 8½x11 Plain Preview ☞ COLOR COPY MODES (page 2-22...

MX-C402SC Operation Manual
Page 175
... reverse side A is set . • If you are Exposure 1. 8½x11 selected. In this when the pages will be bound into a A tablet. 3 Select this case, manually change the color mode, touch the [Color Mode] key. 100% Auto ☞ COLOR COPY MODES (page 2-22) 8½x11 Upper Exit 8½x11 Plain Preview...
... reverse side A is set . • If you are Exposure 1. 8½x11 selected. In this when the pages will be bound into a A tablet. 3 Select this case, manually change the color mode, touch the [Color Mode] key. 100% Auto ☞ COLOR COPY MODES (page 2-22) 8½x11 Upper Exit 8½x11 Plain Preview...

MX-C402SC Operation Manual
Page 178
...] key ( ). If an incorrect number of copies is set . • A single copy can be made even if "0" appears for the first original. Repeat this case, manually change the color mode, touch the [Color Mode] key. 100% Auto ☞ COLOR COPY MODES (page 2-22) 8½x11 Upper Exit 8½x11 Plain Preview...
...] key ( ). If an incorrect number of copies is set . • A single copy can be made even if "0" appears for the first original. Repeat this case, manually change the color mode, touch the [Color Mode] key. 100% Auto ☞ COLOR COPY MODES (page 2-22) 8½x11 Upper Exit 8½x11 Plain Preview...

MX-C402SC Operation Manual
Page 180
... the color mode is set to one of the color mode setting. R(Red) C(Cyan) G(Green) M(Magenta) B(Blue) Y(Yellow) • When auto mode is used to manually switch between color and black & white does not take place correctly. In this event, press the [COLOR START] key or the [BLACK & WHITE START] key...
... the color mode is set to one of the color mode setting. R(Red) C(Cyan) G(Green) M(Magenta) B(Blue) Y(Yellow) • When auto mode is used to manually switch between color and black & white does not take place correctly. In this event, press the [COLOR START] key or the [BLACK & WHITE START] key...


