

Operation Guide
Page 39
HOW TO USE THIS MANUAL Click a button below to move to the page that you wish to view. (1) (2) (3) (4) (5) (6) (1) Return to top page button If an operation does not proceed as ...
HOW TO USE THIS MANUAL Click a button below to move to the page that you wish to view. (1) (2) (3) (4) (5) (6) (1) Return to top page button If an operation does not proceed as ...

Operation Guide
Page 40
... misfeeds and provides answers to frequently asked questions regarding the operation of the machine in each mode. Refer to this manual) The manuals in PDF format provide detailed explanations of the procedures for using the machine in each mode. BEFORE USING THE MACHINE ...the document filing function. PRINTER This chapter provides detailed explanations of the procedures for using the machine. iii Printed manual Manual name Start Guide Contents This manual contains instructions for using the print function. 4. Current settings can be made before using the machine, and lists...
... misfeeds and provides answers to frequently asked questions regarding the operation of the machine in each mode. Refer to this manual) The manuals in PDF format provide detailed explanations of the procedures for using the machine in each mode. BEFORE USING THE MACHINE ...the document filing function. PRINTER This chapter provides detailed explanations of the procedures for using the machine. iii Printed manual Manual name Start Guide Contents This manual contains instructions for using the print function. 4. Current settings can be made before using the machine, and lists...

Operation Guide
Page 41
...and its options, or failures due to incorrect operation of the operating system or the software application. • Wherever "MX-xxxx" appears in preparing this manual. This alerts you to a situation where there is not available in some functions and procedures, the explanations assume that ...a right tray and paper drawer are installed. This alerts you have any damage that can only be configured by law, SHARP is explained....
...and its options, or failures due to incorrect operation of the operating system or the software application. • Wherever "MX-xxxx" appears in preparing this manual. This alerts you to a situation where there is not available in some functions and procedures, the explanations assume that ...a right tray and paper drawer are installed. This alerts you have any damage that can only be configured by law, SHARP is explained....
Operation Guide
Page 45
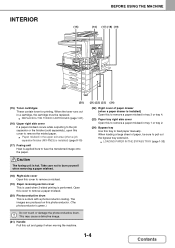
... printing is applied here to pull out the bypass tray extension. When the toner runs out in the upper exit area (when a job separator/finisher (MX-FN23) is installed) (page 8-10) (17) Fusing unit Heat is performed. LOADING PAPER IN THE BYPASS TRAY (page 1-33) 1-4 Contents This may cause a defective image... a paper misfeed. (18) Right side cover Open this tray to remove a paper misfeed. (20) Photoconductive drum This is hot. Open this cover to feed paper manually.
... printing is applied here to pull out the bypass tray extension. When the toner runs out in the upper exit area (when a job separator/finisher (MX-FN23) is installed) (page 8-10) (17) Fusing unit Heat is performed. LOADING PAPER IN THE BYPASS TRAY (page 1-33) 1-4 Contents This may cause a defective image... a paper misfeed. (18) Right side cover Open this tray to remove a paper misfeed. (20) Photoconductive drum This is hot. Open this cover to feed paper manually.

Operation Guide
Page 48
...). (6) [CLEAR] key ( ) Press this key to return the number of copies to "0". (7) [HOME] key Touch this key to perform a variety of the functions in this manual. (4) PRINT mode indicators • READY indicator Print jobs can be used to configure paper tray settings, store addresses for transmission operations, and adjust parameters to...
...). (6) [CLEAR] key ( ) Press this key to return the number of copies to "0". (7) [HOME] key Touch this key to perform a variety of the functions in this manual. (4) PRINT mode indicators • READY indicator Print jobs can be used to configure paper tray settings, store addresses for transmission operations, and adjust parameters to...

Operation Guide
Page 51
... one special mode is a descriptive image. Press the numeric keys to directly enter a value with the numeric keys. The touch panel (screen) shown in this manual is selected, the key appears in the base screen. The key touch sound can be turned off. 1-10 Contents B4 4. The actual screen is used...
... one special mode is a descriptive image. Press the numeric keys to directly enter a value with the numeric keys. The touch panel (screen) shown in this manual is selected, the key appears in the base screen. The key touch sound can be turned off. 1-10 Contents B4 4. The actual screen is used...

Operation Guide
Page 52
... DC DC DC DC (1) Display selection key The status display can only be manipulated in the job status screen. Jobs cannot be manipulated in this manual. (2) (3) (3) "MFP Status" display This shows machine system information. A4 2. "Maintenance Information" This shows machine maintenance information by means of the touch panel shows the machine...
... DC DC DC DC (1) Display selection key The status display can only be manipulated in the job status screen. Jobs cannot be manipulated in this manual. (2) (3) (3) "MFP Status" display This shows machine system information. A4 2. "Maintenance Information" This shows machine maintenance information by means of the touch panel shows the machine...

Operation Guide
Page 63
When this manual. Your computer Operate the machine using your computer. SYSTEM SETTINGS "Remote Operation Settings" (page 7-66) To use the remote operation function Before using this function, ...
When this manual. Your computer Operate the machine using your computer. SYSTEM SETTINGS "Remote Operation Settings" (page 7-66) To use the remote operation function Before using this function, ...

Operation Guide
Page 77
... can be automatically detected) A5: 148 mm (height) x 210 mm (width) 5-1/2" (height) x 8-1/2" (width) Non-standard sizes (Minimum size that can be specified manually) 131 mm (height) x 140 mm (width) 5-1/8" (height) x 5-1/2" (width) Standard sizes (Maximum size that can be automatically detected) A3: 297 mm (height)... 420 mm (width) 12" x 18" size paper (A3W) cannot be used. 11" (height) x 17" (width) Non-standard sizes (Maximum size that can be specified manually) Copy mode: 297 mm (height) x 432 mm (width) 11-5/8" (height) x 17" (width) Image send mode: 297 mm (height) x 1000 mm (width) 11...
... can be automatically detected) A5: 148 mm (height) x 210 mm (width) 5-1/2" (height) x 8-1/2" (width) Non-standard sizes (Minimum size that can be specified manually) 131 mm (height) x 140 mm (width) 5-1/8" (height) x 5-1/2" (width) Standard sizes (Maximum size that can be automatically detected) A3: 297 mm (height)... 420 mm (width) 12" x 18" size paper (A3W) cannot be used. 11" (height) x 17" (width) Non-standard sizes (Maximum size that can be specified manually) Copy mode: 297 mm (height) x 432 mm (width) 11-5/8" (height) x 17" (width) Image send mode: 297 mm (height) x 1000 mm (width) 11...
Operation Guide
Page 99
... 2-21 • AUTOMATIC ADJUSTMENT OF THE EXPOSURE AND ORIGINAL TYPE 2-21 • SELECTING THE ORIGINAL TYPE AND MANUALLY ADJUSTING THE EXPOSURE 2-21 REDUCTION/ENLARGEMENT/ZOOM 2-23 • AUTOMATIC RATIO SELECTION (Auto Image 2-23 • MANUALLY SELECTING THE RATIO (Preset ratios/Zoom 2-24 • ENLARGING/REDUCING THE LENGTH AND WIDTH SEPARATELY (XY Zoom...
... 2-21 • AUTOMATIC ADJUSTMENT OF THE EXPOSURE AND ORIGINAL TYPE 2-21 • SELECTING THE ORIGINAL TYPE AND MANUALLY ADJUSTING THE EXPOSURE 2-21 REDUCTION/ENLARGEMENT/ZOOM 2-23 • AUTOMATIC RATIO SELECTION (Auto Image 2-23 • MANUALLY SELECTING THE RATIO (Preset ratios/Zoom 2-24 • ENLARGING/REDUCING THE LENGTH AND WIDTH SEPARATELY (XY Zoom...

Operation Guide
Page 101
... TRAYS (page 2-11) (7) Original feed display This appears when an original is used. B4 4. When an original is placed, the detected original size is set manually, the set size appears. A4 2. Touch this key to change the paper (tray) that you wish to switch to copy mode, touch the [COPY] key... 2-21) (4) [Copy Ratio] key This shows the current copy ratio. REDUCTION/ENLARGEMENT/ZOOM (page 2-23) (5) [Original] key Touch this key to enter the original size manually. If the original size is displayed.
... TRAYS (page 2-11) (7) Original feed display This appears when an original is used. B4 4. When an original is placed, the detected original size is set manually, the set size appears. A4 2. Touch this key to change the paper (tray) that you wish to switch to copy mode, touch the [COPY] key... 2-21) (4) [Copy Ratio] key This shows the current copy ratio. REDUCTION/ENLARGEMENT/ZOOM (page 2-23) (5) [Original] key Touch this key to enter the original size manually. If the original size is displayed.

Operation Guide
Page 107
... Copy Output File Quick File Preview (A) "Auto" appears when the automatic original detection function is operating. (B) The original size is "AB-1 (Inch-1)". In this event, manually set in "Original Size Detector Setting" in the base screen. Exposure Auto Copy Ratio 100% 1. COPIER ORIGINALS CHECKING THE ORIGINAL SIZE When [Auto] appears in...
... Copy Output File Quick File Preview (A) "Auto" appears when the automatic original detection function is operating. (B) The original size is "AB-1 (Inch-1)". In this event, manually set in "Original Size Detector Setting" in the base screen. Exposure Auto Copy Ratio 100% 1. COPIER ORIGINALS CHECKING THE ORIGINAL SIZE When [Auto] appears in...

Operation Guide
Page 109
...(2) OK Bypass Tray A4 Plain Select the tray that you can also touch the paper size display (A) to automatic paper tray selection after selecting a tray manually, press the [CLEAR ALL] key ( ). A4 2. A4R 3. B4 4. You will return to the base screen and the selected tray will be automatically...Select Auto A4 Plain Special Modes 2-Sided Copy Output File Quick File Preview Touch the [Paper Select] key. 1 You can select the paper tray manually. A4R 3. A4 2. If the selected tray runs out of paper during a copy job and there is set to automatically select a tray that ...
...(2) OK Bypass Tray A4 Plain Select the tray that you can also touch the paper size display (A) to automatic paper tray selection after selecting a tray manually, press the [CLEAR ALL] key ( ). A4 2. A4R 3. B4 4. You will return to the base screen and the selected tray will be automatically...Select Auto A4 Plain Special Modes 2-Sided Copy Output File Quick File Preview Touch the [Paper Select] key. 1 You can select the paper tray manually. A4R 3. A4 2. If the selected tray runs out of paper during a copy job and there is set to automatically select a tray that ...

Operation Guide
Page 110
... COPIES This section explains how to be cases where the same size of paper as the original is selected. • To change the paper size manually. 2-12 Contents Special Modes Check the paper to make copies (1-sided copies of originals must not be placed in the document feeder tray with the...
... COPIES This section explains how to be cases where the same size of paper as the original is selected. • To change the paper size manually. 2-12 Contents Special Modes Check the paper to make copies (1-sided copies of originals must not be placed in the document feeder tray with the...
Operation Guide
Page 112
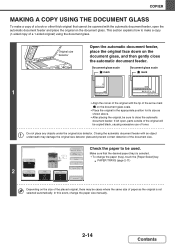
... document glass scale. • Place the original in the appropriate position for its size as the original is selected. • To change the paper size manually. 2-14 Contents COPIER MAKING A COPY USING THE DOCUMENT GLASS To make a copy (1-sided copy of a 1-sided original) using the document glass. B4 4. This section explains...
... document glass scale. • Place the original in the appropriate position for its size as the original is selected. • To change the paper size manually. 2-14 Contents COPIER MAKING A COPY USING THE DOCUMENT GLASS To make a copy (1-sided copy of a 1-sided original) using the document glass. B4 4. This section explains...

Operation Guide
Page 115
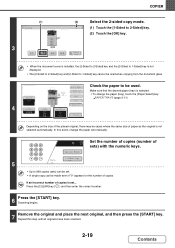
... selected automatically. A4R 3. A3 Plain A4 2-Sided Copy Output File Make sure that the desired paper (tray) is selected. • To change the paper size manually. 7 Special Modes Set the number of copies (number of the original and copying... Press the [CLEAR] key ( ) and then enter the correct number. Press the...
... selected automatically. A4R 3. A3 Plain A4 2-Sided Copy Output File Make sure that the desired paper (tray) is selected. • To change the paper size manually. 7 Special Modes Set the number of copies (number of the original and copying... Press the [CLEAR] key ( ) and then enter the correct number. Press the...
Operation Guide
Page 117
... desired paper (tray) is not displayed. • The [2-Sided to 2-Sided] key and [2-Sided to 1-Sided] key is selected. • To change the paper size manually. 7 Special Modes Set the number of copies (number of paper as the original is set . • A single copy can be used when copying from the...
... desired paper (tray) is not displayed. • The [2-Sided to 2-Sided] key and [2-Sided to 1-Sided] key is selected. • To change the paper size manually. 7 Special Modes Set the number of copies (number of paper as the original is set . • A single copy can be used when copying from the...

Operation Guide
Page 119
...Original Auto A4 Paper Select Auto A4 Plain Special Modes 2-Sided Copy Output File Quick File Preview SELECTING THE ORIGINAL TYPE AND MANUALLY ADJUSTING THE EXPOSURE If you wish to obtain the most suitable copy. Printed photo This mode is displayed.) This function automatically adjusts... the image to select the original type or manually adjust the exposure, touch the [Exposure] key in a magazine or catalogue. Scan Resolution N Original image type select keys 1 Mode ...
...Original Auto A4 Paper Select Auto A4 Plain Special Modes 2-Sided Copy Output File Quick File Preview SELECTING THE ORIGINAL TYPE AND MANUALLY ADJUSTING THE EXPOSURE If you wish to obtain the most suitable copy. Printed photo This mode is displayed.) This function automatically adjusts... the image to select the original type or manually adjust the exposure, touch the [Exposure] key in a magazine or catalogue. Scan Resolution N Original image type select keys 1 Mode ...

Operation Guide
Page 120
...changed. 2-22 Contents When making a full-size copy, you can be adjusted using "Copy Exposure Adjustment" in pencil or light coloured text 3 Exposure Auto Manual 1 3 5 Original Image Type Text Text/ Prtd.Photo Printed Photo Photo OK Text/Photo Map Scan Resolution Touch the [OK] key. • If [... the darkness or lightness of the image does not seem quite right... key to make the copy darker. COPIER 2 Exposure Auto Manual 1 3 5 Original Image Type Text Text/ Prtd.Photo Printed Photo Photo OK Text/Photo Map Scan Resolution Adjust the exposure level.
...changed. 2-22 Contents When making a full-size copy, you can be adjusted using "Copy Exposure Adjustment" in pencil or light coloured text 3 Exposure Auto Manual 1 3 5 Original Image Type Text Text/ Prtd.Photo Printed Photo Photo OK Text/Photo Map Scan Resolution Touch the [OK] key. • If [... the darkness or lightness of the image does not seem quite right... key to make the copy darker. COPIER 2 Exposure Auto Manual 1 3 5 Original Image Type Text Text/ Prtd.Photo Printed Photo Photo OK Text/Photo Map Scan Resolution Adjust the exposure level.
Operation Guide
Page 121
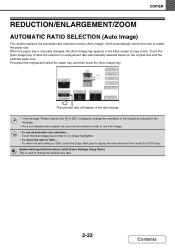
... the original and select the paper tray, and then touch the [Auto Image] key. B4 4. System Settings (Administrator): Initial Status Settings (Copy Ratio) This is manually changed, the [Auto Image] key appears in the base screen of the original as indicated in the message. • For a non-standard size original, the...
... the original and select the paper tray, and then touch the [Auto Image] key. B4 4. System Settings (Administrator): Initial Status Settings (Copy Ratio) This is manually changed, the [Auto Image] key appears in the base screen of the original as indicated in the message. • For a non-standard size original, the...


