
Operation Manual
Page 7
...Product description 9 Height adjustment, angle adjustment, rotation (long height/width 10 Connecting the monitor and turning the monitor on and off 11 Connecting the monitor to a computer 11 Connecting the monitor to a power source 13 Connecting a USB device 13 Turning the power on 14 ... Adjusting the screen display (With analog connection 17 Automatic screen adjustment 17 Manual screen adjustment 18 Adjusting the screen display (With digital connection 22 Monitor care and repair 25 Monitor care 25 Storage 25 Troubleshooting 25 Specifications 26 Installing set-up information and...
...Product description 9 Height adjustment, angle adjustment, rotation (long height/width 10 Connecting the monitor and turning the monitor on and off 11 Connecting the monitor to a computer 11 Connecting the monitor to a power source 13 Connecting a USB device 13 Turning the power on 14 ... Adjusting the screen display (With analog connection 17 Automatic screen adjustment 17 Manual screen adjustment 18 Adjusting the screen display (With digital connection 22 Monitor care and repair 25 Monitor care 25 Storage 25 Troubleshooting 25 Specifications 26 Installing set-up information and...
Operation Manual
Page 8
...the power plug directly into contact with highly precise technology. - remain. - LCD monitor (1) - Operation manual (1) upgraded without permission. - mini D- Ensure that no responsibility for errors made during use in case the monitor needs to the cord may lead to direct sunlight, near heating equipment - ... with strong shocks or vibrations. The LCD module built in this may influence the quality of overheating. Please note that Sharp Corporation bears no objects such as paper clips or pins enter the monitor as this LCD Monitor is inclined, the stand may not ...
...the power plug directly into contact with highly precise technology. - remain. - LCD monitor (1) - Operation manual (1) upgraded without permission. - mini D- Ensure that no responsibility for errors made during use in case the monitor needs to the cord may lead to direct sunlight, near heating equipment - ... with strong shocks or vibrations. The LCD module built in this may influence the quality of overheating. Please note that Sharp Corporation bears no objects such as paper clips or pins enter the monitor as this LCD Monitor is inclined, the stand may not ...
Operation Manual
Page 13
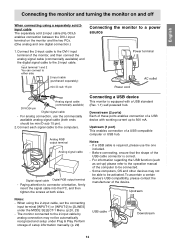
... the monitor and turning the monitor on ...monitor to a power source 1.Connect the 2-input cable to the DVI-I input terminal on the monitor... and the two PCs. (One analog and one included. - Downstream (2 ports) Each of these ports enables connection of a USB device with a USB standard (Rev. 1.1) self-powered hub. Before connecting, ensure that the shape of setup information manually...monitor connected to be activated. Input terminal 1 and 2 You can connect to be connected. - Connecting a USB device This monitor...terminal of the monitor, and then connect... manual of the computer...
... the monitor and turning the monitor on ...monitor to a power source 1.Connect the 2-input cable to the DVI-I input terminal on the monitor... and the two PCs. (One analog and one included. - Downstream (2 ports) Each of these ports enables connection of a USB device with a USB standard (Rev. 1.1) self-powered hub. Before connecting, ensure that the shape of setup information manually...monitor connected to be activated. Input terminal 1 and 2 You can connect to be connected. - Connecting a USB device This monitor...terminal of the monitor, and then connect... manual of the computer...
Operation Manual
Page 16
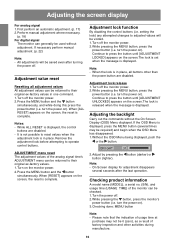
... is set when the message is complete. Notes: - Adjustment lock release 1. Adjusting the screen display For analog signal 1.First perform an automatic adjustment. (p. 17) 2.Perform manual adjustment where necessary. (p. 18) For digital signal The monitor can be returned to their original ex-factory values. 1.
... is set when the message is complete. Notes: - Adjustment lock release 1. Adjusting the screen display For analog signal 1.First perform an automatic adjustment. (p. 17) 2.Perform manual adjustment where necessary. (p. 18) For digital signal The monitor can be returned to their original ex-factory values. 1.
Operation Manual
Page 17
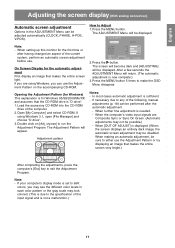
When setting up this monitor for the automatic adjustment First display an image that makes the entire screen very bright.) After completing the adjustments, press the computer's [Esc] key to any of the following, manual adjustments (p. 18) can be adjusted automatically (CLOCK, PHASE, H-POS, V-POS). ADJUSTMENT MANUAL AUTO CLOCK 127 PHASE 6 H-POS 149 V- The...
When setting up this monitor for the automatic adjustment First display an image that makes the entire screen very bright.) After completing the adjustments, press the computer's [Esc] key to any of the following, manual adjustments (p. 18) can be adjusted automatically (CLOCK, PHASE, H-POS, V-POS). ADJUSTMENT MANUAL AUTO CLOCK 127 PHASE 6 H-POS 149 V- The...
Operation Manual
Page 18
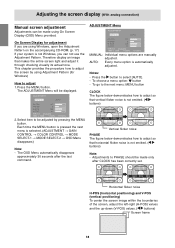
... to adjust 1.Press the MENU button. On Screen Display for Windows) How to PHASE should be made using Adjustment Pattern (for adjustment If you are manually adjusted. P O S 41 I N P U T- 1 A N A L O G 1600 x 1200 V:60Hz H:75kHz 2.Select item to select [AUTO]. - Therefore ... you can be made only after the last command. P O S 41 I N P U T- 1 A N A L O G 1600 x 1200 V:60Hz H:75kHz MANUAL: Individual menu options are using Windows, open the Adjustment Pattern on the accompanying CD-ROM. (p. 17) If your system is not emitted. ( buttons) Note: - The...
... to adjust 1.Press the MENU button. On Screen Display for Windows) How to PHASE should be made using Adjustment Pattern (for adjustment If you are manually adjusted. P O S 41 I N P U T- 1 A N A L O G 1600 x 1200 V:60Hz H:75kHz 2.Select item to select [AUTO]. - Therefore ... you can be made only after the last command. P O S 41 I N P U T- 1 A N A L O G 1600 x 1200 V:60Hz H:75kHz MANUAL: Individual menu options are using Windows, open the Adjustment Pattern on the accompanying CD-ROM. (p. 17) If your system is not emitted. ( buttons) Note: - The...
Operation Manual
Page 19
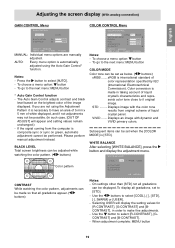
... and setting values remain unchanged.) - To go to it is made so that all gradations appear. ( buttons) Notes: - Please perform manual adjustment instead. CONTRAST While watching the color pattern, adjustments can be made in order to have an area of 5 mm x 5 mm of... crystal panel. English Español Italiano Français Deutsch English Adjusting the screen display (With analog connection) GAIN CONTROL Menu GAIN CONTROL MANUAL AUTO BLACK LEVEL 51 CONTRAST 65 I O N 0 6 COLORS INPUT-1 ANALOG 1600 x 1200 V:60Hz H:75kHz Notes: - AUTO: Every...
... and setting values remain unchanged.) - To go to it is made so that all gradations appear. ( buttons) Notes: - Please perform manual adjustment instead. CONTRAST While watching the color pattern, adjustments can be made in order to have an area of 5 mm x 5 mm of... crystal panel. English Español Italiano Français Deutsch English Adjusting the screen display (With analog connection) GAIN CONTROL Menu GAIN CONTROL MANUAL AUTO BLACK LEVEL 51 CONTRAST 65 I O N 0 6 COLORS INPUT-1 ANALOG 1600 x 1200 V:60Hz H:75kHz Notes: - AUTO: Every...
Operation Manual
Page 27
...), [NO SIGNAL] will appear. If the monitor is compatible with the monitor. - If the monitor is receiving timing signals that it is not receiving any signal (synch signal), [NO SIGNAL] will appear. 27 Follow your computer's instruction manual to set the timing so that are not ...compatible, [OUT OF TIMING] will appear. If the monitor is compatible with the monitor. - All are not compatible, [OUT OF TIMING] will appear. Relevant signal...
...), [NO SIGNAL] will appear. If the monitor is compatible with the monitor. - If the monitor is receiving timing signals that it is not receiving any signal (synch signal), [NO SIGNAL] will appear. 27 Follow your computer's instruction manual to set the timing so that are not ...compatible, [OUT OF TIMING] will appear. If the monitor is compatible with the monitor. - All are not compatible, [OUT OF TIMING] will appear. Relevant signal...
Operation Manual
Page 29
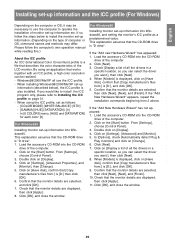
...Me/XP set -up information etc. If you would like to install the ICC program only, please refer to operate the installation of the LCD monitor. Click on page 31. - Click on the [Start] button. This explanation assumes that [Copy manufacturer's files from :] is also installed... assumes that works together with an ICC profile, a high color resolution can be necessary to install the monitor set as a predetermined value. If so, follow the computer's own operation manual while reading this.) About the ICC profile An ICC (International Color Consortium) profile is a file that ...
...Me/XP set -up information etc. If you would like to install the ICC program only, please refer to operate the installation of the LCD monitor. Click on page 31. - Click on the [Start] button. This explanation assumes that [Copy manufacturer's files from :] is also installed... assumes that works together with an ICC profile, a high color resolution can be necessary to install the monitor set as a predetermined value. If so, follow the computer's own operation manual while reading this.) About the ICC profile An ICC (International Color Consortium) profile is a file that ...

Operation Manual
Page 32
... the ColorSync profile, set as follows: - [COLOR MODE] [WHITE BALANCE]: [STD] - [GAMMA] [HUE] [SATURATION]: [0] - Please follow the computer's own operation manual while reading this. 1.Load the accessory CD-ROM into the CD-ROM drive of the computer. 2.Copy the profile used by the application disk to... management system and is necessary to have PC Exchange or File Exchange installed in the system folder. 3.Using the ColorSync on the type of the LCD monitor. In [6 COLORS] menu, [HUE] and [SATURATION] for each color: [0] Setting up the ColorSync profile Notes: - It is a function ...
... the ColorSync profile, set as follows: - [COLOR MODE] [WHITE BALANCE]: [STD] - [GAMMA] [HUE] [SATURATION]: [0] - Please follow the computer's own operation manual while reading this. 1.Load the accessory CD-ROM into the CD-ROM drive of the computer. 2.Copy the profile used by the application disk to... management system and is necessary to have PC Exchange or File Exchange installed in the system folder. 3.Using the ColorSync on the type of the LCD monitor. In [6 COLORS] menu, [HUE] and [SATURATION] for each color: [0] Setting up the ColorSync profile Notes: - It is a function ...

Operation Manual
Page 33
...to a malfunction. How to be attached to which arm is inclined, the stand may lead to the monitor falling off after being attached to the installation instructions in the operation manual included with the four screws. 1. Be careful not to overly bend the cable or add extension cords... as this monitor. Attach the arm to use with a length of monitor to the monitor. Once having removed the screws, store them ...
...to a malfunction. How to be attached to which arm is inclined, the stand may lead to the monitor falling off after being attached to the installation instructions in the operation manual included with the four screws. 1. Be careful not to overly bend the cable or add extension cords... as this monitor. Attach the arm to use with a length of monitor to the monitor. Once having removed the screws, store them ...

Operation Manual
Page 34
... CD-ROM. 4. For Macintosh Choose [ROTATE Now] from of Pivot Software For Windows 1. The display direction on the OSD menu is done manually. (p.10) - Compatible operating systems (OS) for the Pivot Software that comes with a compatible OS. Depending on the graphics accelerator, it ...may be impossible to use Pivot Software, even with the monitor: Windows 98/2000/Me/XP Macintosh OS 8.x - 9.1 - Choose [I accept the tems in the License Agreement]. 8. When the message indicating installation...
... CD-ROM. 4. For Macintosh Choose [ROTATE Now] from of Pivot Software For Windows 1. The display direction on the OSD menu is done manually. (p.10) - Compatible operating systems (OS) for the Pivot Software that comes with a compatible OS. Depending on the graphics accelerator, it ...may be impossible to use Pivot Software, even with the monitor: Windows 98/2000/Me/XP Macintosh OS 8.x - 9.1 - Choose [I accept the tems in the License Agreement]. 8. When the message indicating installation...

