
Operation Manual
Page 5
...E26 Adjusting the backlight E27 Selecting the language on the computer screen (PICTURE IN PICTURE E28 Selecting the video source E28 Selecting the audio source E29 Listening to TV or another audio source while viewing the computer screen (SOUND E30 Adjusting the display E31 How to adjust E31 ADJUSTMENT menu E32 GAIN CONTROL menu E33 COLOR CONTROL menu E33 MODE SELECT menu E34 PICTURE IN PICTURE menu E34 Preventing changes to adjusted values (ADJUSTMENT LOCK E35 Resetting adjustment values for specific menu (RESET E35 Resetting all adjustment values (ALL RESET E36 Installing set...
...E26 Adjusting the backlight E27 Selecting the language on the computer screen (PICTURE IN PICTURE E28 Selecting the video source E28 Selecting the audio source E29 Listening to TV or another audio source while viewing the computer screen (SOUND E30 Adjusting the display E31 How to adjust E31 ADJUSTMENT menu E32 GAIN CONTROL menu E33 COLOR CONTROL menu E33 MODE SELECT menu E34 PICTURE IN PICTURE menu E34 Preventing changes to adjusted values (ADJUSTMENT LOCK E35 Resetting adjustment values for specific menu (RESET E35 Resetting all adjustment values (ALL RESET E36 Installing set...
Operation Manual
Page 6
... VIDEO ADJUST menu E54 CHANNEL SETTING menu (TV mode only E54 MODE SELECT menu E54 CLOSED CAPTION menu E55 V-CHIP BLOCK menu E55 Preventing changes to adjusted values (ADJUSTMENT LOCK E56 Resetting adjustment values for specific menu (RESET E56 Resetting all adjustment values (ALL RESET E57 Other features Other features E58 Checking the current channel and audio mode on screen (DISPLAY E58 Changing the screen size (VIEW MODE E58 Muting the sound (MUTE E59 Changing BRIGHT MODE E59 Using headphones (commercially available E59 Appendix Monitor care E61 Troubleshooting E61 Monitor...
... VIDEO ADJUST menu E54 CHANNEL SETTING menu (TV mode only E54 MODE SELECT menu E54 CLOSED CAPTION menu E55 V-CHIP BLOCK menu E55 Preventing changes to adjusted values (ADJUSTMENT LOCK E56 Resetting adjustment values for specific menu (RESET E56 Resetting all adjustment values (ALL RESET E57 Other features Other features E58 Checking the current channel and audio mode on screen (DISPLAY E58 Changing the screen size (VIEW MODE E58 Muting the sound (MUTE E59 Changing BRIGHT MODE E59 Using headphones (commercially available E59 Appendix Monitor care E61 Troubleshooting E61 Monitor...
Operation Manual
Page 7
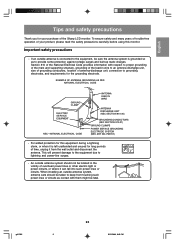
...and supporting structure, grounding of the lead-in the vicinity of the National Electrical Code provides information with them might be sure the antenna system is connected to the equipment, be fatal. Italiano Español English g01.P65 5 E5 8/22/2003, 6:02 PM English Fran...810-21) GROUND CLAMPS POWER SERVICE GROUNDING ELECTRODE SYSTEM (NEC ART 250, PART H) - If an outside antenna system should be taken to keep from the wall outlet and disconnect the antenna. For added protection for this monitor. To ensure safety and many years of trouble-free operation of your purchase ...
...and supporting structure, grounding of the lead-in the vicinity of the National Electrical Code provides information with them might be sure the antenna system is connected to the equipment, be fatal. Italiano Español English g01.P65 5 E5 8/22/2003, 6:02 PM English Fran...810-21) GROUND CLAMPS POWER SERVICE GROUNDING ELECTRODE SYSTEM (NEC ART 250, PART H) - If an outside antenna system should be taken to keep from the wall outlet and disconnect the antenna. For added protection for this monitor. To ensure safety and many years of trouble-free operation of your purchase ...
Operation Manual
Page 8
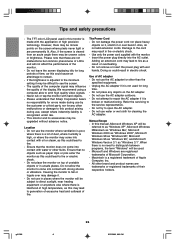
... on the screen where pixels never light or are not malfunctions but common phenomena of overheating. - Use only the power cord supplied with water or other than the specified equipment. - Insert the power plug directly into contact with the monitor. - Use of Apple Computer, Inc. - Do not use water or wet cloth for errors made during use in this could lead to open the AC adapter. - Do...
... on the screen where pixels never light or are not malfunctions but common phenomena of overheating. - Use only the power cord supplied with water or other than the specified equipment. - Insert the power plug directly into contact with the monitor. - Use of Apple Computer, Inc. - Do not use water or wet cloth for errors made during use in this could lead to open the AC adapter. - Do...

Operation Manual
Page 11
... unit Remote control Left view/rear view 14 A A 15 16 17 18 19 20 21 22 23 B 24 14. Left 17. POWER button 2. Channel buttons 9. Antenna input terminal 24. Lug-hole for cable clamp (See next page.) A Ventilation openings Never block the ventilation openings as this may lead to the security lock anchor, the monitor is fixed so that it cannot be transported. SLEEP button 4. VIEW MODE button 11...
... unit Remote control Left view/rear view 14 A A 15 16 17 18 19 20 21 22 23 B 24 14. Left 17. POWER button 2. Channel buttons 9. Antenna input terminal 24. Lug-hole for cable clamp (See next page.) A Ventilation openings Never block the ventilation openings as this may lead to the security lock anchor, the monitor is fixed so that it cannot be transported. SLEEP button 4. VIEW MODE button 11...
Operation Manual
Page 13
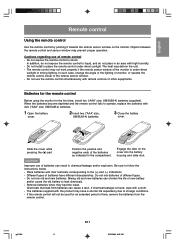
..., install two ("AAA" size, UM/SUM-4) batteries (supplied). Do not expose the remote control to the remote sensor window. - Improper use of new battery and/or cause the old battery to leak chemicals. - Do not install or place the remote control under direct sunlight or strong lighting. Do not use the remote control simultaneously with new ("AAA" size, UM/SUM-4) batteries. 1 Open the battery cover. 2 Insert two ("AAA" size...
..., install two ("AAA" size, UM/SUM-4) batteries (supplied). Do not expose the remote control to the remote sensor window. - Improper use of new battery and/or cause the old battery to leak chemicals. - Do not install or place the remote control under direct sunlight or strong lighting. Do not use the remote control simultaneously with new ("AAA" size, UM/SUM-4) batteries. 1 Open the battery cover. 2 Insert two ("AAA" size...
Operation Manual
Page 22
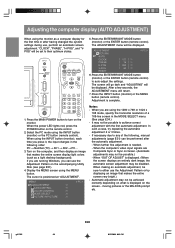
... INPUT button (monitor) or the PC button (remote control). MENU < PC > ADJUSTMENT >> GAIN CONTROL >> COLOR CONTROL >> MODE SELECT >> PICTURE IN PICTURE >> Notes: - When the computer's video input signals are using the 1280 x 768 or 1024 x 768 mode, specify the horizontal resolution of the following order: PC → Number (TV) → AV1 → AV2 → PC... 3. "CLOCK", "PHASE", "H-POS", and "VPOS" will be possible to turn on the computer, and then display an image that makes the entire screen very bright.) - ADJUSTMENT...
... INPUT button (monitor) or the PC button (remote control). MENU < PC > ADJUSTMENT >> GAIN CONTROL >> COLOR CONTROL >> MODE SELECT >> PICTURE IN PICTURE >> Notes: - When the computer's video input signals are using the 1280 x 768 or 1024 x 768 mode, specify the horizontal resolution of the following order: PC → Number (TV) → AV1 → AV2 → PC... 3. "CLOCK", "PHASE", "H-POS", and "VPOS" will be possible to turn on the computer, and then display an image that makes the entire screen very bright.) - ADJUSTMENT...
Operation Manual
Page 24
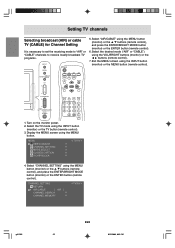
... the MENU screen using the INPUT button (monitor) or the TV button (remote control). 3. Select the TV mode using the INPUT button (monitor) or the MENU button (remote control). Display the MENU screen using the VOL/BRIGHT buttons (monitor) or the buttons (remote control). 7. VOL/BRIGHT DISPLAY CC MTS MUTE VOL MAIN POWER CH FLASHBACK 1. MENU VIDEO ADJUST CHANNEL SETTING MODE SELECT CLOSED CAPTION V-CHIP BLOCK < TV/AV 4. CHANNEL SETTING RETURN AIR/CABLE [ AIR ] CHANNEL SEARCH >> CHANNEL MEMORY >> < TV/AV > E22 g01.P65 22 8/22/2003, 6:02 PM Turn...
... the MENU screen using the INPUT button (monitor) or the TV button (remote control). 3. Select the TV mode using the INPUT button (monitor) or the MENU button (remote control). Display the MENU screen using the VOL/BRIGHT buttons (monitor) or the buttons (remote control). 7. VOL/BRIGHT DISPLAY CC MTS MUTE VOL MAIN POWER CH FLASHBACK 1. MENU VIDEO ADJUST CHANNEL SETTING MODE SELECT CLOSED CAPTION V-CHIP BLOCK < TV/AV 4. CHANNEL SETTING RETURN AIR/CABLE [ AIR ] CHANNEL SEARCH >> CHANNEL MEMORY >> < TV/AV > E22 g01.P65 22 8/22/2003, 6:02 PM Turn...

Operation Manual
Page 25
... the MENU button (remote control). English Français Deutsch Italiano Setting TV channels Saving broadcast TV channels in the memory (CHANNEL SEARCH) "CHANNEL SEARCH" allows you search for channels but cannot receive any higher channels. 7. Note: - Turn on the monitor power. 2. Press the ENTER/BRIGHT MODE button (monitor) or the ENTER button (remote control). Searching channels are: AIR channels: VHF: 2 through 13 UHF: 14 through 69 CABLE...
... the MENU button (remote control). English Français Deutsch Italiano Setting TV channels Saving broadcast TV channels in the memory (CHANNEL SEARCH) "CHANNEL SEARCH" allows you search for channels but cannot receive any higher channels. 7. Note: - Turn on the monitor power. 2. Press the ENTER/BRIGHT MODE button (monitor) or the ENTER button (remote control). Searching channels are: AIR channels: VHF: 2 through 13 UHF: 14 through 69 CABLE...
Operation Manual
Page 26
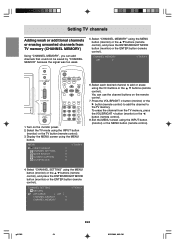
... 1. Turn on the remote control. 7. Display the MENU screen using the MENU button (monitor) or the buttons (remote control), and press the ENTER/BRIGHT MODE button (monitor) or the ENTER button (remote control). Exit the MENU screen using the INPUT button (monitor) or the TV button (remote control). 3. To erase the channel from TV memory (CHANNEL MEMORY) Using "CHANNEL MEMORY", you can use the channel buttons on the monitor power. 2. You can add channels that could not be saved by "CHANNEL SEARCH" because the signal was...
... 1. Turn on the remote control. 7. Display the MENU screen using the MENU button (monitor) or the buttons (remote control), and press the ENTER/BRIGHT MODE button (monitor) or the ENTER button (remote control). Exit the MENU screen using the INPUT button (monitor) or the TV button (remote control). 3. To erase the channel from TV memory (CHANNEL MEMORY) Using "CHANNEL MEMORY", you can use the channel buttons on the monitor power. 2. You can add channels that could not be saved by "CHANNEL SEARCH" because the signal was...
Operation Manual
Page 27
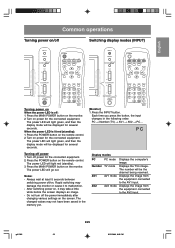
... the remote control. Press the POWER button on the remote control. 2. Notes: - After switching power on, it to malfunction. - Displays the TV's image. The power LED will light green, and then the display mode will be displayed for several seconds. [Monitor] 1. Do not turn off the power immediately after changing various settings on the monitor. 2. Español English E25 g01.P65 25 8/22/2003, 6:02 PM Press the MAIN POWER button on the screen. Press the INPUT button. P C Turning...
... the remote control. Press the POWER button on the remote control. 2. Notes: - After switching power on, it to malfunction. - Displays the TV's image. The power LED will light green, and then the display mode will be displayed for several seconds. [Monitor] 1. Do not turn off the power immediately after changing various settings on the monitor. 2. Español English E25 g01.P65 25 8/22/2003, 6:02 PM Press the MAIN POWER button on the screen. Press the INPUT button. P C Turning...

Operation Manual
Page 29
... "BRIGHT" using the MENU button. 2. Display the MENU screen using the MENU button. 3. Press the VOL/BRIGHT buttons. VOLUME 30 BRIGHT 31 - < PC > + + 2. BRIGHT 31 - < PC > + Selecting the language on the screen You can be displayed in all modes.) INPUT MENU / ENTER BRIGHT MODE CH POWER PC TV AV1 AV2 FREEZE PIP VIEW MODE SLEEP MENU BRIGHT MODE ENTER BRIGHT VOL/BRIGHT DISPLAY CC MTS MUTE VOL MAIN POWER CH FLASHBACK 1. Adjust the brightness using the MENU button (monitor) or the buttons (remote control), and press the ENTER/BRIGHT MODE button (monitor) or...
... "BRIGHT" using the MENU button. 2. Display the MENU screen using the MENU button. 3. Press the VOL/BRIGHT buttons. VOLUME 30 BRIGHT 31 - < PC > + + 2. BRIGHT 31 - < PC > + Selecting the language on the screen You can be displayed in all modes.) INPUT MENU / ENTER BRIGHT MODE CH POWER PC TV AV1 AV2 FREEZE PIP VIEW MODE SLEEP MENU BRIGHT MODE ENTER BRIGHT VOL/BRIGHT DISPLAY CC MTS MUTE VOL MAIN POWER CH FLASHBACK 1. Adjust the brightness using the MENU button (monitor) or the buttons (remote control), and press the ENTER/BRIGHT MODE button (monitor) or...
Operation Manual
Page 35
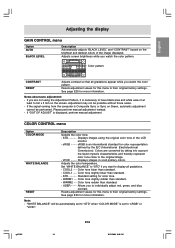
... Resets adjustment values for this menu to individually adjust red, green, and blue contrast. STD Displays images using the Adjustment Pattern, it is Composite Sync or Sync on the screen. sRGB is displayed, perform manual adjustment. Colors are not using the original color tone of the LCD monitor. - COOL1 ..... Color tone redder than standard. - Resets adjustment values for this menu to their original factory settings. Adjustment may not be automatically set to "STD" when "COLOR MODE" is set to the original image. - If "OUT OF ADJUST...
... Resets adjustment values for this menu to individually adjust red, green, and blue contrast. STD Displays images using the Adjustment Pattern, it is Composite Sync or Sync on the screen. sRGB is displayed, perform manual adjustment. Colors are not using the original color tone of the LCD monitor. - COOL1 ..... Color tone redder than standard. - Resets adjustment values for this menu to their original factory settings. Adjustment may not be automatically set to "STD" when "COLOR MODE" is set to the original image. - If "OUT OF ADJUST...
Operation Manual
Page 37
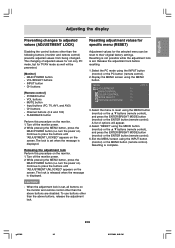
...monitor and remote control) prevents adjusted values from being changed. Turn off the monitor power. 2. Display the MENU screen using the MENU button (monitor) or the buttons (remote control), and press the ENTER/BRIGHT MODE button (monitor) or the ENTER button (remote control). 5. Select the menu to their original factory settings. Resetting is set when the message is displayed. INPUT button - Channel buttons (0-9 and 100) - MENU < PC > ADJUSTMENT >> GAIN CONTROL >> COLOR CONTROL >> MODE SELECT >> PICTURE IN PICTURE >> 3. Select "RESET" using the MENU button...
...monitor and remote control) prevents adjusted values from being changed. Turn off the monitor power. 2. Display the MENU screen using the MENU button (monitor) or the buttons (remote control), and press the ENTER/BRIGHT MODE button (monitor) or the ENTER button (remote control). 5. Select the menu to their original factory settings. Resetting is set when the message is displayed. INPUT button - Channel buttons (0-9 and 100) - MENU < PC > ADJUSTMENT >> GAIN CONTROL >> COLOR CONTROL >> MODE SELECT >> PICTURE IN PICTURE >> 3. Select "RESET" using the MENU button...
Operation Manual
Page 39
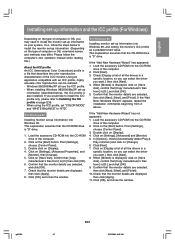
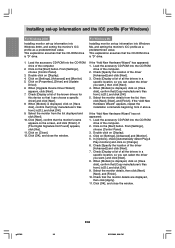
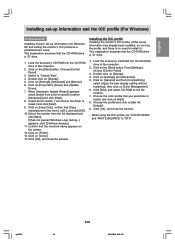
.... 1. When using the ICC profile, set "COLOR MODE" and "WHITE BALANCE" to install the monitor set-up information on your system. This explanation assumes that describes the color reproduction characteristics of the LCD monitor. Double click on the [Start] button. This explanation assumes that [Copy manufacturer's files from 2 above. Check [Display a list of all the drivers in a specific location, so you can be realized. - When [Models] is displayed, click...
.... 1. When using the ICC profile, set "COLOR MODE" and "WHITE BALANCE" to install the monitor set-up information on your system. This explanation assumes that describes the color reproduction characteristics of the LCD monitor. Double click on the [Start] button. This explanation assumes that [Copy manufacturer's files from 2 above. Check [Display a list of all the drivers in a specific location, so you can be realized. - When [Models] is displayed, click...
Operation Manual
Page 40
... the drivers in a specific location, so you can select the driver you want .] and click [Next]. 8. From [Settings], choose [Control Panel]. 3. When [Upgrade Device Driver Wizard] appears, click [Next]. 7. Check [Display a list of the computer. 2. When [Models] is "D" drive. Check [Specify the location of the computer. 2. If [The Digital Signature Not Found] appears, click [Yes]. 11. Load the accessory CD-ROM into Windows 2000, and setting the monitor...
... the drivers in a specific location, so you can select the driver you want .] and click [Next]. 8. From [Settings], choose [Control Panel]. 3. When [Upgrade Device Driver Wizard] appears, click [Next]. 7. Check [Display a list of the computer. 2. When [Models] is "D" drive. Check [Specify the location of the computer. 2. If [The Digital Signature Not Found] appears, click [Yes]. 11. Load the accessory CD-ROM into Windows 2000, and setting the monitor...
Operation Manual
Page 41
... the [Start] button. When using the ICC profile, set -up information into the CD-ROM drive of the computer. 2. Installing the ICC profile Installing the monitor's ICC profile. (If the set "COLOR MODE" and "WHITE BALANCE" to install, and click on [Properties], [Driver] and [Update Driver]. 7. Italiano Español English E39 g02.P65 39 8/22/2003, 6:06 PM Click on [Add]. 8. If [has not passed Windows Logo...
... the [Start] button. When using the ICC profile, set -up information into the CD-ROM drive of the computer. 2. Installing the ICC profile Installing the monitor's ICC profile. (If the set "COLOR MODE" and "WHITE BALANCE" to install, and click on [Properties], [Driver] and [Update Driver]. 7. Italiano Español English E39 g02.P65 39 8/22/2003, 6:06 PM Click on [Add]. 8. If [has not passed Windows Logo...

Operation Manual
Page 58
...to press the buttons until "ADJUSTMENT UNLOCKED" appears on ). Resetting is not possible while the adjustment lock is displayed. Display the MENU screen using the INPUT button (monitor) or the MENU button (remote control). A list of adjusted values for not only TV/ AV mode, but for specific menu (RESET) Disabling the control buttons other than the above buttons are disabled. When the adjustment lock is complete. MUTE button - While pressing the MENU button, press the MAIN POWER button (i.e. turn the power on the screen. MENU VIDEO ADJUST CHANNEL SETTING MODE SELECT CLOSED...
...to press the buttons until "ADJUSTMENT UNLOCKED" appears on ). Resetting is not possible while the adjustment lock is displayed. Display the MENU screen using the INPUT button (monitor) or the MENU button (remote control). A list of adjusted values for not only TV/ AV mode, but for specific menu (RESET) Disabling the control buttons other than the above buttons are disabled. When the adjustment lock is complete. MUTE button - While pressing the MENU button, press the MAIN POWER button (i.e. turn the power on the screen. MENU VIDEO ADJUST CHANNEL SETTING MODE SELECT CLOSED...
Operation Manual
Page 63
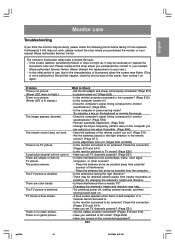
.... - Problem There is no picture. (Power LED does not light.) There is no video picture. A particular channel will not tune in . - There is no picture. (Power LED is not a malfunction.) Should this happen, check by first turning off , waiting several seconds, and then turning power back on ? (Page E25) - Are the AC adapter and power cord properly connected? (Page E17) - Perform automatic adjustment. (Page E20) - Change the Vsync frequency (refresh rate) on TV picture...
.... - Problem There is no picture. (Power LED does not light.) There is no video picture. A particular channel will not tune in . - There is no picture. (Power LED is not a malfunction.) Should this happen, check by first turning off , waiting several seconds, and then turning power back on ? (Page E25) - Are the AC adapter and power cord properly connected? (Page E17) - Perform automatic adjustment. (Page E20) - Change the Vsync frequency (refresh rate) on TV picture...
Operation Manual
Page 64
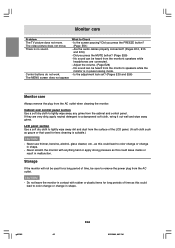
... and control panel. Is the screen pausing? No sound can be sure to remove the power plug from the monitor's speakers while headphones are very dirty, apply neutral detergent to lightly wipe away dirt and dust from the AC outlet when cleaning the monitor. Adjust the volume. (Page E26) - What to color change or change in malfunction. Did you press the FREEZE button? (Page E51) - Cabinet and control panel section Use...
... and control panel. Is the screen pausing? No sound can be sure to remove the power plug from the monitor's speakers while headphones are very dirty, apply neutral detergent to lightly wipe away dirt and dust from the AC outlet when cleaning the monitor. Adjust the volume. (Page E26) - What to color change or change in malfunction. Did you press the FREEZE button? (Page E51) - Cabinet and control panel section Use...


