
LC-26D42U-W | LC-26D43U Operation Manual
Page 6
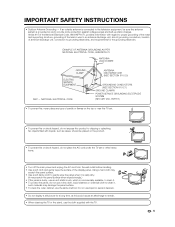
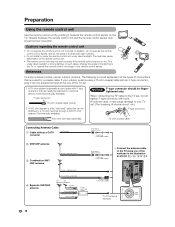
... to the television equipment, be placed on the product. • To prevent fire or shock hazard, do not place the AC cord under the TV set or other heavy items. • Turn off the main power and unplug the AC cord from the wall outlet before handling. • Use a soft cloth... and gently wipe the surface of candle or flames on the top or near the TV set. • To prevent fire or shock hazard, do not use a dirty cloth, liquid cleaners or chemical cloth to clean it, such materials may scratch...
... to the television equipment, be placed on the product. • To prevent fire or shock hazard, do not place the AC cord under the TV set or other heavy items. • Turn off the main power and unplug the AC cord from the wall outlet before handling. • Use a soft cloth... and gently wipe the surface of candle or flames on the top or near the TV set. • To prevent fire or shock hazard, do not use a dirty cloth, liquid cleaners or chemical cloth to clean it, such materials may scratch...
LC-26D42U-W | LC-26D43U Operation Manual
Page 9
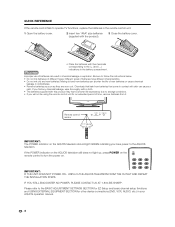
...IF THE UNIT DOES NOT POWER ON - QUICK REFERENCE If the remote control fails to operate TV functions, replace the batteries in the remote control unit. 1 Open the battery cover. 2...the battery cover. • Place the batteries with their terminals corresponding to the BASIC ADJUSTMENT SETTINGS SECTION for EZ Setup and basic channel setup functions and USING EXTERNAL EQUIPMENT SECTION for an...your AQUOS operation manual. 8 IF YOU STILL ENCOUNTER NO POWER, PLEASE CONTACT US AT 1-800-BE-SHARP. Remote control sensor 17n (5 m) IMPORTANT: The POWER indicator on . Be sure to storage conditions...
...IF THE UNIT DOES NOT POWER ON - QUICK REFERENCE If the remote control fails to operate TV functions, replace the batteries in the remote control unit. 1 Open the battery cover. 2...the battery cover. • Place the batteries with their terminals corresponding to the BASIC ADJUSTMENT SETTINGS SECTION for EZ Setup and basic channel setup functions and USING EXTERNAL EQUIPMENT SECTION for an...your AQUOS operation manual. 8 IF YOU STILL ENCOUNTER NO POWER, PLEASE CONTACT US AT 1-800-BE-SHARP. Remote control sensor 17n (5 m) IMPORTANT: The POWER indicator on . Be sure to storage conditions...
LC-26D42U-W | LC-26D43U Operation Manual
Page 10
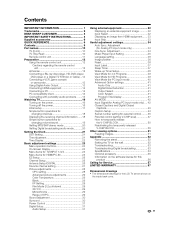
...INFORMATION 1 Trademarks 2 DEAR SHARP CUSTOMER 3 IMPORTANT SAFETY INSTRUCTIONS 3 Supplied accessories 6 QUICK REFERENCE 6 Contents 9 Part names 10 TV (Front 10 TV (Top/Rear 10 Remote control... Channel Setup 25 Antenna Setup-DIGITAL 26 Favorite channel setting 27 Picture adjustments 28 OPC setting 28 Advanced picture adjustments 29 Color Temperature 29 Black 29 I/P Setting 29 Film Mode (3:2 pull-down 29...Service 57 LIMITED WARRANTY 57 Dimensional drawings • The dimensional drawings for the LCD TV set are shown on the power 16 Turning off the power 16 Initial setup 17...
...INFORMATION 1 Trademarks 2 DEAR SHARP CUSTOMER 3 IMPORTANT SAFETY INSTRUCTIONS 3 Supplied accessories 6 QUICK REFERENCE 6 Contents 9 Part names 10 TV (Front 10 TV (Top/Rear 10 Remote control... Channel Setup 25 Antenna Setup-DIGITAL 26 Favorite channel setting 27 Picture adjustments 28 OPC setting 28 Advanced picture adjustments 29 Color Temperature 29 Black 29 I/P Setting 29 Film Mode (3:2 pull-down 29...Service 57 LIMITED WARRANTY 57 Dimensional drawings • The dimensional drawings for the LCD TV set are shown on the power 16 Turning off the power 16 Initial setup 17...
LC-26D42U-W | LC-26D43U Operation Manual
Page 12
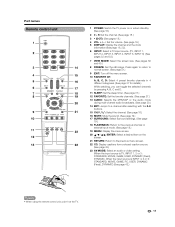
...control unit 1 POWER: Switch the TV power on the screen. 21 RETURN: Return to the previous channel or external input mode. (See page 18.) 19 MENU: Display the menu screen. 20 a/b/c/d/ENTER: Select a desired item on or enters standby. (See page 16.) 2 0 - 9: Set the channel. (See page 18.) ...3 • (DOT): (See pages 18.) 4 VOL k/l: Set the volume. (See page 19.) 5 DISPLAY: Display the channel and the clock information (See page 18, 22). 6 INPUT: Select a TV input source. (TV, INPUT 1, INPUT 2, INPUT 3, INPUT 4, INPUT 5, INPUT 6) (See pages 32 and 33.) 7 VIEW MODE: ...
...control unit 1 POWER: Switch the TV power on the screen. 21 RETURN: Return to the previous channel or external input mode. (See page 18.) 19 MENU: Display the menu screen. 20 a/b/c/d/ENTER: Select a desired item on or enters standby. (See page 16.) 2 0 - 9: Set the channel. (See page 18.) ...3 • (DOT): (See pages 18.) 4 VOL k/l: Set the volume. (See page 19.) 5 DISPLAY: Display the channel and the clock information (See page 18, 22). 6 INPUT: Select a TV input source. (TV, INPUT 1, INPUT 2, INPUT 3, INPUT 4, INPUT 5, INPUT 6) (See pages 32 and 33.) 7 VIEW MODE: ...
LC-26D42U-W | LC-26D43U Operation Manual
Page 13
...). Objects between the remote control unit and the remote control sensor may cause damage to your TV set. (The breaking of the lighting or the TV, or operate the remote control unit closer to the TV set . 1. A 300-ohm system is a brief explanation of the types of connections that can...the remote control unit • Do not expose the remote control unit to the TV using one of the TV set , do not place in the illustration as shown (1, 2, 3 or 4). 4 Separate VHF/UHF antenna 12 To TV antenna terminal The heat may cause deformation of the remote control unit. •...
...). Objects between the remote control unit and the remote control sensor may cause damage to your TV set. (The breaking of the lighting or the TV, or operate the remote control unit closer to the TV set . 1. A 300-ohm system is a brief explanation of the types of connections that can...the remote control unit • Do not expose the remote control unit to the TV using one of the TV set , do not place in the illustration as shown (1, 2, 3 or 4). 4 Separate VHF/UHF antenna 12 To TV antenna terminal The heat may cause deformation of the remote control unit. •...

LC-26D42U-W | LC-26D43U Operation Manual
Page 15
...connecting HDMI equipment. Power Management is a registered trademark of Video Electronics Standards Association. Check the output device settings." Check the output device settings." PC Resolution Horizontal Frequency Vertical Frequency VESA Standard DDC is necessary to AUDIO terminal of International Business Machines Co...HDMI cable (commercially available) HDMI equipment • When using an HDMI-DVI conversion cable, input the audio signal to set PC input signals. For an incompatible video signal: "An incompatible video signal has been received. PC compatibility chart It ...
...connecting HDMI equipment. Power Management is a registered trademark of Video Electronics Standards Association. Check the output device settings." Check the output device settings." PC Resolution Horizontal Frequency Vertical Frequency VESA Standard DDC is necessary to AUDIO terminal of International Business Machines Co...HDMI cable (commercially available) HDMI equipment • When using an HDMI-DVI conversion cable, input the audio signal to set PC input signals. For an incompatible video signal: "An incompatible video signal has been received. PC compatibility chart It ...
LC-26D42U-W | LC-26D43U Operation Manual
Page 16
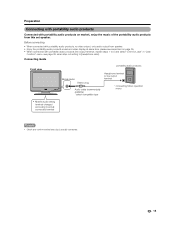
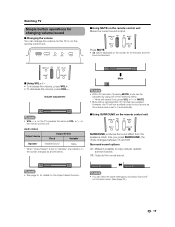
... • When connected with portability audio products on market, enjoy the music of the portability audio products from this set speaker. Connecting Guide Front view portability audio products Mobile Audio Stereo plug Audio cable (commercially available) * select compatible ...type Headphone terminal or line output terminal * connecting follow operation menu • Mobile audio setting terminal changed according to [headphone Jack]. Before connecting • When connected with portability audio products, no video output, only audio...
... • When connected with portability audio products on market, enjoy the music of the portability audio products from this set speaker. Connecting Guide Front view portability audio products Mobile Audio Stereo plug Audio cable (commercially available) * select compatible ...type Headphone terminal or line output terminal * connecting follow operation menu • Mobile audio setting terminal changed according to [headphone Jack]. Before connecting • When connected with portability audio products, no video output, only audio...
LC-26D42U-W | LC-26D43U Operation Manual
Page 17
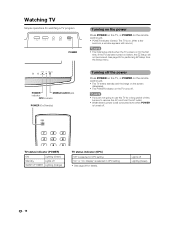
... indicator (POWER) ON Lighting (Green) Standby Lights off WAKE UP TIMER Lighting (Orange) TV status indicator (OPC) "Off" is selected in OPC setting "On" or "On: Display" is selected in OPC setting • See page 28 for performing EZ Setup from the AC outlet. • Weak electric ...power is still consumed even when POWER is turned off Lighting (Green) 16 Watching TV Simple operations for watching a TV program POWER POWER MOBILE AUDIO jack indicator...
... indicator (POWER) ON Lighting (Green) Standby Lights off WAKE UP TIMER Lighting (Orange) TV status indicator (OPC) "Off" is selected in OPC setting "On" or "On: Display" is selected in OPC setting • See page 28 for performing EZ Setup from the AC outlet. • Weak electric ...power is still consumed even when POWER is turned off Lighting (Green) 16 Watching TV Simple operations for watching a TV program POWER POWER MOBILE AUDIO jack indicator...
LC-26D42U-W | LC-26D43U Operation Manual
Page 18
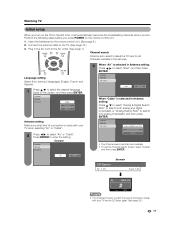
..." or "Cable". Connect the antenna cable to enter the setting. Press ENTER to the TV. (See page 12.) 3. Watching TV Initial setup When you turn on the TV for all channels viewable in the set area. 3 When "Air" is selected in Antenna setting: Press c/d to select "Start", and then press ENTER.... remote control unit. (See page 8.) 2. Example • If no channel is made with your TV and try EZ Setup again. (See page 25.) 17 Example When "Cable" is selected in Antenna setting: Press a/b to select "Analog & Digital Search Start" to search both analog and digital broadcasts or...
..." or "Cable". Connect the antenna cable to enter the setting. Press ENTER to the TV. (See page 12.) 3. Watching TV Initial setup When you turn on the TV for all channels viewable in the set area. 3 When "Air" is selected in Antenna setting: Press c/d to select "Start", and then press ENTER.... remote control unit. (See page 8.) 2. Example • If no channel is made with your TV and try EZ Setup again. (See page 25.) 17 Example When "Cable" is selected in Antenna setting: Press a/b to select "Analog & Digital Search Start" to search both analog and digital broadcasts or...
LC-26D42U-W | LC-26D43U Operation Manual
Page 20
... be displayed on the screen for 30 minutes, and the sound is set to 0 automatically. O Using VOLk/l • To increase the volume, press VOLk. • To decrease the volume, press VOLl. Volume adjustment • VOLl/k on the TV operates the same as shown below . - O Using SURROUND on the... on the menu items. (See page 30.) 19 Press MUTE. • M will not suddenly output a loud sound as the volume level is set to enjoy natural, realistic surround sound. Mute • Within 30 minutes of the methods below . Audio status Output device Output Select Fixed Variable Speaker...
... be displayed on the screen for 30 minutes, and the sound is set to 0 automatically. O Using VOLk/l • To increase the volume, press VOLk. • To decrease the volume, press VOLl. Volume adjustment • VOLl/k on the TV operates the same as shown below . - O Using SURROUND on the... on the menu items. (See page 30.) 19 Press MUTE. • M will not suddenly output a loud sound as the volume level is set to enjoy natural, realistic surround sound. Mute • Within 30 minutes of the methods below . Audio status Output device Output Select Fixed Variable Speaker...
LC-26D42U-W | LC-26D43U Operation Manual
Page 21
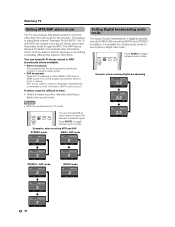
...something completely different like live sporting events, shows and concerts in dynamic stereo sound. • SAP broadcasts Receive TV broadcasts in either in mono or stereo). Setting Digital broadcasting audio mode The types of sound other than the main audio for multiple audio tracks to accompany ...sound. Press AUDIO to toggle between audio modes. In addition, it is called Multi-channel Television Sound (MTS). Watching TV Setting MTS/SAP stereo mode The TV has a feature that allows reception of audio transmitted in a digital broadcast include SURROUND as well as shown below to ...
...something completely different like live sporting events, shows and concerts in dynamic stereo sound. • SAP broadcasts Receive TV broadcasts in either in mono or stereo). Setting Digital broadcasting audio mode The types of sound other than the main audio for multiple audio tracks to accompany ...sound. Press AUDIO to toggle between audio modes. In addition, it is called Multi-channel Television Sound (MTS). Watching TV Setting MTS/SAP stereo mode The TV has a feature that allows reception of audio transmitted in a digital broadcast include SURROUND as well as shown below to ...
LC-26D42U-W | LC-26D43U Operation Manual
Page 22
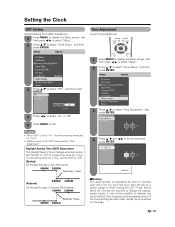
... Press MENU to display the Menu screen, and then press c/d to select "Setup". 2 Press a/b to forward the clock by 1 hour. • Please be possible to set the time and press ENTER. (Autumn) On the last Sunday in April DST starts. 3 Press a/b to select "Time Adjustment", and press ENTER. 4 Press a/b and c/d ...the charging time is maintained for about 5 minutes even when the AC cord has been shut off due to a power outage or when moving the LCD TV set. (Since about 30 minutes are required to charge the backup power supply, it may not be sure to select "Clock Setup", and then press...
... Press MENU to display the Menu screen, and then press c/d to select "Setup". 2 Press a/b to forward the clock by 1 hour. • Please be possible to set the time and press ENTER. (Autumn) On the last Sunday in April DST starts. 3 Press a/b to select "Time Adjustment", and press ENTER. 4 Press a/b and c/d ...the charging time is maintained for about 5 minutes even when the AC cord has been shut off due to a power outage or when moving the LCD TV set. (Since about 30 minutes are required to charge the backup power supply, it may not be sure to select "Clock Setup", and then press...

LC-26D42U-W | LC-26D43U Operation Manual
Page 23
Setting the Clock Time Display You can display the current time on the screen. Selected item On On (every halfhour) Off Description Displays the current time on the screen. 1 Press MENU to display the MENU Screen, and then press c/d to select "Setup". 2 Press a/b to select "Time Display", and then press ENTER. 3 Press a/b to exit. • When you press DISPLAY, the current time is displayed in sync with channel information. 22 Display the current time (every half-hour) No display 4 Press EXIT to select "On", "On (every half- hour)" or "off", and press ENTER.
Setting the Clock Time Display You can display the current time on the screen. Selected item On On (every halfhour) Off Description Displays the current time on the screen. 1 Press MENU to display the MENU Screen, and then press c/d to select "Setup". 2 Press a/b to select "Time Display", and then press ENTER. 3 Press a/b to exit. • When you press DISPLAY, the current time is displayed in sync with channel information. 22 Display the current time (every half-hour) No display 4 Press EXIT to select "On", "On (every half- hour)" or "off", and press ENTER.
LC-26D42U-W | LC-26D43U Operation Manual
Page 24
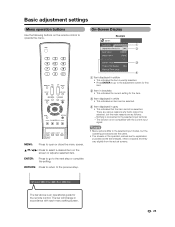
...vary slightly from the actual screens. There are various reasons why items cannot be selected. MENU: Press to the next step or complete the setting. RETURN: Press to return to operate the menu. The bar above is an operational guide for explanation purposes (some are as follows: -...Nothing is connected to the adjustment screen for this item. 2 Item in brackets • This indicates the current setting for the item. 3 Item displayed in white • This indicates an item can be selected. 4 Item displayed in gray • This indicates that...
...vary slightly from the actual screens. There are various reasons why items cannot be selected. MENU: Press to the next step or complete the setting. RETURN: Press to return to operate the menu. The bar above is an operational guide for explanation purposes (some are as follows: -...Nothing is connected to the adjustment screen for this item. 2 Item in brackets • This indicates the current setting for the item. 3 Item displayed in white • This indicates an item can be selected. 4 Item displayed in gray • This indicates that...

LC-26D42U-W | LC-26D43U Operation Manual
Page 25
Basic adjustment settings Menu items for TV/INPUT 1/2/3 Menu items for HDMI/PC-IN OPC Page 28 Backlight Page 28 Contrast Page 28 Brightness Page 28 Color Page 28 Tint Page 28 Sharpness Page 28 Advanced Color Temp Page 29 Black Page 29 I/P Setting Page 29 Film Mode Page 29 3D-Y/C Page 29 Monochrome Page... 29 I/P Setting Page 29 Film Mode Page 29 Monochrome Page 29 Range of OPC Page 29 Treble Page 30 Bass Page 30 Balance Page 30 Surround Page 30 No Signal Off Page 31 No Operation Off Page 31 EZ Setup Page 25 CH Setup Page 25 Antenna Setup-DIGITAL Page 26 Input...
Basic adjustment settings Menu items for TV/INPUT 1/2/3 Menu items for HDMI/PC-IN OPC Page 28 Backlight Page 28 Contrast Page 28 Brightness Page 28 Color Page 28 Tint Page 28 Sharpness Page 28 Advanced Color Temp Page 29 Black Page 29 I/P Setting Page 29 Film Mode Page 29 3D-Y/C Page 29 Monochrome Page... 29 I/P Setting Page 29 Film Mode Page 29 Monochrome Page 29 Range of OPC Page 29 Treble Page 30 Bass Page 30 Balance Page 30 Surround Page 30 No Signal Off Page 31 No Operation Off Page 31 EZ Setup Page 25 CH Setup Page 25 Antenna Setup-DIGITAL Page 26 Input...

LC-26D42U-W | LC-26D43U Operation Manual
Page 26
...ENTER. See page 45 for Cable Digital will be deleted. 25 Channel search Channel auto search makes the TV look for all channels viewable in the set area. 1 Repeat steps 1 and 2 in Antenna setting in Channel Setup. 2 Press a/b to select "CH Search", and then press ENTER. 3 When "Air..." is made with your TV when selecting "Air" or "Cable". 5 Press c/d to manually memorize the channels. Basic adjustment settings EZ Setup You can run EZ Setup again, even after setting up the preset channels. If not, skip to exit. Press ENTER to...
...ENTER. See page 45 for Cable Digital will be deleted. 25 Channel search Channel auto search makes the TV look for all channels viewable in the set area. 1 Repeat steps 1 and 2 in Antenna setting in Channel Setup. 2 Press a/b to select "CH Search", and then press ENTER. 3 When "Air..." is made with your TV when selecting "Air" or "Cable". 5 Press c/d to manually memorize the channels. Basic adjustment settings EZ Setup You can run EZ Setup again, even after setting up the preset channels. If not, skip to exit. Press ENTER to...

LC-26D42U-W | LC-26D43U Operation Manual
Page 27
...setting 1 Press MENU to display the MENU screen, and then press c/d to select "Setup". 2 Press a/b to select "CH Setup", and then press ENTER. • If you need a digital broadcast antenna. The signal information is available for DIGITAL (Air) only. 26... to select "Signal Strength". • The signal strength of the selected channel. • Make sure the signal is strong enough for setting a secret number. 3 Press a/b to select "CH Memory", and then press ENTER. 4 Press a/b to select ANALOG (Air), ANALOG...the signal strength of DIGITAL channel is made with your TV.
...setting 1 Press MENU to display the MENU screen, and then press c/d to select "Setup". 2 Press a/b to select "CH Setup", and then press ENTER. • If you need a digital broadcast antenna. The signal information is available for DIGITAL (Air) only. 26... to select "Signal Strength". • The signal strength of the selected channel. • Make sure the signal is strong enough for setting a secret number. 3 Press a/b to select "CH Memory", and then press ENTER. 4 Press a/b to select ANALOG (Air), ANALOG...the signal strength of DIGITAL channel is made with your TV.

LC-26D42U-W | LC-26D43U Operation Manual
Page 28
... delete all the favorite channels, select "All Data Clear", and then skip to step 4. 3 Press a/b/c/d to select the channel you want to register. Basic adjustment settings Favorite channel setting This function allows you can also set your favorite channels easily. By setting the favorite channels in 4 different categories.
... delete all the favorite channels, select "All Data Clear", and then skip to step 4. 3 Press a/b/c/d to select the channel you want to register. Basic adjustment settings Favorite channel setting This function allows you can also set your favorite channels easily. By setting the favorite channels in 4 different categories.
LC-26D42U-W | LC-26D43U Operation Manual
Page 29
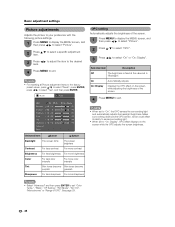
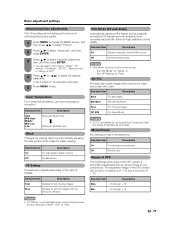
... color intensity For more color intensity Tint Skin tones become Skin tones become purplish greenish Sharpness For less sharpness For more sharpness • Select "Advanced" and then press ENTER to set in "Backlight". See page 29. 28 Selected item Description Off The brightness is &#...64257;xed at the value set "Color Temp.", "Black", "I/P Setting", "Film Mode", "3D-Y/C", "Monochrome" or "Range of OPC". ...
... color intensity For more color intensity Tint Skin tones become Skin tones become purplish greenish Sharpness For less sharpness For more sharpness • Select "Advanced" and then press ENTER to set in "Backlight". See page 29. 28 Selected item Description Off The brightness is &#...64257;xed at the value set "Color Temp.", "Black", "I/P Setting", "Film Mode", "3D-Y/C", "Monochrome" or "Range of OPC". ...
LC-26D42U-W | LC-26D43U Operation Manual
Page 30
... images Standard Normal adjustment Fast For moving images Slow Suitable for smooth images with minimal dot crawl and cross color noise. Basic adjustment settings Advanced picture adjustments This TV provides various advanced functions for optimizing the picture quality. 1 Press MENU to display the MENU screen, and then press c/d to select "Picture". 2 Press...
... images Standard Normal adjustment Fast For moving images Slow Suitable for smooth images with minimal dot crawl and cross color noise. Basic adjustment settings Advanced picture adjustments This TV provides various advanced functions for optimizing the picture quality. 1 Press MENU to display the MENU screen, and then press c/d to select "Picture". 2 Press...


