
LC-19DV24U Operation Manual
Page 9
...scratched or broken when dropped or impacted. 11D Clean the screen by a heat source or use . 1 Remove each sheet. 2 Tear from Sharp in a well ventilated area and make sure not to lightly moisten. Do not use the same method. CLOTH- 3) packs. QUICK REFERENCE ...TV/DVD in single (00Z-LCD-CLOTH) or triple (00Z-LCD- Please remove these sheets before use near water. The screen is designed for ordering, or VISIT www.sharpusa.com/SharpDirect. Approved cleaning cloths are covering the product. To clean the outer cabinet, use liquid or aerosol cleaners. LC-IS0224U Remote control...
...scratched or broken when dropped or impacted. 11D Clean the screen by a heat source or use . 1 Remove each sheet. 2 Tear from Sharp in a well ventilated area and make sure not to lightly moisten. Do not use the same method. CLOTH- 3) packs. QUICK REFERENCE ...TV/DVD in single (00Z-LCD-CLOTH) or triple (00Z-LCD- Please remove these sheets before use near water. The screen is designed for ordering, or VISIT www.sharpusa.com/SharpDirect. Approved cleaning cloths are covering the product. To clean the outer cabinet, use liquid or aerosol cleaners. LC-IS0224U Remote control...

LC-19DV24U Operation Manual
Page 11
...: IF THE UNIT DOES NOT POWER ON - IF YOU STILL ENCOUNTER NO POWER, PLEASE CONTACT US AT 1-800-BE-SHARP. - 9 Different types of new batteries or cause chemical leakage in the remote control unit. 1 Open the battery cover. 2 Insert two "AA" size batteries (supplied with the product). 3 Close the...The batteries supplied with this product may have power to operate TV/DVD functions, replace the batteries in old batteries. • Remove batteries as soon as they are worn out. If you will not be using the remote control unit for an extended period of time, remove batteries from ...
...: IF THE UNIT DOES NOT POWER ON - IF YOU STILL ENCOUNTER NO POWER, PLEASE CONTACT US AT 1-800-BE-SHARP. - 9 Different types of new batteries or cause chemical leakage in the remote control unit. 1 Open the battery cover. 2 Insert two "AA" size batteries (supplied with the product). 3 Close the...The batteries supplied with this product may have power to operate TV/DVD functions, replace the batteries in old batteries. • Remove batteries as soon as they are worn out. If you will not be using the remote control unit for an extended period of time, remove batteries from ...

LC-19DV24U Operation Manual
Page 12
...SHARP CUSTOMER 3 IMPORTANT SAFETY INSTRUCTIONS 3 Disc 5 Discs which can be played back 5 Discs which cannot be played back 5 Title/Chapter/Track 5 Handling discs 6 Supplied accessories 7 QUICK REFERENCE 7 Removing the protective sheet 7 Contents 10 Part names 11 TV/DVD (Front) 11 TV/DVD (Rear) 11 TV/DVD (Right) 11 Remote control unit 12 Preparation 13 Using the remote control... .18 Caption setup 19 Password setting for parental control 19 How to enter the Lock menu 19 Parental control (V-CHIP) 20 TV Parental Guidelines (TV Guidelines) 20 Voluntary ...
...SHARP CUSTOMER 3 IMPORTANT SAFETY INSTRUCTIONS 3 Disc 5 Discs which can be played back 5 Discs which cannot be played back 5 Title/Chapter/Track 5 Handling discs 6 Supplied accessories 7 QUICK REFERENCE 7 Removing the protective sheet 7 Contents 10 Part names 11 TV/DVD (Front) 11 TV/DVD (Rear) 11 TV/DVD (Right) 11 Remote control unit 12 Preparation 13 Using the remote control... .18 Caption setup 19 Password setting for parental control 19 How to enter the Lock menu 19 Parental control (V-CHIP) 20 TV Parental Guidelines (TV Guidelines) 20 Voluntary ...

LC-19DV24U Operation Manual
Page 13
.../v/ ■ STOP button 000 CUM 614.6.11, POWER Remote control sensor POWER indicator TV/DVD (Left) • The buttons on the main unit have the same functions as the same buttons on the back of the main unit. Disc slot TV/DVD_ (Rear) (tEIMEIVIENIONIERVAIO ilop""""""po U is nog.... ig) - 11 Adjust the sound volume using the remote control. INPUT 1 terminals ogolloomooloommomq " 10=0 MT/ Cj ANT./CABLE in COAXIAL DIGITAL AUDIO ...
.../v/ ■ STOP button 000 CUM 614.6.11, POWER Remote control sensor POWER indicator TV/DVD (Left) • The buttons on the main unit have the same functions as the same buttons on the back of the main unit. Disc slot TV/DVD_ (Rear) (tEIMEIVIENIONIERVAIO ilop""""""po U is nog.... ig) - 11 Adjust the sound volume using the remote control. INPUT 1 terminals ogolloomooloommomq " 10=0 MT/ Cj ANT./CABLE in COAXIAL DIGITAL AUDIO ...
LC-19DV24U Operation Manual
Page 14
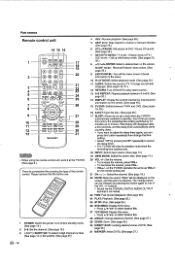
...FNiEN 9 OP 27 10 Auao it 28 12 13 II a 's `if I 29 30 31 SHARP ZeiV • When using the remote control unit, point it at the TV/DVD (See page 9.) There is a protective film covering the face of TV/ DVD mode - SLOW page 26.) Reverse/Forward -slow motion. (See 9 EXIT/CANCEL: Turn ...page 14.) 19 VIEW MODE: Select the screen size. (See page 17.) 20 VOL +/-: Set the volume. • To increase the volume, press VOL+. • To decrease the volume, press VOL-. • VOL+/- Display menu of the remote control. on the screen. (See page 16.) 15 TV/DVD: Switch between TV/AV and ...
...FNiEN 9 OP 27 10 Auao it 28 12 13 II a 's `if I 29 30 31 SHARP ZeiV • When using the remote control unit, point it at the TV/DVD (See page 9.) There is a protective film covering the face of TV/ DVD mode - SLOW page 26.) Reverse/Forward -slow motion. (See 9 EXIT/CANCEL: Turn ...page 14.) 19 VIEW MODE: Select the screen size. (See page 17.) 20 VOL +/-: Set the volume. • To increase the volume, press VOL+. • To decrease the volume, press VOL-. • VOL+/- Display menu of the remote control. on the screen. (See page 16.) 15 TV/DVD: Switch between TV/AV and ...

LC-19DV24U Operation Manual
Page 15
...). Objects between the remote control unit and the remote control sensor may not work properly if the remote control sensor on the TV/DVD. Preparation Using the remote control unit Use the remote control unit by pointing it into the antenna terminal at the rear of the TV set. 1. The heat may cause deformation of the remote control unit. • The remote control unit may prevent...
...). Objects between the remote control unit and the remote control sensor may not work properly if the remote control sensor on the TV/DVD. Preparation Using the remote control unit Use the remote control unit by pointing it into the antenna terminal at the rear of the TV set. 1. The heat may cause deformation of the remote control unit. • The remote control unit may prevent...

LC-19DV24U Operation Manual
Page 17
...of time, be made if there is not necessary to the AC outlet. (See page 8.) Turning on the power Press POWER on the TV/DVD, or POWER on the remote control. FiaM • If you are broadcasting digital signals. If you enter 0-9 and • (DOT), channel selection will be sure to...for all the channels available in the AC cord to press 0 before you press POWER on the TV/DVD. To select a 3-digit channel number (e. Method 1 Using CH ...he on the remote control unit or on the remote control unit. 1 Insert the batteries into memory. • New digital channels may take from the ...
...of time, be made if there is not necessary to the AC outlet. (See page 8.) Turning on the power Press POWER on the TV/DVD, or POWER on the remote control. FiaM • If you are broadcasting digital signals. If you enter 0-9 and • (DOT), channel selection will be sure to...for all the channels available in the AC cord to press 0 before you press POWER on the TV/DVD. To select a 3-digit channel number (e. Method 1 Using CH ...he on the remote control unit or on the remote control unit. 1 Insert the batteries into memory. • New digital channels may take from the ...

LC-19DV24U Operation Manual
Page 24
or ENTER. MP 5551 O 0 ntn -a A-m u m SHARP Quick guide for the remote control. MMUMWMpMn Reda .===.1, 3 Press 4/o• to select the desired language. ...on the following buttons on the remote control to open the menu screen. EXIT: Press to normal Monitor screen automatically. TV MENU: Press to operate the menu. It will change in the same way as here... press It. A V : Select 4►: Adjust ENTER :Set The lower part of the menu screen is an operational guide for MENU operation example : Select Language 1 Press TV MENU and the MENU screen displays.
or ENTER. MP 5551 O 0 ntn -a A-m u m SHARP Quick guide for the remote control. MMUMWMpMn Reda .===.1, 3 Press 4/o• to select the desired language. ...on the following buttons on the remote control to open the menu screen. EXIT: Press to normal Monitor screen automatically. TV MENU: Press to operate the menu. It will change in the same way as here... press It. A V : Select 4►: Adjust ENTER :Set The lower part of the menu screen is an operational guide for MENU operation example : Select Language 1 Press TV MENU and the MENU screen displays.
LC-19DV24U Operation Manual
Page 26
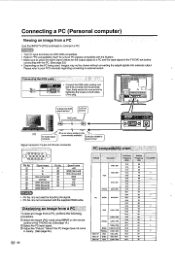
...34.9 67 MAC 16• SVGA 8322624 49.7 75 MAC 19" XGA 1,024 2768 60.2 76 Connecting a PC (Personal computer) Viewing an image from a PC, perform the following procedure. 0 Select the Input4 (PC) mode using INPUT on the remote control or the TV/DVD set before connecting with the PC. (See page 23.)... • Depending on both sides of the TV/DVD set . (See page 14.) 0 Select the PC input signal. items if the PC image...
...34.9 67 MAC 16• SVGA 8322624 49.7 75 MAC 19" XGA 1,024 2768 60.2 76 Connecting a PC (Personal computer) Viewing an image from a PC, perform the following procedure. 0 Select the Input4 (PC) mode using INPUT on the remote control or the TV/DVD set before connecting with the PC. (See page 23.)... • Depending on both sides of the TV/DVD set . (See page 14.) 0 Select the PC input signal. items if the PC image...

LC-19DV24U Operation Manual
Page 27
...operate a menu feature. 3 Press STOP to select the DVD mode. Remove the disc and then press POWER. Turning off the power Press POWER on the TV/DVD, or POWER on the remote control. • The TV/DVD enters standby mode and the image on the screen disappears. • The POWER indicator on the... page 9.) 2 Plug in the AC cord to the AC outlet. (See page 8.) Turning on the power Press POWER on the TV/DVD, or POWER on the remote control. • POWER indicator (Green): The TV/DVD is on. ("Please wait" will appear for a long period of the disc will commence. • A menu screen appear ...
...operate a menu feature. 3 Press STOP to select the DVD mode. Remove the disc and then press POWER. Turning off the power Press POWER on the TV/DVD, or POWER on the remote control. • The TV/DVD enters standby mode and the image on the screen disappears. • The POWER indicator on the... page 9.) 2 Plug in the AC cord to the AC outlet. (See page 8.) Turning on the power Press POWER on the TV/DVD, or POWER on the remote control. • POWER indicator (Green): The TV/DVD is on. ("Please wait" will appear for a long period of the disc will commence. • A menu screen appear ...

LC-19DV24U Operation Manual
Page 32
... Program" and press ENTER. ABC lEseN -(0); OMEGTSMP 0 0 00 SHARP SETUP: Press to open or close the menu screen. • During stop mode, the DVD SETUP screen displays. • During playback mode, the TV MENU displays. ♦/v/d►: Press to select a desired item on the remote control to remove, then press ENTER. MP3NVMA/JPEG and...
... Program" and press ENTER. ABC lEseN -(0); OMEGTSMP 0 0 00 SHARP SETUP: Press to open or close the menu screen. • During stop mode, the DVD SETUP screen displays. • During playback mode, the TV MENU displays. ♦/v/d►: Press to select a desired item on the remote control to remove, then press ENTER. MP3NVMA/JPEG and...

LC-19DV24U Operation Manual
Page 34
... follows the "Reading" screen will appear. • If you input a wrong number, press CANCEL. 3 Then press ENTER. While holding 7 down on the remote control and at the same time press STOP on the screen. The parental level list will change the parental level. • Depending on the DVD disc... SETUP to return to the normal screen. • After the rating is ejected, the original rating level will not work. Press EJECT to remember this TV/DVD. Select "Parental", then press ► or ENTER. "Enter Password" screen will appear. Then press ENTER. Be sure to remove the disc. ...
... follows the "Reading" screen will appear. • If you input a wrong number, press CANCEL. 3 Then press ENTER. While holding 7 down on the remote control and at the same time press STOP on the screen. The parental level list will change the parental level. • Depending on the DVD disc... SETUP to return to the normal screen. • After the rating is ejected, the original rating level will not work. Press EJECT to remember this TV/DVD. Select "Parental", then press ► or ENTER. "Enter Password" screen will appear. Then press ENTER. Be sure to remove the disc. ...

LC-19DV24U Operation Manual
Page 36
.... Cautions regarding use in high and low temperature environments • When the unit Is used in temperature. Troubleshooting-Digital broadcasting The example of the LCD TV set are matched.(See page 24.) • Some software prohibit video playback on a screen • Digital channel signal strength is low •... Is the volume too low? (See page 12.) • Have you pressed POWER on the remote control unit. (See page 15.) It the indicator on the TV/DVD does not light up, press POWER on the TV/DVD. • Is the AC cord disconnected? (See page 8.) • Has the power been...
.... Cautions regarding use in high and low temperature environments • When the unit Is used in temperature. Troubleshooting-Digital broadcasting The example of the LCD TV set are matched.(See page 24.) • Some software prohibit video playback on a screen • Digital channel signal strength is low •... Is the volume too low? (See page 12.) • Have you pressed POWER on the remote control unit. (See page 15.) It the indicator on the TV/DVD does not light up, press POWER on the TV/DVD. • Is the AC cord disconnected? (See page 8.) • Has the power been...

LC-19DV24U Operation Manual
Page 37
cannot be dirty. on the TV/DVD and press 0 on the remote control simultaneously for several minutes, then replug it in the special playback mode. (See page 26.) • Select the correct Audio Output position on AV amplifier. &#... display. • Select Display to On. (See page 31.) • No surround sound. • The setup does not match your stereo system. • The TV/DVD or remote operation key is not functioning. • Playback does not start . • No picture. • No sound. • Picture is • As a precautionary measure, make...
cannot be dirty. on the TV/DVD and press 0 on the remote control simultaneously for several minutes, then replug it in the special playback mode. (See page 26.) • Select the correct Audio Output position on AV amplifier. &#... display. • Select Display to On. (See page 31.) • No surround sound. • The setup does not match your stereo system. • The TV/DVD or remote operation key is not functioning. • Playback does not start . • No picture. • No sound. • Picture is • As a precautionary measure, make...

LC-19DV24U Operation Manual
Page 40
...tear. (I) Any damage caused by Sharp and no other than Sharp, Sharp's Authorized Service Centres or Sharp's Authorized Servicing Dealers. (c) Damage caused or repairs required as a result of the product Including but not limited to earphones, remote controls, AC adapters, batteries, temperature probe... loss of lime or use of abusive operation, negligence, accident. Visit our Web site: www.sharp.ca ,ostmeek. WARRANTY PERIODS: Audio Product Camcorder DVD Product Projector LCD TV Microwave Oven Air Purifier Portable Air Conditioner Parts & Labour (exceptions noted) 1 year 1 year ...
...tear. (I) Any damage caused by Sharp and no other than Sharp, Sharp's Authorized Service Centres or Sharp's Authorized Servicing Dealers. (c) Damage caused or repairs required as a result of the product Including but not limited to earphones, remote controls, AC adapters, batteries, temperature probe... loss of lime or use of abusive operation, negligence, accident. Visit our Web site: www.sharp.ca ,ostmeek. WARRANTY PERIODS: Audio Product Camcorder DVD Product Projector LCD TV Microwave Oven Air Purifier Portable Air Conditioner Parts & Labour (exceptions noted) 1 year 1 year ...


