Operation Manual
Page 9
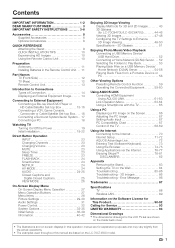
...LIMITED WARRANTY 93 Dimensional Drawings • The dimensional drawings for the LCD TV set are shown on the inside back cover. • The illustrations and ... 32 System Options 33-35 Initial Setup 36-39 Information 40-42 Enjoying 3D Image Viewing Display Methods for 3D and 2D Images 43... - Contents IMPORTANT INFORMATION 1-2 DEAR SHARP CUSTOMER 3 IMPORTANT SAFETY INSTRUCTIONS 3-6 Accessories 8 Supplied Accessories 8 Optional Accessories 8 QUICK REFERENCE Attaching the Stand 9 QUICK INSTALLATION TIPS 10 Experiencing ...Removing the Stand 83 Setting the TV on the LC-70C7450U model. 7
...LIMITED WARRANTY 93 Dimensional Drawings • The dimensional drawings for the LCD TV set are shown on the inside back cover. • The illustrations and ... 32 System Options 33-35 Initial Setup 36-39 Information 40-42 Enjoying 3D Image Viewing Display Methods for 3D and 2D Images 43... - Contents IMPORTANT INFORMATION 1-2 DEAR SHARP CUSTOMER 3 IMPORTANT SAFETY INSTRUCTIONS 3-6 Accessories 8 Supplied Accessories 8 Optional Accessories 8 QUICK REFERENCE Attaching the Stand 9 QUICK INSTALLATION TIPS 10 Experiencing ...Removing the Stand 83 Setting the TV on the LC-70C7450U model. 7
Operation Manual
Page 11
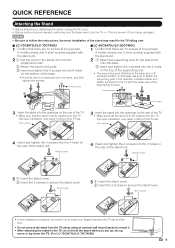
... Improper installation may result in tilting of the TV set . Middle screws 5 1 Insert the stand cover. 2 Insert the 2 screws to the TV, do not hold the stand when you put up, set and the floor. • Do not remove the stand from the TV unless using an optional wall mount bracket to ...Insert and tighten the 6 screws into the 6 holes on the bottom of the base. • Hold the stand unit securely with one hand, and then tighten the screws. 3 Long screws 2 1 1 FRONT ■ LC-60C8470U/LC-60C7450U 1 Confirm that there are 10 screws (4 long screws, 4 middle screws and 2 short ...
... Improper installation may result in tilting of the TV set . Middle screws 5 1 Insert the stand cover. 2 Insert the 2 screws to the TV, do not hold the stand when you put up, set and the floor. • Do not remove the stand from the TV unless using an optional wall mount bracket to ...Insert and tighten the 6 screws into the 6 holes on the bottom of the base. • Hold the stand unit securely with one hand, and then tighten the screws. 3 Long screws 2 1 1 FRONT ■ LC-60C8470U/LC-60C7450U 1 Confirm that there are 10 screws (4 long screws, 4 middle screws and 2 short ...
Operation Manual
Page 85
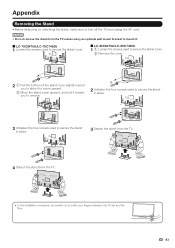
...;ngers between the TV set and the floor. 83 CAUTION • Do not remove the stand from the TV unless using an optional wall mount bracket to mount it. ■ LC-70C8470U/LC-70C7450U 1 Loosen the screws used to secure the stand cover. ■ LC-60C8470U/LC-60C7450U 1 1 Loosen... the screws used to secure the stand cover. 2 Remove the cover. 2 2 1 ...
...;ngers between the TV set and the floor. 83 CAUTION • Do not remove the stand from the TV unless using an optional wall mount bracket to mount it. ■ LC-70C8470U/LC-70C7450U 1 Loosen the screws used to secure the stand cover. ■ LC-60C8470U/LC-60C7450U 1 1 Loosen... the screws used to secure the stand cover. 2 Remove the cover. 2 2 1 ...


