Operation Manual
Page 8
...Doing so may damage the glass section, which may result in the hinge section of a 3D compatible SHARP TV when recharging. Any dust or other fluids to battery damage. Viewing 3D images • If you experience dizziness, nausea, or other devices may lead to come into... damage the coating. • When cleaning the 3D Glasses, take care not to a USB terminal of small children. IMPORTANT SAFETY INSTRUCTIONS 3D Glasses Prevention of accidental ingestion • Keep the accessory out of the reach of a 3D compatible SHARP TV for this product. If a child accidentally swallows...
...Doing so may damage the glass section, which may result in the hinge section of a 3D compatible SHARP TV when recharging. Any dust or other fluids to battery damage. Viewing 3D images • If you experience dizziness, nausea, or other devices may lead to come into... damage the coating. • When cleaning the 3D Glasses, take care not to a USB terminal of small children. IMPORTANT SAFETY INSTRUCTIONS 3D Glasses Prevention of accidental ingestion • Keep the accessory out of the reach of a 3D compatible SHARP TV for this product. If a child accidentally swallows...

Operation Manual
Page 9
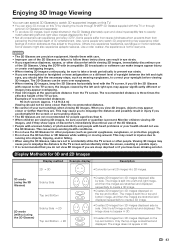
...drawings for the LCD TV set are for 3D and 2D Images 43 3D Glasses 44-46 Viewing 3D Images 47-48 Configuring the TV Settings to Enhance 3D Image Viewing 48-50 Specifications - 3D Glasses 51 Enjoying Photo/Music/Video Playback Connecting... 32 System Options 33-35 Initial Setup 36-39 Information 40-42 Enjoying 3D Image Viewing Display Methods for explanation purposes and may vary slightly from the actual operations. 7 Contents IMPORTANT INFORMATION 1-2 DEAR SHARP CUSTOMER 3 IMPORTANT SAFETY INSTRUCTIONS 3-6 Accessories 8 Supplied Accessories 8 Optional Accessories...
...drawings for the LCD TV set are for 3D and 2D Images 43 3D Glasses 44-46 Viewing 3D Images 47-48 Configuring the TV Settings to Enhance 3D Image Viewing 48-50 Specifications - 3D Glasses 51 Enjoying Photo/Music/Video Playback Connecting... 32 System Options 33-35 Initial Setup 36-39 Information 40-42 Enjoying 3D Image Viewing Display Methods for explanation purposes and may vary slightly from the actual operations. 7 Contents IMPORTANT INFORMATION 1-2 DEAR SHARP CUSTOMER 3 IMPORTANT SAFETY INSTRUCTIONS 3-6 Accessories 8 Supplied Accessories 8 Optional Accessories...
Operation Manual
Page 10
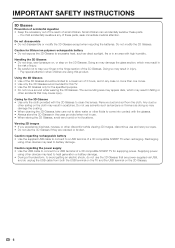
... be available in the near future. Remote control unit (x1) "AAA" size battery (x2) Stand unit (x1) Page 10 AC cord (x1) Page 11 3D Glasses (x2) Page 9 Operation manual (x1) Page 10 Connection guide (x1) See pages 44 to 46 for details of the... the AC cord supplied with the product. When purchasing, please read the newest catalogue for compatibility and check the availability. 8 Part name Model number 3D Glasses AN-3DG20 Accessories Supplied Accessories Make sure the following accessories are provided with the TV. • The illustrations above are available for the Liquid...
... be available in the near future. Remote control unit (x1) "AAA" size battery (x2) Stand unit (x1) Page 10 AC cord (x1) Page 11 3D Glasses (x2) Page 9 Operation manual (x1) Page 10 Connection guide (x1) See pages 44 to 46 for details of the... the AC cord supplied with the product. When purchasing, please read the newest catalogue for compatibility and check the availability. 8 Part name Model number 3D Glasses AN-3DG20 Accessories Supplied Accessories Make sure the following accessories are provided with the TV. • The illustrations above are available for the Liquid...
Operation Manual
Page 14
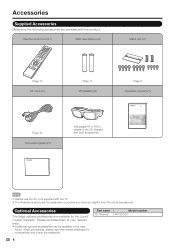
... and 62.) HDMI 2 terminal HDMI 3 terminal HDMI 4 terminal MHL: Mobile High-Definition Link (See page 65.) 12 When the TV is in 3D mode, the emitter may look reddish. *3 OPC: Optical Picture Control (See page 29.) TV (Rear) *1 RS-232C terminal PC IN terminal VIDEO 2 terminals... emitter on the TV and the infrared receiver on the Audio Select function. Part Names TV (Front/Side) *1 POWER button MENU button INPUT button 3D infrared emitter *2 Channel buttons (CHU/V) Volume buttons (VOLk/l) OPC sensor *3 Remote control sensor Center Icon illumination (See page 35.) *1 See pages ...
... and 62.) HDMI 2 terminal HDMI 3 terminal HDMI 4 terminal MHL: Mobile High-Definition Link (See page 65.) 12 When the TV is in 3D mode, the emitter may look reddish. *3 OPC: Optical Picture Control (See page 29.) TV (Rear) *1 RS-232C terminal PC IN terminal VIDEO 2 terminals... emitter on the TV and the infrared receiver on the Audio Select function. Part Names TV (Front/Side) *1 POWER button MENU button INPUT button 3D infrared emitter *2 Channel buttons (CHU/V) Volume buttons (VOLk/l) OPC sensor *3 Remote control sensor Center Icon illumination (See page 35.) *1 See pages ...
Operation Manual
Page 15
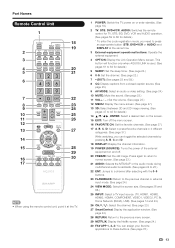
...: Mute the sound. (See page 23.) 11 VOLk/l: Set the volume. (See page 23.) 12 MENU: Display the menu screen. (See page 27.) 13 3D: Select between 3D and 2D image viewing. (See pages 47 to 48 for details.) 14 a/b/c/d, ENTER: Select a desired item on or enter standby. (See page 19.) 2 TV...
...: Mute the sound. (See page 23.) 11 VOLk/l: Set the volume. (See page 23.) 12 MENU: Display the menu screen. (See page 27.) 13 3D: Select between 3D and 2D image viewing. (See pages 47 to 48 for details.) 14 a/b/c/d, ENTER: Select a desired item on or enter standby. (See page 19.) 2 TV...
Operation Manual
Page 22
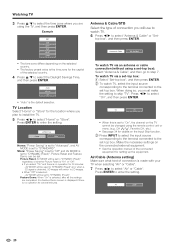
... Cable 20 Antenna & Cable Set-top box • The time zone differs depending on the TV cannot be reset to "DYNAMIC (Fixed)" and, when a 3D signal is detected, 3D images will switch to 2D images. • When "Off" is set to "On", the channel on the selected country. • The factory preset...
... Cable 20 Antenna & Cable Set-top box • The time zone differs depending on the TV cannot be reset to "DYNAMIC (Fixed)" and, when a 3D signal is detected, 3D images will switch to 2D images. • When "Off" is set to "On", the channel on the selected country. • The factory preset...

Operation Manual
Page 28
... aspect ratio in programs to see noise or bars around different outer portions of the screen. screen. Suitable for viewing widescreen 2.35:1 anamorphic DVDs in 3D mode. ■ For HD programs Stretch Dot by an original size. 26 Direct Button Operation VIEW MODE You can select the screen size. 1 Press VIEW...
... aspect ratio in programs to see noise or bars around different outer portions of the screen. screen. Suitable for viewing widescreen 2.35:1 anamorphic DVDs in 3D mode. ■ For HD programs Stretch Dot by an original size. 26 Direct Button Operation VIEW MODE You can select the screen size. 1 Press VIEW...
Operation Manual
Page 30
...48 OPC Page 29 Backlight Page 29 Contrast Page 29 Brightness Page 29 Color Page 29 Tint Page 29 Sharpness Page 29 Advanced Pages 29-30 C.M.S.-Hue Page 29 C.M.S.-Saturation Page 29 C.M.S.-Value Page 29 Color Temp...Page 29 Audio Settings Auto Volume Page 31 Treble Page 31 Bass Page 31 Balance Page 31 3D Surround Page 31 Bass Enhancer Page 31 Clear Voice Page 31 Reset Page 31 Power Control Audio...Panel Page 57 View Mode Page 33 Freeze Page 33 Change Audio Page 33 Change CC Page 33 3D Setup Page 49 AQUOS LINK Setup Page 62 Terminal Setting Pages 33-34, 67 Audio Setup Page ...
...48 OPC Page 29 Backlight Page 29 Contrast Page 29 Brightness Page 29 Color Page 29 Tint Page 29 Sharpness Page 29 Advanced Pages 29-30 C.M.S.-Hue Page 29 C.M.S.-Saturation Page 29 C.M.S.-Value Page 29 Color Temp...Page 29 Audio Settings Auto Volume Page 31 Treble Page 31 Bass Page 31 Balance Page 31 3D Surround Page 31 Bass Enhancer Page 31 Clear Voice Page 31 Reset Page 31 Power Control Audio...Panel Page 57 View Mode Page 33 Freeze Page 33 Change Audio Page 33 Change CC Page 33 3D Setup Page 49 AQUOS LINK Setup Page 62 Terminal Setting Pages 33-34, 67 Audio Setup Page ...
Operation Manual
Page 31
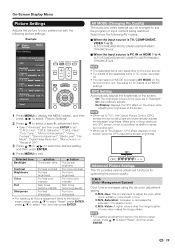
...1 or 2: AUTO/STANDARD/MOVIE/GAME/USER/DYNAMIC/ DYNAMIC(Fixed) ■ When the input source is a standard to adjust the color either more reddish or more sharpness • For resetting all adjustment items to the factory preset values, press a/b to suit the program or input content being watched. Example Picture Settings Picture... the OPC adjusts the screen brightness. OPC: OPC: Advanced Picture Settings This TV provides various advanced functions for details of the selectable items in 3D mode, see page 48. • You can be changed to select "Reset", and then press ENTER. 29
...1 or 2: AUTO/STANDARD/MOVIE/GAME/USER/DYNAMIC/ DYNAMIC(Fixed) ■ When the input source is a standard to adjust the color either more reddish or more sharpness • For resetting all adjustment items to the factory preset values, press a/b to suit the program or input content being watched. Example Picture Settings Picture... the OPC adjusts the screen brightness. OPC: OPC: Advanced Picture Settings This TV provides various advanced functions for details of the selectable items in 3D mode, see page 48. • You can be changed to select "Reset", and then press ENTER. 29

Operation Manual
Page 33
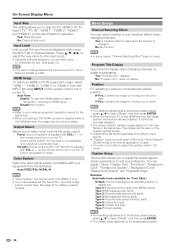
... your BD/DVD player. Example Audio Settings Audio Settings Menu Auto Volume [Off] Treble [ 0] a15 b15 Bass [ 0] a15 b15 Balance [ 0] L R 3D Surround [Off] Bass Enhancer [On] Clear Voice [Off] Reset 1 Press MENU to display the MENU screen, and then press c/d to select "Audio Settings". ...2 Press a/b to select a specific adjustment item. • Select "Auto Volume", "3D Surround", "Bass Enhancer" or "Clear Voice", and then press ENTER to set to "Variable". (See page 34.) • For resetting Audio adjustment items...
... your BD/DVD player. Example Audio Settings Audio Settings Menu Auto Volume [Off] Treble [ 0] a15 b15 Bass [ 0] a15 b15 Balance [ 0] L R 3D Surround [Off] Bass Enhancer [On] Clear Voice [Off] Reset 1 Press MENU to display the MENU screen, and then press c/d to select "Audio Settings". ...2 Press a/b to select a specific adjustment item. • Select "Auto Volume", "3D Surround", "Bass Enhancer" or "Clear Voice", and then press ENTER to set to "Variable". (See page 34.) • For resetting Audio adjustment items...

Operation Manual
Page 34
...; Skip this function may not operate. When set to keep appearing every minute. 32 Enable: The power will automatically shut down if there is in 3D mode. Power Saving This function allows you change the "Power Saving" setting from a music program, you to the left of "OPC" in order to "AUTO...
...; Skip this function may not operate. When set to keep appearing every minute. 32 Enable: The power will automatically shut down if there is in 3D mode. Power Saving This function allows you change the "Power Saving" setting from a music program, you to the left of "OPC" in order to "AUTO...
Operation Manual
Page 35
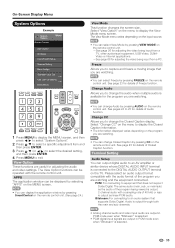
...; You can change the audio when multiple audio is selected. 33 On-Screen Display Menu System Options Example System Options System Options Menu View Option 3D Setup AQUOS LINK Setup Terminal Setting Menu Design Operation Lock Out [Off] Icon Light Up Setting [On] Demo Mode View Mode This function changes the...
...; You can change the audio when multiple audio is selected. 33 On-Screen Display Menu System Options Example System Options System Options Menu View Option 3D Setup AQUOS LINK Setup Terminal Setting Menu Design Operation Lock Out [Off] Icon Light Up Setting [On] Demo Mode View Mode This function changes the...
Operation Manual
Page 36
... the closed caption screen appearance to suit your equipment from the INPUT list using the INPUT list or channel display. Type 0: Proportional font used in 3D mode. Type 6: Cursive font type. HDMI Setup To watch an HDMI or PC IN equipment image, select "HDMI 1", "HDMI 2", "HDMI 3" or "HDMI 4" from the list...
... the closed caption screen appearance to suit your equipment from the INPUT list using the INPUT list or channel display. Type 0: Proportional font used in 3D mode. Type 6: Cursive font type. HDMI Setup To watch an HDMI or PC IN equipment image, select "HDMI 1", "HDMI 2", "HDMI 3" or "HDMI 4" from the list...

Operation Manual
Page 37
... "On", the LED on the front of the TV turns on. • The LED lights white in 2D mode. • The LED lights blue in 3D mode. • "On" is selected, a confirmation screen appears. On-Screen Display Menu Game Play Time This function displays the elapsed game time so...
... "On", the LED on the front of the TV turns on. • The LED lights white in 2D mode. • The LED lights blue in 3D mode. • "On" is selected, a confirmation screen appears. On-Screen Display Menu Game Play Time This function displays the elapsed game time so...
Operation Manual
Page 45
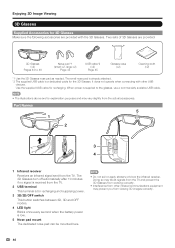
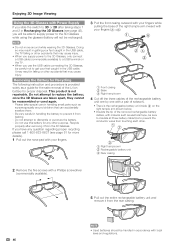
...into objects, tripping, and/or falling. • When using the 3D Glasses) Side by Side ➝ 2D Top and Bottom ➝ 2D • Creates 3D images from 3D images displayed on this TV by viewing the movie through SHARP 3D Glasses supplied with respect to the TV screen, the images viewed by... side. Viewing 3D images may cause you should not be sure a parent or guardian ...
...into objects, tripping, and/or falling. • When using the 3D Glasses) Side by Side ➝ 2D Top and Bottom ➝ 2D • Creates 3D images from 3D images displayed on this TV by viewing the movie through SHARP 3D Glasses supplied with respect to the TV screen, the images viewed by... side. Viewing 3D images may cause you should not be sure a parent or guardian ...
Operation Manual
Page 46
...×2, large ×2) Page 45 USB cable*2 (×2) Page 45 Glasses case (×2) Cleaning cloth (×2) *1 Use the 3D Glasses nose pad as needed. The 3D Glasses turn off automatically after 10 minutes if no signal is received from the actual accessories. Doing so may block signals from...the glasses, use a commercially available USB cable. • The illustrations above are for recharging and supplying power. 3 3D/2D/OFF switch This button switches between 2D, 3D and OFF modes. 4 LED light Blinks once every second when the battery power is for explanation purposes and may vary...
...×2, large ×2) Page 45 USB cable*2 (×2) Page 45 Glasses case (×2) Cleaning cloth (×2) *1 Use the 3D Glasses nose pad as needed. The 3D Glasses turn off automatically after 10 minutes if no signal is received from the actual accessories. Doing so may block signals from...the glasses, use a commercially available USB cable. • The illustrations above are for recharging and supplying power. 3 3D/2D/OFF switch This button switches between 2D, 3D and OFF modes. 4 LED light Blinks once every second when the battery power is for explanation purposes and may vary...

Operation Manual
Page 47
...Sharp Authorized Service Center. 3 After the recharge has completed, turn off the TV, and then remove the USB cable from the 3D Glasses. This is received from the TV. The 3D Glasses turn on the TV. The battery may not recharge. • When you recharge the 3D Glasses. Usage Range of the 3D... does not respond, inquire with a large and small nose pad. 1 1 2 Attaching the nose pad Removing the nose pad Using the 3D Glasses Recharging the 3D Glasses When the battery power is set the switch to OFF. • Recharge the battery within approx. 30° horizontally and 20°...
...Sharp Authorized Service Center. 3 After the recharge has completed, turn off the TV, and then remove the USB cable from the 3D Glasses. This is received from the TV. The 3D Glasses turn on the TV. The battery may not recharge. • When you recharge the 3D Glasses. Usage Range of the 3D... does not respond, inquire with a large and small nose pad. 1 1 2 Attaching the nose pad Removing the nose pad Using the 3D Glasses Recharging the 3D Glasses When the battery power is set the switch to OFF. • Recharge the battery within approx. 30° horizontally and 20°...
Operation Manual
Page 48
...the Battery for any question regarding proper recycling please call 1-800-822-8837 (see page 45), you will be able to supply power to the 3D Glasses while using the glasses (battery will not be recharged). 3 Pull the front casing outward with your fingers while pulling the base of ... them. - Do not attempt to replace the battery; Doing so may cause injury. Do not attempt to dismantle or puncture the battery. - once the 3D Glasses are taken apart, they cannot be reassembled or used again. - Please take special care in handling small parts such as electrical tape, be sure...
...the Battery for any question regarding proper recycling please call 1-800-822-8837 (see page 45), you will be able to supply power to the 3D Glasses while using the glasses (battery will not be recharged). 3 Pull the front casing outward with your fingers while pulling the base of ... them. - Do not attempt to replace the battery; Doing so may cause injury. Do not attempt to dismantle or puncture the battery. - once the 3D Glasses are taken apart, they cannot be reassembled or used again. - Please take special care in handling small parts such as electrical tape, be sure...

Operation Manual
Page 49
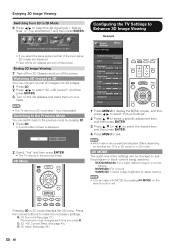
... to detect a 3D image signal and when switching from 3D to 2D Mode 4 Press 3D during the 3D mode. Enjoying 3D Image Viewing Viewing 3D Images Switching from 3D to 2D mode. You can now view 3D images. 47 If you to select between 3D and 2D image viewing. 3D 2D 3D When "3D Auto Change" is... set to 3D mode. Changed to "...
... to detect a 3D image signal and when switching from 3D to 2D Mode 4 Press 3D during the 3D mode. Enjoying 3D Image Viewing Viewing 3D Images Switching from 3D to 2D mode. You can now view 3D images. 47 If you to select between 3D and 2D image viewing. 3D 2D 3D When "3D Auto Change" is... set to 3D mode. Changed to "...
Operation Manual
Page 50
...] OPC [On:Display] Backlight [ b5] a16 b16 Contrast [b30] 0 b40 Brightness [ 0] a30 b30 Color [ b2] a30 b30 Tint [ 0] a30 b30 Sharpness [ b2] a10 b10 Advanced Reset • The TV returns to make the necessary settings. B: 3D Surround (See page 31.) The surround mode changes each other. • If you press B. C: 2D➝...
...] OPC [On:Display] Backlight [ b5] a16 b16 Contrast [b30] 0 b40 Brightness [ 0] a30 b30 Color [ b2] a30 b30 Tint [ 0] a30 b30 Sharpness [ b2] a10 b10 Advanced Reset • The TV returns to make the necessary settings. B: 3D Surround (See page 31.) The surround mode changes each other. • If you press B. C: 2D➝...


