
Operation Manual
Page 9
Contents IMPORTANT INFORMATION 1-2 DEAR SHARP CUSTOMER 3 IMPORTANT SAFETY INSTRUCTIONS 3-6 Accessories 8 Supplied Accessories 8 Optional Accessories 8 QUICK REFERENCE Attaching the Stand 9 QUICK INSTALLATION TIPS 10 Experiencing HD Images 10 Using the Remote ... Audio Input 67 PC Compatibility Chart 67 Control of the TV 68-69 Using the Internet Connecting to the Internet 70 Internet Setup 71-72 AQUOS Advantage Live 72 Entering Text (Software Keyboard 73 Using the Browser 74-75 Using Applications via the Internet 76-77 Enjoying Skype 78-81 DISCLAIMERS...
Contents IMPORTANT INFORMATION 1-2 DEAR SHARP CUSTOMER 3 IMPORTANT SAFETY INSTRUCTIONS 3-6 Accessories 8 Supplied Accessories 8 Optional Accessories 8 QUICK REFERENCE Attaching the Stand 9 QUICK INSTALLATION TIPS 10 Experiencing HD Images 10 Using the Remote ... Audio Input 67 PC Compatibility Chart 67 Control of the TV 68-69 Using the Internet Connecting to the Internet 70 Internet Setup 71-72 AQUOS Advantage Live 72 Entering Text (Software Keyboard 73 Using the Browser 74-75 Using Applications via the Internet 76-77 Enjoying Skype 78-81 DISCLAIMERS...
Operation Manual
Page 15
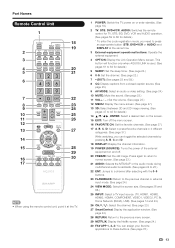
... the power of the external equipment on the screen. 15 EXIT: Turn off . 20 FREEZE: Set the still image. This button will function only when AQUOS LINK is used. (See pages 61 to 64 for details.) 5 SLEEP: Set the sleep timer. (See page 23.) 6 0-9: Set the channel. (See page 23.) 7 •...
... the power of the external equipment on the screen. 15 EXIT: Turn off . 20 FREEZE: Set the still image. This button will function only when AQUOS LINK is used. (See pages 61 to 64 for details.) 5 SLEEP: Set the sleep timer. (See page 23.) 6 0-9: Set the channel. (See page 23.) 7 •...
Operation Manual
Page 30
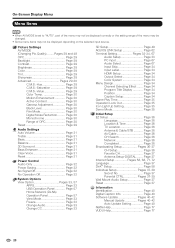
... Network (DLNA) Operation Panel Page 57 View Mode Page 33 Freeze Page 33 Change Audio Page 33 Change CC Page 33 3D Setup Page 49 AQUOS LINK Setup Page 62 Terminal Setting Pages 33-34, 67 Audio Setup Page 33 PC input Page 67 Audio Select Page 67 Input Skip Page... (Changing Pic.Quality) ........Pages 29 and 48 OPC Page 29 Backlight Page 29 Contrast Page 29 Brightness Page 29 Color Page 29 Tint Page 29 Sharpness Page 29 Advanced Pages 29-30 C.M.S.-Hue Page 29 C.M.S.-Saturation Page 29 C.M.S.-Value Page 29 Color Temp Page 30 Motion Enhancement Page 30 Active Contrast...
... Network (DLNA) Operation Panel Page 57 View Mode Page 33 Freeze Page 33 Change Audio Page 33 Change CC Page 33 3D Setup Page 49 AQUOS LINK Setup Page 62 Terminal Setting Pages 33-34, 67 Audio Setup Page 33 PC input Page 67 Audio Select Page 67 Input Skip Page... (Changing Pic.Quality) ........Pages 29 and 48 OPC Page 29 Backlight Page 29 Contrast Page 29 Brightness Page 29 Color Page 29 Tint Page 29 Sharpness Page 29 Advanced Pages 29-30 C.M.S.-Hue Page 29 C.M.S.-Saturation Page 29 C.M.S.-Value Page 29 Color Temp Page 30 Motion Enhancement Page 30 Active Contrast...
Operation Manual
Page 35
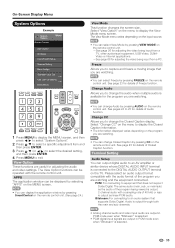
... Digital. See page 25 for details of Freeze function. On-Screen Display Menu System Options Example System Options System Options Menu View Option 3D Setup AQUOS LINK Setup Terminal Setting Menu Design Operation Lock Out [Off] Icon Light Up Setting [On] Demo Mode View Mode This function changes the screen size...
... Digital. See page 25 for details of Freeze function. On-Screen Display Menu System Options Example System Options System Options Menu View Option 3D Setup AQUOS LINK Setup Terminal Setting Menu Design Operation Lock Out [Off] Icon Light Up Setting [On] Demo Mode View Mode This function changes the screen size...

Operation Manual
Page 51
..., such as video from a connected device or video from a VOD service or HDMI-connected equipment. Example System Options System Options Menu View Option 3D Setup AQUOS LINK Setup Terminal Setting 1 Press MENU to display the MENU screen, and then press c/d to select "System Options". 2 Press a/b to select "3D Setup", and then...
..., such as video from a connected device or video from a VOD service or HDMI-connected equipment. Example System Options System Options Menu View Option 3D Setup AQUOS LINK Setup Terminal Setting 1 Press MENU to display the MENU screen, and then press c/d to select "System Options". 2 Press a/b to select "3D Setup", and then...

Operation Manual
Page 63
...and plays back the image from the HDMI source. ■ One Touch Recording Press (REC while you are viewing a broadcast received with the AQUOS LINK-compatible recorder. Make sure to use commercially available cables. • Point the remote control toward the TV, not to connect ARC-compatible ...equipment. The OPTION button will function only when AQUOS LINK is an example of the AQUOS LINK function. • The steps in standby mode, it automatically turns on the equipment and select the appropriate input source...
...and plays back the image from the HDMI source. ■ One Touch Recording Press (REC while you are viewing a broadcast received with the AQUOS LINK-compatible recorder. Make sure to use commercially available cables. • Point the remote control toward the TV, not to connect ARC-compatible ...equipment. The OPTION button will function only when AQUOS LINK is an example of the AQUOS LINK function. • The steps in standby mode, it automatically turns on the equipment and select the appropriate input source...
Operation Manual
Page 64
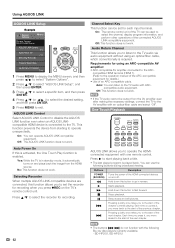
.... 8 Pressing quickly once takes you to operate the HDMIconnected equipment with ARCcompatible audio equipment. Using AQUOS LINK AQUOS LINK Setup Example System Options Menu System Options AQUOS LINK Setup AQUOS LINK Control [On] Auto Power On [Yes] Selecting Recorder Channel Select Key Audio Return Channel ...[Auto] 1 Press MENU to display the MENU screen, and then press c/d to select "System Options". 2 Press a/b to select "AQUOS LINK Setup", and then press ENTER. 3 Press a/b to select a specific item, and then press ENTER. 4 Press a/b (or c/d ) to...
.... 8 Pressing quickly once takes you to operate the HDMIconnected equipment with ARCcompatible audio equipment. Using AQUOS LINK AQUOS LINK Setup Example System Options Menu System Options AQUOS LINK Setup AQUOS LINK Control [On] Auto Power On [Yes] Selecting Recorder Channel Select Key Audio Return Channel ...[Auto] 1 Press MENU to display the MENU screen, and then press c/d to select "System Options". 2 Press a/b to select "AQUOS LINK Setup", and then press ENTER. 3 Press a/b to select a specific item, and then press ENTER. 4 Press a/b (or c/d ) to...

Operation Manual
Page 65
.... 1 Press OPTION to display the Link Operation Menu screen. 2 Press a/b to select "Stop Recording", and then press ENTER. Prepare the connected AQUOS LINK-compatible recorder for recording on the recording media (HDD, DVD, etc.). • On the TV, use the Link Operation Menu for recording.... items. • Make sure that the antenna cable is connected. • Check that there is sufficient available space on the connected AQUOS LINK-compatible equipment. 1 Press OPTION to display the Link Operation Menu screen. 2 Select "Start Recording", and then press ENTER to start recording....
.... 1 Press OPTION to display the Link Operation Menu screen. 2 Press a/b to select "Stop Recording", and then press ENTER. Prepare the connected AQUOS LINK-compatible recorder for recording on the recording media (HDD, DVD, etc.). • On the TV, use the Link Operation Menu for recording.... items. • Make sure that the antenna cable is connected. • Check that there is sufficient available space on the connected AQUOS LINK-compatible equipment. 1 Press OPTION to display the Link Operation Menu screen. 2 Select "Start Recording", and then press ENTER to start recording....
Operation Manual
Page 66
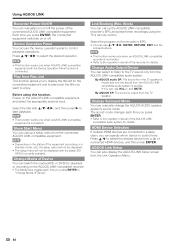
.... • The setup menu will not be displayed with a/b/c/d, and then press d to start playback. • This function works only when AQUOS LINK-compatible equipment is connected. Change Media of Device". Change Surround Mode You can use a/b/c/d, ENTER, RETURN, EXIT and the colored buttons. •...; This function works only when an AQUOS LINK-compatible recorder is output from a list of the equipment (recording or in "Change Media of Device You can switch the media (HDD...
.... • The setup menu will not be displayed with a/b/c/d, and then press d to start playback. • This function works only when AQUOS LINK-compatible equipment is connected. Change Media of Device". Change Surround Mode You can use a/b/c/d, ENTER, RETURN, EXIT and the colored buttons. •...; This function works only when an AQUOS LINK-compatible recorder is output from a list of the equipment (recording or in "Change Media of Device You can switch the media (HDD...

Operation Manual
Page 67
... Input Selection When an MHL-compatible device is connected while the TV is on, the input mode is selected automatically. • This function operates when "AQUOS LINK Control" is required to operate a portable device. • a/b/c/d, ENTER, EXIT, 0-9, • (DOT), ENT, etc. • The operations vary ...depending on a large screen. • You can play back music files. Using AQUOS LINK Using a Smartphone with the TV This function enables you to connect the TV to use this function. To connect the TV to your MHL...
... Input Selection When an MHL-compatible device is connected while the TV is on, the input mode is selected automatically. • This function operates when "AQUOS LINK Control" is required to operate a portable device. • a/b/c/d, ENTER, EXIT, 0-9, • (DOT), ENT, etc. • The operations vary ...depending on a large screen. • You can play back music files. Using AQUOS LINK Using a Smartphone with the TV This function enables you to connect the TV to use this function. To connect the TV to your MHL...

Operation Manual
Page 69
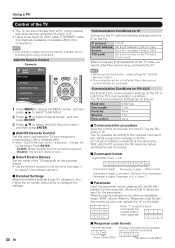
... position-setting screen. PC Compatibility Chart It is needed to optimize the image. Using a PC Example System Options Menu System Options View Option 3D Setup AQUOS LINK Setup Terminal Setting Menu Design O ti L k O t 1 Press MENU to display the MENU screen, and then press c/d to select "System Options". 2 Press a/b to select "Terminal...
... position-setting screen. PC Compatibility Chart It is needed to optimize the image. Using a PC Example System Options Menu System Options View Option 3D Setup AQUOS LINK Setup Terminal Setting Menu Design O ti L k O t 1 Press MENU to display the MENU screen, and then press c/d to select "System Options". 2 Press a/b to select "Terminal...
Operation Manual
Page 70
...procedure Send the control commands from equipment connected by a person who is accustomed to select "AQUOS Remote Control", and then press ENTER. ■ AQUOS Remote Control Set this function, make settings for "AQUOS Remote Control". • The connection will be cut off when there has been no ... Communication Conditions for IP on the TV menu, you need to the TV. • When you set the name. Press ENTER. AQUOS Remote Control Example Initial Setup Initial Setup Menu EZ Setup Broadcasting Setup Internet Setup Language DivX ® Setup [English] 1 Press MENU to...
...procedure Send the control commands from equipment connected by a person who is accustomed to select "AQUOS Remote Control", and then press ENTER. ■ AQUOS Remote Control Set this function, make settings for "AQUOS Remote Control". • The connection will be cut off when there has been no ... Communication Conditions for IP on the TV menu, you need to the TV. • When you set the name. Press ENTER. AQUOS Remote Control Example Initial Setup Initial Setup Menu EZ Setup Broadcasting Setup Internet Setup Language DivX ® Setup [English] 1 Press MENU to...
Operation Manual
Page 72
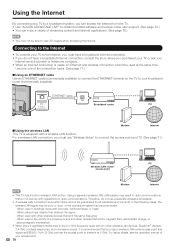
... 71.) PC Wireless LAN router/ access point Modem Internet • This TV has a built-in the 2.4-GHz frequency (such as from the TV. • Use "AQUOS ADVANTAGE LIVE" to obtain the latest software and receive online user support. (See page 72.) • You can access the Internet from other wireless devices...
... 71.) PC Wireless LAN router/ access point Modem Internet • This TV has a built-in the 2.4-GHz frequency (such as from the TV. • Use "AQUOS ADVANTAGE LIVE" to obtain the latest software and receive online user support. (See page 72.) • You can access the Internet from other wireless devices...
Operation Manual
Page 74
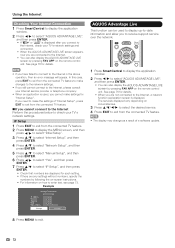
... to enter text, see page 73. Using the Internet Checking Your Internet Connection 1 Press SmartCentral to display the application window. 2 Press c/d to select "AQUOS ADVANTAGE LIVE", and then press ENTER. • If " " or " " is displayed. In this case, press EXIT to exit from the connected TV...If you cannot connect to the Internet Perform the procedures below to check your TV's network settings and connection. • When the AQUOS ADVANTAGE LIVE screen appears, now you to receive support service over the network. 1 Press SmartCentral to display the application window. 2 Press c/d ...
... to enter text, see page 73. Using the Internet Checking Your Internet Connection 1 Press SmartCentral to display the application window. 2 Press c/d to select "AQUOS ADVANTAGE LIVE", and then press ENTER. • If " " or " " is displayed. In this case, press EXIT to exit from the connected TV...If you cannot connect to the Internet Perform the procedures below to check your TV's network settings and connection. • When the AQUOS ADVANTAGE LIVE screen appears, now you to receive support service over the network. 1 Press SmartCentral to display the application window. 2 Press c/d ...
Operation Manual
Page 76
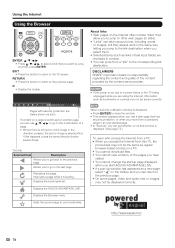
... on a page is continued on another page, you can use a/b/c/d to go to the next page. D • Display the toolbar. DISCLAIMERS SHARP corporation bears no responsibility regarding the content and quality of the content provided by the content serve provider. Using the Internet Using the Browser ENTER... files. • You cannot view a history of the pages you have visited. • You cannot change the startup page displayed when you start AQUOS ADVANTAGE LIVE. • If a pop-up window has appeared as a new page, select " " on the Internet often include "links" that you want...
... on a page is continued on another page, you can use a/b/c/d to go to the next page. D • Display the toolbar. DISCLAIMERS SHARP corporation bears no responsibility regarding the content and quality of the content provided by the content serve provider. Using the Internet Using the Browser ENTER... files. • You cannot view a history of the pages you have visited. • You cannot change the startup page displayed when you start AQUOS ADVANTAGE LIVE. • If a pop-up window has appeared as a new page, select " " on the Internet often include "links" that you want...
Operation Manual
Page 88
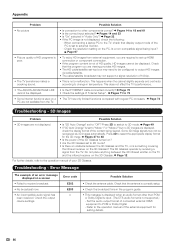
... according to receive broadcast. • No broadcast now. • An incompatible audio signal has been received. This does not affect the TV's performance. • The AQUOS ADVANTAGE LIVE • Is the ETHERNET cable connected correctly? Page 74 PC are displayed, check the display format of the external equipment for the 3D...
... according to receive broadcast. • No broadcast now. • An incompatible audio signal has been received. This does not affect the TV's performance. • The AQUOS ADVANTAGE LIVE • Is the ETHERNET cable connected correctly? Page 74 PC are displayed, check the display format of the external equipment for the 3D...


