Operation Manual
Page 2
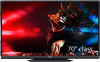
....skype.com (for the operation manual) • http://freetalk.me /product/sharp/ (para obtener más información sobre la cámara de comunicación) • http://www.skype.com (para conocer detalles de Skype) Skype™ is supported by this TV set. For details, refer to the following: • http://www.sharpusa.com...
....skype.com (for the operation manual) • http://freetalk.me /product/sharp/ (para obtener más información sobre la cámara de comunicación) • http://www.skype.com (para conocer detalles de Skype) Skype™ is supported by this TV set. For details, refer to the following: • http://www.sharpusa.com...
Operation Manual
Page 3
...Operation is no guarantee that the cable ground shall be installed and operated with FCC radiation exposure limits set forth for compliance could void the user's authority to the following two conditions: (1) This device may ... installation. Selection of the TV. DECLARATION OF CONFORMITY: SHARP LIQUID CRYSTAL TELEVISION, MODEL LC-80LE857U/LC-70LE857U/LC-60LE857U/ LC-80LE757U/LC-70LE757U/LC-60LE757U/LC-70LE755U/LC-60LE755U/LC-80LE657U/ LC-70LE657U/LC-60LE657U/LC-80LE650U/LC-70LE650U/LC-60LE650U/LC-70C7500U/ LC-60C7500U/LC-80C6500U/LC-70C6500U/LC-60C6500U This device complies with...
...Operation is no guarantee that the cable ground shall be installed and operated with FCC radiation exposure limits set forth for compliance could void the user's authority to the following two conditions: (1) This device may ... installation. Selection of the TV. DECLARATION OF CONFORMITY: SHARP LIQUID CRYSTAL TELEVISION, MODEL LC-80LE857U/LC-70LE857U/LC-60LE857U/ LC-80LE757U/LC-70LE757U/LC-60LE757U/LC-70LE755U/LC-60LE755U/LC-80LE657U/ LC-70LE657U/LC-60LE657U/LC-80LE650U/LC-70LE650U/LC-60LE650U/LC-70C7500U/ LC-60C7500U/LC-80C6500U/LC-70C6500U/LC-60C6500U This device complies with...
Operation Manual
Page 5
... furniture that can be heavy. Approved cleaning cloths are mounting the television is appropriate. Call 1-800-BE-SHARP for the front panel • Turn off the main power and unplug the AC cord from Sharp in contact with steel studs or cinder block construction. TUNE IN TO SAFETY • ALWAYS follow the... installation if you have any type of candle or flames on the top or near the TV set. • To prevent fire or shock hazard, do not place the AC cord under the TV set or other heavy items. • Do not display a still picture for a long period of two people is...
... furniture that can be heavy. Approved cleaning cloths are mounting the television is appropriate. Call 1-800-BE-SHARP for the front panel • Turn off the main power and unplug the AC cord from Sharp in contact with steel studs or cinder block construction. TUNE IN TO SAFETY • ALWAYS follow the... installation if you have any type of candle or flames on the top or near the TV set. • To prevent fire or shock hazard, do not place the AC cord under the TV set or other heavy items. • Do not display a still picture for a long period of two people is...
Operation Manual
Page 7
Contents IMPORTANT INFORMATION 1 DEAR SHARP CUSTOMER 2 IMPORTANT SAFETY INSTRUCTIONS 2-4 Accessories 4 Supplied ...3D and 2D Images . . . . 31 Viewing 3D Images 31-32 Configuring the TV Settings to Enhance 3D Image Viewing 32-33 Enjoying Photo/Music/Video Playback Connecting a USB Memory Device/ USB...TV 42-43 PC Compatibility Chart 43 Using the Internet Connecting to Play Back 34 Playing Back Files on a USB Memory Device/ Home Network (DLNA) Server 35-37 Playing Back Files from the actual operations. • The examples used throughout this operation manual are based on the LC...
Contents IMPORTANT INFORMATION 1 DEAR SHARP CUSTOMER 2 IMPORTANT SAFETY INSTRUCTIONS 2-4 Accessories 4 Supplied ...3D and 2D Images . . . . 31 Viewing 3D Images 31-32 Configuring the TV Settings to Enhance 3D Image Viewing 32-33 Enjoying Photo/Music/Video Playback Connecting a USB Memory Device/ USB...TV 42-43 PC Compatibility Chart 43 Using the Internet Connecting to Play Back 34 Playing Back Files on a USB Memory Device/ Home Network (DLNA) Server 35-37 Playing Back Files from the actual operations. • The examples used throughout this operation manual are based on the LC...

Operation Manual
Page 8
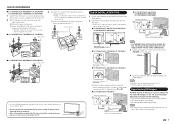
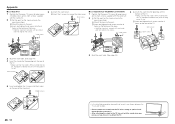
.... Middle screws 6 This will prevent it from being damaged. NOTE • Refer to pages 49 and 50 for the instructions on the rear of the TV set . Middle screws Long screws 5 1 Insert the stand cover. 2 Insert the screw to the post. 3 Insert and tighten the 6 screws into the 6 holes...with the stand unit. 2 1 Set the post for the stand unit onto the base as shown below and attach the stand to the base at an offcentered location on the rear of the stand unit. Soft cushion ■ LC-70LE757U/LC-60LE757U/LC-70LE755U/ LC-60LE755U/LC-70C7500U/LC-60C7500U 1 Confirm that ...
.... Middle screws 6 This will prevent it from being damaged. NOTE • Refer to pages 49 and 50 for the instructions on the rear of the TV set . Middle screws Long screws 5 1 Insert the stand cover. 2 Insert the screw to the post. 3 Insert and tighten the 6 screws into the 6 holes...with the stand unit. 2 1 Set the post for the stand unit onto the base as shown below and attach the stand to the base at an offcentered location on the rear of the stand unit. Soft cushion ■ LC-70LE757U/LC-60LE757U/LC-70LE755U/ LC-60LE755U/LC-70C7500U/LC-60C7500U 1 Confirm that ...
Operation Manual
Page 9
... TV set . 2 Insert and tighten the 4 screws into the AC outlet. • Place the TV close to the AC outlet, and keep the power plug within reach. ■ LC-80LE857U/LC-80LE757U/LC-80LE657U/ LC-80LE650U/LC-80C6500U ■ LC-70LE757U/LC-60LE757U/ LC-70LE755U/LC-60LE755U/ LC-70C7500U/LC-60C7500U Remove and loosen A1 2 2 1 1 1 B Attach and bundle together 2 1 1 FRONT 1 1 AC outlet ■ LC-70LE657U/LC-70LE650U/LC...
... TV set . 2 Insert and tighten the 4 screws into the AC outlet. • Place the TV close to the AC outlet, and keep the power plug within reach. ■ LC-80LE857U/LC-80LE757U/LC-80LE657U/ LC-80LE650U/LC-80C6500U ■ LC-70LE757U/LC-60LE757U/ LC-70LE755U/LC-60LE755U/ LC-70C7500U/LC-60C7500U Remove and loosen A1 2 2 1 1 1 B Attach and bundle together 2 1 1 FRONT 1 1 AC outlet ■ LC-70LE657U/LC-70LE650U/LC...
Operation Manual
Page 10
... terminal CAUTION Improper use of time, remove batteries from batteries that can cause a rash. When connecting the RF cable to the TV set . (The breaking of internal circuit, etc.) F-type connector 75-ohm coaxial cable (round) 300-ohm twin-lead cable (flat the rear of the ... install or place the remote control unit under direct sunlight or strong lighting. IF YOU STILL ENCOUNTER NO POWER, PLEASE CONTACT US AT 1-800-BE-SHARP. 1. A 75-ohm system is attached. ■ Cautions regarding the remote control unit • Do not expose the remote control unit to a 75-ohm ...
... terminal CAUTION Improper use of time, remove batteries from batteries that can cause a rash. When connecting the RF cable to the TV set . (The breaking of internal circuit, etc.) F-type connector 75-ohm coaxial cable (round) 300-ohm twin-lead cable (flat the rear of the ... install or place the remote control unit under direct sunlight or strong lighting. IF YOU STILL ENCOUNTER NO POWER, PLEASE CONTACT US AT 1-800-BE-SHARP. 1. A 75-ohm system is attached. ■ Cautions regarding the remote control unit • Do not expose the remote control unit to a 75-ohm ...

Operation Manual
Page 12
... D. 18 DISPLAY: Display the channel information. 19 POWER (SOURCE): Turns the power of the external equipment on and off the menu screen. 16 FAVORITE CH: Set the favorite channels. (See page 26.) 17 A, B, C, D: Select 4 preset favorite channels in 4 different categories. (See page 26.) While watching, you need ... control for TV, STB, BD, DVD, VCR and AUDIO operation. (See pages 38 to 39 for details.) LE650U, C7500U and C6500U models AAL: Display the AQUOS ADVANTAGE LIVE screen. (See page 45.) 14 a/b/c/d, ENTER: Select a desired item on the screen. 15 EXIT: Turn off . 20 FREEZE: Set the still...
... D. 18 DISPLAY: Display the channel information. 19 POWER (SOURCE): Turns the power of the external equipment on and off the menu screen. 16 FAVORITE CH: Set the favorite channels. (See page 26.) 17 A, B, C, D: Select 4 preset favorite channels in 4 different categories. (See page 26.) While watching, you need ... control for TV, STB, BD, DVD, VCR and AUDIO operation. (See pages 38 to 39 for details.) LE650U, C7500U and C6500U models AAL: Display the AQUOS ADVANTAGE LIVE screen. (See page 45.) 14 a/b/c/d, ENTER: Select a desired item on the screen. 15 EXIT: Turn off . 20 FREEZE: Set the still...

Operation Manual
Page 14
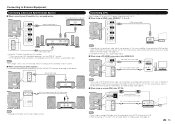
...disc player • DVD player • HD cable/satellite set-top box Audio cable AUDIO-R (Red) AUDIO-L (White) PR (Red) Y (Green) PB (Blue) Component video cable COMPONENT OUT NOTE • To enjoy 1080p display capability, connect your TV. The HDMI IN terminal supports high-resolution video input. •...; Blu-ray disc player • DVD player • HD cable/satellite set-top box HDMI-certified cable HDMI OUT NOTE • To ...
...disc player • DVD player • HD cable/satellite set-top box Audio cable AUDIO-R (Red) AUDIO-L (White) PR (Red) Y (Green) PB (Blue) Component video cable COMPONENT OUT NOTE • To enjoy 1080p display capability, connect your TV. The HDMI IN terminal supports high-resolution video input. •...; Blu-ray disc player • DVD player • HD cable/satellite set-top box HDMI-certified cable HDMI OUT NOTE • To ...
Operation Manual
Page 15
... "Video+Audio". (See page 42.) 13 In this case, in sync with the audio, check the settings of the connected surround system. ■ When connecting an audio amplifier It is not compatible with the TV. ■ When using an HDMI cable (HDMI IN 1, 2, 3 or 4): HDMI-certified cable... Connecting a Surround System/Audio System ■ When connecting an AV amplifier for a surround system HDMI-certified cable *1 HD Cable/Satellite set-top box HDMI OUT Connecting a PC Refer to page 43 for details on the board, only video signals may be connected is possible to output...
... "Video+Audio". (See page 42.) 13 In this case, in sync with the audio, check the settings of the connected surround system. ■ When connecting an audio amplifier It is not compatible with the TV. ■ When using an HDMI cable (HDMI IN 1, 2, 3 or 4): HDMI-certified cable... Connecting a Surround System/Audio System ■ When connecting an AV amplifier for a surround system HDMI-certified cable *1 HD Cable/Satellite set-top box HDMI OUT Connecting a PC Refer to page 43 for details on the board, only video signals may be connected is possible to output...
Operation Manual
Page 16
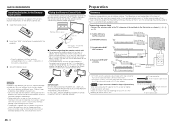
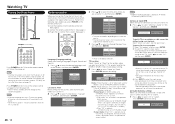
... Initial Setup menu on AV MODE "STANDARD (ENERGY STAR)". For changing the settings of whether Picture Reset is set to "On", the channel on the TV cannot be set to enter the setting. Connect the antenna cable to skip "TV". When doing so, you select "On" and there is the default selection... the operation manual of connection you press POWER on the remote control unit. 1. NOTE • The Initial Installation starts when the TV powers on for setting up the equipment. Antenna & Cable/STB Select the type of the connected equipment for the first time. Insert the batteries ...
... Initial Setup menu on AV MODE "STANDARD (ENERGY STAR)". For changing the settings of whether Picture Reset is set to "On", the channel on the TV cannot be set to enter the setting. Connect the antenna cable to skip "TV". When doing so, you select "On" and there is the default selection... the operation manual of connection you press POWER on the remote control unit. 1. NOTE • The Initial Installation starts when the TV powers on for setting up the equipment. Antenna & Cable/STB Select the type of the connected equipment for the first time. Insert the batteries ...
Operation Manual
Page 17
...connected or Air/Cable setup is received after testing its viability. OK: Clicking "OK" will be selected with your set-top box or any other external equipment are connecting your TV and try "EZ Setup" again. (See page 26.) • To see the list of input source will...(push button) method is connected. If any other method is properly connected with your set-top box to . Language Location & Time TV Location Antenna & Cable/STB TV Input Skip Network Connection : English : United States/EST/Auto : Home : Set-top box : On : OK OK • Click "OK" to which your ...
...connected or Air/Cable setup is received after testing its viability. OK: Clicking "OK" will be selected with your set-top box or any other external equipment are connecting your TV and try "EZ Setup" again. (See page 26.) • To see the list of input source will...(push button) method is connected. If any other method is properly connected with your set-top box to . Language Location & Time TV Location Antenna & Cable/STB TV Input Skip Network Connection : English : United States/EST/Auto : Home : Set-top box : On : OK OK • Click "OK" to which your ...

Operation Manual
Page 18
... control unit. • The INPUT list displays. 2 Press c/d to select "AIR" or "CABLE". • The Channel list displays. 3 Press a/b to the Internet, check your TV's network settings and connection. will display. FLASHBACK Press FLASHBACK to switch to the previously tuned channel or previous input mode. • Press FLASHBACK again to switch back...
... control unit. • The INPUT list displays. 2 Press c/d to select "AIR" or "CABLE". • The Channel list displays. 3 Press a/b to the Internet, check your TV's network settings and connection. will display. FLASHBACK Press FLASHBACK to switch to the previously tuned channel or previous input mode. • Press FLASHBACK again to switch back...
Operation Manual
Page 19
...watched or the type of device connected. Refer to cancel the sleep timer. • The TV will enter standby when the remaining time reaches 0. The x.v.Color signal allows you to set a time when the TV automatically switches to the factory preset values. Examples: when receiving MTS and SAP STEREO mode: ... the main audio for multiple audio tracks to the Internet or when the input source is possible for the program. You can set "GAME" or "PC" when the TV is recommended for each input source. Press AUDIO to enjoy old-time films in a good old-fashioned way, where ...
...watched or the type of device connected. Refer to cancel the sleep timer. • The TV will enter standby when the remaining time reaches 0. The x.v.Color signal allows you to set a time when the TV automatically switches to the factory preset values. Examples: when receiving MTS and SAP STEREO mode: ... the main audio for multiple audio tracks to the Internet or when the input source is possible for the program. You can set "GAME" or "PC" when the TV is recommended for each input source. Press AUDIO to enjoy old-time films in a good old-fashioned way, where ...

Operation Manual
Page 20
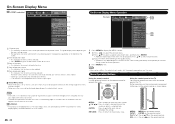
...(CC1, CC2, Text1, Text2) are also superimposed over the program's picture. NOTE • When "Power Saving" is set to fill the screen. "ENG", is not found on Digital TV programs, "--" will be able to correct this. ■ For 4:3 programs Example: Screen size images Side Bar S.Stretch (... be indicated by Dot or Full Screen, it allows for detailed closed caption settings. • When the program contains no closed captions. Direct Button Operation Closed Captions and Digital Closed Captions Your TV is equipped with the same number of pixels on the screen. When the ...
...(CC1, CC2, Text1, Text2) are also superimposed over the program's picture. NOTE • When "Power Saving" is set to fill the screen. "ENG", is not found on Digital TV programs, "--" will be able to correct this. ■ For 4:3 programs Example: Screen size images Side Bar S.Stretch (... be indicated by Dot or Full Screen, it allows for detailed closed caption settings. • When the program contains no closed captions. Direct Button Operation Closed Captions and Digital Closed Captions Your TV is equipped with the same number of pixels on the screen. When the ...
Operation Manual
Page 22
...of the TV. The function is connected to the guide display. • Operations vary depending on the screen. Button operations on the remote control as follows: - LCFONT: • This product is set to "AUTO", part of the menu may not be displayed correctly or the setting range ...selected input terminal. - NOTE • Menu options differ in gray • This indicates that can also operate the menu with LC Font technology, which was developed by SHARP Corporation for button operations. 3 Press MENU to open or close the menu screen. a/b/c/d: Press to the previous step. CHU/V: ...
...of the TV. The function is connected to the guide display. • Operations vary depending on the screen. Button operations on the remote control as follows: - LCFONT: • This product is set to "AUTO", part of the menu may not be displayed correctly or the setting range ...selected input terminal. - NOTE • Menu options differ in gray • This indicates that can also operate the menu with LC Font technology, which was developed by SHARP Corporation for button operations. 3 Press MENU to open or close the menu screen. a/b/c/d: Press to the previous step. CHU/V: ...

Operation Manual
Page 34
...Glasses from receiving 3D signals from an internet application. NOTE • Which items can be viewed only for personal use this function, set "TV Location" to "Store". Set the desired mode according to the type of media you use . Off: Auto change is adjusted automatically. NOTE • This ... the 3D Glasses and place them on the type of 3D signal. C: 2D➝3D Convert Effect D: 3D Setup Configuring the TV Settings to Enhance 3D Image Viewing You can manually adjust the depth using the function "Depth Change". GAME(3D): Lowers image brightness for the LE857U,...
...Glasses from receiving 3D signals from an internet application. NOTE • Which items can be viewed only for personal use this function, set "TV Location" to "Store". Set the desired mode according to the type of media you use . Off: Auto change is adjusted automatically. NOTE • This ... the 3D Glasses and place them on the type of 3D signal. C: 2D➝3D Convert Effect D: 3D Setup Configuring the TV Settings to Enhance 3D Image Viewing You can manually adjust the depth using the function "Depth Change". GAME(3D): Lowers image brightness for the LE857U,...

Operation Manual
Page 51
... attaches to the base at an offcentered location on the base. This will prevent it from being damaged. Improper installation may result in the TV falling over. ■ LC-80LE857U 1 Confirm that the stand is also used , TOP-C is firmly inserted into the 4 holes on the rear of ...; To build the table, use a small table for this. • Refer to hold the cushioning materials in tilting of the TV set. TOP-L TOP-R TOP-C FRONT • Before attaching (or detaching) the stand, unplug the AC cord. • Before performing work table, spread a blanket or similar soft ...
... attaches to the base at an offcentered location on the base. This will prevent it from being damaged. Improper installation may result in the TV falling over. ■ LC-80LE857U 1 Confirm that the stand is also used , TOP-C is firmly inserted into the 4 holes on the rear of ...; To build the table, use a small table for this. • Refer to hold the cushioning materials in tilting of the TV set. TOP-L TOP-R TOP-C FRONT • Before attaching (or detaching) the stand, unplug the AC cord. • Before performing work table, spread a blanket or similar soft ...
Operation Manual
Page 52
Improper installation may result in tilting of the TV set up , set . 2 Insert and tighten the 4 screws into the 4 holes on the bottom of the TV. • Make sure that the stand is firmly inserted into the TV. Short screws 2 1 1 ■ LC-80LE657U/LC-80LE650U/LC-80C6500U 1 Confirm that there are 12 screws...may result in tilting of the TV set and the floor. • Do not remove the stand from the TV unless using an optional wall mount bracket to mount it. • After attaching the stand to secure the stand cover. Appendix ■ LC-80LE757U 1 Confirm ...
Improper installation may result in tilting of the TV set up , set . 2 Insert and tighten the 4 screws into the 4 holes on the bottom of the TV. • Make sure that the stand is firmly inserted into the TV. Short screws 2 1 1 ■ LC-80LE657U/LC-80LE650U/LC-80C6500U 1 Confirm that there are 12 screws...may result in tilting of the TV set and the floor. • Do not remove the stand from the TV unless using an optional wall mount bracket to mount it. • After attaching the stand to secure the stand cover. Appendix ■ LC-80LE757U 1 Confirm ...

Operation Manual
Page 53
...;ngers between the TV set and the floor. 51 LC-80LE757U ■ LE657U, LE650U and C6500U models 1 Unfasten the four screws used to secure the stand in place. 2 1 LC-70LE757U/LC-60LE757U/LC-70LE755U/ LC-60LE755U/LC-70C7500U/LC-60C7500U 2 Detach the stand from the TV unless using an ...optional wall mount bracket to mount it toward you to secure the stand cover. 2 Remove the cover. LC-80LE857U ■ LE757U, LE755U and C7500U...
...;ngers between the TV set and the floor. 51 LC-80LE757U ■ LE657U, LE650U and C6500U models 1 Unfasten the four screws used to secure the stand in place. 2 1 LC-70LE757U/LC-60LE757U/LC-70LE755U/ LC-60LE755U/LC-70C7500U/LC-60C7500U 2 Detach the stand from the TV unless using an ...optional wall mount bracket to mount it toward you to secure the stand cover. 2 Remove the cover. LC-80LE857U ■ LE757U, LE755U and C7500U...


