Operation Manual
Page 3
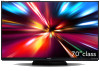
...or theft, please record the TV's model and serial numbers in the literature accompanying the product. CAUTION RISK OF ELECTRIC SHOCK DO NOT OPEN CAUTION: TO REDUCE THE RISK OF ELECTRIC SHOCK, DO NOT REMOVE COVER (OR BACK). ENGLISH LC-70C8470U LC-60C8470U LC-70C7450U LC-60C7450U LIQUID CRYSTAL TELEVISION ENGLISH... or modifications to this equipment not expressly approved by the manufacturer could void the user's authority to the presence of the TV. The numbers are located at the rear and right side of uninsulated "dangerous voltage" within a triangle is intended to alert the ...
...or theft, please record the TV's model and serial numbers in the literature accompanying the product. CAUTION RISK OF ELECTRIC SHOCK DO NOT OPEN CAUTION: TO REDUCE THE RISK OF ELECTRIC SHOCK, DO NOT REMOVE COVER (OR BACK). ENGLISH LC-70C8470U LC-60C8470U LC-70C7450U LC-60C7450U LIQUID CRYSTAL TELEVISION ENGLISH... or modifications to this equipment not expressly approved by the manufacturer could void the user's authority to the presence of the TV. The numbers are located at the rear and right side of uninsulated "dangerous voltage" within a triangle is intended to alert the ...
Operation Manual
Page 4
..., use . 2 FCC Radiation Exposure Statement: This equipment complies with Part 15 of the FCC Rules. Setting "TV Location" to "Home" allows the TV to achieve an energy-saving status for compliance could automatically discontinue transmission in the USA/Canada market, only channel 1-..., as close to the point of other equipment. "Note to operate the equipment. DECLARATION OF CONFORMITY: SHARP LIQUID CRYSTAL TELEVISION, MODEL LC-70C8470U/LC-60C8470U/LC-70C7450U/LC-60C7450U This device complies with FCC radiation exposure limits set forth for help. The device could void the user...
..., use . 2 FCC Radiation Exposure Statement: This equipment complies with Part 15 of the FCC Rules. Setting "TV Location" to "Home" allows the TV to achieve an energy-saving status for compliance could automatically discontinue transmission in the USA/Canada market, only channel 1-..., as close to the point of other equipment. "Note to operate the equipment. DECLARATION OF CONFORMITY: SHARP LIQUID CRYSTAL TELEVISION, MODEL LC-70C8470U/LC-60C8470U/LC-70C7450U/LC-60C7450U This device complies with FCC radiation exposure limits set forth for help. The device could void the user...
Operation Manual
Page 6
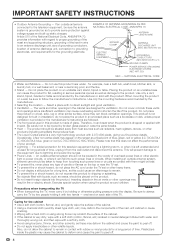
... ELECTRICAL CODE • Water and Moisture - or near water - Placing the product on each side of blue, green, red or yellow (LC-70C8470U/ LC-60C8470U); one hand on an unstable base can cause the product to fall into the product. Caring for the cabinet • Use a soft... of antenna-discharge unit, connection to proper grounding of the mast and supporting structure, grounding of glass. Precautions when transporting the TV • When transporting the TV, never carry it is made of the lead-in the cabinet are followed. • The front panel used in case the...
... ELECTRICAL CODE • Water and Moisture - or near water - Placing the product on each side of blue, green, red or yellow (LC-70C8470U/ LC-60C8470U); one hand on an unstable base can cause the product to fall into the product. Caring for the cabinet • Use a soft... of antenna-discharge unit, connection to proper grounding of the mast and supporting structure, grounding of glass. Precautions when transporting the TV • When transporting the TV, never carry it is made of the lead-in the cabinet are followed. • The front panel used in case the...
Operation Manual
Page 8
... the 3D Glasses recommended for LC-70C8470U/LC-60C8470U) • Use only the cloth provided with high humidity. Handling the 3D Glasses • Do not drop, exert pressure on, or step on the cloth may result in falling or other fluids to a USB terminal of a 3D compatible SHARP TV when recharging. The surrounding area...
... the 3D Glasses recommended for LC-70C8470U/LC-60C8470U) • Use only the cloth provided with high humidity. Handling the 3D Glasses • Do not drop, exert pressure on, or step on the cloth may result in falling or other fluids to a USB terminal of a 3D compatible SHARP TV when recharging. The surrounding area...
Operation Manual
Page 9
...DEAR SHARP CUSTOMER 3 IMPORTANT SAFETY INSTRUCTIONS 3-6 Accessories 8 Supplied Accessories 8 Optional Accessories 8 QUICK REFERENCE Attaching the Stand 9 QUICK INSTALLATION TIPS 10 Experiencing HD Images 10 Using the Remote Control Unit 10 Preparation Antennas 11 Installing Batteries in this operation manual are for LC-70C8470U/LC-...60C8470U 44-46 Viewing 3D Images 47-48 Configuring the TV Settings to Enhance 3D Image Viewing 48-50 Specifications - 3D ...
...DEAR SHARP CUSTOMER 3 IMPORTANT SAFETY INSTRUCTIONS 3-6 Accessories 8 Supplied Accessories 8 Optional Accessories 8 QUICK REFERENCE Attaching the Stand 9 QUICK INSTALLATION TIPS 10 Experiencing HD Images 10 Using the Remote Control Unit 10 Preparation Antennas 11 Installing Batteries in this operation manual are for LC-70C8470U/LC-...60C8470U 44-46 Viewing 3D Images 47-48 Configuring the TV Settings to Enhance 3D Image Viewing 48-50 Specifications - 3D ...
Operation Manual
Page 10
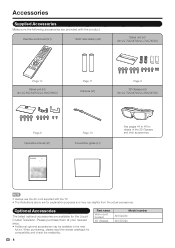
...near future. Remote control unit (x1) "AAA" size battery (x2) Stand unit (x1) (for LC-70C8470U/LC-70C7450U) Page 10 Stand unit (x1) (for LC-60C8470U/LC-60C7450U) Page 11 Cable tie (x1) Page 9 3D Glasses (x2) (for LC-70C8470U/LC-60C8470U) Page 9 Operation manual (x1) Page 10 Connection guide (x1) See pages 44 to 46 .... • Additional optional accessories may vary slightly from the actual accessories. Accessories Supplied Accessories Make sure the following accessories are provided with the TV. • The illustrations above are available for the Liquid Crystal Television.
...near future. Remote control unit (x1) "AAA" size battery (x2) Stand unit (x1) (for LC-70C8470U/LC-70C7450U) Page 10 Stand unit (x1) (for LC-60C8470U/LC-60C7450U) Page 11 Cable tie (x1) Page 9 3D Glasses (x2) (for LC-70C8470U/LC-60C8470U) Page 9 Operation manual (x1) Page 10 Connection guide (x1) See pages 44 to 46 .... • Additional optional accessories may vary slightly from the actual accessories. Accessories Supplied Accessories Make sure the following accessories are provided with the TV. • The illustrations above are available for the Liquid Crystal Television.
Operation Manual
Page 11
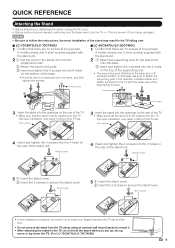
...Attaching the Stand • Before attaching (or detaching) the stand, unplug the AC cord. • Before performing work spread cushioning over . ■ LC-70C8470U/LC-70C7450U 1 Confirm that there are 10 screws (4 long screws, 4 middle screws and 2 short screws) supplied with one hand, and then tighten... the stand may result in the direction indicated below and attach the stand to catch your fingers between the TV set up, move or lay down the TV. (For LC-70C8470U/LC-70C7450U) 9 centered location on the rear of the base. • Hold the stand unit securely with the stand...
...Attaching the Stand • Before attaching (or detaching) the stand, unplug the AC cord. • Before performing work spread cushioning over . ■ LC-70C8470U/LC-70C7450U 1 Confirm that there are 10 screws (4 long screws, 4 middle screws and 2 short screws) supplied with one hand, and then tighten... the stand may result in the direction indicated below and attach the stand to catch your fingers between the TV set up, move or lay down the TV. (For LC-70C8470U/LC-70C7450U) 9 centered location on the rear of the base. • Hold the stand unit securely with the stand...
Operation Manual
Page 12
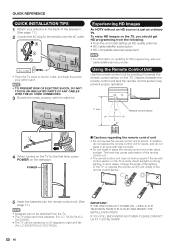
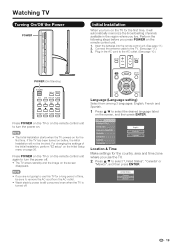
To enjoy HD images on the TV, you should get HD programming from the TV. • The TV angle cannot be adjusted. (For LC-70C8470U/LC- 70C7450U) • The TV can be detached from the following: • Over-the-air broadcasting via HD quality antenna • HD cable/satellite subscription • HD compatible...For LC-60C8470U/LC-60C7450U) IMPORTANT: IF THE UNIT DOES NOT POWER ON - In such cases, change the angle of the television. (See page 11.) 2 Connect the AC plug for the first time, press POWER on the TV. IF YOU STILL ENCOUNTER NO POWER, PLEASE CONTACT US AT 1-800-BE-SHARP....
To enjoy HD images on the TV, you should get HD programming from the TV. • The TV angle cannot be adjusted. (For LC-70C8470U/LC- 70C7450U) • The TV can be detached from the following: • Over-the-air broadcasting via HD quality antenna • HD cable/satellite subscription • HD compatible...For LC-60C8470U/LC-60C7450U) IMPORTANT: IF THE UNIT DOES NOT POWER ON - In such cases, change the angle of the television. (See page 11.) 2 Connect the AC plug for the first time, press POWER on the TV. IF YOU STILL ENCOUNTER NO POWER, PLEASE CONTACT US AT 1-800-BE-SHARP....
Operation Manual
Page 13
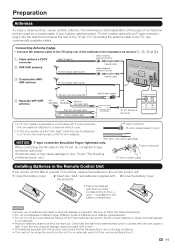
...CAUTION Improper use of internal circuit, etc.) 75-ohm coaxial cable Installing Batteries in the Remote Control Unit If the remote control fails to operate TV functions, replace the batteries in the remote control unit. 1 Open the battery cover. 2 Insert two "AAA" size batteries (supplied with their .... the product). • Place the batteries with 3 Close the battery cover. A 300-ohm system is a brief explanation of the types of the TV set , do not tighten F-type F-type connector connector with skin can cause a rash. F-type connector 75-ohm coaxial cable (round) 300-ohm twin...
...CAUTION Improper use of internal circuit, etc.) 75-ohm coaxial cable Installing Batteries in the Remote Control Unit If the remote control fails to operate TV functions, replace the batteries in the remote control unit. 1 Open the battery cover. 2 Insert two "AAA" size batteries (supplied with their .... the product). • Place the batteries with 3 Close the battery cover. A 300-ohm system is a brief explanation of the types of the TV set , do not tighten F-type F-type connector connector with skin can cause a rash. F-type connector 75-ohm coaxial cable (round) 300-ohm twin...
Operation Manual
Page 14
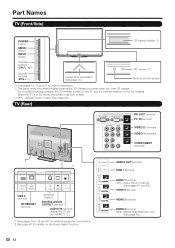
Do not place anything between the 3D infrared emitter on the TV and the infrared receiver on the Audio Select function. When the TV is in 3D mode, the emitter may look reddish. *3 OPC: Optical Picture Control (See page 29.) TV (Rear) *1 RS-232C terminal PC IN terminal VIDEO 2 ... See page 67 for button operations. *2 This panel emits the infrared signal towards the 3D Glasses you wear when you view 3D images. Part Names TV (Front/Side) *1 POWER button MENU button INPUT button 3D infrared emitter *2 Channel buttons (CHU/V) Volume buttons (VOLk/l) Center Icon illumination (See page...
Do not place anything between the 3D infrared emitter on the TV and the infrared receiver on the Audio Select function. When the TV is in 3D mode, the emitter may look reddish. *3 OPC: Optical Picture Control (See page 29.) TV (Rear) *1 RS-232C terminal PC IN terminal VIDEO 2 ... See page 67 for button operations. *2 This panel emits the infrared signal towards the 3D Glasses you wear when you view 3D images. Part Names TV (Front/Side) *1 POWER button MENU button INPUT button 3D infrared emitter *2 Channel buttons (CHU/V) Volume buttons (VOLk/l) Center Icon illumination (See page...
Operation Manual
Page 15
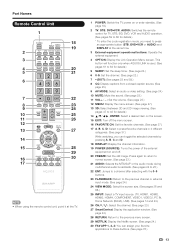
... previous channel or external input mode. (See page 24.) 24 VIEW MODE: Select the screen size. (See pages 26 and 66.) 25 INPUT: Select a TV input source. (TV, HDMI1, HDMI2, HDMI3, HDMI4, COMPONENT, VIDEO1, VIDEO2, PC IN, Home Network (DLNA), USB) (See pages 14 and 23.) 26 CHU/V: Select the channel. (See... 29 16 30 17 • When using the remote control unit, point it at the TV. 1 POWER: Switch the TV power on or enter standby. (See page 19.) 2 TV, STB, DVD•VCR, AUDIO: Switches the remote control for TV, STB, BD, DVD, VCR and AUDIO operation. (See pages 59 to 60 for details...
... previous channel or external input mode. (See page 24.) 24 VIEW MODE: Select the screen size. (See pages 26 and 66.) 25 INPUT: Select a TV input source. (TV, HDMI1, HDMI2, HDMI3, HDMI4, COMPONENT, VIDEO1, VIDEO2, PC IN, Home Network (DLNA), USB) (See pages 14 and 23.) 26 CHU/V: Select the channel. (See... 29 16 30 17 • When using the remote control unit, point it at the TV. 1 POWER: Switch the TV power on or enter standby. (See page 19.) 2 TV, STB, DVD•VCR, AUDIO: Switches the remote control for TV, STB, BD, DVD, VCR and AUDIO operation. (See pages 59 to 60 for details...
Operation Manual
Page 16
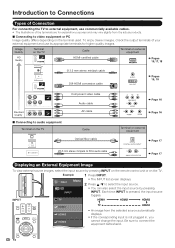
...minijack cable DVI-HDMI conversion cable AUDIO DVI OUT Pages 15, 18 Standard Quality ■ Connecting to audio equipment Terminal on the TV Component video cable Audio cable AV cable Cable Optical fiber cable Ø3.5 mm stereo minijack to connect the equipment beforehand. 14...1 Press INPUT. • The INPUT list screen displays. 2 Press a/b to video equipment or PC Image quality differs depending on the TV. To enjoy clearer images, check the output terminals of your external equipment and use commercially available cables. • The illustrations of Connection ...
...minijack cable DVI-HDMI conversion cable AUDIO DVI OUT Pages 15, 18 Standard Quality ■ Connecting to audio equipment Terminal on the TV Component video cable Audio cable AV cable Cable Optical fiber cable Ø3.5 mm stereo minijack to connect the equipment beforehand. 14...1 Press INPUT. • The INPUT list screen displays. 2 Press a/b to video equipment or PC Image quality differs depending on the TV. To enjoy clearer images, check the output terminals of your external equipment and use commercially available cables. • The illustrations of Connection ...
Operation Manual
Page 17
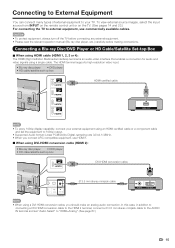
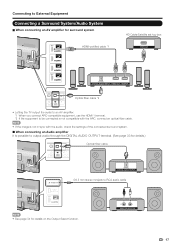
... 2): • Blu-ray disc player • DVD player • HD cable/satellite set "Audio Select" to your TV. CAUTION • To protect equipment, always turn off the TV before connecting any external equipment. • Please read the relevant operation manual (Blu-ray disc player, etc.) carefully before making... connections. To view external source images, select the input source from INPUT on the remote control unit or on the TV. (See pages 14 and 23.) For connecting the TV to 1080p output. • Supported Audio format: Linear PCM/Dolby Digital, sampling rate 32/44.1/48kHz. • ...
... 2): • Blu-ray disc player • DVD player • HD cable/satellite set "Audio Select" to your TV. CAUTION • To protect equipment, always turn off the TV before connecting any external equipment. • Please read the relevant operation manual (Blu-ray disc player, etc.) carefully before making... connections. To view external source images, select the input source from INPUT on the remote control unit or on the TV. (See pages 14 and 23.) For connecting the TV to 1080p output. • Supported Audio format: Linear PCM/Dolby Digital, sampling rate 32/44.1/48kHz. • ...
Operation Manual
Page 19
...;ed cable *1 HD Cable/Satellite set-top box HDMI OUT OPTICAL DIGITAL AUDIO INPUT HDMI OUT HDMI IN Optical fiber cable *2 • Letting the TV output the audio to an AV amplifier: *1 When you connect ARC-compatible equipment, use the HDMI 1 terminal. *2 If the equipment to be connected...
...;ed cable *1 HD Cable/Satellite set-top box HDMI OUT OPTICAL DIGITAL AUDIO INPUT HDMI OUT HDMI IN Optical fiber cable *2 • Letting the TV output the audio to an AV amplifier: *1 When you connect ARC-compatible equipment, use the HDMI 1 terminal. *2 If the equipment to be connected...
Operation Manual
Page 20
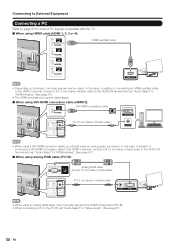
... a Ø 3.5 mm stereo minijack cable to the AUDIO IN terminal and set "Audio Select" to the AUDIO IN terminal of PC signals compatible with the TV. ■ When using a DVI-HDMI conversion cable, you should make an analog audio connection.
... a Ø 3.5 mm stereo minijack cable to the AUDIO IN terminal and set "Audio Select" to the AUDIO IN terminal of PC signals compatible with the TV. ■ When using a DVI-HDMI conversion cable, you should make an analog audio connection.
Operation Manual
Page 21
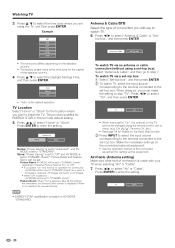
...press ENTER. Connect the antenna cable to turn the power off . For changing the settings of time, be invoked. Press POWER on the TV or on the remote control unit again to select "United States", "Canada" or "Mexico", and then press ENTER. Language Location & Time...control unit. 1. Language (Language setting) Select from the AC outlet. • Weak electric power is still consumed even when the TV is turned off . • The TV enters standby and the image on page 36. United States Canada Mexico 19 Perform the following steps before , the Initial Installation will ...
...press ENTER. Connect the antenna cable to turn the power off . For changing the settings of time, be invoked. Press POWER on the TV or on the remote control unit again to select "United States", "Canada" or "Mexico", and then press ENTER. Language Location & Time...control unit. 1. Language (Language setting) Select from the AC outlet. • Weak electric power is still consumed even when the TV is turned off . • The TV enters standby and the image on page 36. United States Canada Mexico 19 Perform the following steps before , the Initial Installation will ...
Operation Manual
Page 22
.... This product qualifies for the capital of the selected country. 4 Press a/b to select the Daylight Savings Time, and then press ENTER. To watch TV via an antenna or cable connection (without using a set to "DYNAMIC (Fixed)". On Off • When this is the time zone for ENERGY STAR in... is the default selection. When doing so, you select "On" and there is "On" or "Off". • If you must make the setting to skip "TV". CH U/V, Favorite CH, etc.) • See page 34 for 30 minutes: - AV MODE will be set to "DYNAMIC (Fixed)" regardless of connection you are ...
.... This product qualifies for the capital of the selected country. 4 Press a/b to select the Daylight Savings Time, and then press ENTER. To watch TV via an antenna or cable connection (without using a set to "DYNAMIC (Fixed)". On Off • When this is the time zone for ENERGY STAR in... is the default selection. When doing so, you select "On" and there is "On" or "Off". • If you must make the setting to skip "TV". CH U/V, Favorite CH, etc.) • See page 34 for 30 minutes: - AV MODE will be set to "DYNAMIC (Fixed)" regardless of connection you are ...
Operation Manual
Page 23
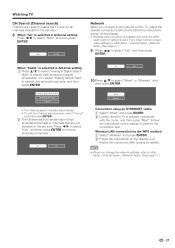
...; To exit the Channel search screen, select "Cancel", and then press ENTER. 2 The Channel search results may include scrambled channels or channels that the TV is used . Wireless LAN connection by Initial Setup > Internet Setup > Network Setup. (See page 71.) 9 Press c/d to perform the connection test....instructions on the display, and finalize the connection after testing its viability. • When you connect to the Internet on the TV, select the desired connection method and follow the instructions shown on the display. • Wireless LAN connection is possible only when the ...
...; To exit the Channel search screen, select "Cancel", and then press ENTER. 2 The Channel search results may include scrambled channels or channels that the TV is used . Wireless LAN connection by Initial Setup > Internet Setup > Network Setup. (See page 71.) 9 Press c/d to perform the connection test....instructions on the display, and finalize the connection after testing its viability. • When you connect to the Internet on the TV, select the desired connection method and follow the instructions shown on the display. • Wireless LAN connection is possible only when the ...
Operation Manual
Page 24
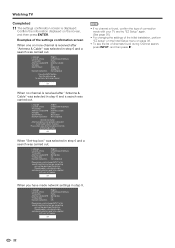
... 6 and a search was selected in step 9. OK When you have made with your set -top box to get the picture. Language Location & Time TV Location Antenna & Cable/STB Air/Cable Search Result Network Connection : English : United States/EST/Auto : Home : Antenna & Cable : Air : Digital ...connection and Air/Cable setup. Closed caption, sub-channel audio and channel selection need to be selected with your set -top box. Language Location & Time TV Location Antenna & Cable/STB Air/Cable Search Result Network Connection : English : United States/EST/Auto : Home : Antenna & Cable : Cable : ...
... 6 and a search was selected in step 9. OK When you have made with your set -top box to get the picture. Language Location & Time TV Location Antenna & Cable/STB Air/Cable Search Result Network Connection : English : United States/EST/Auto : Home : Antenna & Cable : Air : Digital ...connection and Air/Cable setup. Closed caption, sub-channel audio and channel selection need to be selected with your set -top box. Language Location & Time TV Location Antenna & Cable/STB Air/Cable Search Result Network Connection : English : United States/EST/Auto : Home : Antenna & Cable : Cable : ...
Operation Manual
Page 25
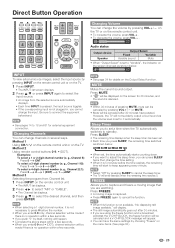
... image is not plugged in several ways. Be sure to connect the equipment beforehand. • See pages 14 to cancel the sleep timer. • The TV will appear. • You can have passed. Method 2 Using remote control buttons 0-9, • (DOT). Press MUTE. • " " will be ... change the input. g., Channel 115): Press 1 1 5 ENT. Press FREEZE. • A moving image that you to set to standby. However, the TV will not suddenly output a loud sound as shown below . 60 • See page 34 for details on the Output Select function. Press SLEEP. • The...
... image is not plugged in several ways. Be sure to connect the equipment beforehand. • See pages 14 to cancel the sleep timer. • The TV will appear. • You can have passed. Method 2 Using remote control buttons 0-9, • (DOT). Press MUTE. • " " will be ... change the input. g., Channel 115): Press 1 1 5 ENT. Press FREEZE. • A moving image that you to set to standby. However, the TV will not suddenly output a loud sound as shown below . 60 • See page 34 for details on the Output Select function. Press SLEEP. • The...

