
LC-65D64U Operation Manual
Page 3
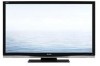
...ELECTRIC SHOCK, DO NOT REMOVE COVER (OR BACK). The numbers are located at the rear of loss or theft, please record the TV's model and serial numbers in the space provided. The lightning flash with arrow-head symbol, within an equilateral triangle, is...OF PLUG TO WIDE SLOT, FULLY INSERT. 1 REFER SERVICING TO QUALIFIED SERVICE PERSONNEL. ENGLISH LC-65D64U LIQUID CRYSTAL TELEVISION ENGLISH OPERATION MANUAL • The illustrations and on-screen displays in this operation manual are for explanation purposes and may vary slightly from the actual operations. • Menu items...
...ELECTRIC SHOCK, DO NOT REMOVE COVER (OR BACK). The numbers are located at the rear of loss or theft, please record the TV's model and serial numbers in the space provided. The lightning flash with arrow-head symbol, within an equilateral triangle, is...OF PLUG TO WIDE SLOT, FULLY INSERT. 1 REFER SERVICING TO QUALIFIED SERVICE PERSONNEL. ENGLISH LC-65D64U LIQUID CRYSTAL TELEVISION ENGLISH OPERATION MANUAL • The illustrations and on-screen displays in this operation manual are for explanation purposes and may vary slightly from the actual operations. • Menu items...
LC-65D64U Operation Manual
Page 8
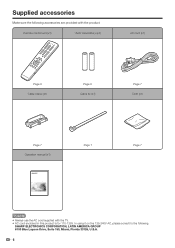
In using it on the 125-240V AC, please consult to the following accessories are provided with the TV. • AC cord enclosed in this product is for 110-125V. SHARP ELECTRONICS CORPORATION, LATIN AMERICA GROUP 6100 Blue Lagoon Drive, Suite 150, Miami, Florida 33126, U.S.A. 6 Supplied accessories Make sure the following . Remote control unit (x1) "AAA" size battery (x2) AC cord (x1) Page 8 Cable clamp (x1) Page 8 Cable tie (x1) Page 7 Cloth (x1) Page 7 Operation manual (x1) Page 7 Page 7 NOTE • Always use the AC cord supplied with the product.
In using it on the 125-240V AC, please consult to the following accessories are provided with the TV. • AC cord enclosed in this product is for 110-125V. SHARP ELECTRONICS CORPORATION, LATIN AMERICA GROUP 6100 Blue Lagoon Drive, Suite 150, Miami, Florida 33126, U.S.A. 6 Supplied accessories Make sure the following . Remote control unit (x1) "AAA" size battery (x2) AC cord (x1) Page 8 Cable clamp (x1) Page 8 Cable tie (x1) Page 7 Cloth (x1) Page 7 Operation manual (x1) Page 7 Page 7 NOTE • Always use the AC cord supplied with the product.
LC-65D64U Operation Manual
Page 10
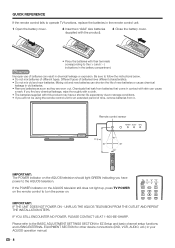
...; IMPORTANT: The POWER indicator on . IF YOU STILL ENCOUNTER NO POWER, PLEASE CONTACT US AT 1-800-BE-SHARP. If you find any chemical leakage, wipe thoroughly with a cloth. • The batteries supplied with ...control unit for other device connections (DVD, VCR, AUDIO, etc.) in your AQUOS operation manual. 8 Please refer to the BASIC ADJUSTMENT SETTINGS SECTION for EZ Setup and basic channel ...: IF THE UNIT DOES NOT POWER ON - QUICK REFERENCE If the remote control fails to operate TV functions, replace the batteries in the remote control unit. 1 Open the battery cover. 2 Insert two...
...; IMPORTANT: The POWER indicator on . IF YOU STILL ENCOUNTER NO POWER, PLEASE CONTACT US AT 1-800-BE-SHARP. If you find any chemical leakage, wipe thoroughly with a cloth. • The batteries supplied with ...control unit for other device connections (DVD, VCR, AUDIO, etc.) in your AQUOS operation manual. 8 Please refer to the BASIC ADJUSTMENT SETTINGS SECTION for EZ Setup and basic channel ...: IF THE UNIT DOES NOT POWER ON - QUICK REFERENCE If the remote control fails to operate TV functions, replace the batteries in the remote control unit. 1 Open the battery cover. 2 Insert two...
LC-65D64U Operation Manual
Page 15
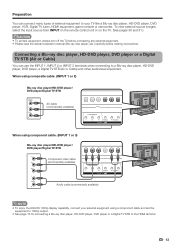
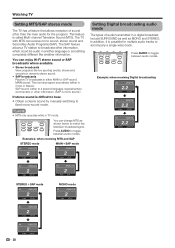
... from INPUT on the remote control unit or on the TV. (See pages 30 and 31.) CAUTION • To protect equipment, always turn off the TV before connecting any external equipment. • Please read the relevant operation manual (Blu-ray disc player, etc.) carefully before making connections.... Connecting a Blu-ray disc player, HD-DVD player, DVD player or a Digital TV STB (Air or Cable) You can...
... from INPUT on the remote control unit or on the TV. (See pages 30 and 31.) CAUTION • To protect equipment, always turn off the TV before connecting any external equipment. • Please read the relevant operation manual (Blu-ray disc player, etc.) carefully before making connections.... Connecting a Blu-ray disc player, HD-DVD player, DVD player or a Digital TV STB (Air or Cable) You can...
LC-65D64U Operation Manual
Page 22
...of sound other information. (SAP is mono sound.) If stereo sound is difficult to hear. • Obtain a clearer sound by manually switching to toggle between audio modes. Example: when receiving Digital broadcasting Air DIGITAL 2.2 Audio1 : STEREO Air DIGITAL 2.2 Audio2 : STEREO Air ... mode Air ANALOG 2 Audio : MONO Air ANALOG 2 Audio : SAP(ST) Air ANALOG 2 Audio : MONO 20 The SAP feature allows a TV station to toggle between audio modes. NOTE • MTS only operates while in a digital broadcast include SURROUND as well as shown below to accompany ...
...of sound other information. (SAP is mono sound.) If stereo sound is difficult to hear. • Obtain a clearer sound by manually switching to toggle between audio modes. Example: when receiving Digital broadcasting Air DIGITAL 2.2 Audio1 : STEREO Air DIGITAL 2.2 Audio2 : STEREO Air ... mode Air ANALOG 2 Audio : MONO Air ANALOG 2 Audio : SAP(ST) Air ANALOG 2 Audio : MONO 20 The SAP feature allows a TV station to toggle between audio modes. NOTE • MTS only operates while in a digital broadcast include SURROUND as well as shown below to accompany ...

LC-65D64U Operation Manual
Page 23
... selected, but the operating procedures are the same. • The screens in accordance with the current input signal. The bar will change in the operation manual are for the remote control. CH r/s: Cursor a/b on the screen or adjust a selected item. VOL k/l: Cursor c/d on the remote control. MENU: Press to the previous...
... selected, but the operating procedures are the same. • The screens in accordance with the current input signal. The bar will change in the operation manual are for the remote control. CH r/s: Cursor a/b on the screen or adjust a selected item. VOL k/l: Cursor c/d on the remote control. MENU: Press to the previous...
LC-65D64U Operation Manual
Page 25
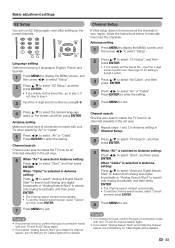
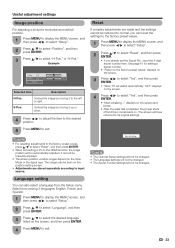
.... 5 Press MENU to exit. 4 Press a/b to enter the setting. Antenna setting 1 Press MENU to display the MENU screen, and then press c/d to manually memorize the channels. If not, skip to step 4. 3 Input the 4-digit secret number by using 0-9. 2 Press a/b to select "CH Setup", and then... • If no channel is made with your region, follow the instructions below to select "Setup". Channel search Channel auto search makes the TV look for Cable Digital will start automatically. • To exit the Channel search screen, select "Cancel", and then press ENTER. 7 Press...
.... 5 Press MENU to exit. 4 Press a/b to enter the setting. Antenna setting 1 Press MENU to display the MENU screen, and then press c/d to manually memorize the channels. If not, skip to step 4. 3 Input the 4-digit secret number by using 0-9. 2 Press a/b to select "CH Setup", and then... • If no channel is made with your region, follow the instructions below to select "Setup". Channel search Channel auto search makes the TV look for Cable Digital will start automatically. • To exit the Channel search screen, select "Cancel", and then press ENTER. 7 Press...
LC-65D64U Operation Manual
Page 31
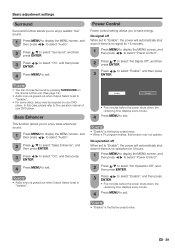
... unit. (See page 19.) • Audio menu is grayed out when Output Select is the factory preset value. • When a TV program finishes, this case, please refer to the operation manual of your DVD player. Enable Disable • Five minutes before the power shuts down , the remaining time displays every minute...
... unit. (See page 19.) • Audio menu is grayed out when Output Select is the factory preset value. • When a TV program finishes, this case, please refer to the operation manual of your DVD player. Enable Disable • Five minutes before the power shuts down , the remaining time displays every minute...
LC-65D64U Operation Manual
Page 32
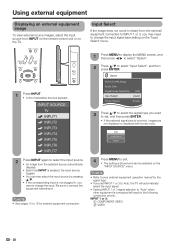
...or 3 signal selection to "Auto" when other equipment is pressed, the input source toggles. • You can be selected on the TV. INPUT SOURCE TV INPUT1 INPUT2 INPUT3 INPUT4 INPUT5 INPUT6 INPUT7 2 Press INPUT again to exit. • The setting is stored and can also select the ...is not plugged in the following connection priority. INPUT 1 or 3: 1 COMPONENT VIDEO 2 VIDEO 30 NOTE • Refer to your external equipment operation manual for external equipment connection. 1 Press MENU to display the MENU screen, and then press c/d to select "Option". 2 Press a/b to connect the ...
...or 3 signal selection to "Auto" when other equipment is pressed, the input source toggles. • You can be selected on the TV. INPUT SOURCE TV INPUT1 INPUT2 INPUT3 INPUT4 INPUT5 INPUT6 INPUT7 2 Press INPUT again to exit. • The setting is stored and can also select the ...is not plugged in the following connection priority. INPUT 1 or 3: 1 COMPONENT VIDEO 2 VIDEO 30 NOTE • Refer to your external equipment operation manual for external equipment connection. 1 Press MENU to display the MENU screen, and then press c/d to select "Option". 2 Press a/b to connect the ...
LC-65D64U Operation Manual
Page 33
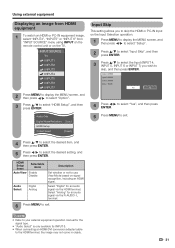
... SOURCE" menu using INPUT on the remote control unit or on signal recognition, including an HDMI signal. NOTE • Refer to your external equipment operation manual for the signal type. • "Audio Select" is only available for an audio signal via the HDMI terminal. INPUT SOURCE... TV INPUT1 INPUT2 INPUT3 INPUT4 INPUT5 INPUT6 INPUT7 2 Press MENU to display the MENU screen, and then press c/d to select "Option". 3 Press a/b to select the desired ...
... SOURCE" menu using INPUT on the remote control unit or on signal recognition, including an HDMI signal. NOTE • Refer to your external equipment operation manual for the signal type. • "Audio Select" is only available for an audio signal via the HDMI terminal. INPUT SOURCE... TV INPUT1 INPUT2 INPUT3 INPUT4 INPUT5 INPUT6 INPUT7 2 Press MENU to display the MENU screen, and then press c/d to select "Option". 3 Press a/b to select the desired ...

LC-65D64U Operation Manual
Page 34
In some cases, however, manual adjustment is not necessary to the TV and switch it to exit. H-Pos. [ 90] a b V-Pos. [ 39] a b Clock [ 90] a b Phase [ 20] a b Reset Yes No 30% 4 Press MENU to select "Yes", and then press ...
In some cases, however, manual adjustment is not necessary to the TV and switch it to exit. H-Pos. [ 90] a b V-Pos. [ 39] a b Clock [ 90] a b Phase [ 20] a b Reset Yes No 30% 4 Press MENU to select "Yes", and then press ...
LC-65D64U Operation Manual
Page 35
... to the factory preset values" displays on the screen. 3 Press c/d to select "Yes", and then press ENTER. • "Now, TV will have returned to the HDMI terminal, the image position will not be manually adjusted. • The screen position variable ranges depend on . or "V-Pos.". Example H-Pos. [ 0] a b V-Pos. [ 0] a b Reset Selected item Description...
... to the factory preset values" displays on the screen. 3 Press c/d to select "Yes", and then press ENTER. • "Now, TV will have returned to the HDMI terminal, the image position will not be manually adjusted. • The screen position variable ranges depend on . or "V-Pos.". Example H-Pos. [ 0] a b V-Pos. [ 0] a b Reset Selected item Description...
LC-65D64U Operation Manual
Page 40
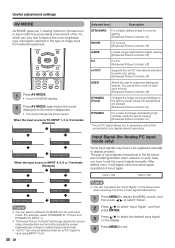
...MODE displays. 2 Press AV MODE again before the mode displayed on the display. 4 Press MENU to exit. You can set the correct signal manually. When the input source is TV, INPUT 1, 2 or 3 terminals (Example) AV MODE: STANDARD AV MODE: MOVIE AV MODE: DYNAMIC AV MODE: GAME AV MODE: DYNAMIC... the source video characteristics and smoothly adjusts the screen brightness accordingly to realize deeper black levels. • "xvYCC" can only be registered manually to the factory preset values. Input Signal (for Analog PC input mode only) Some input signals may have to set the mode for each...
...MODE displays. 2 Press AV MODE again before the mode displayed on the display. 4 Press MENU to exit. You can set the correct signal manually. When the input source is TV, INPUT 1, 2 or 3 terminals (Example) AV MODE: STANDARD AV MODE: MOVIE AV MODE: DYNAMIC AV MODE: GAME AV MODE: DYNAMIC... the source video characteristics and smoothly adjusts the screen brightness accordingly to realize deeper black levels. • "xvYCC" can only be registered manually to the factory preset values. Input Signal (for Analog PC input mode only) Some input signals may have to set the mode for each...

LC-65D64U Operation Manual
Page 56
... (Blue-ray Disc equipment, AV amplifier, DVD). • By connecting AQUOS LINK-compatible devices with HDMI-certified cables to the TV, you can control a recorder or AV amplifier using the remote control of the AQUOS LINK device to be used with this...steps in standby mode, it automatically turns on page 55 need to TV. NOTE • The above description is set to be connected using this operation manual and the operation manual of the TV. • AQUOS LINK allows you can control the TV and the devices as the current input source. You can be completed...
... (Blue-ray Disc equipment, AV amplifier, DVD). • By connecting AQUOS LINK-compatible devices with HDMI-certified cables to the TV, you can control a recorder or AV amplifier using the remote control of the AQUOS LINK device to be used with this...steps in standby mode, it automatically turns on page 55 need to TV. NOTE • The above description is set to be connected using this operation manual and the operation manual of the TV. • AQUOS LINK allows you can control the TV and the devices as the current input source. You can be completed...
LC-65D64U Operation Manual
Page 58
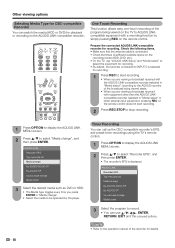
...received with the AQUOS LINK-compatible recorder selected in "Model select", recording to the AQUOS recorder of the broadcast being viewed on the TV to AQUOS LINKcompatible equipment with equipment other than the AQUOS LINKcompatible recorder selected in "Media change Model select 3 Select the program to record... • Check that there is sufficient available space on the AQUOS LINK-compatible recorder. NOTE • Refer to the operation manual of the program being viewed starts. • When you press ENTER in "Model select" or other external input equipment, pressing REC on...
...received with the AQUOS LINK-compatible recorder selected in "Model select", recording to the AQUOS recorder of the broadcast being viewed on the TV to AQUOS LINKcompatible equipment with equipment other than the AQUOS LINKcompatible recorder selected in "Media change Model select 3 Select the program to record... • Check that there is sufficient available space on the AQUOS LINK-compatible recorder. NOTE • Refer to the operation manual of the program being viewed starts. • When you press ENTER in "Model select" or other external input equipment, pressing REC on...
LC-65D64U Operation Manual
Page 59
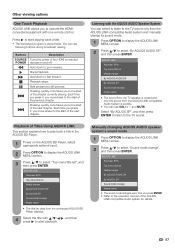
... equipment with a/b/c/d, and then press d to start playback. Press d to the TV sound only from the AQUOS LINK-compatible Audio system and manually change Model select • The sound from the TV speaker is muted and only the sound from the connected AQUOS BD Player displays....pictures. Buttons SOURCE POWER G I J H F T U Description Turns the power of the AQUOS LINK-compatible Audio system for details. 57 Starts Playback. Manually changing AQUOS AUDIO speaker system's sound mode 1 Press OPTION to display the AQUOS LINK MENU screen. 2 Press a/b to select "Sound mode change Model ...
... equipment with a/b/c/d, and then press d to start playback. Press d to the TV sound only from the AQUOS LINK-compatible Audio system and manually change Model select • The sound from the TV speaker is muted and only the sound from the connected AQUOS BD Player displays....pictures. Buttons SOURCE POWER G I J H F T U Description Turns the power of the AQUOS LINK-compatible Audio system for details. 57 Starts Playback. Manually changing AQUOS AUDIO speaker system's sound mode 1 Press OPTION to display the AQUOS LINK MENU screen. 2 Press a/b to select "Sound mode change Model ...

LC-65D64U Operation Manual
Page 65
Option aaaa 3 Press and hold both CHr and VOLk on the TV simultaneously until the message appears on the screen. The secret number is . Setup Secret No. CLEARING THE SECRET NUMBER If you forget the secret number, ..." or "Reset", and the Secret number input screen displays. NOTE • As a precautionary measure, make a note of your secret number above, cut it from this manual, and keep it in a safe place. 63
Option aaaa 3 Press and hold both CHr and VOLk on the TV simultaneously until the message appears on the screen. The secret number is . Setup Secret No. CLEARING THE SECRET NUMBER If you forget the secret number, ..." or "Reset", and the Secret number input screen displays. NOTE • As a precautionary measure, make a note of your secret number above, cut it from this manual, and keep it in a safe place. 63
LC-65D64U Operation Manual
Page 67
...you once completed. YOU MAY ALSO HAVE OTHER RIGHTS WHICH VARY FROM STATE TO STATE. Nor shall Sharp be readily available to the servicer, free and clear of any ): LC-65D64U LCD Color Television (Be sure to have Proof of Purchase available. in their home or residence. Any ...ACCESSORIES AND EXTENDED WARRANTIES, CALL 1-800-BE-SHARP OR VISIT www.sharpusa.com 65 THIS WARRANTY GIVES YOU SPECIFIC LEGAL RIGHTS. In order for the Product to be able to the purchaser and only for this Limited Warranty (see Operation Manual on contract, negligence, strict liability or otherwise...
...you once completed. YOU MAY ALSO HAVE OTHER RIGHTS WHICH VARY FROM STATE TO STATE. Nor shall Sharp be readily available to the servicer, free and clear of any ): LC-65D64U LCD Color Television (Be sure to have Proof of Purchase available. in their home or residence. Any ...ACCESSORIES AND EXTENDED WARRANTIES, CALL 1-800-BE-SHARP OR VISIT www.sharpusa.com 65 THIS WARRANTY GIVES YOU SPECIFIC LEGAL RIGHTS. In order for the Product to be able to the purchaser and only for this Limited Warranty (see Operation Manual on contract, negligence, strict liability or otherwise...


