
User Manual
Page 9
Contents IMPORTANT INFORMATION 1-2 DEAR SHARP CUSTOMER 3 IMPORTANT SAFETY INSTRUCTIONS 3-6 Accessories 8 Supplied Accessories 8 Optional Accessories 8 ... 54 Other Viewing Options Presetting Remote Control Function 55 Operating the Connected Equipment 55-56 Using AQUOS LINK Controlling HDMI Equipment Using AQUOS LINK 57-59 Link Operation Menu 59-60 Using a Smartphone with the TV 61 Using...of the TV 64-65 Using the Internet Connecting to the Internet 66 Internet Setup 67-68 AQUOS Advantage Live 68 Entering Text (Software Keyboard 69 Using the Browser 70-71 Using Applications via ...
Contents IMPORTANT INFORMATION 1-2 DEAR SHARP CUSTOMER 3 IMPORTANT SAFETY INSTRUCTIONS 3-6 Accessories 8 Supplied Accessories 8 Optional Accessories 8 ... 54 Other Viewing Options Presetting Remote Control Function 55 Operating the Connected Equipment 55-56 Using AQUOS LINK Controlling HDMI Equipment Using AQUOS LINK 57-59 Link Operation Menu 59-60 Using a Smartphone with the TV 61 Using...of the TV 64-65 Using the Internet Connecting to the Internet 66 Internet Setup 67-68 AQUOS Advantage Live 68 Entering Text (Software Keyboard 69 Using the Browser 70-71 Using Applications via ...
User Manual
Page 15
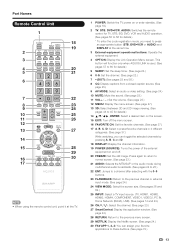
... at the same time. 3 External equipment operational buttons: Operate the external equipment. 4 OPTION: Display the Link Operation Menu screen. This button will function only when AQUOS LINK is used. (See pages 57 to 60 for details.) 5 SLEEP: Set the sleep timer. (See page 23.) 6 0-9: Set the channel. (See page 23.) 7 •...
... at the same time. 3 External equipment operational buttons: Operate the external equipment. 4 OPTION: Display the Link Operation Menu screen. This button will function only when AQUOS LINK is used. (See pages 57 to 60 for details.) 5 SLEEP: Set the sleep timer. (See page 23.) 6 0-9: Set the channel. (See page 23.) 7 •...
User Manual
Page 30
... and 45 OPC Page 29 Backlight Page 29 3D Brightness Boost Page 45 Contrast Page 29 Brightness Page 29 Color Page 29 Tint Page 29 Sharpness Page 29 Advanced Pages 29-30 C.M.S.-Hue Page 29 C.M.S.-Saturation Page 29 C.M.S.-Value Page 29 Color Gamut Range Page 30 Color Temp Page 30 Motion... Network (DLNA) Operation Panel Page 53 View Mode Page 33 Freeze Page 33 Change Audio Page 33 Change CC Page 33 3D Setup Page 46 AQUOS LINK Setup Page 58 Terminal Setting Pages 33-34, 63 Audio Setup Page 33 PC input Page 63 Audio Select Page 63 Input Skip Page...
... and 45 OPC Page 29 Backlight Page 29 3D Brightness Boost Page 45 Contrast Page 29 Brightness Page 29 Color Page 29 Tint Page 29 Sharpness Page 29 Advanced Pages 29-30 C.M.S.-Hue Page 29 C.M.S.-Saturation Page 29 C.M.S.-Value Page 29 Color Gamut Range Page 30 Color Temp Page 30 Motion... Network (DLNA) Operation Panel Page 53 View Mode Page 33 Freeze Page 33 Change Audio Page 33 Change CC Page 33 3D Setup Page 46 AQUOS LINK Setup Page 58 Terminal Setting Pages 33-34, 63 Audio Setup Page 33 PC input Page 63 Audio Select Page 63 Input Skip Page...
User Manual
Page 35
..." when connecting to display the View Mode menu screen. On-Screen Display Menu System Options Example System Options System Options Menu View Option 3D Setup AQUOS LINK Setup Terminal Setting Menu Design Operation Lock Out [Off] Icon Light Up Setting [On] Demo Mode View Mode This function changes the screen size...
..." when connecting to display the View Mode menu screen. On-Screen Display Menu System Options Example System Options System Options Menu View Option 3D Setup AQUOS LINK Setup Terminal Setting Menu Design Operation Lock Out [Off] Icon Light Up Setting [On] Demo Mode View Mode This function changes the screen size...
User Manual
Page 48
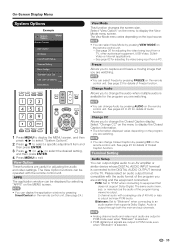
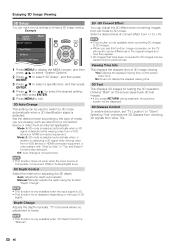
Example System Options System Options Menu View Option 3D Setup AQUOS LINK Setup Terminal Setting 1 Press MENU to display the MENU screen, and then press c/d to select "System Options". 2 Press a/b to select "3D Setup", and then ...
Example System Options System Options Menu View Option 3D Setup AQUOS LINK Setup Terminal Setting 1 Press MENU to display the MENU screen, and then press c/d to select "System Options". 2 Press a/b to select "3D Setup", and then ...

User Manual
Page 59
... may not operate properly when an HDMI splitter or AV selector unit is an example of the AQUOS LINK function. • The steps in "AQUOS LINK Setup" on the type of the TV. • AQUOS LINK allows you to operate the HDMI-connected equipment with one AV amplifier can be... completed beforehand. • Refer to this operation manual and the operation manual of the AQUOS LINK device to 3 pieces of the remote control unit. Connected AQUOS LINK-compatible devices can control the TV and the devices as the current input source. OPTION button will function only...
... may not operate properly when an HDMI splitter or AV selector unit is an example of the AQUOS LINK function. • The steps in "AQUOS LINK Setup" on the type of the TV. • AQUOS LINK allows you to operate the HDMI-connected equipment with one AV amplifier can be... completed beforehand. • Refer to this operation manual and the operation manual of the AQUOS LINK device to 3 pieces of the remote control unit. Connected AQUOS LINK-compatible devices can control the TV and the devices as the current input source. OPTION button will function only...

User Manual
Page 60
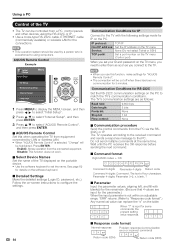
... Select Key Audio Return Channel [Auto] 1 Press MENU to display the MENU screen, and then press c/d to select "System Options". 2 Press a/b to select "AQUOS LINK Setup", and then press ENTER. 3 Press a/b to select a specific item, and then press ENTER. 4 Press a/b (or c/d ) to select ...equipment for recording when you to set for each input terminal. Press d to operate unexpectedly. AQUOS LINK Control Select AQUOS LINK Control to disable AQUOS LINK function even when an AQUOS LINK-compatible HDMI device is played back. Channel Select Key This function can be output from ...
... Select Key Audio Return Channel [Auto] 1 Press MENU to display the MENU screen, and then press c/d to select "System Options". 2 Press a/b to select "AQUOS LINK Setup", and then press ENTER. 3 Press a/b to select a specific item, and then press ENTER. 4 Press a/b (or c/d ) to select ...equipment for recording when you to set for each input terminal. Press d to operate unexpectedly. AQUOS LINK Control Select AQUOS LINK Control to disable AQUOS LINK function even when an AQUOS LINK-compatible HDMI device is played back. Channel Select Key This function can be output from ...

User Manual
Page 61
... following items. • Make sure that the antenna cable is connected. • Check that there is selected for recording on the connected AQUOS LINK-compatible equipment. 1 Press OPTION to display the Link Operation Menu screen. 2 Select "Start Recording", and then press ENTER to start recording.... • You can also use "AQUOS LINK Setup" and "Selecting Recorder" to select the equipment for recording. • By default, the recorder connected to HDMI 1 is sufficient...
... following items. • Make sure that the antenna cable is connected. • Check that there is selected for recording on the connected AQUOS LINK-compatible equipment. 1 Press OPTION to display the Link Operation Menu screen. 2 Select "Start Recording", and then press ENTER to start recording.... • You can also use "AQUOS LINK Setup" and "Selecting Recorder" to select the equipment for recording. • By default, the recorder connected to HDMI 1 is sufficient...

User Manual
Page 62
... power of the recorder for the connected equipment and to play back the title you press ENTER, the connected equipment switches on the AQUOS LINK-compatible equipment, and select the appropriate external input. HDMI Device Selection If multiple HDMI devices are connected in a daisy chain, ...displayed. • The setup menu will not be displayed with a/b/c/d, and then press d to start playback. • This function works only when AQUOS LINK-compatible equipment is connected. Show Start Menu You can call up a setup menu from a list of the equipment (recording or in "Change...
... power of the recorder for the connected equipment and to play back the title you press ENTER, the connected equipment switches on the AQUOS LINK-compatible equipment, and select the appropriate external input. HDMI Device Selection If multiple HDMI devices are connected in a daisy chain, ...displayed. • The setup menu will not be displayed with a/b/c/d, and then press d to start playback. • This function works only when AQUOS LINK-compatible equipment is connected. Show Start Menu You can call up a setup menu from a list of the equipment (recording or in "Change...

User Manual
Page 63
...Selection When an MHL-compatible device is connected while the TV is on, the input mode is selected automatically. • This function operates when "AQUOS LINK Control" is required to use an MHL-compatible cable (commercially available). • You can view pictures and video on a large screen.... device. • a/b/c/d, ENTER, EXIT, 0-9, • (DOT), ENT, etc. • The operations vary depending on automatically. • This function operates when "AQUOS LINK Control" is set to a smartphone that supports Mobile High-Definition Link (MHL) using an MHL-compatible cable.
...Selection When an MHL-compatible device is connected while the TV is on, the input mode is selected automatically. • This function operates when "AQUOS LINK Control" is required to use an MHL-compatible cable (commercially available). • You can view pictures and video on a large screen.... device. • a/b/c/d, ENTER, EXIT, 0-9, • (DOT), ENT, etc. • The operations vary depending on automatically. • This function operates when "AQUOS LINK Control" is set to a smartphone that supports Mobile High-Definition Link (MHL) using an MHL-compatible cable.

User Manual
Page 65
... the TV and PC are registered trademarks of International Business Machines Corp. 63 Using a PC Example System Options Menu System Options View Option 3D Setup AQUOS LINK Setup Terminal Setting Menu Design O ti L k O t 1 Press MENU to display the MENU screen, and then press c/d to select "System Options". 2 Press a/b to select "Terminal...
... the TV and PC are registered trademarks of International Business Machines Corp. 63 Using a PC Example System Options Menu System Options View Option 3D Setup AQUOS LINK Setup Terminal Setting Menu Design O ti L k O t 1 Press MENU to display the MENU screen, and then press c/d to select "System Options". 2 Press a/b to select "Terminal...
User Manual
Page 66
...digits: Parameter 0-9, x, blank, ? ■ Parameter Input the parameter values, aligning left, and fill with the following settings made for "AQUOS Remote Control". • The connection will be cut off when there has been no communication for RS-232C Set the RS-232C communication settings on... select "Initial Setup". 2 Press a/b to select "Internet Setup", and then press ENTER. 3 Press a/b to select "AQUOS Remote Control", and then press ENTER. ■ AQUOS Remote Control Set this function, make settings for IP on the TV menu (Control port) When you use this when operating...
...digits: Parameter 0-9, x, blank, ? ■ Parameter Input the parameter values, aligning left, and fill with the following settings made for "AQUOS Remote Control". • The connection will be cut off when there has been no communication for RS-232C Set the RS-232C communication settings on... select "Initial Setup". 2 Press a/b to select "Internet Setup", and then press ENTER. 3 Press a/b to select "AQUOS Remote Control", and then press ENTER. ■ AQUOS Remote Control Set this function, make settings for IP on the TV menu (Control port) When you use this when operating...
User Manual
Page 68
... 3D images when accessing the Internet. Using a separate wireless USB LAN adapter may result in the 2.4-GHz frequency (such as from the TV. • Use "AQUOS ADVANTAGE LIVE" to your broadband router (commercially available).
... 3D images when accessing the Internet. Using a separate wireless USB LAN adapter may result in the 2.4-GHz frequency (such as from the TV. • Use "AQUOS ADVANTAGE LIVE" to your broadband router (commercially available).

User Manual
Page 70
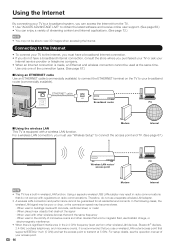
...you cannot connect to the Internet Perform the procedures below to check your TV's network settings and connection. • When the AQUOS ADVANTAGE LIVE screen appears, now you are displayed for "Internet Setup". Using the Internet Checking Your Internet Connection 1 Press SmartCentral to... display the application window. 2 Press c/d to select "AQUOS ADVANTAGE LIVE", and then press ENTER. • If " " or " " is displayed after you connect to the Internet, check your TV's...
...you cannot connect to the Internet Perform the procedures below to check your TV's network settings and connection. • When the AQUOS ADVANTAGE LIVE screen appears, now you are displayed for "Internet Setup". Using the Internet Checking Your Internet Connection 1 Press SmartCentral to... display the application window. 2 Press c/d to select "AQUOS ADVANTAGE LIVE", and then press ENTER. • If " " or " " is displayed after you connect to the Internet, check your TV's...

User Manual
Page 72
...64257;les. • You cannot view a history of the pages you have visited. • You cannot change the startup page displayed when you start AQUOS ADVANTAGE LIVE. • If a pop-up window has appeared as such. EXIT • Press the button to return to the next page. RETURN...video and audio, text or images may not be displayed correctly. Tool bar Selected item Description Go back to jump, and then press ENTER. DISCLAIMERS SHARP corporation bears no responsibility regarding the content and quality of a page. • Where there is link text or a link image in a frame....
...64257;les. • You cannot view a history of the pages you have visited. • You cannot change the startup page displayed when you start AQUOS ADVANTAGE LIVE. • If a pop-up window has appeared as such. EXIT • Press the button to return to the next page. RETURN...video and audio, text or images may not be displayed correctly. Tool bar Selected item Description Go back to jump, and then press ENTER. DISCLAIMERS SHARP corporation bears no responsibility regarding the content and quality of a page. • Where there is link text or a link image in a frame....
User Manual
Page 84
Check the resolution setting on the 3D Glasses? This does not affect the TV's performance. • The AQUOS ADVANTAGE LIVE • Is the ETHERNET cable connected correctly? Press 3D to switch to PCM or Dolby Digital. - Set the audio output format of connected ...
Check the resolution setting on the 3D Glasses? This does not affect the TV's performance. • The AQUOS ADVANTAGE LIVE • Is the ETHERNET cable connected correctly? Press 3D to switch to PCM or Dolby Digital. - Set the audio output format of connected ...


