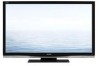
LC-42D64U | LC-46D64U | LC-52D64U Operation Manual
Page 3
The numbers are based on -screen displays in this operation manual are for explanation purposes and may vary slightly from... of important operating and maintenance (servicing) instructions in the space provided. IMPORTANT: To aid reporting in case of the TV. NO USER-SERVICEABLE PARTS INSIDE. The lightning flash with arrow-head symbol, within the product's enclosure that are... FIRE OR ELECTRIC SHOCK, DO NOT EXPOSE THIS PRODUCT TO RAIN OR MOISTURE. ENGLISH LC-42D64U LC-46D64U LC-52D64U LIQUID CRYSTAL TELEVISION ENGLISH OPERATION MANUAL • The illustrations and on the...
The numbers are based on -screen displays in this operation manual are for explanation purposes and may vary slightly from... of important operating and maintenance (servicing) instructions in the space provided. IMPORTANT: To aid reporting in case of the TV. NO USER-SERVICEABLE PARTS INSIDE. The lightning flash with arrow-head symbol, within the product's enclosure that are... FIRE OR ELECTRIC SHOCK, DO NOT EXPOSE THIS PRODUCT TO RAIN OR MOISTURE. ENGLISH LC-42D64U LC-46D64U LC-52D64U LIQUID CRYSTAL TELEVISION ENGLISH OPERATION MANUAL • The illustrations and on the...
LC-42D64U | LC-46D64U | LC-52D64U Operation Manual
Page 6
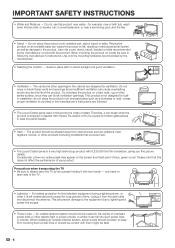
...and good ventilation. • Ventilation - Occasionally, a few non-active pixels may appear on each side of your product. one hand on the screen as damage to be situated away from the wall outlet and disconnect the antenna. For added protection for this product is a very high technology ...other products (including amplifiers) that this product near a bath tub, wash bowl, kitchen sink, or laundry tub; Precautions when transporting the TV • Be sure to lightning and power-line surges. • Power Lines - Do not cover or block these vents and openings since they can...
...and good ventilation. • Ventilation - Occasionally, a few non-active pixels may appear on each side of your product. one hand on the screen as damage to be situated away from the wall outlet and disconnect the antenna. For added protection for this product is a very high technology ...other products (including amplifiers) that this product near a bath tub, wash bowl, kitchen sink, or laundry tub; Precautions when transporting the TV • Be sure to lightning and power-line surges. • Power Lines - Do not cover or block these vents and openings since they can...
LC-42D64U | LC-46D64U | LC-52D64U Operation Manual
Page 9
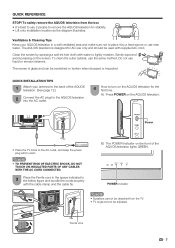
...dropped or impacted. Do not use the same method. B) The POWER indicator on the AQUOS television for AC use near water. Clean the screen by a heat source or use only and should be adjusted. Gently wipe and avoid pressing on the AQUOS television. To clean the outer cabinet..., use liquid or aerosol cleaners. A) Press POWER on the screen. Power AC outlet • Place the TV close to the back of the AQUOS television lights GREEN. The screen is designed for the first time. Ferrite core 7 NOTE • TO PREVENT RISK ...
...dropped or impacted. Do not use the same method. B) The POWER indicator on the AQUOS television for AC use near water. Clean the screen by a heat source or use only and should be adjusted. Gently wipe and avoid pressing on the AQUOS television. To clean the outer cabinet..., use liquid or aerosol cleaners. A) Press POWER on the screen. Power AC outlet • Place the TV close to the back of the AQUOS television lights GREEN. The screen is designed for the first time. Ferrite core 7 NOTE • TO PREVENT RISK ...
LC-42D64U | LC-46D64U | LC-52D64U Operation Manual
Page 11
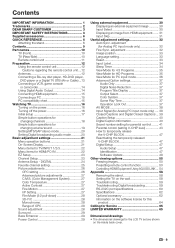
...Contents IMPORTANT INFORMATION 1 Trademarks 2 DEAR SHARP CUSTOMER 3 IMPORTANT SAFETY INSTRUCTIONS 3 Supplied accessories 6 QUICK REFERENCE 6 Attaching the stand 6 Contents 9 Part names 10 TV (Front 10 TV (Rear/Side 10 Remote control unit 11...Calling for Service 65 LIMITED WARRANTY 65 Dimensional drawings • The dimensional drawings for the LCD TV set are shown on the power 16 Turning off the power 16 Initial setup 17 Simple...settings 21 Menu operation buttons 21 On-Screen Display 21 Menu items for TV/INPUT 1/2/3 22 Menu items for Analog PC input mode only 32 Fine ...
...Contents IMPORTANT INFORMATION 1 Trademarks 2 DEAR SHARP CUSTOMER 3 IMPORTANT SAFETY INSTRUCTIONS 3 Supplied accessories 6 QUICK REFERENCE 6 Attaching the stand 6 Contents 9 Part names 10 TV (Front 10 TV (Rear/Side 10 Remote control unit 11...Calling for Service 65 LIMITED WARRANTY 65 Dimensional drawings • The dimensional drawings for the LCD TV set are shown on the power 16 Turning off the power 16 Initial setup 17 Simple...settings 21 Menu operation buttons 21 On-Screen Display 21 Menu items for TV/INPUT 1/2/3 22 Menu items for Analog PC input mode only 32 Fine ...
LC-42D64U | LC-46D64U | LC-52D64U Operation Manual
Page 13
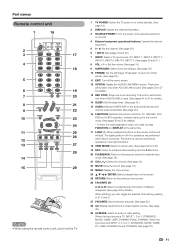
...lights up for the current mode. (See pages 50 to 53 for details.) While watching, you need to press FUNCTION and DISPLAY at the TV. 1 TV POWER: Switch the TV power on or enters standby. (See page 16.) 2 DISPLAY: Display the channel information. 3 SOURCE POWER: Turns the power of the ... if no operations are performed within about 5 seconds. Press again to return to 57 for TV, CBL/SAT, VCR, DVD and AUDIO operation. This button will turn off the menu screen. 12 OPTION: Display the AQUOS LINK MENU screen. The lighting will function only when AQUOS LINK is INPUT 4, 5, 6 or 7: STANDARD,...
...lights up for the current mode. (See pages 50 to 53 for details.) While watching, you need to press FUNCTION and DISPLAY at the TV. 1 TV POWER: Switch the TV power on or enters standby. (See page 16.) 2 DISPLAY: Display the channel information. 3 SOURCE POWER: Turns the power of the ... if no operations are performed within about 5 seconds. Press again to return to 57 for TV, CBL/SAT, VCR, DVD and AUDIO operation. This button will turn off the menu screen. 12 OPTION: Display the AQUOS LINK MENU screen. The lighting will function only when AQUOS LINK is INPUT 4, 5, 6 or 7: STANDARD,...
LC-42D64U | LC-46D64U | LC-52D64U Operation Manual
Page 18
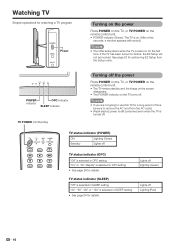
...off . POWER indicator OPC indicator SLEEP indicator TV POWER (On/Standby) Turning off the power Press POWER on the TV, or TV POWER on the remote control unit. • The TV enters standby and the image on the screen disappears. • The POWER indicator on the TV turns off Lighting (Red) 16 NOTE •...; If you are not going to remove the AC cord from the AC outlet. • Weak electric power is still consumed even when the TV is turned off TV status indicator (OPC...
...off . POWER indicator OPC indicator SLEEP indicator TV POWER (On/Standby) Turning off the power Press POWER on the TV, or TV POWER on the remote control unit. • The TV enters standby and the image on the screen disappears. • The POWER indicator on the TV turns off Lighting (Red) 16 NOTE •...; If you are not going to remove the AC cord from the AC outlet. • Weak electric power is still consumed even when the TV is turned off TV status indicator (OPC...

LC-42D64U | LC-46D64U | LC-52D64U Operation Manual
Page 19
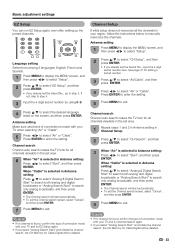
...Antenna setting: Press c/d to the AC outlet. (See page 7.) Channel search Channel auto search makes the TV look for the first time, it will start automatically. • To exit the Channel search screen, select "Cancel", and then press ENTER. Example CH Search Air [ 25 ] Found [ 20 ] ... both analog and digital broadcasts or "Analog Search Start" to select the desired language listed on the screen, and then press ENTER. Watching TV Initial setup When you turn on the TV for all channels viewable in the set area. Language setting Select from among 3 languages: English, French...
...Antenna setting: Press c/d to the AC outlet. (See page 7.) Channel search Channel auto search makes the TV look for the first time, it will start automatically. • To exit the Channel search screen, select "Cancel", and then press ENTER. Example CH Search Air [ 25 ] Found [ 20 ] ... both analog and digital broadcasts or "Analog Search Start" to select the desired language listed on the screen, and then press ENTER. Watching TV Initial setup When you turn on the TV for all channels viewable in the set area. Language setting Select from among 3 languages: English, French...
LC-42D64U | LC-46D64U | LC-52D64U Operation Manual
Page 21
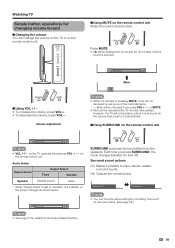
...automatically. ■ Using SURROUND on the remote control unit 20 NOTE • VOLk/l on the TV operates the same as shown below . - Surround sound options On: Makes it possible to "Variable", the indicator on the screen changes as VOL k/l on the menu items. (See page 29.) 19 However, the... TV will be canceled by choosing "Surround" on the remote control unit. SURROUND produces Surround effect from the ...
...automatically. ■ Using SURROUND on the remote control unit 20 NOTE • VOLk/l on the TV operates the same as shown below . - Surround sound options On: Makes it possible to "Variable", the indicator on the screen changes as VOL k/l on the menu items. (See page 29.) 19 However, the... TV will be canceled by choosing "Surround" on the remote control unit. SURROUND produces Surround effect from the ...
LC-42D64U | LC-46D64U | LC-52D64U Operation Manual
Page 23
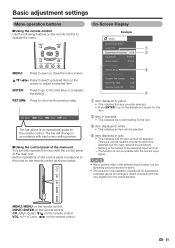
... bar will change in the operation manual are for explanation purposes (some are various reasons why items cannot be selected. On-Screen Display Example Option AQUOS LINK Setup Audio Only Digital Noise Reduction [Off] Input Select [VIDEO] Output select [Fixed] Color System [Auto] Caption Setup ... this item. 2 Item in the selected input modes, but the main reasons are the same. • The screens in accordance with each menu setting screen. ■ Using the control panel of the main unit You can be selected. 4 Item displayed in gray • This indicates that the item ...
... bar will change in the operation manual are for explanation purposes (some are various reasons why items cannot be selected. On-Screen Display Example Option AQUOS LINK Setup Audio Only Digital Noise Reduction [Off] Input Select [VIDEO] Output select [Fixed] Color System [Auto] Caption Setup ... this item. 2 Item in the selected input modes, but the main reasons are the same. • The screens in accordance with each menu setting screen. ■ Using the control panel of the main unit You can be selected. 4 Item displayed in gray • This indicates that the item ...
LC-42D64U | LC-46D64U | LC-52D64U Operation Manual
Page 25
..." to search only analog broadcasts, and then press ENTER. • The Channel search will start automatically. • To exit the Channel search screen, select "Cancel", and then press ENTER. 4 Press MENU to exit. Antenna setting Make sure what kind of connection is selected in Antenna setting...: Press c/d to manually memorize the channels. Channel search Channel auto search makes the TV look for Cable Digital will be deleted. When "Cable" is made with your region, follow the instructions below to select "Start",...
..." to search only analog broadcasts, and then press ENTER. • The Channel search will start automatically. • To exit the Channel search screen, select "Cancel", and then press ENTER. 4 Press MENU to exit. Antenna setting Make sure what kind of connection is selected in Antenna setting...: Press c/d to manually memorize the channels. Channel search Channel auto search makes the TV look for Cable Digital will be deleted. When "Cable" is made with your region, follow the instructions below to select "Start",...
LC-42D64U | LC-46D64U | LC-52D64U Operation Manual
Page 26
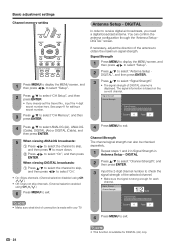
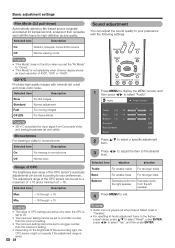
... channel is strong enough for each channel. Antenna Setup - The signal information is made with your TV. See page 41 for DIGITAL (Air) only. 24 Signal Strength 1 Press MENU to display the MENU screen, and then press c/d to select "Setup". 2 Press a/b to select "Antenna Setup DIGITAL", and... check the signal strength of the antenna to obtain the maximum signal strength. Basic adjustment settings Channel memory setting 1 Press MENU to display the MENU screen, and then press c/d to select "Setup". 2 Press a/b to select "CH Setup", and then press ENTER. • If you need a ...
... channel is strong enough for each channel. Antenna Setup - The signal information is made with your TV. See page 41 for DIGITAL (Air) only. 24 Signal Strength 1 Press MENU to display the MENU screen, and then press c/d to select "Setup". 2 Press a/b to select "Antenna Setup DIGITAL", and... check the signal strength of the antenna to obtain the maximum signal strength. Basic adjustment settings Channel memory setting 1 Press MENU to display the MENU screen, and then press c/d to select "Setup". 2 Press a/b to select "CH Setup", and then press ENTER. • If you need a ...
LC-42D64U | LC-46D64U | LC-52D64U Operation Manual
Page 27
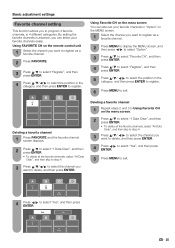
...c/d to exit. Basic adjustment settings Favorite channel setting This function allows you to program 4 favorite channels, in Using Favorite CH on the menu screen. 2 Press a/b to select "1 Data Clear", and then press ENTER. • To delete all the favorite channels, select "All Data ... then press ENTER to register. 6 Press MENU to exit. A B C D Air 3 Deleting a favorite channel 1 Press FAVORITE and the favorite channel screen displays. 2 Press a/b to select "1 Data Clear", and then press ENTER. • To delete all the favorite channels, select "All Data Clear", and...
...c/d to exit. Basic adjustment settings Favorite channel setting This function allows you to program 4 favorite channels, in Using Favorite CH on the menu screen. 2 Press a/b to select "1 Data Clear", and then press ENTER. • To delete all the favorite channels, select "All Data ... then press ENTER to register. 6 Press MENU to exit. A B C D Air 3 Deleting a favorite channel 1 Press FAVORITE and the favorite channel screen displays. 2 Press a/b to select "1 Data Clear", and then press ENTER. • To delete all the favorite channels, select "All Data Clear", and...
LC-42D64U | LC-46D64U | LC-52D64U Operation Manual
Page 28
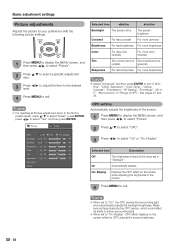
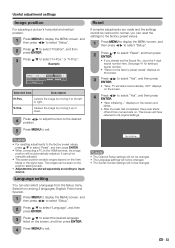
... adjusts On: Display Displays the OPC effect on the screen while the OPC adjusts the screen brightness. 26 Picture Audio OPC Off On Backlight [b12] a16 Contrast [b30] 0 Brightness [ 0] a30 Color [ 0] a30 Tint [ 0] a30 Sharpness [ b2] a10 Advanced Reset On : Display b16 b40... b30 b30 b30 b10 Selected item cbutton dbutton Backlight The screen dims The screen brightens Contrast For less contrast For more contrast Brightness For less brightness For more ...
... adjusts On: Display Displays the OPC effect on the screen while the OPC adjusts the screen brightness. 26 Picture Audio OPC Off On Backlight [b12] a16 Contrast [b30] 0 Brightness [ 0] a30 Color [ 0] a30 Tint [ 0] a30 Sharpness [ b2] a10 Advanced Reset On : Display b16 b40... b30 b30 b30 b10 Selected item cbutton dbutton Backlight The screen dims The screen brightens Contrast For less contrast For more contrast Brightness For less brightness For more ...
LC-42D64U | LC-46D64U | LC-52D64U Operation Manual
Page 29
..., use color temperature correction. Increases or decreases the saturation of images. Basic adjustment settings Advanced picture adjustments This TV provides various advanced functions for optimizing the picture quality. 1 Press MENU to display the MENU screen, and then press c/d to select "Picture". 2 Press a/b to select "Advanced", and then press ENTER. 3 Press a/b to select...
..., use color temperature correction. Increases or decreases the saturation of images. Basic adjustment settings Advanced picture adjustments This TV provides various advanced functions for optimizing the picture quality. 1 Press MENU to display the MENU screen, and then press c/d to select "Picture". 2 Press a/b to select "Advanced", and then press ENTER. 3 Press a/b to select...
LC-42D64U | LC-46D64U | LC-52D64U Operation Manual
Page 30
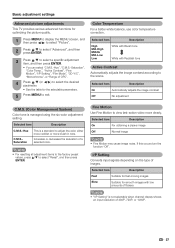
... picture quality. The adjustment range of 480P, 720P, or 1080P. 3D-Y/C Provides high quality images with the following settings. 1 Press MENU to display the MENU screen, and then press c/d to select "Audio". Selected item Description On Detects, analyzes, converts film source Off Normal viewing mode NOTE • "Film Mode" does...
... picture quality. The adjustment range of 480P, 720P, or 1080P. 3D-Y/C Provides high quality images with the following settings. 1 Press MENU to display the MENU screen, and then press c/d to select "Audio". Selected item Description On Detects, analyzes, converts film source Off Normal viewing mode NOTE • "Film Mode" does...

LC-42D64U | LC-46D64U | LC-52D64U Operation Manual
Page 31
... Press MENU to exit. NOTE • Audio menu is grayed out when Output Select is the factory preset value. • When a TV program finishes, this case, please refer to the operation manual of your DVD player. Bass Enhancer This function allows you to enjoy ... is the factory preset value. 29 Basic adjustment settings Surround Surround function allows you to enjoy bass-enhanced sound. 1 Press MENU to display the MENU screen, and then press c/d to select "Audio". 2 Press a/b to select "Bass Enhancer", and then press ENTER. 3 Press c/d to select "On", ...
... Press MENU to exit. NOTE • Audio menu is grayed out when Output Select is the factory preset value. • When a TV program finishes, this case, please refer to the operation manual of your DVD player. Bass Enhancer This function allows you to enjoy ... is the factory preset value. 29 Basic adjustment settings Surround Surround function allows you to enjoy bass-enhanced sound. 1 Press MENU to display the MENU screen, and then press c/d to select "Audio". 2 Press a/b to select "Bass Enhancer", and then press ENTER. 3 Press c/d to select "On", ...
LC-42D64U | LC-46D64U | LC-52D64U Operation Manual
Page 32
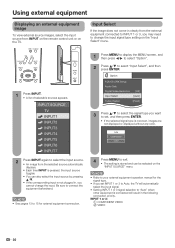
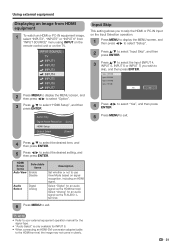
...the equipment beforehand. NOTE • Refer to your external equipment operation manual for external equipment connection. 1 Press MENU to display the MENU screen, and then press c/d to select "Option". 2 Press a/b to exit. • The setting is incorrect, images are not displayed ...A list of selectable sources appears. Auto COMPONENT VIDEO 4 Press MENU to select "Input Select", and then press ENTER. INPUT SOURCE TV INPUT1 INPUT2 INPUT3 INPUT4 INPUT5 INPUT6 INPUT7 2 Press INPUT again to change the input. Using external equipment Displaying an external equipment image To...
...the equipment beforehand. NOTE • Refer to your external equipment operation manual for external equipment connection. 1 Press MENU to display the MENU screen, and then press c/d to select "Option". 2 Press a/b to exit. • The setting is incorrect, images are not displayed ...A list of selectable sources appears. Auto COMPONENT VIDEO 4 Press MENU to select "Input Select", and then press ENTER. INPUT SOURCE TV INPUT1 INPUT2 INPUT3 INPUT4 INPUT5 INPUT6 INPUT7 2 Press INPUT again to change the input. Using external equipment Displaying an external equipment image To...
LC-42D64U | LC-46D64U | LC-52D64U Operation Manual
Page 33
..." or "INPUT 6" from "INPUT SOURCE" menu using INPUT on the remote control unit or on the Input Selection operation. 1 Press MENU to display the MENU screen, and then press c/d to select "Setup". 2 Press a/b to select "Input Skip", and then press ENTER. 3 Press a/b to select the Input (INPUT 4, INPUT ...INPUT6 INPUT7 Input Skip This setting allows you to skip the HDMI or PC-IN Input on the TV. Input 4 (HDMI) Input 5 (HDMI) Input 6 (HDMI) Input 7 (RGB) Yes No 2 Press MENU to display the MENU screen, and then press c/d to select "Option". 3 Press a/b to skip, and then press ENTER...
..." or "INPUT 6" from "INPUT SOURCE" menu using INPUT on the remote control unit or on the Input Selection operation. 1 Press MENU to display the MENU screen, and then press c/d to select "Setup". 2 Press a/b to select "Input Skip", and then press ENTER. 3 Press a/b to select the Input (INPUT 4, INPUT ...INPUT6 INPUT7 Input Skip This setting allows you to skip the HDMI or PC-IN Input on the TV. Input 4 (HDMI) Input 5 (HDMI) Input 6 (HDMI) Input 7 (RGB) Yes No 2 Press MENU to display the MENU screen, and then press c/d to select "Option". 3 Press a/b to skip, and then press ENTER...
LC-42D64U | LC-46D64U | LC-52D64U Operation Manual
Page 34
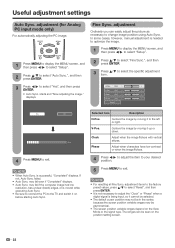
...8226; Auto Sync. adjustment Ordinarily you can be asymmetrical. • The screen position variable ranges depend on before starting Auto Sync. starts and "Now adjusting the image." is not necessary to the TV and switch it to select the specific adjustment item. Centers the ... to exit. displays. 2 Press a/b to select "Fine Sync.", and then press ENTER. 3 Press a/b to the left or right. may be seen on the position-setting screen. 32 Useful adjustment settings Auto Sync. H-Pos. [ 90] a b V-Pos. [ 39] a b Clock [ 90] a b Phase [ 20] a b Reset Yes No...
...8226; Auto Sync. adjustment Ordinarily you can be asymmetrical. • The screen position variable ranges depend on before starting Auto Sync. starts and "Now adjusting the image." is not necessary to the TV and switch it to select the specific adjustment item. Centers the ... to exit. displays. 2 Press a/b to select "Fine Sync.", and then press ENTER. 3 Press a/b to the left or right. may be seen on the position-setting screen. 32 Useful adjustment settings Auto Sync. H-Pos. [ 90] a b V-Pos. [ 39] a b Clock [ 90] a b Phase [ 20] a b Reset Yes No...
LC-42D64U | LC-46D64U | LC-52D64U Operation Manual
Page 35
... variable ranges depend on the screen. 4 Press c/d to select "H-Pos." NOTE • The Channel Setup settings will not be changed . • The Secret number settings will have returned to select "Yes", and then press ENTER. • "Now, TV will be changed. 33 Useful adjustment ...settings Image position For adjusting a picture's horizontal and vertical position. 1 Press MENU to display the MENU screen, and then press c/d to select "Setup". 2 Press a/b to select "...
... variable ranges depend on the screen. 4 Press c/d to select "H-Pos." NOTE • The Channel Setup settings will not be changed . • The Secret number settings will have returned to select "Yes", and then press ENTER. • "Now, TV will be changed. 33 Useful adjustment ...settings Image position For adjusting a picture's horizontal and vertical position. 1 Press MENU to display the MENU screen, and then press c/d to select "Setup". 2 Press a/b to select "...


