

LC-28HM2 Operation Manual
Page 2
... replaced. Replace only with the limits for help. NO USER-SERVICEABLE PARTS INSIDE. ONLY CAUTION Danger of important operating and maintenance (servicing) instructions in a particular installation. REFER SERVICING TO QUALIFIED SERVICE PERSONNEL. This equipment generates, uses, and can be of sufficient magnitude to operate this equipment. If this equipment not expressly approved by the manufacturer. Do not remove the core part from that to which the receiver...
... replaced. Replace only with the limits for help. NO USER-SERVICEABLE PARTS INSIDE. ONLY CAUTION Danger of important operating and maintenance (servicing) instructions in a particular installation. REFER SERVICING TO QUALIFIED SERVICE PERSONNEL. This equipment generates, uses, and can be of sufficient magnitude to operate this equipment. If this equipment not expressly approved by the manufacturer. Do not remove the core part from that to which the receiver...
LC-28HM2 Operation Manual
Page 3
...Preparation 9 Connecting the Display and AVC System 9 Batteries for Remote Control 11 System Connection (Example 12 Basic Operation 14 Turning on POWER 14 Switching INPUT Source 14 Adjusting BRIGHTNESS 15 Sound VOLUME 15 Adjusting the Display's Position 16 Cleaning 16 Adjustments to the On-Screen Display 17 Menu List 17 Adjusting the VIEW Settings 18 Page Adjusting the BRIGHT Settings 22 Adjusting the PICTURE Settings 23 Adjusting the SOUND Settings 25 Adjusting the OPTION Settings 27 Notes for Connection 29 Connecting a DVD Video Player 29 Connecting a VCR/GAME System (AV...
...Preparation 9 Connecting the Display and AVC System 9 Batteries for Remote Control 11 System Connection (Example 12 Basic Operation 14 Turning on POWER 14 Switching INPUT Source 14 Adjusting BRIGHTNESS 15 Sound VOLUME 15 Adjusting the Display's Position 16 Cleaning 16 Adjustments to the On-Screen Display 17 Menu List 17 Adjusting the VIEW Settings 18 Page Adjusting the BRIGHT Settings 22 Adjusting the PICTURE Settings 23 Adjusting the SOUND Settings 25 Adjusting the OPTION Settings 27 Notes for Connection 29 Connecting a DVD Video Player 29 Connecting a VCR/GAME System (AV...

LC-28HM2 Operation Manual
Page 4
.... Power cord protection-The power cords must be routed properly to perform many years of trouble-free operation of a SHARP LCD product. The LCD panel used to prevent people from stepping on them . 12. Be careful not to service the product yourself. To ensure safety and many useful functions, but it can block ventilation openings. Keep this manual in a safe place-These safety and operating instructions must...
.... Power cord protection-The power cords must be routed properly to perform many years of trouble-free operation of a SHARP LCD product. The LCD panel used to prevent people from stepping on them . 12. Be careful not to service the product yourself. To ensure safety and many useful functions, but it can block ventilation openings. Keep this manual in a safe place-These safety and operating instructions must...

LC-28HM2 Operation Manual
Page 5
... service or repair work by holding it by a qualified technician. b.When a liquid was spilled on batteries or another power source, refer to operate on the product or when objects have fallen into the product. For units designed to the operating instructions. a.When the power cord or plug is a very high technology product with two hands-one hand on the specification label. The LCD panel...
... service or repair work by holding it by a qualified technician. b.When a liquid was spilled on batteries or another power source, refer to operate on the product or when objects have fallen into the product. For units designed to the operating instructions. a.When the power cord or plug is a very high technology product with two hands-one hand on the specification label. The LCD panel...
LC-28HM2 Operation Manual
Page 6
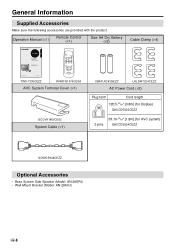
...] (for AVC system) QACCD5024CEZZ QCNW-5948CEZZ Optional Accessories • Bose System Side Speaker (Model: AN-28SP2) • Wall Mount Bracket (Model: AN-28AG1) 4 US Operation Manual (×1) Remote Control (×1) Size AA Dry Battery (×2) Cable Clamp (×4) ENGLISH LC-28HM2 LCD AV MONITOR MONITEUR AV À CRISTAUX LIQUIDES OPERATION MANUAL MODE D'EMPLOI FRANÇAIS POWER INPUT AV INPUT 1 2 3 COMPONENT PC 1 2 MUTE VOL MENU ENTER Printed on post-consumer recycled paper. General Information...
...] (for AVC system) QACCD5024CEZZ QCNW-5948CEZZ Optional Accessories • Bose System Side Speaker (Model: AN-28SP2) • Wall Mount Bracket (Model: AN-28AG1) 4 US Operation Manual (×1) Remote Control (×1) Size AA Dry Battery (×2) Cable Clamp (×4) ENGLISH LC-28HM2 LCD AV MONITOR MONITEUR AV À CRISTAUX LIQUIDES OPERATION MANUAL MODE D'EMPLOI FRANÇAIS POWER INPUT AV INPUT 1 2 3 COMPONENT PC 1 2 MUTE VOL MENU ENTER Printed on post-consumer recycled paper. General Information...

LC-28HM2 Operation Manual
Page 7
Top view - General Information General Information Names of Parts Display For details on the use of each control, refer to the page number indicated in the brackets. VOL + INPUT BRIGHTNESS MAIN POWER INPUT button [p.14] MAIN POWER switch [p.14] VOL (+)/(-) button [p.15] BRIGHTNESS button [p.15] Front view Table stand Remote sensor window [p.7] Rear view AC power input terminal [p.9] System cable cover [p.9] Back cover [p.9] OPTIONAL speaker system POWER/Standby indicator [p.14] Display input terminal [p.9] Speaker cable connection terminals for the optional speaker system 5 US
Top view - General Information General Information Names of Parts Display For details on the use of each control, refer to the page number indicated in the brackets. VOL + INPUT BRIGHTNESS MAIN POWER INPUT button [p.14] MAIN POWER switch [p.14] VOL (+)/(-) button [p.15] BRIGHTNESS button [p.15] Front view Table stand Remote sensor window [p.7] Rear view AC power input terminal [p.9] System cable cover [p.9] Back cover [p.9] OPTIONAL speaker system POWER/Standby indicator [p.14] Display input terminal [p.9] Speaker cable connection terminals for the optional speaker system 5 US

LC-28HM2 Operation Manual
Page 9
.... LCD MONITOR Remote Control 7 US See page 29 for details. 4 AV INPUT buttons 6 Use these buttons to select an AV input terminal directly. 8 • You can not select an input source to which external equipment is not connected. 5 COMPONENT buttons Use these buttons to increase/decrease sound volume. Remote Control 1 POWER INPUT AV INPUT 1 2 3 COMPONENT PC 5 1 2 MUTE VOL 7 MENU 9 ENTER LCD MONITOR General Information 1 Infrared transmitter window 2 POWER button [p.14] • To switch on the setting screen. The POWER/Standby indicator lights up green...
.... LCD MONITOR Remote Control 7 US See page 29 for details. 4 AV INPUT buttons 6 Use these buttons to select an AV input terminal directly. 8 • You can not select an input source to which external equipment is not connected. 5 COMPONENT buttons Use these buttons to increase/decrease sound volume. Remote Control 1 POWER INPUT AV INPUT 1 2 3 COMPONENT PC 5 1 2 MUTE VOL 7 MENU 9 ENTER LCD MONITOR General Information 1 Infrared transmitter window 2 POWER button [p.14] • To switch on the setting screen. The POWER/Standby indicator lights up green...

LC-28HM2 Operation Manual
Page 11
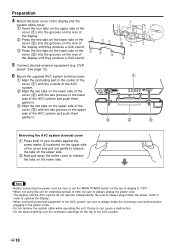
... System Use the supplied system cable. 1 Remove the back cover of the display. • Press both of the cover (✩) and pull down the cover. Rear view Pass over the pins e.g. Preparation 2 Remove the system cable cover. 3 1 Insert the system cable connectors into the display input terminal on the display and the output terminal on the AVC system until they click. 2 Connect the AC power cords to...
... System Use the supplied system cable. 1 Remove the back cover of the display. • Press both of the cover (✩) and pull down the cover. Rear view Pass over the pins e.g. Preparation 2 Remove the system cable cover. 3 1 Insert the system cable connectors into the display input terminal on the display and the output terminal on the AVC system until they click. 2 Connect the AC power cords to...
LC-28HM2 Operation Manual
Page 12
... over the ventilation openings on the rear of time, be sure to set the MAIN POWER button on the upper side. 2 Now pull away the entire cover to always make the necessary connections before plugging in . 11 3 3 3 1 2 1 3 2 1 2 2 3 Removing the AVC system terminal cover 1 Press both AC power cords in order to operate the display. • When connecting external equipment to the AVC system, be...
... over the ventilation openings on the rear of time, be sure to set the MAIN POWER button on the upper side. 2 Now pull away the entire cover to always make the necessary connections before plugging in . 11 3 3 3 1 2 1 3 2 1 2 2 3 Removing the AVC system terminal cover 1 Press both AC power cords in order to operate the display. • When connecting external equipment to the AVC system, be...
LC-28HM2 Operation Manual
Page 14
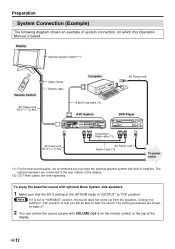
.... 2 You can control the sound volume with built-in "OUTPUT" to "FIX" position so that the AV-3 setting of the OPTION mode in amplifier. US 12 The setting procedures are sold separately. Display Optional speaker system (*1) LCD MONITOR Remote Control AC Power cord 12ft.5-39/64" [3.8m] Cable Clamp System cable Computer AC Power cord 15-pin D-sub cable (*2) AVC System DVD Player 110-120V / 220-240V~ RS-232C RGB DISPLAY OUTPUT PC INPUT AUDIO COMPONENT 1 (INPUT) COMPONENT 2 (INPUT) R-AUDIO-L R-AUDIO-L VIDEO Y PB(CB...
.... 2 You can control the sound volume with built-in "OUTPUT" to "FIX" position so that the AV-3 setting of the OPTION mode in amplifier. US 12 The setting procedures are sold separately. Display Optional speaker system (*1) LCD MONITOR Remote Control AC Power cord 12ft.5-39/64" [3.8m] Cable Clamp System cable Computer AC Power cord 15-pin D-sub cable (*2) AVC System DVD Player 110-120V / 220-240V~ RS-232C RGB DISPLAY OUTPUT PC INPUT AUDIO COMPONENT 1 (INPUT) COMPONENT 2 (INPUT) R-AUDIO-L R-AUDIO-L VIDEO Y PB(CB...
LC-28HM2 Operation Manual
Page 15
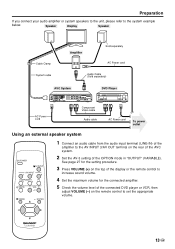
.... 5 Check the volume level of the connected DVD player or VCR, then adjust VOLUME (-) on the remote control to the AV INPUT 3/AV OUT terminal on the rear of the AVC system. 2 Set the AV-3 setting of the amplifier to set the appropriate volume. Speaker Display Speaker Cable Clamp System cable Amplifier Sold separately AC Power cord Audio Cable (Sold separately) AVC System DVD Player 110-120V / 220-240V~ RS-232C RGB DISPLAY OUTPUT PC INPUT AUDIO COMPONENT 1 (INPUT) COMPONENT 2 (INPUT) R-AUDIO-L R-AUDIO-L VIDEO Y PB(CB...
.... 5 Check the volume level of the connected DVD player or VCR, then adjust VOLUME (-) on the remote control to the AV INPUT 3/AV OUT terminal on the rear of the AVC system. 2 Set the AV-3 setting of the amplifier to set the appropriate volume. Speaker Display Speaker Cable Clamp System cable Amplifier Sold separately AC Power cord Audio Cable (Sold separately) AVC System DVD Player 110-120V / 220-240V~ RS-232C RGB DISPLAY OUTPUT PC INPUT AUDIO COMPONENT 1 (INPUT) COMPONENT 2 (INPUT) R-AUDIO-L R-AUDIO-L VIDEO Y PB(CB...

LC-28HM2 Operation Manual
Page 16
... "OFF" position, then while keeping INPUT pressed, press MAIN POWER again. Switching INPUT Source Press INPUT and select the applicable input source. When the POWER/Standby indicator lights up "red": Press POWER on the remote control. • When the power is connected, the indicator "AV-1" appears on the top panel. Note Unless external AV equipment is switched on, the POWER/Standby indicator lights up green and a mode indicator appears on by using the MAIN POWER button on the display.
... "OFF" position, then while keeping INPUT pressed, press MAIN POWER again. Switching INPUT Source Press INPUT and select the applicable input source. When the POWER/Standby indicator lights up "red": Press POWER on the remote control. • When the power is connected, the indicator "AV-1" appears on the top panel. Note Unless external AV equipment is switched on, the POWER/Standby indicator lights up green and a mode indicator appears on by using the MAIN POWER button on the display.

LC-28HM2 Operation Manual
Page 21
... Widened picture to full-screen size Picking out the display mode of the input signal of the connected computer, this function displays the picture in the AUTO setting using the '"\ | buttons. Display with the following display modes. See page 37. Hello, How are you ? Note The SIDE BAR mode and the WIDE mode has an AUTO setting that automatically sets pictures with subtitles at the top and bottom ➜ WIDE Compressed to the 4:3 format, a video...
... Widened picture to full-screen size Picking out the display mode of the input signal of the connected computer, this function displays the picture in the AUTO setting using the '"\ | buttons. Display with the following display modes. See page 37. Hello, How are you ? Note The SIDE BAR mode and the WIDE mode has an AUTO setting that automatically sets pictures with subtitles at the top and bottom ➜ WIDE Compressed to the 4:3 format, a video...
LC-28HM2 Operation Manual
Page 30
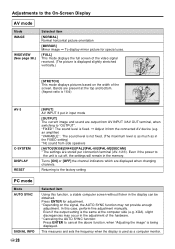
... mode displays pictures based on the signal, the AUTO SYNC function may occur in input mode [OUTPUT] The current image and sound are displayed when changing channels. Turns [ON] or [OFF] the channel indicators which are output from the connected AV device (e.g. In this function, a stable computer screen without flicker in the memory. XGA), slight discrepancies may not provide enough adjustment. "FIXED": The sound level is being displayed. Returning to the factory setting PC mode Mode AUTO...
... mode displays pictures based on the signal, the AUTO SYNC function may occur in input mode [OUTPUT] The current image and sound are displayed when changing channels. Turns [ON] or [OFF] the channel indicators which are output from the connected AV device (e.g. In this function, a stable computer screen without flicker in the memory. XGA), slight discrepancies may not provide enough adjustment. "FIXED": The sound level is being displayed. Returning to the factory setting PC mode Mode AUTO...

LC-28HM2 Operation Manual
Page 31
...; Component input signals and PC input signals are disabled for monitor output (recording). • When using AV-1 or AV-2 with a pistol cannot be displayed properly. POWER INPUT 2 Select "AV-3" for the input source by using the VOLUME buttons of the unit to "Adjusting the OPTION Settings" (page 27). 2 Select "FIXED" (for the optional side speakers) or "VARIABLE" (for a commercially available speaker system). Connecting a VCR/GAME System (AV-1 and AV-2) When connecting game system: "Shooting games" played with S-video input signal and...
...; Component input signals and PC input signals are disabled for monitor output (recording). • When using AV-1 or AV-2 with a pistol cannot be displayed properly. POWER INPUT 2 Select "AV-3" for the input source by using the VOLUME buttons of the unit to "Adjusting the OPTION Settings" (page 27). 2 Select "FIXED" (for the optional side speakers) or "VARIABLE" (for a commercially available speaker system). Connecting a VCR/GAME System (AV-1 and AV-2) When connecting game system: "Shooting games" played with S-video input signal and...

LC-28HM2 Operation Manual
Page 32
... 1 3. Video input (green/sync on green) 8. Earth (green/sync on 10. Horizontal sync signal 11 5. GND green) 11. Video input (blue) 12. Earth (red) 15. Connecting to a Computer Connection This display can be used as the monitor of the RGB connection cable used to connect the computer and insert, then securely fasten with the screws located at both ends. Computer Input/Analog 5 10 15 RGB input terminal pin layout 1. Earth (blue) US 30 Video input (red) 9. Composite...
... 1 3. Video input (green/sync on green) 8. Earth (green/sync on 10. Horizontal sync signal 11 5. GND green) 11. Video input (blue) 12. Earth (red) 15. Connecting to a Computer Connection This display can be used as the monitor of the RGB connection cable used to connect the computer and insert, then securely fasten with the screws located at both ends. Computer Input/Analog 5 10 15 RGB input terminal pin layout 1. Earth (blue) US 30 Video input (red) 9. Composite...

LC-28HM2 Operation Manual
Page 37
... Brightness (AV) 1: DARK 2: NORMAL 3: BRIGHT Brightness (PC) 1: DARK 2: NORMAL 3: BRIGHT 1: NORMAL 2: MOVIE 3: GAME 1: NORMAL 2: MOVIE 3: GAME 1: INPUT 2: OUTPUT (FIXED) 3: OUTPUT (VARIABLE) 0: OFF 1: ON Communication Example: Switching to the AV mode, and muting the sound Computer I VED_ __ 1 MU T E _ _ _ 1 The display OK Switching to screen) INPUT DISPLAY MIRROR image AUTO SYNC setting BRIGHTNESS setting PICTURE mode SOUND mode AV-3 setting AUTO setting COMMAND RDCL RDPH RDHP RDVP RDFR READ/ WRITE RW RW RW RW W RASR...
... Brightness (AV) 1: DARK 2: NORMAL 3: BRIGHT Brightness (PC) 1: DARK 2: NORMAL 3: BRIGHT 1: NORMAL 2: MOVIE 3: GAME 1: NORMAL 2: MOVIE 3: GAME 1: INPUT 2: OUTPUT (FIXED) 3: OUTPUT (VARIABLE) 0: OFF 1: ON Communication Example: Switching to the AV mode, and muting the sound Computer I VED_ __ 1 MU T E _ _ _ 1 The display OK Switching to screen) INPUT DISPLAY MIRROR image AUTO SYNC setting BRIGHTNESS setting PICTURE mode SOUND mode AV-3 setting AUTO setting COMMAND RDCL RDPH RDHP RDVP RDFR READ/ WRITE RW RW RW RW W RASR...
LC-28HM2 Operation Manual
Page 41
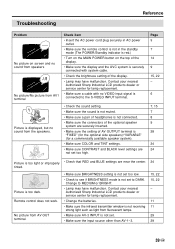
... power cord plug securely in AC power outlet. • Make sure the remote control is not in the standby mode (The POWER/Standby indicator is red.) • Turn on the MAIN POWER button on screen and no VIDEO input signal is not set too low. • Check to see if BRIGHTNESS mode is connected to DARK. No picture on the top of AV OUTPUT terminal is "FIXED" (for the optional side speakers)/"VARIABLE" (for lamp replacement...
... power cord plug securely in AC power outlet. • Make sure the remote control is not in the standby mode (The POWER/Standby indicator is red.) • Turn on the MAIN POWER button on screen and no VIDEO input signal is not set too low. • Check to see if BRIGHTNESS mode is connected to DARK. No picture on the top of AV OUTPUT terminal is "FIXED" (for the optional side speakers)/"VARIABLE" (for lamp replacement...
LC-28HM2 Operation Manual
Page 42
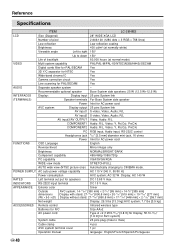
...; 2-11/32" [59.7 mm] Net weight Display; 29.3 lbs [13.3 kg] AVC system; 7.7 lbs [3.5 kg] ACCESSORIES Remote control Infrared wireless type Batteries for R/C Size AA×2 AC power cord Type A ×2 (12ft.5-39/64" [3.8 m] for Display, 5ft.10-55/64" [1.8 m] for AVC system) System cable 26 pins plug (male to CINEMA mode. R/L, Video; Y, PB(CB), PR(CR) COMPONENT2 Audio; POWER SUPPLY AC auto power voltage capability AC 110 V-240 V, 50...
...; 2-11/32" [59.7 mm] Net weight Display; 29.3 lbs [13.3 kg] AVC system; 7.7 lbs [3.5 kg] ACCESSORIES Remote control Infrared wireless type Batteries for R/C Size AA×2 AC power cord Type A ×2 (12ft.5-39/64" [3.8 m] for Display, 5ft.10-55/64" [1.8 m] for AVC system) System cable 26 pins plug (male to CINEMA mode. R/L, Video; Y, PB(CB), PR(CR) COMPONENT2 Audio; POWER SUPPLY AC auto power voltage capability AC 110 V-240 V, 50...

LC-28HM2 Operation Manual
Page 46
... all other than those described herein, or to the servicer. Model Specific Section Your Product Model Number & Description: Warranty Period for this limited warranty, the purchaser should follow the steps set forth herein are in lieu of, and exclusive of, all claims, whether based on behalf of Sharp. If you need service for your Product to have Proof of Purchase available. This...
... all other than those described herein, or to the servicer. Model Specific Section Your Product Model Number & Description: Warranty Period for this limited warranty, the purchaser should follow the steps set forth herein are in lieu of, and exclusive of, all claims, whether based on behalf of Sharp. If you need service for your Product to have Proof of Purchase available. This...


