
LC-13B6U-S | LC-15B6U-S Operation Manual
Page 4
... described in the instructions must be observed closely. ■ Follow instructions-All operating instructions must operate on a power source specified on the specification label. Any noticeable abnormality in the product indicates that the product needs servicing. ■ Replacement parts-In case the product needs replacement parts, make sure that the product is misplaced or needs to be routed properly to perform servicing. ■ Repair-If any of controls not described...
... described in the instructions must be observed closely. ■ Follow instructions-All operating instructions must operate on a power source specified on the specification label. Any noticeable abnormality in the product indicates that the product needs servicing. ■ Replacement parts-In case the product needs replacement parts, make sure that the product is misplaced or needs to be routed properly to perform servicing. ■ Repair-If any of controls not described...
LC-13B6U-S | LC-15B6U-S Operation Manual
Page 6
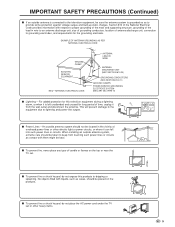
... TV set or other electric light or power circuits, or where it can fall into such power lines or circuits. When installing an outside antenna system, extreme care should be taken to keep from the wall outlet and disconnect the antenna. Section 810 of the National Electrical Code provides information with respect to proper grounding of the mast and supporting...
... TV set or other electric light or power circuits, or where it can fall into such power lines or circuits. When installing an outside antenna system, extreme care should be taken to keep from the wall outlet and disconnect the antenna. Section 810 of the National Electrical Code provides information with respect to proper grounding of the mast and supporting...
LC-13B6U-S | LC-15B6U-S Operation Manual
Page 7
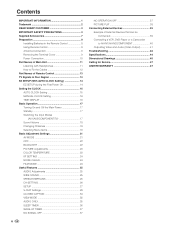
... Fix the Cables 12 Part Names of Remote Control 13 TV Signals in Your Region 13 EZ SETUP (With AUTO CLOCK Setting 14 EZ SETUP during the First Power On 14 Setting the CLOCK 15 AUTO CLOCK Setting 15 MANUAL CLOCK Setting 16 TIME DISPLAY 16 Basic Operation 17 Turning On and Off the Main Power 17 Standby 17 Switching the Input Modes (AV1/AV2/COMPONENT/TV 17 Sound Volume 18 Changing Channels 18 Selecting Menu Items 19 Basic Adjustment Settings 21 AV MODE...
... Fix the Cables 12 Part Names of Remote Control 13 TV Signals in Your Region 13 EZ SETUP (With AUTO CLOCK Setting 14 EZ SETUP during the First Power On 14 Setting the CLOCK 15 AUTO CLOCK Setting 15 MANUAL CLOCK Setting 16 TIME DISPLAY 16 Basic Operation 17 Turning On and Off the Main Power 17 Standby 17 Switching the Input Modes (AV1/AV2/COMPONENT/TV 17 Sound Volume 18 Changing Channels 18 Selecting Menu Items 19 Basic Adjustment Settings 21 AV MODE...
LC-13B6U-S | LC-15B6U-S Operation Manual
Page 12
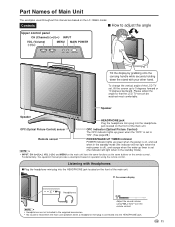
... are based on the LC-15B6U model. OPC indicator (Optical Picture Control) The OPC indicator lights up green when the "OPC" is set to "ON". (See page 22.) Remote sensor A POWER/WAKE UP TIMER indicator POWER indicator lights up green when the power is on, and red when in the supplied accessories. • No sound is heard from the main unit speakers when a headphone mini-plug is set , tilt the screen up timer is connected into...
... are based on the LC-15B6U model. OPC indicator (Optical Picture Control) The OPC indicator lights up green when the "OPC" is set to "ON". (See page 22.) Remote sensor A POWER/WAKE UP TIMER indicator POWER indicator lights up green when the power is on, and red when in the supplied accessories. • No sound is heard from the main unit speakers when a headphone mini-plug is set , tilt the screen up timer is connected into...

LC-13B6U-S | LC-15B6U-S Operation Manual
Page 14
SLEEP (p. 36) Sets the sleep timer. AUDIO ONLY (p. 35) Outputs audio without screen image. INPUT (p. 17) Switches the input source between AV1, AV2, COMPONENT and TV mode. Part Names of the picture. ENTER Executes a command. MENU RETURN (p. 19) Returns to the previous channel. MTS (p. 18) Selects audio settings. DISPLAY Displays the receiving channel and the current time for 10 seconds. AV MODE (p. 21) Selects preferred AV MODE. Canada, Mexico, Latin America Brazil Argentina, Uruguay TV broadcasting system Color: NTSC...
SLEEP (p. 36) Sets the sleep timer. AUDIO ONLY (p. 35) Outputs audio without screen image. INPUT (p. 17) Switches the input source between AV1, AV2, COMPONENT and TV mode. Part Names of the picture. ENTER Executes a command. MENU RETURN (p. 19) Returns to the previous channel. MTS (p. 18) Selects audio settings. DISPLAY Displays the receiving channel and the current time for 10 seconds. AV MODE (p. 21) Selects preferred AV MODE. Canada, Mexico, Latin America Brazil Argentina, Uruguay TV broadcasting system Color: NTSC...

LC-13B6U-S | LC-15B6U-S Operation Manual
Page 15
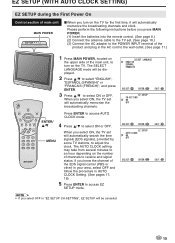
... POWER INPUT terminal of channels to pages 26 and 27 on the number of the LCD TV set up again, please refer to receive and signal status. YES NO CONNECT ANTENNA OR CABLE. In this case, a "EDS CH IS NOT AVAILABLE." Press '/" to access START EZ SETUP mode. Please perform the following instructions before you want to set and plug in step 5 appears. The AUTO CLOCK setting may not operate...
... POWER INPUT terminal of channels to pages 26 and 27 on the number of the LCD TV set up again, please refer to receive and signal status. YES NO CONNECT ANTENNA OR CABLE. In this case, a "EDS CH IS NOT AVAILABLE." Press '/" to access START EZ SETUP mode. Please perform the following instructions before you want to set and plug in step 5 appears. The AUTO CLOCK setting may not operate...
LC-13B6U-S | LC-15B6U-S Operation Manual
Page 16
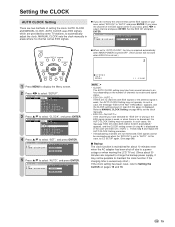
... charging time is set to "AUTO CLOCK", the time is acquired automatically when MAIN POWER is turned OFF. (This function will not work when EDS CH is displayed as in the case with EDS signals or the antenna signal is displayed. If you do not know the channel of setting the clock: AUTO CLOCK and MANUAL CLOCK. M E N U [ SETUP] PICTURE AUDIO SETUP OPTION CH-SETTING MTS CLOCK AV2 IN/OUT V-CHIP BLOCK CLOSED CAPTION COLOR...
... charging time is set to "AUTO CLOCK", the time is acquired automatically when MAIN POWER is turned OFF. (This function will not work when EDS CH is displayed as in the case with EDS signals or the antenna signal is displayed. If you do not know the channel of setting the clock: AUTO CLOCK and MANUAL CLOCK. M E N U [ SETUP] PICTURE AUDIO SETUP OPTION CH-SETTING MTS CLOCK AV2 IN/OUT V-CHIP BLOCK CLOSED CAPTION COLOR...

LC-13B6U-S | LC-15B6U-S Operation Manual
Page 22
...sports viewing. AV MODE [STANDARD] AV MODE [DYNAMIC] AV MODE [DYNAMIC (FIXED)] AV MODE [MOVIE] AV MODE [GAME] Selected item STANDARD DYNAMIC DYNAMIC (FIXED) MOVIE GAME Description Changing image settings to select desired setting, and press ENTER. A V M O D E ] PICTURE S AUDIO SETUP OPTION AV MODE [DYNAMIC] OPC [OFF] B A C K L I G H T [ BRIGHT ] CONTRAST [ 56] BRIGHTNESS[ 0 ]- + COLOR [+ 2]- + TINT [ 0] SHARPNESS [+ 4]- + ADVANCED RESET 4 Press '/" to standard values. No adjustments are allowed. Directly setting the AV MODE 1 Press MENU to display the Menu Screen...
...sports viewing. AV MODE [STANDARD] AV MODE [DYNAMIC] AV MODE [DYNAMIC (FIXED)] AV MODE [MOVIE] AV MODE [GAME] Selected item STANDARD DYNAMIC DYNAMIC (FIXED) MOVIE GAME Description Changing image settings to select desired setting, and press ENTER. A V M O D E ] PICTURE S AUDIO SETUP OPTION AV MODE [DYNAMIC] OPC [OFF] B A C K L I G H T [ BRIGHT ] CONTRAST [ 56] BRIGHTNESS[ 0 ]- + COLOR [+ 2]- + TINT [ 0] SHARPNESS [+ 4]- + ADVANCED RESET 4 Press '/" to standard values. No adjustments are allowed. Directly setting the AV MODE 1 Press MENU to display the Menu Screen...

LC-13B6U-S | LC-15B6U-S Operation Manual
Page 25
... display the Menu screen. 2 Press \/| to select "PICTURE". 3 Press '/" to detect a film-based source (originally encoded at 24 frames/second), analyses it, and then recreates each still film frame for media with special effects like game software.) Normally, you a more beautiful picture. RED [ 0] INTERLACE GREEN [ 0] BLUE [ 0] PROGRESSIVE I/P SETTING NOISE CLEAN FILM MODE RESET 1 Repeat Steps 1 to 3 of I /P SETTING" cannot be set when 480P, 576P, 720P or 1080I signal...
... display the Menu screen. 2 Press \/| to select "PICTURE". 3 Press '/" to detect a film-based source (originally encoded at 24 frames/second), analyses it, and then recreates each still film frame for media with special effects like game software.) Normally, you a more beautiful picture. RED [ 0] INTERLACE GREEN [ 0] BLUE [ 0] PROGRESSIVE I/P SETTING NOISE CLEAN FILM MODE RESET 1 Repeat Steps 1 to 3 of I /P SETTING" cannot be set when 480P, 576P, 720P or 1080I signal...

LC-13B6U-S | LC-15B6U-S Operation Manual
Page 28
... BLOCK CLOSED CAPTION COLOR SYSTEM LANGUAGE 4 Press '/" to change the setting, and press ENTER. 5 Press MENU to select "CH-SETTING", and press ENTER. Selected Item Factory setting Setting options MTS [STEREO] Stereo audio [SAP] Secondary audio program [MONO] Monophonic audio AV2 IN/OUT* [IN] AV-IN2/OUT terminals selected as input terminals [OUT FAO] Line Output is selected, Output volume is fixed, Speaker output is available. [OUT VAO] Line Output is selected, Output volume...
... BLOCK CLOSED CAPTION COLOR SYSTEM LANGUAGE 4 Press '/" to change the setting, and press ENTER. 5 Press MENU to select "CH-SETTING", and press ENTER. Selected Item Factory setting Setting options MTS [STEREO] Stereo audio [SAP] Secondary audio program [MONO] Monophonic audio AV2 IN/OUT* [IN] AV-IN2/OUT terminals selected as input terminals [OUT FAO] Line Output is selected, Output volume is fixed, Speaker output is available. [OUT VAO] Line Output is selected, Output volume...

LC-13B6U-S | LC-15B6U-S Operation Manual
Page 30
Otherwise, continue to select "MPAA", and press ENTER. V - INPUT SECRET NO. - -- - 5 Press '/" to step 5. M E N U [ SETUP... C H I P MPAA SET RATING BLOCK] G PG PG-13 R NC-17 X ----- digit secret number by using Channel Select. M E N U [ SETUP... V - V - V - C H I P B L O C K ] PICTURE AUDIO SETUP OPTION CH-SETTING MTS CLOCK AV2 IN/OUT V-CHIP BLOCK CLOSED CAPTION COLOR SYSTEM LANGUAGE 4 "INPUT SECRET NO." V - M E N U [ SETUP... C H I P B L O C K ] TV GUIDELINES MPAA TV GUIDELINES CAN.ENGLISH RATINGS CAN.FRENCH RATINGS STATUS 3 Press '/" to...
Otherwise, continue to select "MPAA", and press ENTER. V - INPUT SECRET NO. - -- - 5 Press '/" to step 5. M E N U [ SETUP... C H I P MPAA SET RATING BLOCK] G PG PG-13 R NC-17 X ----- digit secret number by using Channel Select. M E N U [ SETUP... V - V - V - C H I P B L O C K ] PICTURE AUDIO SETUP OPTION CH-SETTING MTS CLOCK AV2 IN/OUT V-CHIP BLOCK CLOSED CAPTION COLOR SYSTEM LANGUAGE 4 "INPUT SECRET NO." V - M E N U [ SETUP... C H I P B L O C K ] TV GUIDELINES MPAA TV GUIDELINES CAN.ENGLISH RATINGS CAN.FRENCH RATINGS STATUS 3 Press '/" to...

LC-13B6U-S | LC-15B6U-S Operation Manual
Page 35
... T2: TEXT mode for some programs. Should this occur, switch the CLOSED CAPTION mode to display the CC/TEXT screen. Please look for CH2 data 5 Press MENU to change the setting. C L O S E D C A P T I O N ] PICTURE AUDIO SETUP OPTION CH-SETTING MTS CLOCK AV2 IN/OUT V-CHIP BLOCK CLOSED CAPTION COLOR SYSTEM LANGUAGE 4 Press '/" to exit. 34 For each mode, two channels are problems at the broadcast source. Useful Features (Continued) CLOSED CAPTION ■ Setting CLOSED CAPTION • This LCD TV set enters CLOSED CAPTION mode automatically.
... T2: TEXT mode for some programs. Should this occur, switch the CLOSED CAPTION mode to display the CC/TEXT screen. Please look for CH2 data 5 Press MENU to change the setting. C L O S E D C A P T I O N ] PICTURE AUDIO SETUP OPTION CH-SETTING MTS CLOCK AV2 IN/OUT V-CHIP BLOCK CLOSED CAPTION COLOR SYSTEM LANGUAGE 4 Press '/" to exit. 34 For each mode, two channels are problems at the broadcast source. Useful Features (Continued) CLOSED CAPTION ■ Setting CLOSED CAPTION • This LCD TV set enters CLOSED CAPTION mode automatically.
LC-13B6U-S | LC-15B6U-S Operation Manual
Page 38
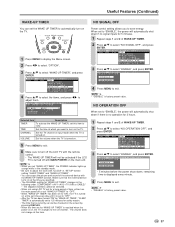
... is factory preset value. M E N U [ OPTION... W A K E - W A K E - U P T I O N O F F ] SELECT OPTION ENABLE DISABLE • 5 minutes before setting "SLEEP TIMER" and "WAKE-UP TIMER". • You can output the picture and sound of WAKE-UP TIMER. 1 Press MENU to display the Menu screen. 2 Press \/| to select "OPTION". 3 Press '/" to select "WAKE-UP TIMER", and press ENTER. M E N U [ OPTION... N O S I O N O F F ] PICTURE AUDIO SETUP OPTION VIEW MODE AUDIO ONLY SLEEP TIMER WAKE-UP TIMER NO SIGNAL OFF NO OPERATION OFF PICTURE FLIP 3 Press '/" to turn on . 5 Press MENU...
... is factory preset value. M E N U [ OPTION... W A K E - W A K E - U P T I O N O F F ] SELECT OPTION ENABLE DISABLE • 5 minutes before setting "SLEEP TIMER" and "WAKE-UP TIMER". • You can output the picture and sound of WAKE-UP TIMER. 1 Press MENU to display the Menu screen. 2 Press \/| to select "OPTION". 3 Press '/" to select "WAKE-UP TIMER", and press ENTER. M E N U [ OPTION... N O S I O N O F F ] PICTURE AUDIO SETUP OPTION VIEW MODE AUDIO ONLY SLEEP TIMER WAKE-UP TIMER NO SIGNAL OFF NO OPERATION OFF PICTURE FLIP 3 Press '/" to turn on . 5 Press MENU...
LC-13B6U-S | LC-15B6U-S Operation Manual
Page 43
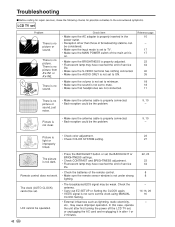
... signal is not sent, set the clock using MANUAL CLOCK Setting. • External influences such as lightning, static electricity, etc., may be the problem. 9, 10 - 9, 10 - sound. • Make sure the input mode is set to TV. 17 • Make sure the MAIN POWER switch of the remote control. • Make sure the remote sensor window is 17 on. picture from • Make sure the S-VIDEO terminal has nothing connected...
... signal is not sent, set the clock using MANUAL CLOCK Setting. • External influences such as lightning, static electricity, etc., may be the problem. 9, 10 - 9, 10 - sound. • Make sure the input mode is set to TV. 17 • Make sure the MAIN POWER switch of the remote control. • Make sure the remote sensor window is 17 on. picture from • Make sure the S-VIDEO terminal has nothing connected...
LC-13B6U-S | LC-15B6U-S Operation Manual
Page 48
...(s) set forth below and provide proof of Sharp. Non-rechargeable batteries. Neither the sales personnel of the seller nor any warranties beyond the time period described herein on contract, negligence, strict liability or otherwise. Model Specific Section Your Product Model Number & Description: LC-13B6U/LC-15B6U LCD Color Television Warranty Period for this information available when you . From a Sharp Authorized Servicer located in your Product.) One (1) year parts...
...(s) set forth below and provide proof of Sharp. Non-rechargeable batteries. Neither the sales personnel of the seller nor any warranties beyond the time period described herein on contract, negligence, strict liability or otherwise. Model Specific Section Your Product Model Number & Description: LC-13B6U/LC-15B6U LCD Color Television Warranty Period for this information available when you . From a Sharp Authorized Servicer located in your Product.) One (1) year parts...
LC-13B6U-S | LC-15B6U-S Operation Manual
Page 49
... earphones, remote controls, AC adapters, batteries, temperature probe, stylus, trays, filters, belts, ribbons, cables and paper. (e) Any cosmetic damage to the surface or exterior that this product is free, under normal use of this Sharp brand product, when shipped in material or workmanship relating to transmission line/power line voltage or liquid spillage. (g) Any product received without appropriate model, serial number and...
... earphones, remote controls, AC adapters, batteries, temperature probe, stylus, trays, filters, belts, ribbons, cables and paper. (e) Any cosmetic damage to the surface or exterior that this product is free, under normal use of this Sharp brand product, when shipped in material or workmanship relating to transmission line/power line voltage or liquid spillage. (g) Any product received without appropriate model, serial number and...
LC-13S1U | LC-15S1U | LC-20S1U Operation Manual
Page 4
... a safe place-These safety and operating instructions must operate on a power source specified on batteries or another power source, refer to perform many years of trouble-free operation of service or repair work by the manufacturer, or those described in the product indicates that the service person uses replacement parts specified by a qualified technician. Use of the polarized plug. 3 To ensure safety and many useful functions, but it can expose...
... a safe place-These safety and operating instructions must operate on a power source specified on batteries or another power source, refer to perform many years of trouble-free operation of service or repair work by the manufacturer, or those described in the product indicates that the service person uses replacement parts specified by a qualified technician. Use of the polarized plug. 3 To ensure safety and many useful functions, but it can expose...
LC-13S1U | LC-15S1U | LC-20S1U Operation Manual
Page 7
... ...9 Antenna Connection ...10, 11 Power Connection ...11 DISPLAY AND CONTROL OVERVIEW 12, 13 REMOTE CONTROL ...14 EZ SETUP (WITH AUTO CLOCK SETTING 15, 16 EZ SETUP during the First Power On 15, 16 SETTING THE CLOCK ...17-19 AUTO CLOCK Setting ...17, 18 MANUAL CLOCK Setting ...19 BASIC OPERATION ...20-24 TV signals in your region ...20 Turning on POWER ...21 Standby ...21 Switching TV/VIDEO [AV1/AV2/COMPONENT/TV] Modes 22 Sound Volume ...23 Listening with Headphones ...23 Changing Channels...
... ...9 Antenna Connection ...10, 11 Power Connection ...11 DISPLAY AND CONTROL OVERVIEW 12, 13 REMOTE CONTROL ...14 EZ SETUP (WITH AUTO CLOCK SETTING 15, 16 EZ SETUP during the First Power On 15, 16 SETTING THE CLOCK ...17-19 AUTO CLOCK Setting ...17, 18 MANUAL CLOCK Setting ...19 BASIC OPERATION ...20-24 TV signals in your region ...20 Turning on POWER ...21 Standby ...21 Switching TV/VIDEO [AV1/AV2/COMPONENT/TV] Modes 22 Sound Volume ...23 Listening with Headphones ...23 Changing Channels...
LC-13S1U | LC-15S1U | LC-20S1U Operation Manual
Page 16
... you press MAIN POWER. (1) Insert the batteries into the remote control. (See page 8.) (2) Connect the antenna cable to the TV set. (See page 10.) (3) Connect the AC adapter to the POWER INPUT terminal of the product and plug in the AC cord to the wall outlet. (See page 11.) POWER SLEEP BRIGHT PIC. Please perform the following instructions before you know the channel of the EDS signal carrier (PBS...
... you press MAIN POWER. (1) Insert the batteries into the remote control. (See page 8.) (2) Connect the antenna cable to the TV set. (See page 10.) (3) Connect the AC adapter to the POWER INPUT terminal of the product and plug in the AC cord to the wall outlet. (See page 11.) POWER SLEEP BRIGHT PIC. Please perform the following instructions before you know the channel of the EDS signal carrier (PBS...
LC-13S1U | LC-15S1U | LC-20S1U Operation Manual
Page 58
... purposes. (i) Any installation, setup and/or programming charges. WARRANTY PERIODS: Audio Products Camcorder DVD Products Projector LCD & Plasma Display TV Microwave Oven Television Products VCR Products Vacuum Cleaner Parts & Labour (exceptions noted) 1 year 1 year 1 year 1 year (lamp 90 days) 1 year 1 year (magnetron component-4 additional years) 1 year (picture tube component-1 additional year) 1 year 1 year To obtain the name and address of abusive operation, negligence, accident...
... purposes. (i) Any installation, setup and/or programming charges. WARRANTY PERIODS: Audio Products Camcorder DVD Products Projector LCD & Plasma Display TV Microwave Oven Television Products VCR Products Vacuum Cleaner Parts & Labour (exceptions noted) 1 year 1 year 1 year 1 year (lamp 90 days) 1 year 1 year (magnetron component-4 additional years) 1 year (picture tube component-1 additional year) 1 year 1 year To obtain the name and address of abusive operation, negligence, accident...


