
Operation Manual
Page 3
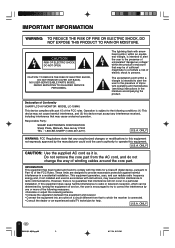
... a particular installation. Declaration of Conformity SHARP LCD AV MONITOR MODEL LC-15M4U This device complies with the limits for help. DO NOT OPEN. INFORMATION This equipment has been tested and found to comply with part 15 of electric shock to Part 15 of winding cables around the core part. These limits are designed to the following measures: • Relocate or adjust the receiving antenna. •...
... a particular installation. Declaration of Conformity SHARP LCD AV MONITOR MODEL LC-15M4U This device complies with the limits for help. DO NOT OPEN. INFORMATION This equipment has been tested and found to comply with part 15 of electric shock to Part 15 of winding cables around the core part. These limits are designed to the following measures: • Relocate or adjust the receiving antenna. •...
Operation Manual
Page 5
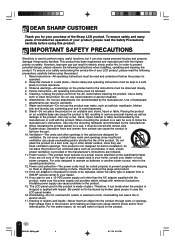
... glass pieces in case the LCD panel breaks. 16. Cleaning-Unplug the power cord from a SHARP service center or your dealer. 14. Stand-Do not place the product on the product. 4 LC-15M4U(01-08)Eng.p65 4 01.7.24, 5:21 PM When relocating the product placed on a cart, it must operate on a power source specified on the specification label. Ventilation-The vents and...
... glass pieces in case the LCD panel breaks. 16. Cleaning-Unplug the power cord from a SHARP service center or your dealer. 14. Stand-Do not place the product on the product. 4 LC-15M4U(01-08)Eng.p65 4 01.7.24, 5:21 PM When relocating the product placed on a cart, it must operate on a power source specified on the specification label. Ventilation-The vents and...
Operation Manual
Page 6
... operating instructions. This is damaged. Occasionally, a few non-active pixels may be sure to install the product according to high voltage and other ). a.When the power cord or plug is a safety feature. When the product has been exposed to service the product yourself. Do not touch the controls other than the other dangerous conditions. Improper adjustment of blue, green or red. Repair...
... operating instructions. This is damaged. Occasionally, a few non-active pixels may be sure to install the product according to high voltage and other ). a.When the power cord or plug is a safety feature. When the product has been exposed to service the product yourself. Do not touch the controls other than the other dangerous conditions. Improper adjustment of blue, green or red. Repair...
Operation Manual
Page 7
... INPUT [AV1/AV2] Mode 12 Sound Volume ...13 ON/OFF Standby ...13 SELECTING THE MENU ITEMS ...14 ADJUSTMENT ...15 Adjusting the LANGUAGE Settings 15 Adjusting the PICTURE Settings 16 Adjusting the SET UP Settings 18 Adjusting the SLEEP TIMER Settings 19 CONNECTING TO EXTERNAL DEVICES 20 Connecting to a VCR, a DVD player etc. (AV 1/2 IN 20 Connecting to a DVD player (COMPONENT terminal 21 Outputting video and audio (video output 22 Listening with Headphones ...22 Watching TV ...23 EXAMPLE OF APPLICATION ...24 Mounting the LCD monitor on a wall 24 TROUBLESHOOTING...
... INPUT [AV1/AV2] Mode 12 Sound Volume ...13 ON/OFF Standby ...13 SELECTING THE MENU ITEMS ...14 ADJUSTMENT ...15 Adjusting the LANGUAGE Settings 15 Adjusting the PICTURE Settings 16 Adjusting the SET UP Settings 18 Adjusting the SLEEP TIMER Settings 19 CONNECTING TO EXTERNAL DEVICES 20 Connecting to a VCR, a DVD player etc. (AV 1/2 IN 20 Connecting to a DVD player (COMPONENT terminal 21 Outputting video and audio (video output 22 Listening with Headphones ...22 Watching TV ...23 EXAMPLE OF APPLICATION ...24 Mounting the LCD monitor on a wall 24 TROUBLESHOOTING...
Operation Manual
Page 8
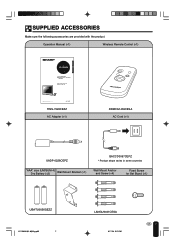
... in some countries "AAA" size (UM/SUM-4) Dry Battery (×2) Wall Mount Bracket (×1) Wall Mount Anchor and Screw (×4) Fixed Screw for Set Stand (×1) UBATU0026GEZZ LC-15M4U(01-08)Eng.p65 7 LANGU9041CESA 7 01.7.24, 5:21 PM SUPPLIED ACCESSORIES Make sure the following accessories are provided with the product. Operation Manual (×1) Wireless Remote Control (×1) ENGLISH LC-15M4U LCD AV MONITOR MONITEUR AV Á CRISTAUX LIQUIDES OPERATION MANUAL MODE D'EMPLOI Printed on post-consumer...
... in some countries "AAA" size (UM/SUM-4) Dry Battery (×2) Wall Mount Bracket (×1) Wall Mount Anchor and Screw (×4) Fixed Screw for Set Stand (×1) UBATU0026GEZZ LC-15M4U(01-08)Eng.p65 7 LANGU9041CESA 7 01.7.24, 5:21 PM SUPPLIED ACCESSORIES Make sure the following accessories are provided with the product. Operation Manual (×1) Wireless Remote Control (×1) ENGLISH LC-15M4U LCD AV MONITOR MONITEUR AV Á CRISTAUX LIQUIDES OPERATION MANUAL MODE D'EMPLOI Printed on post-consumer...

Operation Manual
Page 9
... batteries with product). 3 Close the battery cover. Plug into AC outlet. PREPARATION Power Connection Connect to DC input terminal of new batteries and/or cause old batteries to leak chemicals. • Remove batteries as soon as they are non-operable. Do not mix batteries of the LCD monitor to storage conditions. • If the remote control is not used for an extended period...
... batteries with product). 3 Close the battery cover. Plug into AC outlet. PREPARATION Power Connection Connect to DC input terminal of new batteries and/or cause old batteries to leak chemicals. • Remove batteries as soon as they are non-operable. Do not mix batteries of the LCD monitor to storage conditions. • If the remote control is not used for an extended period...

Operation Manual
Page 11
NAMES OF PARTS (Main Unit) (Continued) Main unit (rear view) Stand Rear Speaker (woofer) Rear terminal section Can also be used as video output terminals. AV 2 IN/OUT AUDIO VIDEO R L AUDIO R L VIDEO AV 1 IN COMPONENT Y PB POWER INPUT HEAD DC12V PR PHONE AUDIO AUDIO VIDEO VIDEO COMPONENT POWER INPUT DC12V HEADPHONE AV 2 IN/OUT AV 1 IN 10 LC-15M4U(09-14)Eng.p65 10 01.7.24, 5:20 PM
NAMES OF PARTS (Main Unit) (Continued) Main unit (rear view) Stand Rear Speaker (woofer) Rear terminal section Can also be used as video output terminals. AV 2 IN/OUT AUDIO VIDEO R L AUDIO R L VIDEO AV 1 IN COMPONENT Y PB POWER INPUT HEAD DC12V PR PHONE AUDIO AUDIO VIDEO VIDEO COMPONENT POWER INPUT DC12V HEADPHONE AV 2 IN/OUT AV 1 IN 10 LC-15M4U(09-14)Eng.p65 10 01.7.24, 5:20 PM

Operation Manual
Page 13
... right corner each time AV INPUT is red, press ON/OFF on the remote control to turn on the monitor. M On-screen display AV1 N358 Power/Standby indicator Notes: I When the Power indicator is pressed. The display of the AV1 mode indicates either IN or OUT in the SET UP settings, and COMPONENT is displayed when AV1 is turned on. Initial mode (AV1) AV1 mode AV2 mode AV1 AV2 12 LC-15M4U(09-14...
... right corner each time AV INPUT is red, press ON/OFF on the remote control to turn on the monitor. M On-screen display AV1 N358 Power/Standby indicator Notes: I When the Power indicator is pressed. The display of the AV1 mode indicates either IN or OUT in the SET UP settings, and COMPONENT is displayed when AV1 is turned on. Initial mode (AV1) AV1 mode AV2 mode AV1 AV2 12 LC-15M4U(09-14...

Operation Manual
Page 14
... sound back to temporarily turn off the LCD monitor ON/OFF Press ON/OFF. To turn off the sound. VOLUME 10 To mute the sound | Press MUTE to the previous level. VOLUME 50 | Press VOL (-) to increase the sound volume. The power indicator turns red. BASIC OPERATION (Continued) Sound Volume ON/OFF MUTE AV INPUT MENU SELECT MUTE VOL VOL SELECT LCD MONITOR VOL (+)/( ) To adjust the volume | Press VOL (+) to decrease the sound volume. LCD MONITOR LC-15M4U...
... sound back to temporarily turn off the LCD monitor ON/OFF Press ON/OFF. To turn off the sound. VOLUME 10 To mute the sound | Press MUTE to the previous level. VOLUME 50 | Press VOL (-) to increase the sound volume. The power indicator turns red. BASIC OPERATION (Continued) Sound Volume ON/OFF MUTE AV INPUT MENU SELECT MUTE VOL VOL SELECT LCD MONITOR VOL (+)/( ) To adjust the volume | Press VOL (+) to decrease the sound volume. LCD MONITOR LC-15M4U...
Operation Manual
Page 15
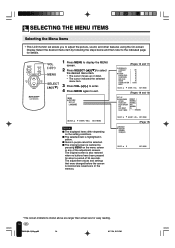
...) PICTURE(AV1) CONTRAST [ 30] TINT [ 0] COLOR [ 0] BLACK LEVEL [ 0] SHARPNESS [ 0] RED-BLUE [ 0] GREEN [ 0] COLOR SYSTEM [ AUTO] RESET SELECT: ENTER: -VOL+ EXIT: MENU (Pages 18 and 19) SET UP BRIGHTNESS UPSIDE RIGHT/LEFT BLUE SCREEN AV1 AV2 IN/OUT SLEEP TIMER [BRIGHT ] [NORMAL] [NORMAL] [OFF ] [NORMAL] [IN ] [ - - - Select the desired menu item by pressing MENU on the setting conditions. I Items in yellow. The adjustment values and settings that were changed before the screen...
...) PICTURE(AV1) CONTRAST [ 30] TINT [ 0] COLOR [ 0] BLACK LEVEL [ 0] SHARPNESS [ 0] RED-BLUE [ 0] GREEN [ 0] COLOR SYSTEM [ AUTO] RESET SELECT: ENTER: -VOL+ EXIT: MENU (Pages 18 and 19) SET UP BRIGHTNESS UPSIDE RIGHT/LEFT BLUE SCREEN AV1 AV2 IN/OUT SLEEP TIMER [BRIGHT ] [NORMAL] [NORMAL] [OFF ] [NORMAL] [IN ] [ - - - Select the desired menu item by pressing MENU on the setting conditions. I Items in yellow. The adjustment values and settings that were changed before the screen...
Operation Manual
Page 17
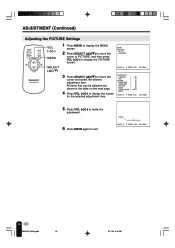
... [ 0] SHARPNESS [ 0] RED-BLUE [ 0] GREEN [ 0] COLOR SYSTEM [ AUTO] RESET SELECT: ENTER: -VOL+ EXIT: MENU 5 Press VOL (+)/(-) to make the adjustment. 6 Press MENU again to move the cursor and select the desired adjustment item. COLOR 0 - + SELECT: ADJUST: -VOL+ EXIT: MENU 16 LC-15M4U(15-19)Eng.p65 16 01.7.24, 5:19 PM ADJUSTMENT (Continued) Adjusting the PICTURE Settings ON/OFF MUTE AV INPUT MENU SELECT VOL VOL SELECT LCD MONITOR VOL (+)/( ) MENU SELECT (])/([) 1 Press MENU to display the MENU screen...
... [ 0] SHARPNESS [ 0] RED-BLUE [ 0] GREEN [ 0] COLOR SYSTEM [ AUTO] RESET SELECT: ENTER: -VOL+ EXIT: MENU 5 Press VOL (+)/(-) to make the adjustment. 6 Press MENU again to move the cursor and select the desired adjustment item. COLOR 0 - + SELECT: ADJUST: -VOL+ EXIT: MENU 16 LC-15M4U(15-19)Eng.p65 16 01.7.24, 5:19 PM ADJUSTMENT (Continued) Adjusting the PICTURE Settings ON/OFF MUTE AV INPUT MENU SELECT VOL VOL SELECT LCD MONITOR VOL (+)/( ) MENU SELECT (])/([) 1 Press MENU to display the MENU screen...
Operation Manual
Page 18
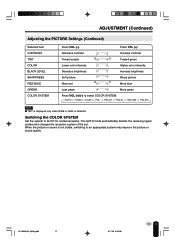
... red More blue Less green More green Press VOL (+)/(-) to AUTO for normal reception. The AUTO mode automatically detects the receiving signal system and changes the reception system of the set. Note: I TINT is displayed only when N358 or N443 is not stable, switching to an appropriate system may improve the picture or sound quality. Press VOL (+). Switching the COLOR SYSTEM Set the system to select COLOR SYSTEM. LC-15M4U...
... red More blue Less green More green Press VOL (+)/(-) to AUTO for normal reception. The AUTO mode automatically detects the receiving signal system and changes the reception system of the set. Note: I TINT is displayed only when N358 or N443 is not stable, switching to an appropriate system may improve the picture or sound quality. Press VOL (+). Switching the COLOR SYSTEM Set the system to select COLOR SYSTEM. LC-15M4U...

Operation Manual
Page 19
... display images upside down for special uses. MENU PICTURE SET UP LANGUAGE VOL VOL SELECT LCD MONITOR SELECT (])/([) 3 Press VOL (+)/(-) to SET UP. REMAIN] [ON] The screen is turned blue when there is no signal. [COMPONENT] [OUT [OUT ] Line Output is selected, Output volume is fixed, Speaker output is available. ] Line Output is selected, Output volume is variable, Speaker output is inactivated. [NORMAL] [IN] [ - - - ON/OFF MUTE AV INPUT MENU SELECT VOL (+)/( ) MENU 1 Press MENU to display the MENU screen...
... display images upside down for special uses. MENU PICTURE SET UP LANGUAGE VOL VOL SELECT LCD MONITOR SELECT (])/([) 3 Press VOL (+)/(-) to SET UP. REMAIN] [ON] The screen is turned blue when there is no signal. [COMPONENT] [OUT [OUT ] Line Output is selected, Output volume is fixed, Speaker output is available. ] Line Output is selected, Output volume is variable, Speaker output is inactivated. [NORMAL] [IN] [ - - - ON/OFF MUTE AV INPUT MENU SELECT VOL (+)/( ) MENU 1 Press MENU to display the MENU screen...

Operation Manual
Page 21
... instruction manuals. 20 LC-15M4U(20-28)Eng.p65 20 01.7.24, 5:17 PM I Do not connect headphones to prevent any possible damage. CONNECTING TO EXTERNAL DEVICES Connecting to a VCR, a DVD Player, etc. (AV 1/2 IN) This LCD monitor can be connected to most external devices as shown below. AV 2 IN/OUT AUDIO VIDEO R L AUDIO R L VIDEO AV 1 IN COMPONENT Y PB PR POWER INPUT DC12V To AUDIO input terminal Audio cord To audio output terminal To VIDEO input terminal Video cord (BNC TYPE) To AUDIO input...
... instruction manuals. 20 LC-15M4U(20-28)Eng.p65 20 01.7.24, 5:17 PM I Do not connect headphones to prevent any possible damage. CONNECTING TO EXTERNAL DEVICES Connecting to a VCR, a DVD Player, etc. (AV 1/2 IN) This LCD monitor can be connected to most external devices as shown below. AV 2 IN/OUT AUDIO VIDEO R L AUDIO R L VIDEO AV 1 IN COMPONENT Y PB PR POWER INPUT DC12V To AUDIO input terminal Audio cord To audio output terminal To VIDEO input terminal Video cord (BNC TYPE) To AUDIO input...

Operation Manual
Page 22
... EXTERNAL DEVICES (Continued) Connecting to a DVD player (COMPONENT terminal) AV 2 IN/OUT AUDIO VIDEO R L AUDIO R L VIDEO AV 1 IN COMPONENT Y PB PR POWER INPUT DC12V To AUDIO input terminal Audio cord To audio output terminal To COMPONENT terminal Video cord (BNC TYPE) To COMPONENT terminal Audio Audio (R) (L) Y PB PR DVD TUNER/BAND AUX 1 AUX 2 AUX 3 SURROUND ON/OFF DVD Player Note: I To view the image from the component connected to the terminals for AV 1 IN, set AV1 to COMPONENT with the SET UP setting (see page 18). LC-15M4U...
... EXTERNAL DEVICES (Continued) Connecting to a DVD player (COMPONENT terminal) AV 2 IN/OUT AUDIO VIDEO R L AUDIO R L VIDEO AV 1 IN COMPONENT Y PB PR POWER INPUT DC12V To AUDIO input terminal Audio cord To audio output terminal To COMPONENT terminal Video cord (BNC TYPE) To COMPONENT terminal Audio Audio (R) (L) Y PB PR DVD TUNER/BAND AUX 1 AUX 2 AUX 3 SURROUND ON/OFF DVD Player Note: I To view the image from the component connected to the terminals for AV 1 IN, set AV1 to COMPONENT with the SET UP setting (see page 18). LC-15M4U...

Operation Manual
Page 23
... input or output. I The headphones are connected. 22 LC-15M4U(20-28)Eng.p65 22 01.7.24, 5:17 PM AV 2 IN/OUT O AUDIO R L VIDEO POWER HEAD PHONE INPUT DC12V Mini-plug M On-screen display HEADPHONE jack Headphones VOLUME 60 Notes: I No sound will be set to input, output is not possible and vice versa. CONNECTING TO EXTERNAL DEVICES (Continued) Outputting video and audio (video output) It is possible to output video and audio from the main unit speakers...
... input or output. I The headphones are connected. 22 LC-15M4U(20-28)Eng.p65 22 01.7.24, 5:17 PM AV 2 IN/OUT O AUDIO R L VIDEO POWER HEAD PHONE INPUT DC12V Mini-plug M On-screen display HEADPHONE jack Headphones VOLUME 60 Notes: I No sound will be set to input, output is not possible and vice versa. CONNECTING TO EXTERNAL DEVICES (Continued) Outputting video and audio (video output) It is possible to output video and audio from the main unit speakers...

Operation Manual
Page 25
... 0.5 in. (12.5 mm). Be sure to 8° downward. Fixed Screw (× 1) (Supplied) Anchor and Screw (× 4) 24 LC-15M4U(20-28)Eng.p65 24 01.7.24, 5:17 PM EXAMPLE OF APPLICATION Mounting the LCD monitor on a wall Note: I The supplied anchor screws are designed for wall. Remove the screws from the anchors before installation. (Various materials are used for plaster boards with a thickness of the anchors with...
... 0.5 in. (12.5 mm). Be sure to 8° downward. Fixed Screw (× 1) (Supplied) Anchor and Screw (× 4) 24 LC-15M4U(20-28)Eng.p65 24 01.7.24, 5:17 PM EXAMPLE OF APPLICATION Mounting the LCD monitor on a wall Note: I The supplied anchor screws are designed for wall. Remove the screws from the anchors before installation. (Various materials are used for plaster boards with a thickness of the anchors with...
Operation Manual
Page 26
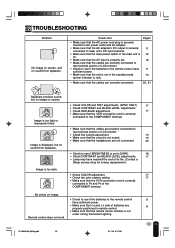
... AC power cord plug is securely inserted in AC power outlet and AC adapter. • Make sure that the AC adapter's DC output is securely connected to main unit's DC input terminal. • Make sure that the remote sensor window is correctly connected to PB and PR of the main unit is on screen. No colors on screen, and no sound from speakers. TROUBLESHOOTING Problem No image on image. Remote control...
... AC power cord plug is securely inserted in AC power outlet and AC adapter. • Make sure that the AC adapter's DC output is securely connected to main unit's DC input terminal. • Make sure that the remote sensor window is correctly connected to PB and PR of the main unit is on screen. No colors on screen, and no sound from speakers. TROUBLESHOOTING Problem No image on image. Remote control...
Operation Manual
Page 27
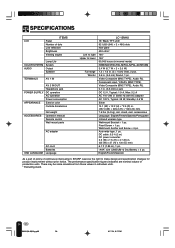
... Wallmount Anchor and Screw × 4 pc. "AAA" size (UM/SUM-4) Dry Battery × 2 pc. stand, excl. English/French/Spanish As a part of policy of dots Low reflection Brightness Viewing angles COLOR SYSTEM AUDIO Lamp Life System Output Speaker TERMINALS AV 1 IN POWER SUPPLY APPEARANCE AV 2 IN/OUT Headphone jack DC operation AC operation Power consumption Exterior color Outside dimensions ACCESSORIES Net weight Operation manual Remote control Wall mount parts AC adapter AC cord Batteries OSD LANGUAGE...
... Wallmount Anchor and Screw × 4 pc. "AAA" size (UM/SUM-4) Dry Battery × 2 pc. stand, excl. English/French/Spanish As a part of policy of dots Low reflection Brightness Viewing angles COLOR SYSTEM AUDIO Lamp Life System Output Speaker TERMINALS AV 1 IN POWER SUPPLY APPEARANCE AV 2 IN/OUT Headphone jack DC operation AC operation Power consumption Exterior color Outside dimensions ACCESSORIES Net weight Operation manual Remote control Wall mount parts AC adapter AC cord Batteries OSD LANGUAGE...
Operation Manual
Page 29
... all claims, whether based on remedies for any ): Where to Obtain Service: What to do to Obtain Service: LC-15M4U LCD AV MONITOR (Be sure to the purchaser. Calling for Service For location of the nearest Sharp Authorized Service, or to extend the duration of any warranties beyond the time period described herein on behalf of Sharp. None From a Sharp Authorized Servicer located in lieu of, and...
... all claims, whether based on remedies for any ): Where to Obtain Service: What to do to Obtain Service: LC-15M4U LCD AV MONITOR (Be sure to the purchaser. Calling for Service For location of the nearest Sharp Authorized Service, or to extend the duration of any warranties beyond the time period described herein on behalf of Sharp. None From a Sharp Authorized Servicer located in lieu of, and...


