
LC-13E1U | LC-15E1U Operation Manual
Page 4
... . Check the cords at the plugs and product. f. However, improper use attachments not recommended by the manufacturer. I Power cord protection-The power cords must be replaced, obtain the same type of service or repair work by the manufacturer, or those described in your home, consult your obsolete outlet. I Keep this product. This is damaged. I If the AC adapter is used in the operating instructions. I Observe warnings...
... . Check the cords at the plugs and product. f. However, improper use attachments not recommended by the manufacturer. I Power cord protection-The power cords must be replaced, obtain the same type of service or repair work by the manufacturer, or those described in your home, consult your obsolete outlet. I Keep this product. This is damaged. I If the AC adapter is used in the operating instructions. I Observe warnings...

LC-13E1U | LC-15E1U Operation Manual
Page 5
... product placed on a wall, be moved with 921,600 thin film transistors, giving you fine picture details. Use only the mounting hardware recommended by the manufacturer or sold with impact. This product is dropped or applied with the product. Use only a cart, stand, tripod, bracket or table recommended by the manufacturer. I Cleaning-Unplug the power cord from the AC outlet...
... product placed on a wall, be moved with 921,600 thin film transistors, giving you fine picture details. Use only the mounting hardware recommended by the manufacturer or sold with impact. This product is dropped or applied with the product. Use only a cart, stand, tripod, bracket or table recommended by the manufacturer. I Cleaning-Unplug the power cord from the AC outlet...
LC-13E1U | LC-15E1U Operation Manual
Page 6
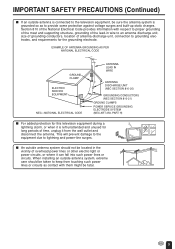
... be located in wire to an antenna discharge unit, size of grounding conductors, Iocation of antenna-discharge unit, connection to grounding electrodes, and requirements for long periods of overhead power lines or other electric light or power circuits, or where it is connected to lightning and power-line surges. This will prevent damage to the equipment due to the television equipment...
... be located in wire to an antenna discharge unit, size of grounding conductors, Iocation of antenna-discharge unit, connection to grounding electrodes, and requirements for long periods of overhead power lines or other electric light or power circuits, or where it is connected to lightning and power-line surges. This will prevent damage to the equipment due to the television equipment...
LC-13E1U | LC-15E1U Operation Manual
Page 7
... the Remote Control 8 Power Connection ...9 Antenna Connection ...9, 10 FRONT AND REAR CONTROL OPTIONS 11-13 Removing the Back Cover ...13 Listening with Headphones ...13 EZ SETUP ...14 EZ SETUP during the First Power On 14 REMOTE CONTROL ...15 BASIC OPERATION ...15-18 Turning on POWER ...16 Switching TV/VIDEO [AV1/AV2/COMPONENT/TV] Modes 16 Sound Volume ...17 ON/OFF Standby ...17 Changing the Channels ...18 SELECTING MENU ITEMS ...19 Selecting Menu Items ...19 ADJUSTMENT ...20-37 Adjusting the SLEEP TIMER Settings 20 Adjusting...
... the Remote Control 8 Power Connection ...9 Antenna Connection ...9, 10 FRONT AND REAR CONTROL OPTIONS 11-13 Removing the Back Cover ...13 Listening with Headphones ...13 EZ SETUP ...14 EZ SETUP during the First Power On 14 REMOTE CONTROL ...15 BASIC OPERATION ...15-18 Turning on POWER ...16 Switching TV/VIDEO [AV1/AV2/COMPONENT/TV] Modes 16 Sound Volume ...17 ON/OFF Standby ...17 Changing the Channels ...18 SELECTING MENU ITEMS ...19 Selecting Menu Items ...19 ADJUSTMENT ...20-37 Adjusting the SLEEP TIMER Settings 20 Adjusting...

LC-13E1U | LC-15E1U Operation Manual
Page 9
... the remote control and sensor window may not work properly if the remote sensor window of time, remove the batteries from batteries can cause a rash. I Do not install or place the remote control under direct sunlight or strong lighting. SLEEP indicator POWER indicator Remote Sensor Window Batteries for the Remote Control Before using the LCD TV set , or operate the remote control closer to liquid, and do not expose the remote control to the remote sensor window. If...
... the remote control and sensor window may not work properly if the remote sensor window of time, remove the batteries from batteries can cause a rash. I Do not install or place the remote control under direct sunlight or strong lighting. SLEEP indicator POWER indicator Remote Sensor Window Batteries for the Remote Control Before using the LCD TV set , or operate the remote control closer to liquid, and do not expose the remote control to the remote sensor window. If...
LC-13E1U | LC-15E1U Operation Manual
Page 10
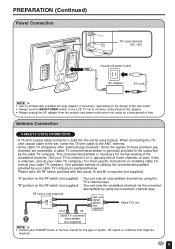
... type of the LCD TV set , screw the 75-ohm cable to channel 3 or 4, typically one of time. One possible method of these channels is explained below. RF switch (not supplied) OUT IN Cable TV converter/ descrambler (not supplied) Two-set for normal viewing of the scrambled channels. (Set your cable TV company is used. PREPARATION (Continued) Power Connection VIDEO AV-IN 2/OUT L AUDIO R COMPONENT Y PB PR L AUDIO R VIDEO AV-IN 1 L AUDIO R S-VIDEO PHHEOANDE ANT. Since the signals...
... type of the LCD TV set , screw the 75-ohm cable to channel 3 or 4, typically one of time. One possible method of these channels is explained below. RF switch (not supplied) OUT IN Cable TV converter/ descrambler (not supplied) Two-set for normal viewing of the scrambled channels. (Set your cable TV company is used. PREPARATION (Continued) Power Connection VIDEO AV-IN 2/OUT L AUDIO R COMPONENT Y PB PR L AUDIO R VIDEO AV-IN 1 L AUDIO R S-VIDEO PHHEOANDE ANT. Since the signals...
LC-13E1U | LC-15E1U Operation Manual
Page 12
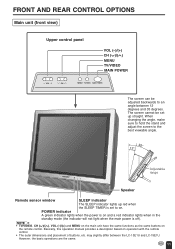
... operation manual provides a description based on and a red indicator lights when in the standby mode (the indicator will not light when the main power is off). The screen cannot be adjusted backwards to an angle between the LC-13E1U and LC-15E1U. Adjustable range Speaker Remote sensor window SLEEP indicator The SLEEP indicator lights up red when the SLEEP TIMER is on operation with the remote control. • The outer dimensions and placement of buttons, etc. POWER indicator A green indicator lights...
... operation manual provides a description based on and a red indicator lights when in the standby mode (the indicator will not light when the main power is off). The screen cannot be adjusted backwards to an angle between the LC-13E1U and LC-15E1U. Adjustable range Speaker Remote sensor window SLEEP indicator The SLEEP indicator lights up red when the SLEEP TIMER is on operation with the remote control. • The outer dimensions and placement of buttons, etc. POWER indicator A green indicator lights...

LC-13E1U | LC-15E1U Operation Manual
Page 14
... 1 L AUDIO R S-VIDEO PHHEOANDE ANT. PDINOCPW1U2EVTR c Rear terminal Headphones M On-screen display VOLUME 60 A • Headphones are not included in the supplied accessories. • No sound will be heard from the main unit speakers when a headphone mini-plug is connected into the HEADPHONE jack located on the bottom of the TV set. I Plug the headphone mini-plug into the HEADPHONE jack. 13 FRONT AND REAR CONTROL OPTIONS (Continued) Removing...
... 1 L AUDIO R S-VIDEO PHHEOANDE ANT. PDINOCPW1U2EVTR c Rear terminal Headphones M On-screen display VOLUME 60 A • Headphones are not included in the supplied accessories. • No sound will be heard from the main unit speakers when a headphone mini-plug is connected into the HEADPHONE jack located on the bottom of the TV set. I Plug the headphone mini-plug into the HEADPHONE jack. 13 FRONT AND REAR CONTROL OPTIONS (Continued) Removing...
LC-13E1U | LC-15E1U Operation Manual
Page 15
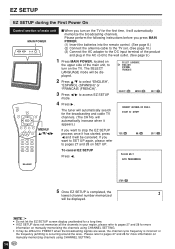
... on manually memorizing channels using CHANNEL SETTING. • It may be displayed. YES : NO : EX I T : MENU 4 Press d. PLEASE WA I T AUTO PROGRAMMI NG STOP : 5 Once EZ SETUP is occurring around the area. A • Do not let the EZ SETUP screen display unattended for a long time. • If EZ SETUP does not memorize all the channels in the AC cord to the wall outlet. (See page 9.) 1 Press MAIN POWER, located on...
... on manually memorizing channels using CHANNEL SETTING. • It may be displayed. YES : NO : EX I T : MENU 4 Press d. PLEASE WA I T AUTO PROGRAMMI NG STOP : 5 Once EZ SETUP is occurring around the area. A • Do not let the EZ SETUP screen display unattended for a long time. • If EZ SETUP does not memorize all the channels in the AC cord to the wall outlet. (See page 9.) 1 Press MAIN POWER, located on...
LC-13E1U | LC-15E1U Operation Manual
Page 16
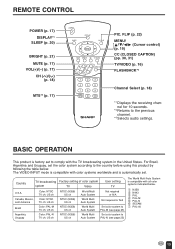
...) MENU/ a/b/c/d (Cursor control) (p. 19) CC (CLOSED CAPTION) (pp. 30, 31) TV/VIDEO (p. 16) FLASHBACK*2 Channel Select (p. 18) *1 Displays the receiving channel for 10 seconds. *2 Returns to comply with the TV broadcasting system in the United States. The VIDEO INPUT mode is compatible with all color systems indicated below . For Brazil, Argentina and Uruguay, set the color system according to PAL-N (see page 25) The World Multi Auto...
...) MENU/ a/b/c/d (Cursor control) (p. 19) CC (CLOSED CAPTION) (pp. 30, 31) TV/VIDEO (p. 16) FLASHBACK*2 Channel Select (p. 18) *1 Displays the receiving channel for 10 seconds. *2 Returns to comply with the TV broadcasting system in the United States. The VIDEO INPUT mode is compatible with all color systems indicated below . For Brazil, Argentina and Uruguay, set the color system according to PAL-N (see page 25) The World Multi Auto...
LC-13E1U | LC-15E1U Operation Manual
Page 17
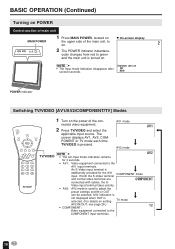
A • The input mode indication disappears after several seconds. ously changes from red to on . STEREO BASIC OPERATION (Continued) Turning on POWER Control section of main unit 1 Press MAIN POWER, located on M On-screen display MAIN POWER the upper side of the main unit, to green and the main unit is turned on . 2 VOL CH MENU TV/VIDEO MAIN POWER 2 The POWER indicator instantane-
A • The input mode indication disappears after several seconds. ously changes from red to on . STEREO BASIC OPERATION (Continued) Turning on POWER Control section of main unit 1 Press MAIN POWER, located on M On-screen display MAIN POWER the upper side of the main unit, to green and the main unit is turned on . 2 VOL CH MENU TV/VIDEO MAIN POWER 2 The POWER indicator instantane-

LC-13E1U | LC-15E1U Operation Manual
Page 20
... special buttons: CC, PIC. MENU SLEEP T IMER V I DEO ADJUST PRESET CLOSED CAPT I ON V-CH I P BLOCK SET UP SELECT : ENTER : EX I T : MENU 19 The picture and sound may be selected. • TV mode This product is not stable, set a specific COLOR SYSTEM (not AUTO). POWER SLEEP DISPLAY MENU PIC. SELECTING MENU ITEMS Selecting Menu Items • This LCD TV set allows you to the previous screen, select RETURN. • You can adjust some settings with the color...
... special buttons: CC, PIC. MENU SLEEP T IMER V I DEO ADJUST PRESET CLOSED CAPT I ON V-CH I P BLOCK SET UP SELECT : ENTER : EX I T : MENU 19 The picture and sound may be selected. • TV mode This product is not stable, set a specific COLOR SYSTEM (not AUTO). POWER SLEEP DISPLAY MENU PIC. SELECTING MENU ITEMS Selecting Menu Items • This LCD TV set allows you to the previous screen, select RETURN. • You can adjust some settings with the color...

LC-13E1U | LC-15E1U Operation Manual
Page 21
... 120 minutes. SLEEP DISPLAY PIC. The time can set the SLEEP TIMER to the main screen. is displayed. 5 Press MENU to return to automatically turn off the MAIN POWER on the TV set or press the POWER button on the remote control, the SLEEP TIMER setting is cancelled and the SLEEP indicator goes out. • 5 minutes before the SLEEP TIMER turns off the TV, 5 REMAIN is displayed on the MENU screen 1 Press MENU to display the MENU screen. 2 Press a/b to...
... 120 minutes. SLEEP DISPLAY PIC. The time can set the SLEEP TIMER to the main screen. is displayed. 5 Press MENU to return to automatically turn off the MAIN POWER on the TV set or press the POWER button on the remote control, the SLEEP TIMER setting is cancelled and the SLEEP indicator goes out. • 5 minutes before the SLEEP TIMER turns off the TV, 5 REMAIN is displayed on the MENU screen 1 Press MENU to display the MENU screen. 2 Press a/b to...

LC-13E1U | LC-15E1U Operation Manual
Page 25
SELECT : ENTER : MENU SLEEP T IMER V I DEO ADJUST PRESET CLOSED CAPT I ON V-CH I P BLOCK SET UP EX I T : MENU 6 Press c/d to change the setting. SELECT : ENTER : V I DEO ADJUST ( TV) RE TURN P I CTURE [ 30] T I NT [ 0] COLOR [ 0] BLACK LEVEL [ 0 ] SHARPNESS [ 0 ] COLOR SYSTEM [ N358 ] RESET EX I T : MENU 4 Press a/b to move the cursor to VIDEO ADJUST. 3 Press c/d to enter. SELECT : ADJUST : EX I T : MENU + EX I P BLOCK SET UP MENU MUTE BRIGHT CC TV/VIDEO VOL CH FLASHBACK MENU/ a/b/c/d 2 Press a/b to move the...
SELECT : ENTER : MENU SLEEP T IMER V I DEO ADJUST PRESET CLOSED CAPT I ON V-CH I P BLOCK SET UP EX I T : MENU 6 Press c/d to change the setting. SELECT : ENTER : V I DEO ADJUST ( TV) RE TURN P I CTURE [ 30] T I NT [ 0] COLOR [ 0] BLACK LEVEL [ 0 ] SHARPNESS [ 0 ] COLOR SYSTEM [ N358 ] RESET EX I T : MENU 4 Press a/b to move the cursor to VIDEO ADJUST. 3 Press c/d to enter. SELECT : ADJUST : EX I T : MENU + EX I P BLOCK SET UP MENU MUTE BRIGHT CC TV/VIDEO VOL CH FLASHBACK MENU/ a/b/c/d 2 Press a/b to move the...
LC-13E1U | LC-15E1U Operation Manual
Page 31
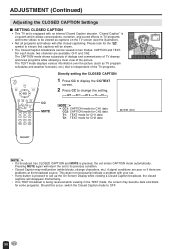
... button is pressed to call up the On-Screen Display while viewing a Closed Caption broadcast, the closed captioning. For each mode, two channels are problems at the broadcast source. The CAPTION mode shows subscripts of dialogs and commentaries of TV dramas and news programs while allowing a clear view of the TV programs. POWER SLEEP DISPLAY MENU PIC. "Closed Caption" is a system which allows conversations, narration, and sound effects in TV programs and home videos to be viewed...
... button is pressed to call up the On-Screen Display while viewing a Closed Caption broadcast, the closed captioning. For each mode, two channels are problems at the broadcast source. The CAPTION mode shows subscripts of dialogs and commentaries of TV dramas and news programs while allowing a clear view of the TV programs. POWER SLEEP DISPLAY MENU PIC. "Closed Caption" is a system which allows conversations, narration, and sound effects in TV programs and home videos to be viewed...

LC-13E1U | LC-15E1U Operation Manual
Page 35
...; If you set X to enter. Channel Select 3 INPUT SECRET NO. Input the 4-digit secret number by using Channel Select. FLIP 1 Press MENU to register. V-CH I P BLOCK RE TURN MPAA TV GU I DEL I NES STATUS [OFF ] EX I T : MENU 5 Press a/b to move the cursor to PG, and then press c/d to enter. If you set PG to the main screen. MENU MUTE BRIGHT CC TV/VIDEO VOL CH...
...; If you set X to enter. Channel Select 3 INPUT SECRET NO. Input the 4-digit secret number by using Channel Select. FLIP 1 Press MENU to register. V-CH I P BLOCK RE TURN MPAA TV GU I DEL I NES STATUS [OFF ] EX I T : MENU 5 Press a/b to move the cursor to PG, and then press c/d to enter. If you set PG to the main screen. MENU MUTE BRIGHT CC TV/VIDEO VOL CH...

LC-13E1U | LC-15E1U Operation Manual
Page 41
... mounting the cover. • Connect the cables and cords after fixing the cable clamp. A • AV2 has 2 OUT modes (see page 26). • When using as an OUTPUT terminal, select PRESET in the MENU and set AV2 IN/OUT to OUT. (See page 26.) • The factory setting for connection to external audio systems. How to a VCR, audio amplifier, etc. CONNECTING WITH EXTERNAL DEVICES (Continued) Outputting video and audio (video output) You can output video and audio...
... mounting the cover. • Connect the cables and cords after fixing the cable clamp. A • AV2 has 2 OUT modes (see page 26). • When using as an OUTPUT terminal, select PRESET in the MENU and set AV2 IN/OUT to OUT. (See page 26.) • The factory setting for connection to external audio systems. How to a VCR, audio amplifier, etc. CONNECTING WITH EXTERNAL DEVICES (Continued) Outputting video and audio (video output) You can output video and audio...
LC-13E1U | LC-15E1U Operation Manual
Page 42
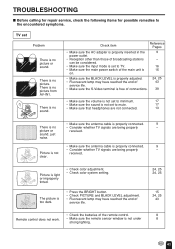
... set to the encountered symptoms. TV set Problem Sound Picture There is properly inserted in the 9 power outlet. • Reception other than those of the remote control. 8 Remote control does not work. • Make sure the remote sensor window is no picture or sound. The picture is too dark. • Press the BRIGHT button. • Check PICTURE and BLACK LEVEL adjustment. • Fluorescent lamp may have reached the end of service...
... set to the encountered symptoms. TV set Problem Sound Picture There is properly inserted in the 9 power outlet. • Reception other than those of the remote control. 8 Remote control does not work. • Make sure the remote sensor window is no picture or sound. The picture is too dark. • Press the BRIGHT button. • Check PICTURE and BLACK LEVEL adjustment. • Fluorescent lamp may have reached the end of service...

LC-13E1U | LC-15E1U Operation Manual
Page 47
... your Product to the period(s) from Warranty Coverage (if any): Where to Obtain Service: What to do to Obtain Service: LC-13E1U LCD Color Television LC-15E1U LCD Color Television (Be sure to extend the duration of any incidental or consequential economic or property damage. in the United States. If you need service for the period of time described herein, shall constitute complete fulfillment...
... your Product to the period(s) from Warranty Coverage (if any): Where to Obtain Service: What to do to Obtain Service: LC-13E1U LCD Color Television LC-15E1U LCD Color Television (Be sure to extend the duration of any incidental or consequential economic or property damage. in the United States. If you need service for the period of time described herein, shall constitute complete fulfillment...

LC-13E1U | LC-15E1U Operation Manual
Page 48
... defects in its option, repair or replace the product as a result of abusive operation, negligence, accident, improper installation or inappropriate use as outlined in the owner's manual. (b) Any Sharp product tampered with, modified, adjusted or repaired by Sharp, including but not limited to operate during the warranty period, warranty service may be responsible for rental or commercial purposes. (i) Any installation, setup and/or programming charges. The purchaser will...
... defects in its option, repair or replace the product as a result of abusive operation, negligence, accident, improper installation or inappropriate use as outlined in the owner's manual. (b) Any Sharp product tampered with, modified, adjusted or repaired by Sharp, including but not limited to operate during the warranty period, warranty service may be responsible for rental or commercial purposes. (i) Any installation, setup and/or programming charges. The purchaser will...


