
Operation Manual
Page 4
... service life of the following instructions when installing, operating and cleaning the product. Use of unauthorized parts can cause damage, which often requires extensive adjustment work , request the service technician to perform safety checks to ensure that the service person uses replacement parts specified by a qualified technician. Use of inadequate attachments can cause fire or electric shock. ■ Entering of adapter from a SHARP service center or your LCD color...
... service life of the following instructions when installing, operating and cleaning the product. Use of unauthorized parts can cause damage, which often requires extensive adjustment work , request the service technician to perform safety checks to ensure that the service person uses replacement parts specified by a qualified technician. Use of inadequate attachments can cause fire or electric shock. ■ Entering of adapter from a SHARP service center or your LCD color...
Operation Manual
Page 6
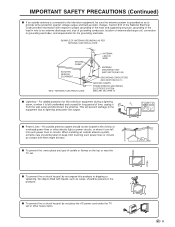
... prevent fire, never place any type of time, unplug it from the wall outlet and disconnect the antenna. Section 810 of the National Electrical Code provides information with liquids, such as vases, should not be located in wire to an antenna discharge unit, size of grounding conductors, location of overhead power lines or other electric light or power circuits, or where it...
... prevent fire, never place any type of time, unplug it from the wall outlet and disconnect the antenna. Section 810 of the National Electrical Code provides information with liquids, such as vases, should not be located in wire to an antenna discharge unit, size of grounding conductors, location of overhead power lines or other electric light or power circuits, or where it...
Operation Manual
Page 7
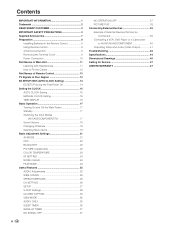
... Fix the Cables 12 Part Names of Remote Control 13 TV Signals in Your Region 13 EZ SETUP (With AUTO CLOCK Setting 14 EZ SETUP during the First Power On 14 Setting the CLOCK 15 AUTO CLOCK Setting 15 MANUAL CLOCK Setting 16 TIME DISPLAY 16 Basic Operation 17 Turning On and Off the Main Power 17 Standby 17 Switching the Input Modes (AV1/AV2/COMPONENT/TV 17 Sound Volume 18 Changing Channels 18 Selecting Menu Items 19 Basic Adjustment Settings 21 AV MODE...
... Fix the Cables 12 Part Names of Remote Control 13 TV Signals in Your Region 13 EZ SETUP (With AUTO CLOCK Setting 14 EZ SETUP during the First Power On 14 Setting the CLOCK 15 AUTO CLOCK Setting 15 MANUAL CLOCK Setting 16 TIME DISPLAY 16 Basic Operation 17 Turning On and Off the Main Power 17 Standby 17 Switching the Input Modes (AV1/AV2/COMPONENT/TV 17 Sound Volume 18 Changing Channels 18 Selecting Menu Items 19 Basic Adjustment Settings 21 AV MODE...

Operation Manual
Page 11
... POWER Power Connection POWER INPUT terminal (DC 12V) Household power outlet AC adapter AC cord ■ Using the AC Adapter • Although the AC adapter may become warm during use, this is unknown, consult your cable TV company. A • Use a commercially available AC plug adapter, if necessary, depending on installing cable TV, consult your cable TV company.) For more specific instructions on the design of the wall outlet. • Always turn the MAIN POWER switch...
... POWER Power Connection POWER INPUT terminal (DC 12V) Household power outlet AC adapter AC cord ■ Using the AC Adapter • Although the AC adapter may become warm during use, this is unknown, consult your cable TV company. A • Use a commercially available AC plug adapter, if necessary, depending on installing cable TV, consult your cable TV company.) For more specific instructions on the design of the wall outlet. • Always turn the MAIN POWER switch...
Operation Manual
Page 12
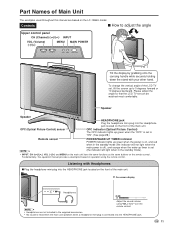
... set , tilt the screen up to adjust the angle Upper control panel CH (Channel) ( )/( ) INPUT VOL (Volume) (-)/(+) MENU MAIN POWER Tilt the display by grabbing onto the carrying handle while securely holding down the stand with Headphones ■ Plug the headphone mini-plug into the HEADPHONE jack located on the front of the main unit. ▼ On-screen display Headphones VOLUME 20 Adjust the sound volume using the remote control. Speaker Speaker OPC (Optical Picture Control) sensor HEADPHONE jack Plug the...
... set , tilt the screen up to adjust the angle Upper control panel CH (Channel) ( )/( ) INPUT VOL (Volume) (-)/(+) MENU MAIN POWER Tilt the display by grabbing onto the carrying handle while securely holding down the stand with Headphones ■ Plug the headphone mini-plug into the HEADPHONE jack located on the front of the main unit. ▼ On-screen display Headphones VOLUME 20 Adjust the sound volume using the remote control. Speaker Speaker OPC (Optical Picture Control) sensor HEADPHONE jack Plug the...

Operation Manual
Page 14
... when S-VIDEO or COMPONENT signals are played. 13 VOL (+)/(-) (p. 18) Sets the volume. INPUT (p. 17) Switches the input source between AV1, AV2, COMPONENT and TV mode. MENU RETURN (p. 19) Returns to the country before using this product by following the table below. Part Names of Remote Control POWER (p. 17) Switches the Liquid Crystal Television power on the screen. SLEEP (p. 36) Sets the sleep timer. MTS (p. 18) Selects audio settings. CC (p. 34) Displays Closed Caption subtitles. CH ( )/( ) (p. 18) Selects channel. Channel Select (p. 18) Sets the channel. Canada...
... when S-VIDEO or COMPONENT signals are played. 13 VOL (+)/(-) (p. 18) Sets the volume. INPUT (p. 17) Switches the input source between AV1, AV2, COMPONENT and TV mode. MENU RETURN (p. 19) Returns to the country before using this product by following the table below. Part Names of Remote Control POWER (p. 17) Switches the Liquid Crystal Television power on the screen. SLEEP (p. 36) Sets the sleep timer. MTS (p. 18) Selects audio settings. CC (p. 34) Displays Closed Caption subtitles. CH ( )/( ) (p. 18) Selects channel. Channel Select (p. 18) Sets the channel. Canada...
Operation Manual
Page 15
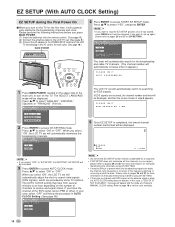
... broadcasting signals are received, the channel number and time will be displayed. Press '/" to access CH-SETTING mode. If you press MAIN POWER. (1) Insert the batteries into the remote control. (See page 8.) (2) Connect the antenna cable to the LCD TV set. (See page 9.) (3) Connect the AC adapter to the POWER INPUT terminal of the EDS signal carrier (PBS or other) in "EZ SETUP, CH-SETTING", EZ SETUP will be canceled. 3 Press ENTER to access AUTO CLOCK mode. Press...
... broadcasting signals are received, the channel number and time will be displayed. Press '/" to access CH-SETTING mode. If you press MAIN POWER. (1) Insert the batteries into the remote control. (See page 8.) (2) Connect the antenna cable to the LCD TV set. (See page 9.) (3) Connect the AC adapter to the POWER INPUT terminal of the EDS signal carrier (PBS or other) in "EZ SETUP, CH-SETTING", EZ SETUP will be canceled. 3 Press ENTER to access AUTO CLOCK mode. Press...
Operation Manual
Page 16
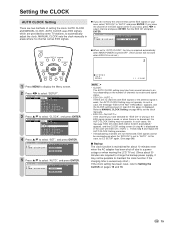
...; EDS CH < Not AUTO >: If the channel you do not know the channel of setting the clock: AUTO CLOCK and MANUAL CLOCK. Refer to MANUAL CLOCK Setting on the number of channels to select "SETUP". M E N U [ SETUP... M E N U [ SETUP... C L O C K ] SELECT SET TIME DISPLAY AUTO OPTION MANUAL STEREO SAP MONO 11:53AM A • CLOCK: The AUTO CLOCK setting may not operate. C L O C K ] AUTO SET TIME DISPLAY EDS CLOCK CH AUTO ● When set .) 2 1 Press MENU to display the Menu screen. 2 Press \/| to receive and signal status. •...
...; EDS CH < Not AUTO >: If the channel you do not know the channel of setting the clock: AUTO CLOCK and MANUAL CLOCK. Refer to MANUAL CLOCK Setting on the number of channels to select "SETUP". M E N U [ SETUP... M E N U [ SETUP... C L O C K ] SELECT SET TIME DISPLAY AUTO OPTION MANUAL STEREO SAP MONO 11:53AM A • CLOCK: The AUTO CLOCK setting may not operate. C L O C K ] AUTO SET TIME DISPLAY EDS CLOCK CH AUTO ● When set .) 2 1 Press MENU to display the Menu screen. 2 Press \/| to receive and signal status. •...
Operation Manual
Page 17
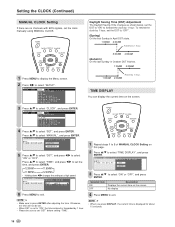
... "TIME", and press \/| to select "MANUAL", and press ENTER. M E N U [ SETUP... M E N U [ SETUP... To rewind the clock by 1 hour, set the clock manually using MANUAL CLOCK. C L O C K ] SELECT SET TIME DISPLAY ON OPTION OFF 3 Press '/" to display the Menu screen. C L O C K ] PICTURE AUDIO SETUP OPTION CH-SETTING MTS CLOCK AV2 IN/OUT V-CHIP BLOCK CLOSED CAPTION COLOR SYSTEM LANGUAGE 4 Press '/" to select "ON" or "OFF". Setting the CLOCK (Continued) MANUAL CLOCK Setting If there are no channels with EDS signals, set...
... "TIME", and press \/| to select "MANUAL", and press ENTER. M E N U [ SETUP... M E N U [ SETUP... To rewind the clock by 1 hour, set the clock manually using MANUAL CLOCK. C L O C K ] SELECT SET TIME DISPLAY ON OPTION OFF 3 Press '/" to display the Menu screen. C L O C K ] PICTURE AUDIO SETUP OPTION CH-SETTING MTS CLOCK AV2 IN/OUT V-CHIP BLOCK CLOSED CAPTION COLOR SYSTEM LANGUAGE 4 Press '/" to select "ON" or "OFF". Setting the CLOCK (Continued) MANUAL CLOCK Setting If there are no channels with EDS signals, set...

Operation Manual
Page 18
... TIMER indicator will turn red. The S-video input terminal is additionally provided for video equipment connected to adjust the preset settings and IN or OUT can be selected. Basic Operation Turning On and Off the Main Power MAIN POWER Switching the Input Modes (AV1/AV2/ COMPONENT/TV) 1 Turn on the power of COMPONENT, AV1, AV2 and TV mode each time INPUT is pressed. Standby To turn the LCD TV set Press POWER. The POWER/WAKE UP TIMER indicator instantly changes from red...
... TIMER indicator will turn red. The S-video input terminal is additionally provided for video equipment connected to adjust the preset settings and IN or OUT can be selected. Basic Operation Turning On and Off the Main Power MAIN POWER Switching the Input Modes (AV1/AV2/ COMPONENT/TV) 1 Turn on the power of COMPONENT, AV1, AV2 and TV mode each time INPUT is pressed. Standby To turn the LCD TV set Press POWER. The POWER/WAKE UP TIMER indicator instantly changes from red...

Operation Manual
Page 20
... for each Menu screen. M E N U [ PICTURE] PICTURE S AUDIO SETUP OPTION AV MODE [DYNAMIC] OPC [OFF] B A C K L I G H T [ BRIGHT ] CONTRAST [ 56] BRIGHTNESS[ 0 ]- + COLOR [+ 2]- + TINT [ 0] SHARPNESS [+ 4]- + ADVANCED RESET 4 Press MENU to return to the previous screen. • Each time MENU is displayed in memory. ■ Using menus ■ Using direct control menu Control panel of your LCD TV set. Basic Operation (Continued) Selecting Menu Items The menus can be saved in yellow. • Settings most recently adjusted will return to display the setting screen...
... for each Menu screen. M E N U [ PICTURE] PICTURE S AUDIO SETUP OPTION AV MODE [DYNAMIC] OPC [OFF] B A C K L I G H T [ BRIGHT ] CONTRAST [ 56] BRIGHTNESS[ 0 ]- + COLOR [+ 2]- + TINT [ 0] SHARPNESS [+ 4]- + ADVANCED RESET 4 Press MENU to return to the previous screen. • Each time MENU is displayed in memory. ■ Using menus ■ Using direct control menu Control panel of your LCD TV set. Basic Operation (Continued) Selecting Menu Items The menus can be saved in yellow. • Settings most recently adjusted will return to display the setting screen...

Operation Manual
Page 22
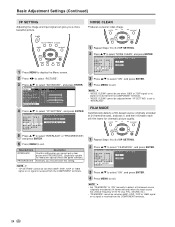
...[ 0 ]- + COLOR [+ 2]- + TINT [ 0] SHARPNESS [+ 4]- + ADVANCED RESET 4 Press '/" to best match the image based on room-brightness and playback software used. M E N U [ PICTURE... For a clear-cut image emphasizing high contrast for VIDEO input.) • When "AV MODE" is displayed and the items in the PICTURE screen (except "OPC" and "ADVANCED") cannot be set to enable easier viewing of video games and other images for easier viewing. 21 No adjustments are allowed. Basic Adjustment Settings AV MODE...
...[ 0 ]- + COLOR [+ 2]- + TINT [ 0] SHARPNESS [+ 4]- + ADVANCED RESET 4 Press '/" to best match the image based on room-brightness and playback software used. M E N U [ PICTURE... For a clear-cut image emphasizing high contrast for VIDEO input.) • When "AV MODE" is displayed and the items in the PICTURE screen (except "OPC" and "ADVANCED") cannot be set to enable easier viewing of video games and other images for easier viewing. 21 No adjustments are allowed. Basic Adjustment Settings AV MODE...
Operation Manual
Page 25
... for media with PROGRESSIVE. (Especially suitable for cinematic picture quality. 5 Press '/" to select "INTERLACE" or "PROGRESSIVE", and press ENTER. 6 Press MENU to select "FILM MODE", and press ENTER. M E N U [ PICTURE... A D V A N C E D ] SELECT OPTION COLOR TEMP. Basic Adjustment Settings (Continued) I/P SETTING Adjusting the image and input signal can give you should select this setting. NOISE CLEAN Produces a clearer video image. 1 Press MENU to display the Menu screen. 2 Press \/| to select "PICTURE". 3 Press...
... for media with PROGRESSIVE. (Especially suitable for cinematic picture quality. 5 Press '/" to select "INTERLACE" or "PROGRESSIVE", and press ENTER. 6 Press MENU to select "FILM MODE", and press ENTER. M E N U [ PICTURE... A D V A N C E D ] SELECT OPTION COLOR TEMP. Basic Adjustment Settings (Continued) I/P SETTING Adjusting the image and input signal can give you should select this setting. NOISE CLEAN Produces a clearer video image. 1 Press MENU to display the Menu screen. 2 Press \/| to select "PICTURE". 3 Press...

Operation Manual
Page 28
... input terminals [OUT FAO] Line Output is selected, Output volume is fixed, Speaker output is available. [OUT VAO] Line Output is selected, Output volume is variable, Speaker output is selected in "WAKE-UP TIMER" in the United States (NTSC-N358). For Brazil (PAL-M), Argentina (PAL-N) or Uruguay (PAL-N), adjust the color system before using this LCD TV. 27 S E T T I N G ] PICTURE AUDIO SETUP OPTION CH-SETTING MTS CLOCK AV2 IN/OUT V-CHIP BLOCK CLOSED CAPTION COLOR...
... input terminals [OUT FAO] Line Output is selected, Output volume is fixed, Speaker output is available. [OUT VAO] Line Output is selected, Output volume is variable, Speaker output is selected in "WAKE-UP TIMER" in the United States (NTSC-N358). For Brazil (PAL-M), Argentina (PAL-N) or Uruguay (PAL-N), adjust the color system before using this LCD TV. 27 S E T T I N G ] PICTURE AUDIO SETUP OPTION CH-SETTING MTS CLOCK AV2 IN/OUT V-CHIP BLOCK CLOSED CAPTION COLOR...

Operation Manual
Page 30
... '/" to select the desired item, press \/| to select "TV GUIDELINES", and press ENTER. V-CHIP Settings (Continued) ■ Setting V-CHIP (MPAA rating) Useful Features (Continued) ■ Setting V-CHIP (TV GUIDELINES) ● Setting TV GUIDELINES 1 Press MENU to display the Menu screen. 2 Press \/| to select "SETUP". 3 Press '/" to register. digit secret number by using Channel Select. V - C H I P MPAA SET RATING BLOCK] G PG PG-13 R NC-17 X ----- C H I P TV GUIDELINES...
... '/" to select the desired item, press \/| to select "TV GUIDELINES", and press ENTER. V-CHIP Settings (Continued) ■ Setting V-CHIP (MPAA rating) Useful Features (Continued) ■ Setting V-CHIP (TV GUIDELINES) ● Setting TV GUIDELINES 1 Press MENU to display the Menu screen. 2 Press \/| to select "SETUP". 3 Press '/" to register. digit secret number by using Channel Select. V - C H I P MPAA SET RATING BLOCK] G PG PG-13 R NC-17 X ----- C H I P TV GUIDELINES...
Operation Manual
Page 35
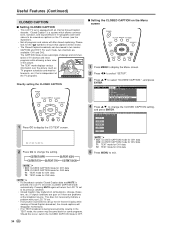
...: CLOSED CAPTION mode for CH2 data T1: TEXT mode for CH1 data T2: TEXT mode for the " " symbol to change the CLOSED CAPTION setting, and press ENTER. For each mode, two channels are problems at the broadcast source. The TEXT mode displays various information over the picture (such as captions on the Menu screen 1 Press MENU to display the Menu screen. 2 Press \/| to select "SETUP". 3 Press '/" to call up the On-Screen Display while viewing a Closed Caption broadcast, the closed captions...
...: CLOSED CAPTION mode for CH2 data T1: TEXT mode for CH1 data T2: TEXT mode for the " " symbol to change the CLOSED CAPTION setting, and press ENTER. For each mode, two channels are problems at the broadcast source. The TEXT mode displays various information over the picture (such as captions on the Menu screen 1 Press MENU to display the Menu screen. 2 Press \/| to select "SETUP". 3 Press '/" to call up the On-Screen Display while viewing a Closed Caption broadcast, the closed captions...

Operation Manual
Page 38
... OPERATION OFF When set to adjust them. CHANNEL Set the TV channel or input mode when the TV is factory preset value. VOLUME Set the volume when the TV is no signal inputs for "WAKE-UP TIMER" is reached when the power is turned on the main unit. The volume does not change at this item to the set channel. W A K E - M E N U [ OPTION... N O S I M E R ] PICTURE AUDIO SETUP OPTION VIEW MODE + AUDIO ONLY SLEEP TIMER WAKE-UP TIMER NO SIGNAL OFF ED CA NO OPERATION OFF PICTURE...
... OPERATION OFF When set to adjust them. CHANNEL Set the TV channel or input mode when the TV is factory preset value. VOLUME Set the volume when the TV is no signal inputs for "WAKE-UP TIMER" is reached when the power is turned on the main unit. The volume does not change at this item to the set channel. W A K E - M E N U [ OPTION... N O S I M E R ] PICTURE AUDIO SETUP OPTION VIEW MODE + AUDIO ONLY SLEEP TIMER WAKE-UP TIMER NO SIGNAL OFF ED CA NO OPERATION OFF PICTURE...
Operation Manual
Page 43
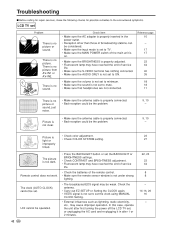
... the LCD TV set the clock using MANUAL CLOCK Setting. • External influences such as lightning, static electricity, etc., may cause improper operation. Check the antenna. • Carry out EZ SETUP or Setting the CLOCK again. • If EDS signal is not sent, set , or unplugging the AC cord and re-plugging it in the 10 Sound Picture power outlet. picture or be the problem. Troubleshooting ■ Before calling for repair services...
... the LCD TV set the clock using MANUAL CLOCK Setting. • External influences such as lightning, static electricity, etc., may cause improper operation. Check the antenna. • Carry out EZ SETUP or Setting the CLOCK again. • If EDS signal is not sent, set , or unplugging the AC cord and re-plugging it in the 10 Sound Picture power outlet. picture or be the problem. Troubleshooting ■ Before calling for repair services...
Operation Manual
Page 48
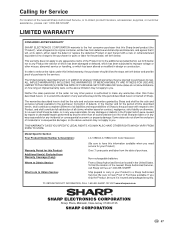
... DATE OF PURCHASE SET FORTH BELOW. Neither the sales personnel of any warranties other than an authorized servicer. Nor shall Sharp be granted to purchasers by anyone other than those described herein, or to make any warranties beyond the time period described herein on behalf of purchase. Model Specific Section Your Product Model Number & Description: LC-13B6U/LC-15B6U LCD Color Television Warranty Period for this...
... DATE OF PURCHASE SET FORTH BELOW. Neither the sales personnel of any warranties other than an authorized servicer. Nor shall Sharp be granted to purchasers by anyone other than those described herein, or to make any warranties beyond the time period described herein on behalf of purchase. Model Specific Section Your Product Model Number & Description: LC-13B6U/LC-15B6U LCD Color Television Warranty Period for this...
Operation Manual
Page 49
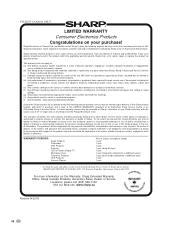
... transmission line/power line voltage or liquid spillage. (g) Any product received without appropriate model, serial number and CSA/cUL markings. (h) Any products used for any Sharp television with respect to extend, enlarge or transfer this Sharp product or the loss of defects, in this product within the applicable warranty period, Sharp shall, at Sharp's discretion on this product is free, under normal use with...
... transmission line/power line voltage or liquid spillage. (g) Any product received without appropriate model, serial number and CSA/cUL markings. (h) Any products used for any Sharp television with respect to extend, enlarge or transfer this Sharp product or the loss of defects, in this product within the applicable warranty period, Sharp shall, at Sharp's discretion on this product is free, under normal use with...


