
LC-15A2U Operation Manual
Page 4
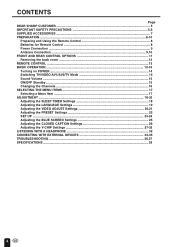
CONTENTS Page DEAR SHARP CUSTOMER ...5 IMPORTANT SAFETY PRECAUTIONS 5,6 SUPPLIED ACCESSORIES ...7 PREPARATION ...8-10 Preparing and Using the Remote Control 8 Batteries for Remote Control ...8 Power Connection ...9 Antenna Connection ... ITEMS ...17 Selecting a Menu Item ...17 ADJUSTMENT ...18-32 Adjusting the SLEEP TIMER Settings 18 Adjusting the LANGUAGE Settings 19 Adjusting the VIDEO ADJUST Settings 20,21 Adjusting the PRESET Settings 22 SET UP ...23-24 Adjusting the BLUE SCREEN Settings 25 Adjusting the CLOSED CAPTION Settings 26 Adjusting the V-CHIP Settings 27-32 LISTENING WITH A...
CONTENTS Page DEAR SHARP CUSTOMER ...5 IMPORTANT SAFETY PRECAUTIONS 5,6 SUPPLIED ACCESSORIES ...7 PREPARATION ...8-10 Preparing and Using the Remote Control 8 Batteries for Remote Control ...8 Power Connection ...9 Antenna Connection ... ITEMS ...17 Selecting a Menu Item ...17 ADJUSTMENT ...18-32 Adjusting the SLEEP TIMER Settings 18 Adjusting the LANGUAGE Settings 19 Adjusting the VIDEO ADJUST Settings 20,21 Adjusting the PRESET Settings 22 SET UP ...23-24 Adjusting the BLUE SCREEN Settings 25 Adjusting the CLOSED CAPTION Settings 26 Adjusting the V-CHIP Settings 27-32 LISTENING WITH A...
LC-15A2U Operation Manual
Page 5
... by a qualified technician. In order to perform servicing. I Attachments-Do not use can cause damage, which often requires extensive adjustment work , request the service technician to perform safety checks to perform repairs. I Follow instructions-All operating instructions must be followed.... equate attachments can cause fire or electric shock. I Repair-If any of adapter from a SHARP service center or your dealer. Overloading can result in accidents. Request a qualified service person to prevent potential danger, please observe ...
... by a qualified technician. In order to perform servicing. I Attachments-Do not use can cause damage, which often requires extensive adjustment work , request the service technician to perform safety checks to perform repairs. I Follow instructions-All operating instructions must be followed.... equate attachments can cause fire or electric shock. I Repair-If any of adapter from a SHARP service center or your dealer. Overloading can result in accidents. Request a qualified service person to prevent potential danger, please observe ...

LC-15A2U Operation Manual
Page 11
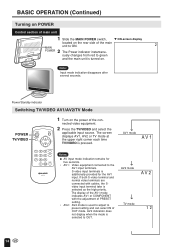
it can be rotated 90 degrees. FRONT AND REAR CONTROL OPTIONS Main unit (front view) Rear control panel To change the angle of the TV set can also be watched most comfortably. Remote sensor window (The actual location is not visible) Power/standby indicator A green indicator lights when the power is on and a red indicator lights when in the standby mode (the indicator will not light when the main power is off). 11 Please adjust the angle so that the TV set , tilt the screen 10 degrees forward or 20 degrees backward.
it can be rotated 90 degrees. FRONT AND REAR CONTROL OPTIONS Main unit (front view) Rear control panel To change the angle of the TV set can also be watched most comfortably. Remote sensor window (The actual location is not visible) Power/standby indicator A green indicator lights when the power is on and a red indicator lights when in the standby mode (the indicator will not light when the main power is off). 11 Please adjust the angle so that the TV set , tilt the screen 10 degrees forward or 20 degrees backward.
LC-15A2U Operation Manual
Page 14
... the main MAIN unit to green and the main unit is turned on the power of PRESET setting. • AV2: AV2 mode is used to adjust to OUT. If both S-video terminal and normal video terminals are connected with the...
... the main MAIN unit to green and the main unit is turned on the power of PRESET setting. • AV2: AV2 mode is used to adjust to OUT. If both S-video terminal and normal video terminals are connected with the...

LC-15A2U Operation Manual
Page 17
.... 3 Press the VOL (+)/(-) to enter. 4 Press the MENU to exit. SELECTING THE MENU ITEMS Selecting a Menu Item • This LCD TV set allows you to adjust the picture and sound, and set the channels and other features using this product. I The displayed items differ depending on the setting conditions.
.... 3 Press the VOL (+)/(-) to enter. 4 Press the MENU to exit. SELECTING THE MENU ITEMS Selecting a Menu Item • This LCD TV set allows you to adjust the picture and sound, and set the channels and other features using this product. I The displayed items differ depending on the setting conditions.

LC-15A2U Operation Manual
Page 18
The setting can be set the sleep timer (in the range between 30 and 120 minutes. is turned off when --- ADJUSTMENT Adjusting the SLEEP TIMER Settings 1 Press the MENU to disply the MENU screen. 2 Press the CH (])/([) to move the cursor to SLEEP TIMER. 3 Press the VOL (+)/(-) to display SLEEP TIMER screen. 4 Press the VOL (+)/(-) to the main screen. (MAIN MENU screen) (SLEEP TIMER screen) 18 The setting is displayed. 5 Press the MENU to return to set in increment of 30 minutes and in minutes).
The setting can be set the sleep timer (in the range between 30 and 120 minutes. is turned off when --- ADJUSTMENT Adjusting the SLEEP TIMER Settings 1 Press the MENU to disply the MENU screen. 2 Press the CH (])/([) to move the cursor to SLEEP TIMER. 3 Press the VOL (+)/(-) to display SLEEP TIMER screen. 4 Press the VOL (+)/(-) to the main screen. (MAIN MENU screen) (SLEEP TIMER screen) 18 The setting is displayed. 5 Press the MENU to return to set in increment of 30 minutes and in minutes).
LC-15A2U Operation Manual
Page 19
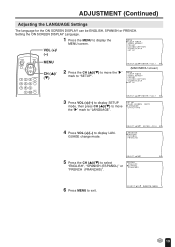
GUAGE change mode. 5 Press the CH (])/([) to select "ENGLISH", "SPANISH (ESPAÑOL)" or "FRENCH (FRANÇAIS)". 6 Press MENU to display LAN- Setting the ON SCREEN DISPLAY Language. 1 Press the MENU to display the MENU screen. 2 Press the CH (])/([) to move the ">" mark to "SETUP". (MAIN MENU screen) 3 Press VOL (+)/(-) to display SETUP mode, then press CH (])/([) to move the ">" mark to "LANGUAGE". 4 Press VOL (+)/(-) to exit. 19 ADJUSTMENT (Continued) Adjusting the LANGUAGE Settings The language for the ON SCREEN DISPLAY can be ENGLISH, SPANISH or FRENCH.
GUAGE change mode. 5 Press the CH (])/([) to select "ENGLISH", "SPANISH (ESPAÑOL)" or "FRENCH (FRANÇAIS)". 6 Press MENU to display LAN- Setting the ON SCREEN DISPLAY Language. 1 Press the MENU to display the MENU screen. 2 Press the CH (])/([) to move the ">" mark to "SETUP". (MAIN MENU screen) 3 Press VOL (+)/(-) to display SETUP mode, then press CH (])/([) to move the ">" mark to "LANGUAGE". 4 Press VOL (+)/(-) to exit. 19 ADJUSTMENT (Continued) Adjusting the LANGUAGE Settings The language for the ON SCREEN DISPLAY can be ENGLISH, SPANISH or FRENCH.
LC-15A2U Operation Manual
Page 20
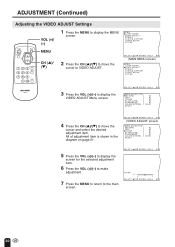
ADJUSTMENT (Continued) Adjusting the VIDEO ADJUST Settings 1 Press the MENU to display the MENU screen. 2 Press the CH (])/([) to move the cursor to VIDEO ADJUST. (MAIN MENU screen) 3 Press the VOL (+)/(-) to display the VIDEO ADJUST Menu screen. 4 Press the CH (])/([) to the main screen. 20 All of adjustment item is shown in the diagram on page 21. (VIDEO ADJUST screen) 5 Press the VOL (+)/(-) to display the screen for the selected adjustment item. 6 Press the VOL (+)/(-) to make adjustment. 7 Press the MENU to return to move the cursor and select the desired adjustment item.
ADJUSTMENT (Continued) Adjusting the VIDEO ADJUST Settings 1 Press the MENU to display the MENU screen. 2 Press the CH (])/([) to move the cursor to VIDEO ADJUST. (MAIN MENU screen) 3 Press the VOL (+)/(-) to display the VIDEO ADJUST Menu screen. 4 Press the CH (])/([) to the main screen. 20 All of adjustment item is shown in the diagram on page 21. (VIDEO ADJUST screen) 5 Press the VOL (+)/(-) to display the screen for the selected adjustment item. 6 Press the VOL (+)/(-) to make adjustment. 7 Press the MENU to return to move the cursor and select the desired adjustment item.

LC-15A2U Operation Manual
Page 21
... More green level Press the VOL (+)/(-) to an appropriate system may improve the picture or sound quality. 21 ADJUSTMENT (Continued) Adjusting the VIDEO ADJUST Settings (Continued) TV mode Selected item PICTURE TINT COLOR BLACK LEVEL SHARPNESS COLOR SYSTEM Press the VOL (-). For Brazil (PALM), Argentina (PAL-N) and Uruguay (PAL-N), set . When... be selected. I Selecting RESET will return all settings to AUTO for normal reception. Increase contrast Toward green Higher color intensity More bright Sharp picture AV mode Selected item PICTURE TINT/WHITE BALANCE COLOR BLACK LEVEL...
... More green level Press the VOL (+)/(-) to an appropriate system may improve the picture or sound quality. 21 ADJUSTMENT (Continued) Adjusting the VIDEO ADJUST Settings (Continued) TV mode Selected item PICTURE TINT COLOR BLACK LEVEL SHARPNESS COLOR SYSTEM Press the VOL (-). For Brazil (PALM), Argentina (PAL-N) and Uruguay (PAL-N), set . When... be selected. I Selecting RESET will return all settings to AUTO for normal reception. Increase contrast Toward green Higher color intensity More bright Sharp picture AV mode Selected item PICTURE TINT/WHITE BALANCE COLOR BLACK LEVEL...

LC-15A2U Operation Manual
Page 22
... user. 1 Press the MENU to display the MENU screen. 2 Press the CH (])/([) to move the cursor to PRESET. 3 Press the VOL (+)/(-) to the main screen. ADJUSTMENT (Continued) Adjusting the PRESET Settings I MTS mode cannot be set is turned off when there is no signal for viewing in well-lit areas.
... user. 1 Press the MENU to display the MENU screen. 2 Press the CH (])/([) to move the cursor to PRESET. 3 Press the VOL (+)/(-) to the main screen. ADJUSTMENT (Continued) Adjusting the PRESET Settings I MTS mode cannot be set is turned off when there is no signal for viewing in well-lit areas.
LC-15A2U Operation Manual
Page 23
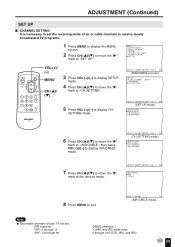
... CH (])/([) to move the ">" mark to the desired mode. 8 Press MENU to exit. (AIR/CABLE mode) Note: I CHANNEL SETTING It is necessary to display CH- ADJUSTMENT (Continued) SET UP I Receivable channels of air or cable channels to receive locally broadcasted TV programs. 1 Press MENU to display the MENU screen. 2 Press CH...
... CH (])/([) to move the ">" mark to the desired mode. 8 Press MENU to exit. (AIR/CABLE mode) Note: I CHANNEL SETTING It is necessary to display CH- ADJUSTMENT (Continued) SET UP I Receivable channels of air or cable channels to receive locally broadcasted TV programs. 1 Press MENU to display the MENU screen. 2 Press CH...

LC-15A2U Operation Manual
Page 24
... mode, then press CH (])/([) to move the ">" mark to "CH SEARCH", then press VOL (+)/(-) to display CH SEARCH screen. (CH SETTING mode) START 2.1 Press VOL (+). ADJUSTMENT (Continued) SET UP (Continued) I If you press VOL (+) again, auto-program will start again, and the previously memorized channels will be lost. 24
... mode, then press CH (])/([) to move the ">" mark to "CH SEARCH", then press VOL (+)/(-) to display CH SEARCH screen. (CH SETTING mode) START 2.1 Press VOL (+). ADJUSTMENT (Continued) SET UP (Continued) I If you press VOL (+) again, auto-program will start again, and the previously memorized channels will be lost. 24

LC-15A2U Operation Manual
Page 25
... shown on your TV even if the BLUE SCREEN is turned on. 25 To continue watching TV under these conditions, switch the BLUE SCREEN "OFF". ADJUSTMENT (Continued) Adjusting the BLUE SCREEN Settings I BLUE SCREEN Automatically turns the screen blue if a broadcast signal is not received. 1 Press the MENU to display the MENU...
... shown on your TV even if the BLUE SCREEN is turned on. 25 To continue watching TV under these conditions, switch the BLUE SCREEN "OFF". ADJUSTMENT (Continued) Adjusting the BLUE SCREEN Settings I BLUE SCREEN Automatically turns the screen blue if a broadcast signal is not received. 1 Press the MENU to display the MENU...
LC-15A2U Operation Manual
Page 26
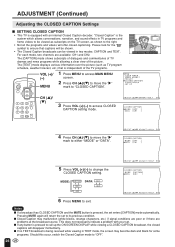
..., the closed captioning. For each mode, two channels are problems at the broadcast source. I If any button is pressed, the set enters [CAPTION] mode automatically. ADJUSTMENT (Continued) Adjusting the CLOSED CAPTION Settings I SETTING CLOSED CAPTION • This TV is independent of the picture.
..., the closed captioning. For each mode, two channels are problems at the broadcast source. I If any button is pressed, the set enters [CAPTION] mode automatically. ADJUSTMENT (Continued) Adjusting the CLOSED CAPTION Settings I SETTING CLOSED CAPTION • This TV is independent of the picture.

LC-15A2U Operation Manual
Page 27
... or sexual scenes that is blocked, this will automatically block the high rating "NC-17", "X" also. ADJUSTMENT (Continued) Adjusting the V-CHIP Settings I MPAA RATING is restricted by age and content. • Since a TV program may be adjusted for complete control. [1] MPAA RATING RATING G GENERAL AUDIENCES. TV Parental Guidelines are restricted by age. X X Rating...
... or sexual scenes that is blocked, this will automatically block the high rating "NC-17", "X" also. ADJUSTMENT (Continued) Adjusting the V-CHIP Settings I MPAA RATING is restricted by age and content. • Since a TV program may be adjusted for complete control. [1] MPAA RATING RATING G GENERAL AUDIENCES. TV Parental Guidelines are restricted by age. X X Rating...

LC-15A2U Operation Manual
Page 28
...-based ratings regardless of content ratings settings. I Age-based ratings can be set TV-Y and TV-Y7 to BLOCK, CONTENT will display all item. 28 ADJUSTMENT (Continued) Adjusting the V-CHIP Settings (Continued) [2] TV PARENTAL GUIDELINES RATING FV (Fantasy Violence) TV-Y (All children) ⇑ TV-Y7 (Direct to Older Children) ✕ TV-G (General...
...-based ratings regardless of content ratings settings. I Age-based ratings can be set TV-Y and TV-Y7 to BLOCK, CONTENT will display all item. 28 ADJUSTMENT (Continued) Adjusting the V-CHIP Settings (Continued) [2] TV PARENTAL GUIDELINES RATING FV (Fantasy Violence) TV-Y (All children) ⇑ TV-Y7 (Direct to Older Children) ✕ TV-G (General...

LC-15A2U Operation Manual
Page 29
... to access MAIN MENU screen. 2 Press CH (])/([) to move the ">" mark to "PG", then press VOL (+)/ (-) to select BLOCK. CHIP select mode to access V- ADJUSTMENT (Continued) Adjusting the V-CHIP Settings (Continued) I If you set "G" to BLOCK, all RATING are automatically blocked. Enter the 4-digit secret No.using the channel select key. 4 Press...
... to access MAIN MENU screen. 2 Press CH (])/([) to move the ">" mark to "PG", then press VOL (+)/ (-) to select BLOCK. CHIP select mode to access V- ADJUSTMENT (Continued) Adjusting the V-CHIP Settings (Continued) I If you set "G" to BLOCK, all RATING are automatically blocked. Enter the 4-digit secret No.using the channel select key. 4 Press...

LC-15A2U Operation Manual
Page 30
ADJUSTMENT (Continued) APdajuresntint gCothnetrVo-lC(HV-IPCHSIePttiOnpgser(aCtoionntinCuoendt)inued) [2] TV GUIDELINES 1 Repeat steps 1 to 3 of [1] MPAA RATING. 2 Press CH (])/([) to move the ">" mark to "TV GUIDELINES". 3 Press VOL (+)/(-) to access ...
ADJUSTMENT (Continued) APdajuresntint gCothnetrVo-lC(HV-IPCHSIePttiOnpgser(aCtoionntinCuoendt)inued) [2] TV GUIDELINES 1 Repeat steps 1 to 3 of [1] MPAA RATING. 2 Press CH (])/([) to move the ">" mark to "TV GUIDELINES". 3 Press VOL (+)/(-) to access ...

LC-15A2U Operation Manual
Page 31
... display.) 01 23 4 Press MENU and SECRET No. Also, if you select V-CHIP BLOCK using MENU again, V-CHIP BLOCK will be turned ON again. 31 ADJUSTMENT (Continued) Adjusting the V-CHIP Settings (Continued) [3] ACTIVATE ON TO TURN ON V-CHIP BLOCK 1 Press MENU to access MENU screen. 2 Press CH (])/([) to move the ">" mark to...
... display.) 01 23 4 Press MENU and SECRET No. Also, if you select V-CHIP BLOCK using MENU again, V-CHIP BLOCK will be turned ON again. 31 ADJUSTMENT (Continued) Adjusting the V-CHIP Settings (Continued) [3] ACTIVATE ON TO TURN ON V-CHIP BLOCK 1 Press MENU to access MENU screen. 2 Press CH (])/([) to move the ">" mark to...

LC-15A2U Operation Manual
Page 32
... screen while V-CHIP BLOCK has been activated, then "INPUT SECRET No." LISTENING WITH A HEADPHONE I The headphone is registered.) 1 Repeat steps 1 to 2 of the set . 32 ADJUSTMENT (Continued) Adjusting the V-CHIP Settings (Continued) [5] TO CHANGE THE V-CHIP BLOCK SETTING. (Secret No.
... screen while V-CHIP BLOCK has been activated, then "INPUT SECRET No." LISTENING WITH A HEADPHONE I The headphone is registered.) 1 Repeat steps 1 to 2 of the set . 32 ADJUSTMENT (Continued) Adjusting the V-CHIP Settings (Continued) [5] TO CHANGE THE V-CHIP BLOCK SETTING. (Secret No.


