
LC-13B4U Operation Manual
Page 4
... plug. 3 I Power cord protection-The power cords must be sure to install the product according to rain or water. I Observe warnings-All warnings on safety. For the same reason, do not spill water or liquid on the specification label. I Safety checks-Upon completion of service or repair work by the manufacturer. Removing covers can result in the operating instructions. c. Do not touch the controls...
... plug. 3 I Power cord protection-The power cords must be sure to install the product according to rain or water. I Observe warnings-All warnings on safety. For the same reason, do not spill water or liquid on the specification label. I Safety checks-Upon completion of service or repair work by the manufacturer. Removing covers can result in the operating instructions. c. Do not touch the controls...

LC-13B4U Operation Manual
Page 5
... products (including amplifiers). I The Liquid Crystal panel used in this does not affect the performance of blue, green or red. I Stand-Do not place the product on the screen as a fixed point of your product. 4 Use only a cart, stand, tripod, bracket or table recommended by the manufacturer. This product is made...as well as radiators, heaters, stoves and other openings in installation; Do not cover or block these vents and openings since they can cause the product to fall from the AC outlet before cleaning the product. I Cleaning-Unplug the power cord from the cart.
... products (including amplifiers). I The Liquid Crystal panel used in this does not affect the performance of blue, green or red. I Stand-Do not place the product on the screen as a fixed point of your product. 4 Use only a cart, stand, tripod, bracket or table recommended by the manufacturer. This product is made...as well as radiators, heaters, stoves and other openings in installation; Do not cover or block these vents and openings since they can cause the product to fall from the AC outlet before cleaning the product. I Cleaning-Unplug the power cord from the cart.
LC-13B4U Operation Manual
Page 6
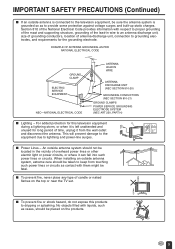
... POWER SERVICE GROUNDING ELECTRODE SYSTEM (NEC ART 250, PART H) I To prevent fire, never place any type of candle or naked flames on the products. 5 I Lighting - Section 810 of the National Electrical Code ...antenna is connected to the television equipment, be sure the antenna system is left unattended and unused for long period of time, unplug it from touching such power lines or circuits as contact with them might be fatal. When installing an outside antenna system, extreme care should not be located in wire to an antenna discharge unit, size of grounding conductors, location...
... POWER SERVICE GROUNDING ELECTRODE SYSTEM (NEC ART 250, PART H) I To prevent fire, never place any type of candle or naked flames on the products. 5 I Lighting - Section 810 of the National Electrical Code ...antenna is connected to the television equipment, be sure the antenna system is left unattended and unused for long period of time, unplug it from touching such power lines or circuits as contact with them might be fatal. When installing an outside antenna system, extreme care should not be located in wire to an antenna discharge unit, size of grounding conductors, location...
LC-13B4U Operation Manual
Page 7
... Standby ...21 Switching TV/VIDEO [AV1/AV2/COMPONENT/TV] Modes 22 Sound Volume ...23 Changing Channels ...24 SELECTING MENU ITEMS ...25 Selecting Menu Items ...25 ADJUSTMENTS ...26-43 Adjusting SLEEP TIMER Settings 26 Adjusting BRIGHTNESS Settings 27 Adjusting PICTURE FLIP Settings 28 Adjusting PRESET Settings ...29 Adjusting LANGUAGE Settings 30 Adjusting VIDEO ADJUST Settings 31, 32 SET UP ...33, 34 Adjusting BLUE SCREEN Settings 35 Adjusting CLOSED CAPTION Settings 36 Adjusting V-CHIP Settings 37-43 CONNECTING EXTERNAL DEVICES 44-46 Bundling Cables with Clamps 46 TROUBLESHOOTING...
... Standby ...21 Switching TV/VIDEO [AV1/AV2/COMPONENT/TV] Modes 22 Sound Volume ...23 Changing Channels ...24 SELECTING MENU ITEMS ...25 Selecting Menu Items ...25 ADJUSTMENTS ...26-43 Adjusting SLEEP TIMER Settings 26 Adjusting BRIGHTNESS Settings 27 Adjusting PICTURE FLIP Settings 28 Adjusting PRESET Settings ...29 Adjusting LANGUAGE Settings 30 Adjusting VIDEO ADJUST Settings 31, 32 SET UP ...33, 34 Adjusting BLUE SCREEN Settings 35 Adjusting CLOSED CAPTION Settings 36 Adjusting V-CHIP Settings 37-43 CONNECTING EXTERNAL DEVICES 44-46 Bundling Cables with Clamps 46 TROUBLESHOOTING...

LC-13B4U Operation Manual
Page 9
.... POWER SLEEP SLEEP indicator POWER indicator Remote control sensor Batteries for the Remote Control Before using the LCD TV set , or operate the remote control closer to the (+) and (-) as indicated in the compartment. • Different types of batteries have a shorter life expectancy due to liquid, and do not expose the remote control to storage conditions. • If the remote control will not be used for the first time, install two ("AAA" size, UM...
.... POWER SLEEP SLEEP indicator POWER indicator Remote control sensor Batteries for the Remote Control Before using the LCD TV set , or operate the remote control closer to the (+) and (-) as indicated in the compartment. • Different types of batteries have a shorter life expectancy due to liquid, and do not expose the remote control to storage conditions. • If the remote control will not be used for the first time, install two ("AAA" size, UM...
LC-13B4U Operation Manual
Page 11
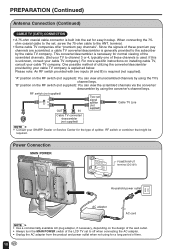
...-ohm cable to off when connecting the AC adapter. • Unplug the AC adapter from the product and power outlet when not using the TV's channel keys. UA(TPHCSAEREATMTDONHAODEP.ETLSLOEULCRAPA.BPTEELLDI.E) ODN PDIONCPW1U2ETVR POWER INPUT terminal (DC12V) Household power outlet AC adapter AC cord A • Use a commercially available AC plug adapter, if necessary, depending on the design of the wall outlet. • Always turn the MAIN POWER switch of...
...-ohm cable to off when connecting the AC adapter. • Unplug the AC adapter from the product and power outlet when not using the TV's channel keys. UA(TPHCSAEREATMTDONHAODEP.ETLSLOEULCRAPA.BPTEELLDI.E) ODN PDIONCPW1U2ETVR POWER INPUT terminal (DC12V) Household power outlet AC adapter AC cord A • Use a commercially available AC plug adapter, if necessary, depending on the design of the wall outlet. • Always turn the MAIN POWER switch of...

LC-13B4U Operation Manual
Page 12
... same buttons on and a red indicator lights when in the standby mode (the indicator will not light when the main power is set. Basically, this operation manual provides a description based on operation with the remote control. 11 DISPLAY AND CONTROL OVERVIEW Controls Upper control panel VOL (l)/(k) CH ( )/( ) MENU TV/VIDEO MAIN POWER VOL CH MENU TV/VIDEO MAIN POWER Speaker (Left) Speaker (Right) To change the vertical angle of the LCD TV set, tilt the screen up red when the SLEEP TIMER is off). SLEEP...
... same buttons on and a red indicator lights when in the standby mode (the indicator will not light when the main power is set. Basically, this operation manual provides a description based on operation with the remote control. 11 DISPLAY AND CONTROL OVERVIEW Controls Upper control panel VOL (l)/(k) CH ( )/( ) MENU TV/VIDEO MAIN POWER VOL CH MENU TV/VIDEO MAIN POWER Speaker (Left) Speaker (Right) To change the vertical angle of the LCD TV set, tilt the screen up red when the SLEEP TIMER is off). SLEEP...

LC-13B4U Operation Manual
Page 14
... tab locks in place with a click. M On-screen display c Rear terminal Headphones VOLUME 20 Adjust the sound volume using VOL (e)/(f) on the upper part of the TV set. Push in the supplied accessories. • No sound is heard from the main unit speakers when a headphone mini-plug is connected into the HEADPHONE jack. 13 I Before connecting cables and cords to the rear terminals, remove the back covers. DISPLAY AND CONTROL OVERVIEW (Continued) Removing the...
... tab locks in place with a click. M On-screen display c Rear terminal Headphones VOLUME 20 Adjust the sound volume using VOL (e)/(f) on the upper part of the TV set. Push in the supplied accessories. • No sound is heard from the main unit speakers when a headphone mini-plug is connected into the HEADPHONE jack. 13 I Before connecting cables and cords to the rear terminals, remove the back covers. DISPLAY AND CONTROL OVERVIEW (Continued) Removing the...

LC-13B4U Operation Manual
Page 15
... on the screen. 12 TV/VIDEO (p. 22) Select a Liquid Crystal Television input source. 13 MENU (p. 17) Display the menu screen. 14 FLASHBACK Return to the previous channel. 15 Channel Select (p. 24) Set the channel. 14 FLIP 4 ENTER 5 MUTE BRIGHT TV/VIDEO MENU 6 FLASH- FLIP (p. 28) Set the orientation of the screen. 6 MUTE (p. 23) Mute the sound. 7 VOL (+)/(-) (p. 23) 15 Set the volume. 8 CH ( )/( ) (p. 24) Select channel. 9 MTS (p. 23) Select audio settings. 10 PIC. REMOTE CONTROL POWER 1 DISPLAY 2 SLEEP 3 PIC...
... on the screen. 12 TV/VIDEO (p. 22) Select a Liquid Crystal Television input source. 13 MENU (p. 17) Display the menu screen. 14 FLASHBACK Return to the previous channel. 15 Channel Select (p. 24) Set the channel. 14 FLIP 4 ENTER 5 MUTE BRIGHT TV/VIDEO MENU 6 FLASH- FLIP (p. 28) Set the orientation of the screen. 6 MUTE (p. 23) Mute the sound. 7 VOL (+)/(-) (p. 23) 15 Set the volume. 8 CH ( )/( ) (p. 24) Select channel. 9 MTS (p. 23) Select audio settings. 10 PIC. REMOTE CONTROL POWER 1 DISPLAY 2 SLEEP 3 PIC...

LC-13B4U Operation Manual
Page 16
... access AUTO CLOCK mode. Please perform the following instructions before you select OFF in AUTO CLOCK Setting. (See pages 17, 18) 5 Press ENTER to select ON or OFF. SE LECT LANGUAGE ENGL I SH ESPAÑOL FRANCA I T : MENU A • If you press MAIN POWER. (1) Insert the batteries into the remote control. (See page 8.) (2) Connect the antenna cable to receive and signal status. MUTE BRIGHT TV/VIDEO MENU...
... access AUTO CLOCK mode. Please perform the following instructions before you select OFF in AUTO CLOCK Setting. (See pages 17, 18) 5 Press ENTER to select ON or OFF. SE LECT LANGUAGE ENGL I SH ESPAÑOL FRANCA I T : MENU A • If you press MAIN POWER. (1) Insert the batteries into the remote control. (See page 8.) (2) Connect the antenna cable to receive and signal status. MUTE BRIGHT TV/VIDEO MENU...
LC-13B4U Operation Manual
Page 17
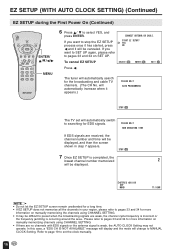
.... CONNECT ANTENNA OR CABLE. STEREO YES NO To cancel EZ SETUP SELECT : ENTER : ENTER EX I T AUTO PROGRAMMI NG STOP : The TV set will automatically search for EDS signals. The tuner will automatically switch to stop the EZ SETUP process once it has started, press c and it appears.) PLEASE WA I T : MENU Press c. PLEASE WA I T NOW SEARCH I NG T IME If EDS signals are received, the channel number...
.... CONNECT ANTENNA OR CABLE. STEREO YES NO To cancel EZ SETUP SELECT : ENTER : ENTER EX I T AUTO PROGRAMMI NG STOP : The TV set will automatically search for EDS signals. The tuner will automatically switch to stop the EZ SETUP process once it has started, press c and it appears.) PLEASE WA I T : MENU Press c. PLEASE WA I T NOW SEARCH I NG T IME If EDS signals are received, the channel number...
LC-13B4U Operation Manual
Page 19
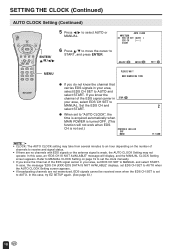
... you know the channel that carries EDS signals in STOP : your area, select EDS CH SET to "AUTO CLOCK", the time is acquired automatically when MAIN POWER is turned OFF. (This function will not work when EDS CH is not set to AUTO and select START. FLIP MUTE BRIGHT TV/VIDEO MENU VOL CH FLASHBACK ENTER/ a/b/c/d 5 Press c/d to select AUTO or MANUAL. 6 Press a/b to...
... you know the channel that carries EDS signals in STOP : your area, select EDS CH SET to "AUTO CLOCK", the time is acquired automatically when MAIN POWER is turned OFF. (This function will not work when EDS CH is not set to AUTO and select START. FLIP MUTE BRIGHT TV/VIDEO MENU VOL CH FLASHBACK ENTER/ a/b/c/d 5 Press c/d to select AUTO or MANUAL. 6 Press a/b to...

LC-13B4U Operation Manual
Page 23
... OPERATION (Continued) Switching TV/VIDEO [AV1/AV2/COMPONENT/TV] Modes POWER SLEEP DISPLAY ENTER PIC. The S-video input terminal is available. AV1 mode MUTE BRIGHT TV/VIDEO MENU VOL CH FLASHBACK TV/VIDEO A • The AV input mode indication remains for the AV- nected video equipment. 2 Press TV/VIDEO and select the applicable input source. AV2 mode • AV1: Video equipment connected to the COMPONENT input terminals. TV mode 12 STEREO The screen displays AV1, AV2, COMPONENT or TV mode...
... OPERATION (Continued) Switching TV/VIDEO [AV1/AV2/COMPONENT/TV] Modes POWER SLEEP DISPLAY ENTER PIC. The S-video input terminal is available. AV1 mode MUTE BRIGHT TV/VIDEO MENU VOL CH FLASHBACK TV/VIDEO A • The AV input mode indication remains for the AV- nected video equipment. 2 Press TV/VIDEO and select the applicable input source. AV2 mode • AV1: Video equipment connected to the COMPONENT input terminals. TV mode 12 STEREO The screen displays AV1, AV2, COMPONENT or TV mode...
LC-13B4U Operation Manual
Page 26
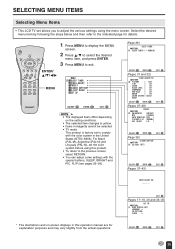
... selected item changes to yellow. • Items in magenta cannot be selected. • TV mode This product is factory set to comply with the special buttons: SLEEP, BRIGHT and PIC. For Brazil (PAL-M), Argentina (PAL-N) and Uruguay (PAL-N), set the color system before using the menu screen. SELECTING MENU ITEMS Selecting Menu Items • This LCD TV set allows you to adjust the various settings using this operation manual are...
... selected item changes to yellow. • Items in magenta cannot be selected. • TV mode This product is factory set to comply with the special buttons: SLEEP, BRIGHT and PIC. For Brazil (PAL-M), Argentina (PAL-N) and Uruguay (PAL-N), set the color system before using the menu screen. SELECTING MENU ITEMS Selecting Menu Items • This LCD TV set allows you to adjust the various settings using this operation manual are...
LC-13B4U Operation Manual
Page 37
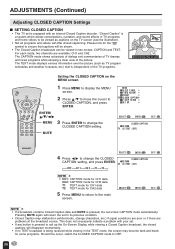
... of the picture. "Closed Caption" is equipped with your set. • If any button is pressed to call up the On-Screen Display while viewing a Closed Caption broadcast, the closed captioning. ADJUSTMENTS (Continued) Adjusting CLOSED CAPTION Settings I SETTING CLOSED CAPTION • This TV set is a system which allows conversations, narration, and sound effects in TV programs and home videos to be viewed in the TEXT mode, the screen may malfunction (white blocks, strange characters, etc.) if signal conditions are...
... of the picture. "Closed Caption" is equipped with your set. • If any button is pressed to call up the On-Screen Display while viewing a Closed Caption broadcast, the closed captioning. ADJUSTMENTS (Continued) Adjusting CLOSED CAPTION Settings I SETTING CLOSED CAPTION • This TV set is a system which allows conversations, narration, and sound effects in TV programs and home videos to be viewed in the TEXT mode, the screen may malfunction (white blocks, strange characters, etc.) if signal conditions are...

LC-13B4U Operation Manual
Page 45
... can enjoy picture and sound by connecting a VCR or a home video game system to the terminals located on the rear of your external device has an S-video terminal, S-VIDEO connection is not possible. • For the cable, use a commercially available audio/video cable. • Only connect audio/video signals to the S-VIDEO terminal. • For more information about external device connections, see the manuals of the TV set. When connecting an external device, turn off the power of the...
... can enjoy picture and sound by connecting a VCR or a home video game system to the terminals located on the rear of your external device has an S-video terminal, S-VIDEO connection is not possible. • For the cable, use a commercially available audio/video cable. • Only connect audio/video signals to the S-VIDEO terminal. • For more information about external device connections, see the manuals of the TV set. When connecting an external device, turn off the power of the...
LC-13B4U Operation Manual
Page 48
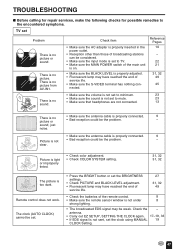
... picture or • Make sure the antenna cable is not under 8 strong lighting. • The broadcasted EDS signal may have reached the end of the remote control. 8 • Make sure the remote sensor window is properly connected. • Bad reception could be considered. • Make sure the input mode is set the BRIGHTNESS settings. • Check PICTURE and BLACK LEVEL adjustment. • Fluorescent lamp may be the problem...
... picture or • Make sure the antenna cable is not under 8 strong lighting. • The broadcasted EDS signal may have reached the end of the remote control. 8 • Make sure the remote sensor window is properly connected. • Bad reception could be considered. • Make sure the input mode is set the BRIGHTNESS settings. • Check PICTURE and BLACK LEVEL adjustment. • Fluorescent lamp may be the problem...

LC-13B4U Operation Manual
Page 50
... Remote control, Battery (x2), Antenna cable, AC adapter, AC cord, Cable clamp (x2), Operation manual As a part of policy of production units. SPECIFICATIONS Items Model LC-13B4U LCD panel Number of dots Video color systems Destination TV Standard (CCIR) TV function TV Tuning System STEREO CATV Y/C FILTER Brightness Lamp life (Fluorescent lamp) Viewing angles Audio amplifier Speakers AV-IN1 AV-IN2 Terminals COMPONENT Antenna Headphone OSD language Power supply Weight Accessories 13" Advanced Super View & BLACK TFT LCD 921...
... Remote control, Battery (x2), Antenna cable, AC adapter, AC cord, Cable clamp (x2), Operation manual As a part of policy of production units. SPECIFICATIONS Items Model LC-13B4U LCD panel Number of dots Video color systems Destination TV Standard (CCIR) TV function TV Tuning System STEREO CATV Y/C FILTER Brightness Lamp life (Fluorescent lamp) Viewing angles Audio amplifier Speakers AV-IN1 AV-IN2 Terminals COMPONENT Antenna Headphone OSD language Power supply Weight Accessories 13" Advanced Super View & BLACK TFT LCD 921...

LC-13B4U Operation Manual
Page 52
... in your Product.) One (1) year parts and labor from Warranty Coverage (if any warranties other warranties, express or implied. Model Specific Section Your Product Model Number & Description: Warranty Period for any other than those described herein, or to the purchaser with a new or remanufactured equivalent at 1-800-BE-SHARP. If you need service for the period(s) set forth herein are in lieu of...
... in your Product.) One (1) year parts and labor from Warranty Coverage (if any warranties other warranties, express or implied. Model Specific Section Your Product Model Number & Description: Warranty Period for any other than those described herein, or to the purchaser with a new or remanufactured equivalent at 1-800-BE-SHARP. If you need service for the period(s) set forth herein are in lieu of...

LC-13B4U Operation Manual
Page 53
... of purchase and a copy of this Sharp product or the loss of abusive operation, negligence, accident, improper installation or inappropriate use as outlined in the owner's manual. (b) Any Sharp product tampered with the screen size of Sharp. This warranty shall not apply to an Authorized Sharp Service Centre or an Authorized Sharp Servicing Dealer. This warranty constitutes the entire express warranty granted by any such defects should...
... of purchase and a copy of this Sharp product or the loss of abusive operation, negligence, accident, improper installation or inappropriate use as outlined in the owner's manual. (b) Any Sharp product tampered with the screen size of Sharp. This warranty shall not apply to an Authorized Sharp Service Centre or an Authorized Sharp Servicing Dealer. This warranty constitutes the entire express warranty granted by any such defects should...


