
DT-500 Operation Manual
Page 3
... a pressurized lamp containing a small amount of America, the Electronic Industries Alliance: www.eiae.org . This SHARP projector uses a DMD panel. As with the operation manual, may result in inactive dots on the remote control. WARNING: The cooling fan in this device must conform to. DURING NORMAL OPERATION, NEVER TURN THE... cord. INFORMATION This equipment has been tested and found to comply with Part 15 of the FCC Rules. ONLY Declaration of conformity SHARP PROJECTOR, MODEL DT-500 This device complies with the limits for a Class B digital device, pursuant to run for help.
... a pressurized lamp containing a small amount of America, the Electronic Industries Alliance: www.eiae.org . This SHARP projector uses a DMD panel. As with the operation manual, may result in inactive dots on the remote control. WARNING: The cooling fan in this device must conform to. DURING NORMAL OPERATION, NEVER TURN THE... cord. INFORMATION This equipment has been tested and found to comply with Part 15 of the FCC Rules. ONLY Declaration of conformity SHARP PROJECTOR, MODEL DT-500 This device complies with the limits for a Class B digital device, pursuant to run for help.
DT-500 Operation Manual
Page 5
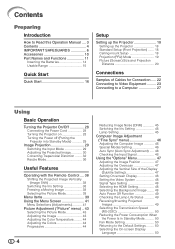
...10 Part Names and Functions 11 Inserting the Batteries 14 Usable Range 15 Quick Start Quick Start 16 Setup Setting up the Projector 18 Setting up the Projector 18 Standard Setup (Front Projection) ....... 18 Ceiling-mount Setup 18 Projection (PRJ) Mode 19 Picture (Screen) Size and...Cord 28 Turning the Projector on 28 Turning the Power off (Putting the Projector into Standby Mode 29 Image Projection 29 Switching the Input Mode 29 Adjusting the Projected Image 30 Correcting Trapezoidal Distortion ........ 32 Resize Mode 36 Useful Features Operating with the Remote Control .... 38 ...
...10 Part Names and Functions 11 Inserting the Batteries 14 Usable Range 15 Quick Start Quick Start 16 Setup Setting up the Projector 18 Setting up the Projector 18 Standard Setup (Front Projection) ....... 18 Ceiling-mount Setup 18 Projection (PRJ) Mode 19 Picture (Screen) Size and...Cord 28 Turning the Projector on 28 Turning the Power off (Putting the Projector into Standby Mode 29 Image Projection 29 Switching the Input Mode 29 Adjusting the Projected Image 30 Correcting Trapezoidal Distortion ........ 32 Resize Mode 36 Useful Features Operating with the Remote Control .... 38 ...
DT-500 Operation Manual
Page 11
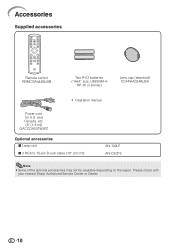
Please check with your nearest Sharp Authorized Service Center or Dealer. 10 and Canada, etc. (6' (1.8 m)) QACCDA007WJPZ Optional accessories I Lamp unit I 3 RCA to 15-pin D-sub cable (10' (3.0 m)) AN-100LP AN-C3CP2 Note • Some of the optional accessories may not be available depending on the region. Accessories Supplied accessories Remote control RRMCGA444WJSB Two R-03 batteries ("AAA" size, UM/SUM-4, HP-16 or similar) Lens cap (attached) CCAPHA024WJSA • Operation manual Power cord for U.S.
Please check with your nearest Sharp Authorized Service Center or Dealer. 10 and Canada, etc. (6' (1.8 m)) QACCDA007WJPZ Optional accessories I Lamp unit I 3 RCA to 15-pin D-sub cable (10' (3.0 m)) AN-100LP AN-C3CP2 Note • Some of the optional accessories may not be available depending on the region. Accessories Supplied accessories Remote control RRMCGA444WJSB Two R-03 batteries ("AAA" size, UM/SUM-4, HP-16 or similar) Lens cap (attached) CCAPHA024WJSA • Operation manual Power cord for U.S.
DT-500 Operation Manual
Page 12
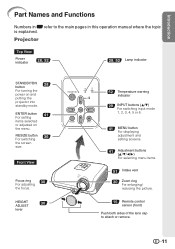
...adjustment and setting screens. 41 Adjustment buttons (P/R/O/Q) For selecting menu items. 51 Intake vent 30 Zoom ring For enlarging/ reducing the picture. 15 Remote control sensor (front) Push both sides of the lens cap to the main pages in this operation manual where the topic is explained. ENTER ...button 41 For setting items selected or adjusted on and putting the projector into standby mode. Projector Top View Power indicator 28, 52 28, 52 Lamp indicator STANDBY/ON 28 button For turning the power on the menu. ...
...adjustment and setting screens. 41 Adjustment buttons (P/R/O/Q) For selecting menu items. 51 Intake vent 30 Zoom ring For enlarging/ reducing the picture. 15 Remote control sensor (front) Push both sides of the lens cap to the main pages in this operation manual where the topic is explained. ENTER ...button 41 For setting items selected or adjusted on and putting the projector into standby mode. Projector Top View Power indicator 28, 52 28, 52 Lamp indicator STANDBY/ON 28 button For turning the power on the menu. ...

DT-500 Operation Manual
Page 13
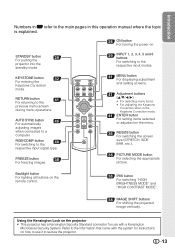
INPUT 3 terminal 2 Connecting video equipment with hard disc, etc.). Rear adjustment 31 foot Terminals 15 Remote control sensor (rear) 13 Kensington Security Standard connector 65 4 1 23 Terminal Description INPUT 1, 2 terminal 1 Connecting video equipment with component output terminal (DVD player, DTV decoder, ...
INPUT 3 terminal 2 Connecting video equipment with hard disc, etc.). Rear adjustment 31 foot Terminals 15 Remote control sensor (rear) 13 Kensington Security Standard connector 65 4 1 23 Terminal Description INPUT 1, 2 terminal 1 Connecting video equipment with component output terminal (DVD player, DTV decoder, ...
DT-500 Operation Manual
Page 14
...; This projector has a Kensington Security Standard connector for instructions on the menu. 36 RESIZE button For switching the screen size (STRETCH, SIDE BAR, etc.). 38 PICTURE MODE button For selecting the appropriate picture. Using the Kensington Lock on the remote control. 38 IRIS button...with the system for use it to the information that came with a Kensington MicroSaver Security System. Refer to secure the projector. 13 AUTO SYNC button 46 For automatically adjusting images when connected to the previous menu screen during menu operations. KEYSTONE ...
...; This projector has a Kensington Security Standard connector for instructions on the menu. 36 RESIZE button For switching the screen size (STRETCH, SIDE BAR, etc.). 38 PICTURE MODE button For selecting the appropriate picture. Using the Kensington Lock on the remote control. 38 IRIS button...with the system for use it to the information that came with a Kensington MicroSaver Security System. Refer to secure the projector. 13 AUTO SYNC button 46 For automatically adjusting images when connected to the previous menu screen during menu operations. KEYSTONE ...

DT-500 Operation Manual
Page 15
...and slide it clicks into place. Be sure to leak. Replace only with this projector may run out, as possible with new batteries. • Remove the batteries from leaked batteries is incorrectly replaced. Battery fluid from the remote control if you first wipe them and then remove them to leak. • ... once they are kept. Please follow the precautions below. Incorrect use of new batteries or may cause them using the remote control for a long time. • Comply with the rules (ordinance) of each local government when disposing of different types. • Do not mix new...
...and slide it clicks into place. Be sure to leak. Replace only with this projector may run out, as possible with new batteries. • Remove the batteries from leaked batteries is incorrectly replaced. Battery fluid from the remote control if you first wipe them and then remove them to leak. • ... once they are kept. Please follow the precautions below. Incorrect use of new batteries or may cause them using the remote control for a long time. • Comply with the rules (ordinance) of each local government when disposing of different types. • Do not mix new...

DT-500 Operation Manual
Page 16
...; Ensure that you do not drop, expose to control the projector within the ranges shown in the illustration. Remote control sensor (front) 30° Remote control signal transmitters 30° 23n (7 m) Remote control Remote control sensor (rear) 23n (7 m) 30° Remote control signal transmitters 30° Remote control Note • The signal from the fluorescent lamp. 15...
...; Ensure that you do not drop, expose to control the projector within the ranges shown in the illustration. Remote control sensor (front) 30° Remote control signal transmitters 30° 23n (7 m) Remote control Remote control sensor (rear) 23n (7 m) 30° Remote control signal transmitters 30° Remote control Note • The signal from the fluorescent lamp. 15...
DT-500 Operation Manual
Page 17
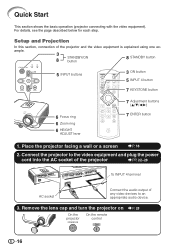
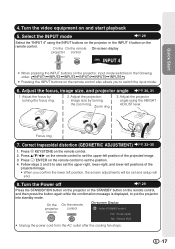
... INPUT 4 terminal AC socket Connect the audio output of the projector and the video equipment is explained using one ex- Remove the lens cap and turn the projector on _P. 28 On the On the remote projector control 16 Place the projector facing a wall or a screen _P. 18 2. Quick Start... This section shows the basic operation (projector connecting with the video equipment). For details, see the page...
... INPUT 4 terminal AC socket Connect the audio output of the projector and the video equipment is explained using one ex- Remove the lens cap and turn the projector on _P. 28 On the On the remote projector control 16 Place the projector facing a wall or a screen _P. 18 2. Quick Start... This section shows the basic operation (projector connecting with the video equipment). For details, see the page...
DT-500 Operation Manual
Page 18
...Adjust the projection image size by turning the focus ring. 2. Focus ring 7. On the On the remote On-screen display projector control INPUT 4 • When pressing the INPUT buttons on the projector, input mode switches in the following order: INPUT1 INPUT2 INPUT3 INPUT4 INPUT5 INPUT6 • Pressing the ...the INPUT mode _P. 29 Select the "INPUT 4" using the HEIGHT ADJUST lever. Adjust the projector angle using the INPUT buttons on the projector or the INPUT 4 button on the remote control, and then press the button again while the confirmation message is displayed, to set the ...
...Adjust the projection image size by turning the focus ring. 2. Focus ring 7. On the On the remote On-screen display projector control INPUT 4 • When pressing the INPUT buttons on the projector, input mode switches in the following order: INPUT1 INPUT2 INPUT3 INPUT4 INPUT5 INPUT6 • Pressing the ...the INPUT mode _P. 29 Select the "INPUT 4" using the HEIGHT ADJUST lever. Adjust the projector angle using the INPUT buttons on the projector or the INPUT 4 button on the remote control, and then press the button again while the confirmation message is displayed, to set the ...
DT-500 Operation Manual
Page 29
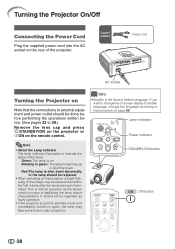
...; About the Lamp Indicator The lamp indicator illuminates to indicate the status of the projector. STANDBY/ON button ON button 28 This is normal operation as faulty operation. • If the projector is on the remote control. Turning the Projector On/Off Connecting the Power Cord Plug the supplied power cord into standby mode...
...; About the Lamp Indicator The lamp indicator illuminates to indicate the status of the projector. STANDBY/ON button ON button 28 This is normal operation as faulty operation. • If the projector is on the remote control. Turning the Projector On/Off Connecting the Power Cord Plug the supplied power cord into standby mode...
DT-500 Operation Manual
Page 30
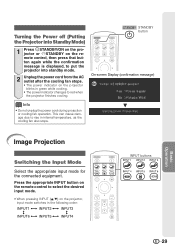
... connected equipment. Turning the Power off (Putting the Projector into Standby Mode) 1 Press SSTANDBY/ON on the projector or aSTANDBY on the remote control, then press that button again while the confirmation message is displayed, to put the projector into standby mode. 2 Unplug the power cord from... the power cord during projection or cooling fan operation. Press the appropriate INPUT button on the remote control to select the desired input mode. • When pressing INPUT (P/R) on the projector blinks in green while cooling. • The power indicator changes to rise in the following ...
... connected equipment. Turning the Power off (Putting the Projector into Standby Mode) 1 Press SSTANDBY/ON on the projector or aSTANDBY on the remote control, then press that button again while the confirmation message is displayed, to put the projector into standby mode. 2 Unplug the power cord from... the power cord during projection or cooling fan operation. Press the appropriate INPUT button on the remote control to select the desired input mode. • When pressing INPUT (P/R) on the projector blinks in green while cooling. • The power indicator changes to rise in the following ...

DT-500 Operation Manual
Page 34
Selecting the Type of the displayed image may appear jagged, when adjusting the Keystone setting. • Also read "About Copyrights" on the remote control. • "GEOMETRIC ADJUSTMENT" will be visible in detailed images. Press c KEYSTONE on page 37. Moiré patterns and line distortions may slightly ... the horizontal or vertical axes. (See page 35.) Note • When corrections are made with Keystone correction, change the placement position of the projector. • Straight lines and the edges of Correction Select the Keystone correction method. Basic Operation 33
Selecting the Type of the displayed image may appear jagged, when adjusting the Keystone setting. • Also read "About Copyrights" on the remote control. • "GEOMETRIC ADJUSTMENT" will be visible in detailed images. Press c KEYSTONE on page 37. Moiré patterns and line distortions may slightly ... the horizontal or vertical axes. (See page 35.) Note • When corrections are made with Keystone correction, change the placement position of the projector. • Straight lines and the edges of Correction Select the Keystone correction method. Basic Operation 33

DT-500 Operation Manual
Page 35
... a 4:3-aspect-ratio input signal to a 4:3-aspect-ratio screen, correct the trapezoidal distortion by setting "RESIZE" to "STRETCH" (16:9). 1 Press c KEYSTONE on the remote control repeatedly until the displayed red arrows line up the screen edges into the blue area as closely as possible. 3 Press P, R, O or Q to move the... position for the upper left of the screen and the projector may result in the upper right turns red. 5 Repeat the same procedure with the positions for the upper right, lower right and lower left of...
... a 4:3-aspect-ratio input signal to a 4:3-aspect-ratio screen, correct the trapezoidal distortion by setting "RESIZE" to "STRETCH" (16:9). 1 Press c KEYSTONE on the remote control repeatedly until the displayed red arrows line up the screen edges into the blue area as closely as possible. 3 Press P, R, O or Q to move the... position for the upper left of the screen and the projector may result in the upper right turns red. 5 Repeat the same procedure with the positions for the upper right, lower right and lower left of...

DT-500 Operation Manual
Page 36
...maximum value. 35 H & V KEYSTONE 1 Project the image and adjust the focus, image size, and projection angle. 2 Press c KEYSTONE on the remote control to align the upper and lower sides of the projected image. Vertical Keystone Correction (Adjustment with O / Q) Basic Operation 5 Press c KEYSTONE or... i ENTER on the remote control to align the left and right sides of the projected image. Note • If adjustments are made to reset the adjustments or...
...maximum value. 35 H & V KEYSTONE 1 Project the image and adjust the focus, image size, and projection angle. 2 Press c KEYSTONE on the remote control to align the upper and lower sides of the projected image. Vertical Keystone Correction (Adjustment with O / Q) Basic Operation 5 Press c KEYSTONE or... i ENTER on the remote control to align the left and right sides of the projected image. Note • If adjustments are made to reset the adjustments or...

DT-500 Operation Manual
Page 37
Depending on the remote control. Image Projection (Continued) Resize Mode This function allows you can choose "STRETCH", "SIDE BAR", "CINEMA ZOOM" or "DOT BY DOT (Computer input only)" image. Press m RESIZE on the projector or jRESIZE on the input signal, you to modify or customize the resize mode to... enhance the input image. On the projector On the remote control RESIZE button VIDEO RESIZE button • "STRETCH" is fixed when 540P, 720P or 1080I signals are entered. Input Signal Output screen ...
Depending on the remote control. Image Projection (Continued) Resize Mode This function allows you can choose "STRETCH", "SIDE BAR", "CINEMA ZOOM" or "DOT BY DOT (Computer input only)" image. Press m RESIZE on the projector or jRESIZE on the input signal, you to modify or customize the resize mode to... enhance the input image. On the projector On the remote control RESIZE button VIDEO RESIZE button • "STRETCH" is fixed when 540P, 720P or 1080I signals are entered. Input Signal Output screen ...

DT-500 Operation Manual
Page 39
... button FREEZE button Switching the Iris Setting This function controls the quantity of the projected light and the contrast of the image. Operating with the Remote Control Shifting the Projected Image Vertically (Image Shift) For easier viewing, this function shifts the entire image projected on the screen up . Press RIMAGE SHIFT...
... button FREEZE button Switching the Iris Setting This function controls the quantity of the projected light and the contrast of the image. Operating with the Remote Control Shifting the Projected Image Vertically (Image Shift) For easier viewing, this function shifts the entire image projected on the screen up . Press RIMAGE SHIFT...
DT-500 Operation Manual
Page 44
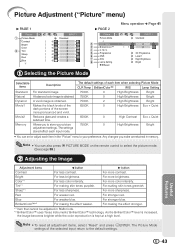
... tones purplish. S. The default settings of the selected input return to your picture adjustment settings. For making skin tones greenish. Sharp*1 For less sharpness. For more color intensity. Red For weaker red. BrilliantColor™*2 For making the effect stronger. *1 Item that cannot be... Eco + Quiet 6500K 7500K 0 High Contrast Eco + Quiet 0 High Brightness Bright • You can also press k PICTURE MODE on the remote control to store your preference. Any changes you to select the picture mode. (See page 38.) 2 Adjusting the Image Adjustment items O button...
... tones purplish. S. The default settings of the selected input return to your picture adjustment settings. For making skin tones greenish. Sharp*1 For less sharpness. For more color intensity. Red For weaker red. BrilliantColor™*2 For making the effect stronger. *1 Item that cannot be... Eco + Quiet 6500K 7500K 0 High Contrast Eco + Quiet 0 High Brightness Bright • You can also press k PICTURE MODE on the remote control to store your preference. Any changes you to select the picture mode. (See page 38.) 2 Adjusting the Image Adjustment items O button...
DT-500 Operation Manual
Page 46
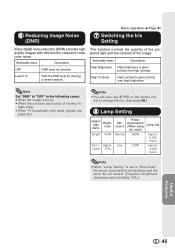
... Note • When "Lamp Setting" is blurry. • When the contours and colors of the image. Note • You can also use l IRIS on the remote control to "Eco+Quiet", the power consumption will decrease and the lamp life will extend. (Projection brightness decreases approximately 13%.) Useful Features 45 Menu operation...
... Note • When "Lamp Setting" is blurry. • When the contours and colors of the image. Note • You can also use l IRIS on the remote control to "Eco+Quiet", the power consumption will decrease and the lamp life will extend. (Projection brightness decreases approximately 13%.) Useful Features 45 Menu operation...
DT-500 Operation Manual
Page 47
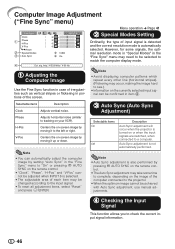
...Modes" in portions of input signal is detected and the correct resolution mode is selected. • The adjustable area of the computer connected to the projector. • When the optimum image cannot be confirmed in item 4. freq : H 33.8 kHz / V 60 Hz 1 Adjusting the Computer ..., when connected to tracking on -screen image by setting "Auto Sync" in the "Fine Sync" menu to "On" or pressing f AUTO SYNC on the remote control. • "Clock", "Phase", "H-Pos" and "V-Pos" cannot be adjusted when INPUT 6 is automatically selected. Cur. Phase Adjusts horizontal noise (similar...
...Modes" in portions of input signal is detected and the correct resolution mode is selected. • The adjustable area of the computer connected to the projector. • When the optimum image cannot be confirmed in item 4. freq : H 33.8 kHz / V 60 Hz 1 Adjusting the Computer ..., when connected to tracking on -screen image by setting "Auto Sync" in the "Fine Sync" menu to "On" or pressing f AUTO SYNC on the remote control. • "Clock", "Phase", "H-Pos" and "V-Pos" cannot be adjusted when INPUT 6 is automatically selected. Cur. Phase Adjusts horizontal noise (similar...


