
DT-500 Operation Manual
Page 3
...standby mode always use the STANDBY/ON button on the projector or the STANDBY button on the picture screen. If this projector continues to Part 15 of the unit. 2 U.S.A. Caution Concerning Lamp Replacement See "Replacing the Lamp" on a circuit different from that the equipment must accept... by one or more of the FCC rules. Responsible Party: SHARP ELECTRONICS CORPORATION Sharp Plaza, Mahwah, New Jersey 07430-2135 TEL: 1-800-BE-SHARP (1-800-237-4277) U.S.A. ONLY Declaration of conformity SHARP PROJECTOR, MODEL DT-500 This device complies with the limits for a Class B digital ...
...standby mode always use the STANDBY/ON button on the projector or the STANDBY button on the picture screen. If this projector continues to Part 15 of the unit. 2 U.S.A. Caution Concerning Lamp Replacement See "Replacing the Lamp" on a circuit different from that the equipment must accept... by one or more of the FCC rules. Responsible Party: SHARP ELECTRONICS CORPORATION Sharp Plaza, Mahwah, New Jersey 07430-2135 TEL: 1-800-BE-SHARP (1-800-237-4277) U.S.A. ONLY Declaration of conformity SHARP PROJECTOR, MODEL DT-500 This device complies with the limits for a Class B digital ...

DT-500 Operation Manual
Page 6
Introduction Reference Appendix Maintenance 51 Maintenance Indicators 52 Regarding the Lamp 54 Lamp 54 Caution Concerning the Lamp 54 Replacing the Lamp 54 Removing and Installing the Lamp Unit 55 Resetting the Lamp Timer 56 Connecting Pin Assignments 57 Computer Compatibility Chart 58 Troubleshooting 59 Service Information (For the U.S.) ..... 60 Specifications 61 Dimensions 62 Index 63 CONSUMER LIMITED WARRANTY (VALID IN USA ONLY 64 LIMITED WARRANTY (VALID IN CANADA ONLY 65 5
Introduction Reference Appendix Maintenance 51 Maintenance Indicators 52 Regarding the Lamp 54 Lamp 54 Caution Concerning the Lamp 54 Replacing the Lamp 54 Removing and Installing the Lamp Unit 55 Resetting the Lamp Timer 56 Connecting Pin Assignments 57 Computer Compatibility Chart 58 Troubleshooting 59 Service Information (For the U.S.) ..... 60 Specifications 61 Dimensions 62 Index 63 CONSUMER LIMITED WARRANTY (VALID IN USA ONLY 64 LIMITED WARRANTY (VALID IN CANADA ONLY 65 5
DT-500 Operation Manual
Page 9
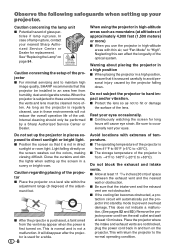
...normal and is subjected to these environments will return the projector to occasionally rest your eyes occasionally. I Be sure that this can affect the longevity of lamp rupture, contact your projector. Place the projector where the intake and exhaust vents are not obstructed. ... I After the projector is regularly cleaned, use the projector in high-altitude areas with extremes of approximately 4,900 feet (1,500 meters) or more often. Observe the following safeguards when setting up your nearest Sharp Authorized Service Center or Dealer for replacement. As long as ...
...normal and is subjected to these environments will return the projector to occasionally rest your eyes occasionally. I Be sure that this can affect the longevity of lamp rupture, contact your projector. Place the projector where the intake and exhaust vents are not obstructed. ... I After the projector is regularly cleaned, use the projector in high-altitude areas with extremes of approximately 4,900 feet (1,500 meters) or more often. Observe the following safeguards when setting up your nearest Sharp Authorized Service Center or Dealer for replacement. As long as ...
DT-500 Operation Manual
Page 29
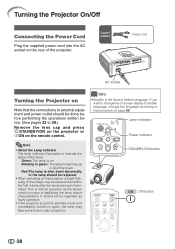
...external equipment and power outlet should be replaced. • When switching on the projector, a slight flickering of the image may take some time to 28.) Remove the lens cap and press S STANDBY/ON on the projector or bON on the remote control. Green: The lamp is warming up or shutting down ... the procedure on page 50. It should not be regarded as the lamp's control circuitry is the factory default language. Red:The lamp is put into the AC socket on the rear of the lamp. Turning the Projector On/Off Connecting the Power Cord Plug the supplied power cord into standby...
...external equipment and power outlet should be replaced. • When switching on the projector, a slight flickering of the image may take some time to 28.) Remove the lens cap and press S STANDBY/ON on the projector or bON on the remote control. Green: The lamp is warming up or shutting down ... the procedure on page 50. It should not be regarded as the lamp's control circuitry is the factory default language. Red:The lamp is put into the AC socket on the rear of the lamp. Turning the Projector On/Off Connecting the Power Cord Plug the supplied power cord into standby...
DT-500 Operation Manual
Page 53
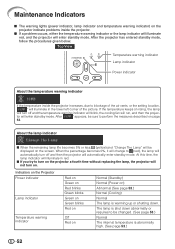
... either the temperature warning indicator or the lamp indicator will illuminate red, and the projector will enter standby mode. tor will enter standby mode. Indicators on the Projector Power indicator Lamp indicator Temperature warning indicator Red on Green ...on Red blinks Green blinks Green on Green blinks Red on Off Red on Normal (Standby) Normal (Power on rising, the lamp will turn off and then the projector will not turn on the projector a fourth time without replacing the lamp, the projector...
... either the temperature warning indicator or the lamp indicator will illuminate red, and the projector will enter standby mode. tor will enter standby mode. Indicators on the Projector Power indicator Lamp indicator Temperature warning indicator Red on Green ...on Red blinks Green blinks Green on Green blinks Red on Off Red on Normal (Standby) Normal (Power on rising, the lamp will turn off and then the projector will not turn on the projector a fourth time without replacing the lamp, the projector...

DT-500 Operation Manual
Page 54
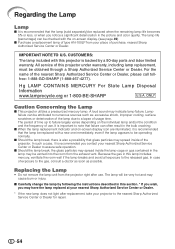
...proper ventilation. (see page 8) • Take the projector to your nearest Sharp Authorized Service Center or Dealer for repair. • Disconnect the power cord from the AC outlet, replace the power cord in red even when the lamp unit cover is controlled automatically. In this case, unplug... the AC outlet, and then connect it again. • Carefully replace the lamp. (See page 55.) • Take the projector to your nearest Sharp Authorized Service Center or Dealer for repair. • Please exercise care when replacing the lamp. • Securely install the cover. • If the power ...
...proper ventilation. (see page 8) • Take the projector to your nearest Sharp Authorized Service Center or Dealer for repair. • Disconnect the power cord from the AC outlet, replace the power cord in red even when the lamp unit cover is controlled automatically. In this case, unplug... the AC outlet, and then connect it again. • Carefully replace the lamp. (See page 55.) • Take the projector to your nearest Sharp Authorized Service Center or Dealer for repair. • Please exercise care when replacing the lamp. • Securely install the cover. • If the power ...
DT-500 Operation Manual
Page 55
...cooling, surface scratches or deterioration of the lamp due to failure largely varies depending on -screen display. (see page 49) I Purchase a replacement lamp of purchase, nearest Sharp Authorized Service Center or Dealer. The period of time up to a lapse of the projector. In such a case, it is ...recommended that glass particles may have the lamp replaced at your place of type AN-100LP from...
...cooling, surface scratches or deterioration of the lamp due to failure largely varies depending on -screen display. (see page 49) I Purchase a replacement lamp of purchase, nearest Sharp Authorized Service Center or Dealer. The period of time up to a lapse of the projector. In such a case, it is ...recommended that glass particles may have the lamp replaced at your place of type AN-100LP from...

DT-500 Operation Manual
Page 57
..., the power will not turn on the projector. • "LAMP 0000H" is displayed, indicating that the lamp timer is connected to close it in the direction of the arrow. Then tighten the user service screw to reset the lamp timer only when replacing the lamp. Regarding the Lamp (Continued) 4 Remove the lamp unit. • Loosen the securing screws...
..., the power will not turn on the projector. • "LAMP 0000H" is displayed, indicating that the lamp timer is connected to close it in the direction of the arrow. Then tighten the user service screw to reset the lamp timer only when replacing the lamp. Regarding the Lamp (Continued) 4 Remove the lamp unit. • Loosen the securing screws...

DT-500 Operation Manual
Page 61
... appear faded when INPUT 6 is shining on . The lamp does not light • The lamp indicator is dark. The black levels of the nearest Sharp Authorized Service Center, or to the projector or the connected flickers. up even after more than 5 minutes. time to a close, replace the lamp. The image sometimes • Cables incorrectly connected to...
... appear faded when INPUT 6 is shining on . The lamp does not light • The lamp indicator is dark. The black levels of the nearest Sharp Authorized Service Center, or to the projector or the connected flickers. up even after more than 5 minutes. time to a close, replace the lamp. The image sometimes • Cables incorrectly connected to...
DT-500 Operation Manual
Page 62
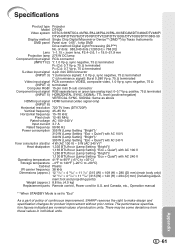
... [V]) Lens 1-1.15 × zoom lens, F2.4-2.6, f = 19.0-21.9 mm Projection lamp 275 W DC lamp Component input signal RCA connector (INPUT1/2) Y: 1.0 Vp-p, sync negative, 75 Ω...Mode is set to "Eco" As a part of policy of continuous improvement, SHARP reserves the right to +60°C) Cabinet Plastic I/R carrier frequency 38 kHz Dimensions...Replacement parts Remote control, Power cord for product improvement without prior notice. There may be some deviations from these values in individual units. 61 Appendix of production units. Specifications Product type Projector Model DT-500...
... [V]) Lens 1-1.15 × zoom lens, F2.4-2.6, f = 19.0-21.9 mm Projection lamp 275 W DC lamp Component input signal RCA connector (INPUT1/2) Y: 1.0 Vp-p, sync negative, 75 Ω...Mode is set to "Eco" As a part of policy of continuous improvement, SHARP reserves the right to +60°C) Cabinet Plastic I/R carrier frequency 38 kHz Dimensions...Replacement parts Remote control, Power cord for product improvement without prior notice. There may be some deviations from these values in individual units. 61 Appendix of production units. Specifications Product type Projector Model DT-500...

DT-500 Operation Manual
Page 64
...vent 11, 12, 51 IRIS button 38 Kensington Security Standard connector 12, 13 KEYSTONE button 32 Keystone Correction 32 Lamp 10, 54 Lamp indicator 52 Lamp Setting 45 Lamp Timer (Life 49 Lamp unit 55 Language (on-screen display language) ...... 50 Lens cap 11 MENU button 41 ON button 28 Optional ...Rear adjustment foot 31 Red 43 Remote control 13 Remote control sensor 15 Replacing the lamp 54, 55 Resize 36, 37 RESIZE button 36 RETURN button 41 RGB/COMP. button 48 RS-232C Setting 50 Saturation 44 Sharp 43 SIDE BAR 36, 37 Special Modes 46 STANDBY button 29 STANDBY...
...vent 11, 12, 51 IRIS button 38 Kensington Security Standard connector 12, 13 KEYSTONE button 32 Keystone Correction 32 Lamp 10, 54 Lamp indicator 52 Lamp Setting 45 Lamp Timer (Life 49 Lamp unit 55 Language (on-screen display language) ...... 50 Lens cap 11 MENU button 41 ON button 28 Optional ...Rear adjustment foot 31 Red 43 Remote control 13 Remote control sensor 15 Replacing the lamp 54, 55 Resize 36, 37 RESIZE button 36 RETURN button 41 RGB/COMP. button 48 RS-232C Setting 50 Saturation 44 Sharp 43 SIDE BAR 36, 37 Special Modes 46 STANDBY button 29 STANDBY...


