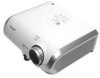
DT-500 Operation Manual
Page 4
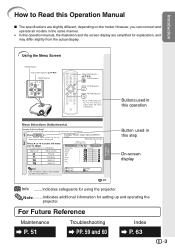
... mode Menu icons Picture Picture Mode Contrast Bright Color Tint Sharp Red Blue INPUT 1 Standard 0 0 0 0 0 0 0 Note • The "Fine Sync" menu is displayed. SEL./ADJ. However, you can also be performed by using the projector. RETURN ENTER END 41 Useful Features Button used in this...In this operation manual, the illustration and the screen display are slightly different, depending on the projector. 1 Press dMENU. • The "Picture" menu screen for the selected input mode is displayed. 2 Press Q or O to select the menu icon to the previous screen when the menu is not ...
... mode Menu icons Picture Picture Mode Contrast Bright Color Tint Sharp Red Blue INPUT 1 Standard 0 0 0 0 0 0 0 Note • The "Fine Sync" menu is displayed. SEL./ADJ. However, you can also be performed by using the projector. RETURN ENTER END 41 Useful Features Button used in this...In this operation manual, the illustration and the screen display are slightly different, depending on the projector. 1 Press dMENU. • The "Picture" menu screen for the selected input mode is displayed. 2 Press Q or O to select the menu icon to the previous screen when the menu is not ...

DT-500 Operation Manual
Page 15
... to skin, therefore ensure that you first wipe them and then remove them using the remote control for a long time. • Comply with this projector may cause them to leak or explode. Be sure to replace them as soon as leaving them in can cause them to leak. Part Names... and Functions (Continued) Inserting the Batteries 1 Press the P mark on how they have different properties, therefore do not mix batteries of different types have run out, as possible with new batteries. &#...
... to skin, therefore ensure that you first wipe them and then remove them using the remote control for a long time. • Comply with this projector may cause them to leak or explode. Be sure to replace them as soon as leaving them in can cause them to leak. Part Names... and Functions (Continued) Inserting the Batteries 1 Press the P mark on how they have different properties, therefore do not mix batteries of different types have run out, as possible with new batteries. &#...
DT-500 Operation Manual
Page 18
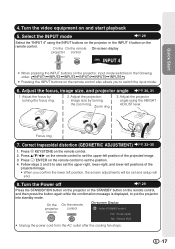
... equipment on the remote control. 2. Adjust the focus, image size, and projector angle _PP. 30, 31 1. Adjust the focus by turning the zoom ring. Press i ENTER on the remote control, and then press the button again while the confirmation message is displayed, to set and setup ...the remote control to put the projector into standby mode. Zoom ring 3. Adjust the projector angle using the INPUT buttons on the projector or the INPUT 4 button on the remote control to switch the input mode. 6. Press c KEYSTONE on and start playback 5. Press P/R/O/Q on the remote control. On...
... equipment on the remote control. 2. Adjust the focus, image size, and projector angle _PP. 30, 31 1. Adjust the focus by turning the zoom ring. Press i ENTER on the remote control, and then press the button again while the confirmation message is displayed, to set and setup ...the remote control to put the projector into standby mode. Zoom ring 3. Adjust the projector angle using the INPUT buttons on the projector or the INPUT 4 button on the remote control to switch the input mode. 6. Press c KEYSTONE on and start playback 5. Press P/R/O/Q on the remote control. On...

DT-500 Operation Manual
Page 28
Connecting to a Computer When connecting a computer, ensure that you are made. Ensure that it is switched on after all the connections are using a SHARP notebook computer). est Macintosh Dealer. • Depending on the computer you have read the operation manuals of the devices to be turned on . (e.g. tor. Use... the computer's external output port is the last device to be required for a list of the functions to enable your computer's external output port. Press "Fn" and "F5" keys simultaneously when using , an image may be connected before making connections.
Connecting to a Computer When connecting a computer, ensure that you are made. Ensure that it is switched on after all the connections are using a SHARP notebook computer). est Macintosh Dealer. • Depending on the computer you have read the operation manuals of the devices to be turned on . (e.g. tor. Use... the computer's external output port is the last device to be required for a list of the functions to enable your computer's external output port. Press "Fn" and "F5" keys simultaneously when using , an image may be connected before making connections.
DT-500 Operation Manual
Page 29
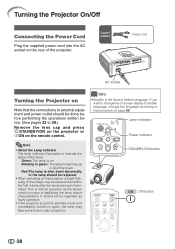
... again, the lamp may be experienced within the first minute after the lamp has been illuminated. Supplied accessory Power cord AC socket Turning the Projector on Note that the connections to external equipment and power outlet should be done before performing the operations written below. (See pages 23 to... 28.) Remove the lens cap and press S STANDBY/ON on the projector or bON on the rear of the projector. Blinking in green: The lamp is on page 50. STANDBY/ON button ON button 28 This is normal ...
... again, the lamp may be experienced within the first minute after the lamp has been illuminated. Supplied accessory Power cord AC socket Turning the Projector on Note that the connections to external equipment and power outlet should be done before performing the operations written below. (See pages 23 to... 28.) Remove the lens cap and press S STANDBY/ON on the projector or bON on the rear of the projector. Blinking in green: The lamp is on page 50. STANDBY/ON button ON button 28 This is normal ...
DT-500 Operation Manual
Page 30
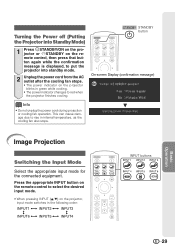
...Basic Operation 29 Turning the Power off (Putting the Projector into Standby Mode) 1 Press SSTANDBY/ON on the projector or aSTANDBY on the remote control, then press that button again while the confirmation message is displayed, to put the projector into standby mode. 2 Unplug the power cord ...in green while cooling. • The power indicator changes to select the desired input mode. • When pressing INPUT (P/R) on the remote control to red when the projector finishes cooling. STANDBY button On-screen Display (confirmation message) Info R • Do not unplug the power ...
...Basic Operation 29 Turning the Power off (Putting the Projector into Standby Mode) 1 Press SSTANDBY/ON on the projector or aSTANDBY on the remote control, then press that button again while the confirmation message is displayed, to put the projector into standby mode. 2 Unplug the power cord ...in green while cooling. • The power indicator changes to select the desired input mode. • When pressing INPUT (P/R) on the remote control to red when the projector finishes cooling. STANDBY button On-screen Display (confirmation message) Info R • Do not unplug the power ...

DT-500 Operation Manual
Page 34
...If you cannot correct trapezoidal distortion with Keystone correction, the changes are made with Keystone correction, change the placement position of the projector. • Straight lines and the edges of Correction Select the Keystone correction method. Moiré patterns and line distortions may... slightly decrease when it is pressed, the display toggles as follows: GEOMETRIC ADJUSTMENT H & V KEYSTONE The display disappears. Basic Operation 33 Selecting the Type of...
...If you cannot correct trapezoidal distortion with Keystone correction, the changes are made with Keystone correction, change the placement position of the projector. • Straight lines and the edges of Correction Select the Keystone correction method. Moiré patterns and line distortions may... slightly decrease when it is pressed, the display toggles as follows: GEOMETRIC ADJUSTMENT H & V KEYSTONE The display disappears. Basic Operation 33 Selecting the Type of...

DT-500 Operation Manual
Page 35
... When adjusting a 4:3-aspect-ratio input signal to a 4:3-aspect-ratio screen, correct the trapezoidal distortion by setting "RESIZE" to "STRETCH" (16:9). 1 Press c KEYSTONE on the remote control repeatedly until "GEOMETRIC ADJUSTMENT" is displayed. 2 Adjust the focus, size, and projection angle so that the screen edges line...right, lower right and lower left of the image. • When you press e RETURN at this point, you will end. Lower Left Lower Right Note • The placement of the screen and the projector may result in the image aspect ratio becoming slightly distorted. • Try "H&V...
... When adjusting a 4:3-aspect-ratio input signal to a 4:3-aspect-ratio screen, correct the trapezoidal distortion by setting "RESIZE" to "STRETCH" (16:9). 1 Press c KEYSTONE on the remote control repeatedly until "GEOMETRIC ADJUSTMENT" is displayed. 2 Adjust the focus, size, and projection angle so that the screen edges line...right, lower right and lower left of the image. • When you press e RETURN at this point, you will end. Lower Left Lower Right Note • The placement of the screen and the projector may result in the image aspect ratio becoming slightly distorted. • Try "H&V...

DT-500 Operation Manual
Page 36
...remote control repeatedly until "H & V KEYSTONE" is made using both "H KEY- Vertical Keystone Correction (Adjustment with O / Q) Basic Operation 5 Press c KEYSTONE or i ENTER on the remote control to align the upper and lower sides of the projected image. STONE" and "V KEYSTONE" ... angles for each setting become smaller. • The adjustable value of the projected image. R On-screen display H&V KEYSTONE END ENTER ADJUST RESET 3 Press P or R on the remote control to align the left and right sides of the "V KEYSTONE" becomes extremely small when "H KEYSTONE" is displayed....
...remote control repeatedly until "H & V KEYSTONE" is made using both "H KEY- Vertical Keystone Correction (Adjustment with O / Q) Basic Operation 5 Press c KEYSTONE or i ENTER on the remote control to align the upper and lower sides of the projected image. STONE" and "V KEYSTONE" ... angles for each setting become smaller. • The adjustable value of the projected image. R On-screen display H&V KEYSTONE END ENTER ADJUST RESET 3 Press P or R on the remote control to align the left and right sides of the "V KEYSTONE" becomes extremely small when "H KEYSTONE" is displayed....

DT-500 Operation Manual
Page 37
... the remote control RESIZE button VIDEO RESIZE button • "STRETCH" is fixed when 540P, 720P or 1080I signals are entered. Press m RESIZE on the projector or jRESIZE on the remote control. Image Projection (Continued) Resize Mode This function allows you can choose "STRETCH", "SIDE BAR", "CINEMA ZOOM" or "DOT BY ...
... the remote control RESIZE button VIDEO RESIZE button • "STRETCH" is fixed when 540P, 720P or 1080I signals are entered. Press m RESIZE on the projector or jRESIZE on the remote control. Image Projection (Continued) Resize Mode This function allows you can choose "STRETCH", "SIDE BAR", "CINEMA ZOOM" or "DOT BY ...

DT-500 Operation Manual
Page 39
... You can select the appropriate picture mode to "DOT BY DOT". • For details on Image Shift, see page 45. Press kPICTURE MODE. • When pressing kPICTURE MODE, the picture mode changes in the following order: Standard Natural Dynamic Memory Movie2 Movie1 Note • See page 43 ...button Switching the Iris Setting This function controls the quantity of the projected light and the contrast of the image. Freezing a Moving Image 1 Press hFREEZE. • The projected image is switched in the following order: HIGH BRIGHTNESS MODE HIGH CONTRAST MODE Note • For details on ,...
... You can select the appropriate picture mode to "DOT BY DOT". • For details on Image Shift, see page 45. Press kPICTURE MODE. • When pressing kPICTURE MODE, the picture mode changes in the following order: Standard Natural Dynamic Memory Movie2 Movie1 Note • See page 43 ...button Switching the Iris Setting This function controls the quantity of the projected light and the contrast of the image. Freezing a Moving Image 1 Press hFREEZE. • The projected image is switched in the following order: HIGH BRIGHTNESS MODE HIGH CONTRAST MODE Note • For details on ,...

DT-500 Operation Manual
Page 42
.... Useful Features Menu Selections (Adjustments) Example: Adjusting "Bright". • This operation can also be performed by using the buttons on the projector. 1 Press dMENU. • The "Picture" menu screen for INPUT 3 or INPUT 4. RETURN ENTER END 41 Menu icon Menu screen Picture Fine Sync... Selected input mode Menu icons Picture Picture Mode Contrast Bright Color Tint Sharp Red Blue INPUT 1 Standard 0 0 0 0 0 0 0 Note • The "Fine Sync" menu is not available for the selected input mode is displayed. 2 Press Q or O to select the menu icon to the previous screen...
.... Useful Features Menu Selections (Adjustments) Example: Adjusting "Bright". • This operation can also be performed by using the buttons on the projector. 1 Press dMENU. • The "Picture" menu screen for INPUT 3 or INPUT 4. RETURN ENTER END 41 Menu icon Menu screen Picture Fine Sync... Selected input mode Menu icons Picture Picture Mode Contrast Bright Color Tint Sharp Red Blue INPUT 1 Standard 0 0 0 0 0 0 0 Note • The "Fine Sync" menu is not available for the selected input mode is displayed. 2 Press Q or O to select the menu icon to the previous screen...

DT-500 Operation Manual
Page 43
... Tint Sharp Red Blue INPUT 1 Standard 0 15 0 0 0 0 0 5 Press dMENU. • The menu screen will be adjusted To adjust the projected image while watching it Press iENTER. • The selected item (e.g. RETURN Single ADJ END Note • The d MENU button does not function while the projector is ...stored. SEL./ADJ. RETURN Single ADJ END Items to be displayed. The item displayed by itself Picture Bright SEL./ADJ. Menu END INPUT 1 Note • Press iENTER again to return to the previous screen. 4 Press O or Q to adjust the ...
... Tint Sharp Red Blue INPUT 1 Standard 0 15 0 0 0 0 0 5 Press dMENU. • The menu screen will be adjusted To adjust the projected image while watching it Press iENTER. • The selected item (e.g. RETURN Single ADJ END Note • The d MENU button does not function while the projector is ...stored. SEL./ADJ. RETURN Single ADJ END Items to be displayed. The item displayed by itself Picture Bright SEL./ADJ. Menu END INPUT 1 Note • Press iENTER again to return to the previous screen. 4 Press O or Q to adjust the ...
DT-500 Operation Manual
Page 44
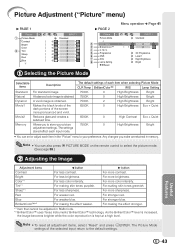
... BrilliantColor™*2 For making skin tones purplish. Useful Features 43 Picture Adjustment ("Picture" menu) Q PAGE 1 Picture Picture Mode Contrast Bright Color Tint Sharp Red Blue INPUT 1 Standard 0 0 0 0 0 0 0 Q PAGE 2 Picture Picture Mode CLR Temp BrilliantColor™ C. The settings stored ... A balanced color image is obtained. Reduces glare and creates a subdued tone. For more sharpness. Note • To reset all adjustment items, select "Reset" and press iENTER. The Picture Mode settings of the screen more pronounced and vivid. M. Makes the ...
... BrilliantColor™*2 For making skin tones purplish. Useful Features 43 Picture Adjustment ("Picture" menu) Q PAGE 1 Picture Picture Mode Contrast Bright Color Tint Sharp Red Blue INPUT 1 Standard 0 0 0 0 0 0 0 Q PAGE 2 Picture Picture Mode CLR Temp BrilliantColor™ C. The settings stored ... A balanced color image is obtained. Reduces glare and creates a subdued tone. For more sharpness. Note • To reset all adjustment items, select "Reset" and press iENTER. The Picture Mode settings of the screen more pronounced and vivid. M. Makes the ...

DT-500 Operation Manual
Page 45
... to display fast-moving images such as sports. 3D Useful to play back a high-definition image. The projector can be made either "Hue", "Saturation", or "Value" and then press i ENTER. 2Select the color to be adjusted with P or R and adjust it with the original encoded..."2D Progressive" and then adjust the colors. 5 Progressive 4 Adjusting the Colors Select "C.M.S." (Color Management System) in the "Picture" menu and then press i ENTER. P R For higher color temperature for cooler, bluish, fluorescent-like images. Film Mode Reproduces the image of the six main colors that ...
... to display fast-moving images such as sports. 3D Useful to play back a high-definition image. The projector can be made either "Hue", "Saturation", or "Value" and then press i ENTER. 2Select the color to be adjusted with P or R and adjust it with the original encoded..."2D Progressive" and then adjust the colors. 5 Progressive 4 Adjusting the Colors Select "C.M.S." (Color Management System) in the "Picture" menu and then press i ENTER. P R For higher color temperature for cooler, bluish, fluorescent-like images. Film Mode Reproduces the image of the six main colors that ...
DT-500 Operation Manual
Page 47
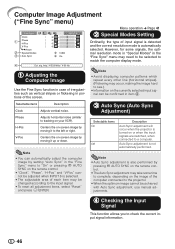
.... 3 Auto Sync (Auto Sync Adjustment) Selectable items On Off Description Auto Sync adjustment will occur when the projector is also performed by pressing f AUTO SYNC on -screen image by setting "Auto Sync" in item 4. sig. V-Pos Centers the on the remote control. • ...adjustment is turned on or when the input signals are switched, when connected to tracking on the image of the computer connected to the projector. • When the optimum image cannot be selected to check the current input signal information. 46 Auto Sync adjustment is automatically selected...
.... 3 Auto Sync (Auto Sync Adjustment) Selectable items On Off Description Auto Sync adjustment will occur when the projector is also performed by pressing f AUTO SYNC on -screen image by setting "Auto Sync" in item 4. sig. V-Pos Centers the on the remote control. • ...adjustment is turned on or when the input signals are switched, when connected to tracking on the image of the computer connected to the projector. • When the optimum image cannot be selected to check the current input signal information. 46 Auto Sync adjustment is automatically selected...

DT-500 Operation Manual
Page 52
...a vacuum cleaner to clean dust from the exhaust vent and the intake vent. Cleaning the exhaust and intake vents I As the surface of the projector. Avoid using benzene or thinner, as they may wear off dirt gently with water Appendix Mild detergent Wax Thinner Info • If you have unplugged... the power cord before use. Strong cleaning detergents may cause damage to press S STANDBY/ON on the projector or aSTANDBY on the projector. Make sure to scrape or hit the lens. Do not use volatile agents such as the operation panel is hard...
...a vacuum cleaner to clean dust from the exhaust vent and the intake vent. Cleaning the exhaust and intake vents I As the surface of the projector. Avoid using benzene or thinner, as they may wear off dirt gently with water Appendix Mild detergent Wax Thinner Info • If you have unplugged... the power cord before use. Strong cleaning detergents may cause damage to press S STANDBY/ON on the projector or aSTANDBY on the projector. Make sure to scrape or hit the lens. Do not use volatile agents such as the operation panel is hard...

DT-500 Operation Manual
Page 56
... Info • Make sure that secures the lamp unit cover. Do not touch the glass surface of the lamp unit or the inside of the projector. • To avoid injury to yourself and damage to the lamp, be very hot and may cause burns or injury. Do not remove the lamp... remove the lamp unit by the handle. Remove the lamp unit cover (2). 1 2 User service screw (for the lamp unit cover and lamp unit. 1 Press SSTANDBY/ON on the projector or aSTANDBY on the remote control to carefully follow the steps below. • Do not loosen other screws except for lamp unit cover...
... Info • Make sure that secures the lamp unit cover. Do not touch the glass surface of the lamp unit or the inside of the projector. • To avoid injury to yourself and damage to the lamp, be very hot and may cause burns or injury. Do not remove the lamp... remove the lamp unit by the handle. Remove the lamp unit cover (2). 1 2 User service screw (for the lamp unit cover and lamp unit. 1 Press SSTANDBY/ON on the projector or aSTANDBY on the remote control to carefully follow the steps below. • Do not loosen other screws except for lamp unit cover...

DT-500 Operation Manual
Page 57
... screws 2 1 Resetting the Lamp Timer Reset the lamp timer after replacing the lamp. Info • Make sure to the projector. Handle 5 Insert the new lamp unit. • Press the lamp unit firmly into the AC socket of the arrow. At this may cause the lamp to secure the lamp unit... unit compartment. Hold the lamp unit by the handle and pull it in the direction of the projector. 2 Reset the lamp timer. • While simultaneously holding down UMENU, TENTER and R on the projector, press SSTANDBY/ON on , even if the power cord is reset. 56 AC socket STANDBY/ON button...
... screws 2 1 Resetting the Lamp Timer Reset the lamp timer after replacing the lamp. Info • Make sure to the projector. Handle 5 Insert the new lamp unit. • Press the lamp unit firmly into the AC socket of the arrow. At this may cause the lamp to secure the lamp unit... unit compartment. Hold the lamp unit by the handle and pull it in the direction of the projector. 2 Reset the lamp timer. • While simultaneously holding down UMENU, TENTER and R on the projector, press SSTANDBY/ON on , even if the power cord is reset. 56 AC socket STANDBY/ON button...

