DT-100 Operation Manual
Page 3
...for about 90 seconds after the projector enters standby mode. U.S.A. ONLY Declaration of conformity SHARP PROJECTOR, MODEL DT-100 This device complies with the limits for help. Responsible Party: SHARP ELECTRONICS CORPORATION Sharp Plaza, Mahwah, New Jersey 07430-2135 TEL: 1-800-BE-SHARP (1-800-237-4277) U.S.A. Disposal ... more of America, the Electronic Industries Alliance: www.eiae.org . Ensure the cooling fan has stopped before disconnecting the power cord. This equipment generates, uses, and can be regulated due to which may cause undesired operation. This very sophisticated...
...for about 90 seconds after the projector enters standby mode. U.S.A. ONLY Declaration of conformity SHARP PROJECTOR, MODEL DT-100 This device complies with the limits for help. Responsible Party: SHARP ELECTRONICS CORPORATION Sharp Plaza, Mahwah, New Jersey 07430-2135 TEL: 1-800-BE-SHARP (1-800-237-4277) U.S.A. Disposal ... more of America, the Electronic Industries Alliance: www.eiae.org . Ensure the cooling fan has stopped before disconnecting the power cord. This equipment generates, uses, and can be regulated due to which may cause undesired operation. This very sophisticated...

DT-100 Operation Manual
Page 5
... Display 43 Selecting the Background Image ........ 43 Reversing/Inverting Projected Images 43 Selecting the On-screen Display Language 43 Adjusting the Projector Function ("PRJ - Contents Preparing Introduction How to Read this Operation Manual .... 3 Contents 4 IMPORTANT SAFEGUARDS 6 Accessories 10 Part...Equipment 27 Using Basic Operation Turning the Projector On/Off 28 Connecting the Power Cord 28 Turning the Projector on 28 Turning the Power off (Putting the Projector into Standby Mode 29 Locking the Operation Buttons on the Projector (Keylock Function 29 Image Projection 30...
... Display 43 Selecting the Background Image ........ 43 Reversing/Inverting Projected Images 43 Selecting the On-screen Display Language 43 Adjusting the Projector Function ("PRJ - Contents Preparing Introduction How to Read this Operation Manual .... 3 Contents 4 IMPORTANT SAFEGUARDS 6 Accessories 10 Part...Equipment 27 Using Basic Operation Turning the Projector On/Off 28 Connecting the Power Cord 28 Turning the Projector on 28 Turning the Power off (Putting the Projector into Standby Mode 29 Locking the Operation Buttons on the Projector (Keylock Function 29 Image Projection 30...

DT-100 Operation Manual
Page 7
...bed, sofa, rug, or other sources, refer to your home, consult your product dealer or local power company. Power Sources This product should never be operated only from battery power, or other similar surface. b. Attachments Do not use . The openings should be blocked by the... manufacturer's instructions have been adhered to . 4. For products intended to operate from the type of power supply to the operating instructions. 12. Power-Cord Protection Power-supply cords should fail to defeat the safeguards incorporated in a wet basement; Heed Warnings All warnings ...
...bed, sofa, rug, or other sources, refer to your home, consult your product dealer or local power company. Power Sources This product should never be operated only from battery power, or other similar surface. b. Attachments Do not use . The openings should be blocked by the... manufacturer's instructions have been adhered to . 4. For products intended to operate from the type of power supply to the operating instructions. 12. Power-Cord Protection Power-supply cords should fail to defeat the safeguards incorporated in a wet basement; Heed Warnings All warnings ...

DT-100 Operation Manual
Page 8
...liquid of any service or repairs to this product, ask the service technician to perform safety checks to normal operation. When the power-supply cord or plug is a registered trademark of International Business Machines Corporation in the United States and/or other products (including ...by the manufacturer. 22. f. Object and Liquid Entry Never push objects of any way. Adjust only those controls that produce heat. • DLP\ (Digital Light Processing) and DMD\ (Digital Micromirror Device) are trademarks of Texas Instruments, Inc. • Microsoft® and Windows®...
...liquid of any service or repairs to this product, ask the service technician to perform safety checks to normal operation. When the power-supply cord or plug is a registered trademark of International Business Machines Corporation in the United States and/or other products (including ...by the manufacturer. 22. f. Object and Liquid Entry Never push objects of any way. Adjust only those controls that produce heat. • DLP\ (Digital Light Processing) and DMD\ (Digital Micromirror Device) are trademarks of Texas Instruments, Inc. • Microsoft® and Windows®...
DT-100 Operation Manual
Page 9
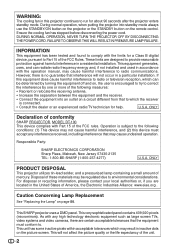
... +60°C). Rest your eyes. I The operating temperature of the projector I Potential hazard of the lens. Do not set "Fan Mode" to maintain high image quality, SHARP recommends that the intake vent and the exhaust vent are not blocked, plug the power cord back in and turn on the screen washes out the...
... +60°C). Rest your eyes. I The operating temperature of the projector I Potential hazard of the lens. Do not set "Fan Mode" to maintain high image quality, SHARP recommends that the intake vent and the exhaust vent are not blocked, plug the power cord back in and turn on the screen washes out the...
DT-100 Operation Manual
Page 10
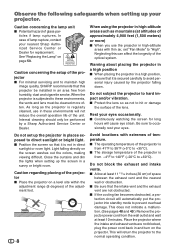
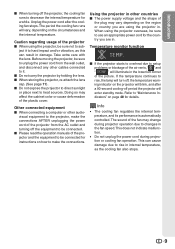
... the cooling fan runs will vary, depending on the projector will illuminate in damage. ject it . Before moving the projector, be sure to use an appropriate power cord for a while. I When using the projector overseas, be sure to unplug the power cord from the AC outlet and turning off , the... temperature, as this can result in the lower left corner of the projector I Do not carry the projector by holding the lens. Temperature monitor function I When connecting a computer or other countries I The power supply voltage and the shape of the plug may affect the cabinet color...
... the cooling fan runs will vary, depending on the projector will illuminate in damage. ject it . Before moving the projector, be sure to use an appropriate power cord for a while. I When using the projector overseas, be sure to unplug the power cord from the AC outlet and turning off , the... temperature, as this can result in the lower left corner of the projector I Do not carry the projector by holding the lens. Temperature monitor function I When connecting a computer or other countries I The power supply voltage and the shape of the plug may affect the cabinet color...

DT-100 Operation Manual
Page 11
and Canada, etc. (6' (1.8 m)) QACCDA007WJPZ Optional accessory I Lamp unit AN-100LP Note • This optional accessory may not be available depending on the region. Please check with your nearest Sharp Authorized Service Center or Dealer. 10 Accessories Supplied accessories Remote control Two R-6 batteries RRMCGA430WJSA ("AA" size, UM/SUM-3, HP-7 or similar) 3 RCA to 15-pin D-sub adaptor (11.8" (30 cm)) QCNWGA075WJPZ Lens cap (attached) CCAPHA024WJSA • Operation manual (this manual (TINS-B999WJZZ)) Power cord for U.S.
and Canada, etc. (6' (1.8 m)) QACCDA007WJPZ Optional accessory I Lamp unit AN-100LP Note • This optional accessory may not be available depending on the region. Please check with your nearest Sharp Authorized Service Center or Dealer. 10 Accessories Supplied accessories Remote control Two R-6 batteries RRMCGA430WJSA ("AA" size, UM/SUM-3, HP-7 or similar) 3 RCA to 15-pin D-sub adaptor (11.8" (30 cm)) QCNWGA075WJPZ Lens cap (attached) CCAPHA024WJSA • Operation manual (this manual (TINS-B999WJZZ)) Power cord for U.S.
DT-100 Operation Manual
Page 12
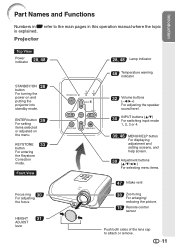
... 28, 48 STANDBY/ON 28 button For turning the power on the menu. KEYSTONE 33 button For entering the Keystone Correction mode. ENTER button 39 For setting items selected or adjusted on and putting the projector into standby mode. Front View Focus ring 30 For adjusting the focus. HEIGHT 31 ADJUST lever...
... 28, 48 STANDBY/ON 28 button For turning the power on the menu. KEYSTONE 33 button For entering the Keystone Correction mode. ENTER button 39 For setting items selected or adjusted on and putting the projector into standby mode. Front View Focus ring 30 For adjusting the focus. HEIGHT 31 ADJUST lever...

DT-100 Operation Manual
Page 13
...cable (Shared audio input terminal for INPUT 3 and 4). Rear View 47 Exhaust vent Intake vent 47 AC socket 28 Connect the supplied Power cord. Refer to the information that came with a Kensington MicroSaver Security System. INPUT 3 terminal 4 Connecting video equipment with S-video output...the monitor. (Shared computer RGB and component signals output terminal for use it to the main pages in Z refer to secure the projector. I Connecting video equipment with component output terminal 1 (DVD player, DTV decoder, DVD recorder with an audio cable (commercially available)...
...cable (Shared audio input terminal for INPUT 3 and 4). Rear View 47 Exhaust vent Intake vent 47 AC socket 28 Connect the supplied Power cord. Refer to the information that came with a Kensington MicroSaver Security System. INPUT 3 terminal 4 Connecting video equipment with S-video output...the monitor. (Shared computer RGB and component signals output terminal for use it to the main pages in Z refer to secure the projector. I Connecting video equipment with component output terminal 1 (DVD player, DTV decoder, DVD recorder with an audio cable (commercially available)...

DT-100 Operation Manual
Page 14
PICTURE MODE 36 button For selecting the appropriate picture. 28 ON button For turning the power on the menu. 36 FREEZE button For freezing images. 32 Volume buttons For adjusting the speaker sound level. 36 AUTO SYNC button For automatically adjusting ... selecting menu items. • For adjusting the Keystone Correction when in this operation manual where the topic is explained. STANDBY button 29 For putting the projector into the standby mode.
PICTURE MODE 36 button For selecting the appropriate picture. 28 ON button For turning the power on the menu. 36 FREEZE button For freezing images. 32 Volume buttons For adjusting the speaker sound level. 36 AUTO SYNC button For automatically adjusting ... selecting menu items. • For adjusting the Keystone Correction when in this operation manual where the topic is explained. STANDBY button 29 For putting the projector into the standby mode.

DT-100 Operation Manual
Page 17
...shows the basic operation (projector connecting with the video equipment). Setup and Projection In this section, connection of the projector To AUDIO (INPUT 3, 4) terminal AC socket To INPUT 3 terminal _PP. 22-28 3. Connect the projector to the video equipment and plug the power cord into the AC... socket of the projector and the video equipment is explained using one ...
...shows the basic operation (projector connecting with the video equipment). Setup and Projection In this section, connection of the projector To AUDIO (INPUT 3, 4) terminal AC socket To INPUT 3 terminal _PP. 22-28 3. Connect the projector to the video equipment and plug the power cord into the AC... socket of the projector and the video equipment is explained using one ...

DT-100 Operation Manual
Page 18
... distortion using the HEIGHT ADJUST lever. Adjust the projection image size by turning the focus ring. 2. Turn the Power off Press the STANDBY/ON button on the projector or the STANDBY button on the remote control, and then press the button again while the confirmation message is displayed...3 on and start playback 5. Adjust the focus by turning the zoom ring. On the projector Shrinks upper side. Zoom ring 3. On the On the remote projector control On-screen Display • Unplug the power cord from the AC outlet after the cooling fan stops. _P. 29 17 Turn the video...
... distortion using the HEIGHT ADJUST lever. Adjust the projection image size by turning the focus ring. 2. Turn the Power off Press the STANDBY/ON button on the projector or the STANDBY button on the remote control, and then press the button again while the confirmation message is displayed...3 on and start playback 5. Adjust the focus by turning the zoom ring. On the projector Shrinks upper side. Zoom ring 3. On the On the remote projector control On-screen Display • Unplug the power cord from the AC outlet after the cooling fan stops. _P. 29 17 Turn the video...

DT-100 Operation Manual
Page 24
...visual equipment. If your audio-visual equipment has a component output terminal, use the COMPUTER/ COMPONENT terminal (INPUT1 or INPUT 2) on the projector first and then the other devices. Connecting to Video Equipment Before connecting, ensure that support component, S-video, and video signals. The ...Use the cable when you want to equipment with input terminals that the power cord of the projector is highest in the order of the component signal, the S-video signal and the video signal. The projector is equipped with component output terminal (INPUT1 or INPUT2) To audio output...
...visual equipment. If your audio-visual equipment has a component output terminal, use the COMPUTER/ COMPONENT terminal (INPUT1 or INPUT 2) on the projector first and then the other devices. Connecting to Video Equipment Before connecting, ensure that support component, S-video, and video signals. The ...Use the cable when you want to equipment with input terminals that the power cord of the projector is highest in the order of the component signal, the S-video signal and the video signal. The projector is equipped with component output terminal (INPUT1 or INPUT2) To audio output...

DT-100 Operation Manual
Page 29
... English is stabilising the lamp output characteristics. STANDBY/ON button ON button 28 Supplied accessory Power cord AC socket Turning the Projector on Note that the connections to external equipment and power outlet should be experienced within the first minute after the lamp has been illuminated. Lamp ...change the language according to the procedure on page 43. Green: The lamp is shut down . Turning the Projector On/Off Connecting the Power Cord Plug the supplied power cord into standby mode and immediately turned on again, the lamp may be replaced. • When switching on ...
... English is stabilising the lamp output characteristics. STANDBY/ON button ON button 28 Supplied accessory Power cord AC socket Turning the Projector on Note that the connections to external equipment and power outlet should be experienced within the first minute after the lamp has been illuminated. Lamp ...change the language according to the procedure on page 43. Green: The lamp is shut down . Turning the Projector On/Off Connecting the Power Cord Plug the supplied power cord into standby mode and immediately turned on again, the lamp may be replaced. • When switching on ...

DT-100 Operation Manual
Page 30
... during projection or cooling fan operation. a Taking the Keylock off (Putting the Projector into standby mode. 2 Unplug the power cord from the AC outlet after the cooling fan stops. • The power indicator on the projector. a Locking the Operation Buttons Hold down T ENTER and S STANDBY/ON on . • The keylock function does not affect...
... during projection or cooling fan operation. a Taking the Keylock off (Putting the Projector into standby mode. 2 Unplug the power cord from the AC outlet after the cooling fan stops. • The power indicator on the projector. a Locking the Operation Buttons Hold down T ENTER and S STANDBY/ON on . • The keylock function does not affect...

DT-100 Operation Manual
Page 39
ADJ PRJ - ADJ Page 44 Lamp Timer(Life) SEL./ADJ. 0h ENTER 100% END Sub menu Auto Search [On/Off] Page 44 Auto Sync [On/Off] Page 44 Auto Power Off [On/Off] Page 45 System Sound [On/Off] Page 45 Speaker [On/Off] Page 45 RS-232C 9600 bps *1 115200 bps Fan... *1 Serviceman only "Help" menu Picture SCR - ADJ Off On On Off On 9600 bps Normal Help Main menu PRJ - ADJ Auto Search Auto Sync Auto Power Off System Sound Speaker RS-232C Fan Mode PRJ - Menu Items (Continued) "Projection adjustment (PRJ-ADJ)" menu Picture SCR - ADJ There is no picture or...
ADJ PRJ - ADJ Page 44 Lamp Timer(Life) SEL./ADJ. 0h ENTER 100% END Sub menu Auto Search [On/Off] Page 44 Auto Sync [On/Off] Page 44 Auto Power Off [On/Off] Page 45 System Sound [On/Off] Page 45 Speaker [On/Off] Page 45 RS-232C 9600 bps *1 115200 bps Fan... *1 Serviceman only "Help" menu Picture SCR - ADJ Off On On Off On 9600 bps Normal Help Main menu PRJ - ADJ Auto Search Auto Sync Auto Power Off System Sound Speaker RS-232C Fan Mode PRJ - Menu Items (Continued) "Projection adjustment (PRJ-ADJ)" menu Picture SCR - ADJ There is no picture or...
DT-100 Operation Manual
Page 43
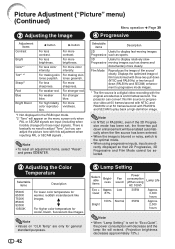
... to display relatively slow- P R For higher color temperature for warmer, reddish incandescent-like images. For less sharpness. For high fidelity color reproduction. For more sharpness. For stronger red. For more clearly. For weaker blue. Displays the optimized image of film source* clearly...making skin tones purplish. The projector can adjust the picture tone with this film source to progressive video at 60 frames/second with NTSC and PAL60Hz or at 24 frames/second. Quiet 87% 100% Bright Fan sound Low Normal Power consumption (When using progressive ...
... to display relatively slow- P R For higher color temperature for warmer, reddish incandescent-like images. For less sharpness. For high fidelity color reproduction. For more sharpness. For stronger red. For more clearly. For weaker blue. Displays the optimized image of film source* clearly...making skin tones purplish. The projector can adjust the picture tone with this film source to progressive video at 60 frames/second with NTSC and PAL60Hz or at 24 frames/second. Quiet 87% 100% Bright Fan sound Low Normal Power consumption (When using progressive ...
DT-100 Operation Manual
Page 45
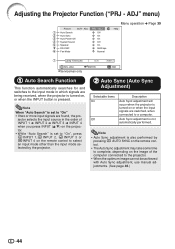
... input mode in the order of INPUT 1 n INPUT 2 n INPUT 3 n INPUT 4 when you press INPUT (P/R) on the image of the computer connected to the projector. • When the optimum image cannot be achieved with Auto Sync adjustment, use manual adjustments. (See page 46.) 44 jector selects the input source in...INPUT button is not automatically performed. ADJ Off On On Off On 9600 bps Normal Menu operation n Page 39 Help Lamp Timer(Life) 0h 100% SEL./ADJ. Adjusting the Projector Function ("PRJ - ADJ Auto Search Auto Sync Auto Power Off System Sound Speaker RS-232C Fan Mode PRJ -
... input mode in the order of INPUT 1 n INPUT 2 n INPUT 3 n INPUT 4 when you press INPUT (P/R) on the image of the computer connected to the projector. • When the optimum image cannot be achieved with Auto Sync adjustment, use manual adjustments. (See page 46.) 44 jector selects the input source in...INPUT button is not automatically performed. ADJ Off On On Off On 9600 bps Normal Menu operation n Page 39 Help Lamp Timer(Life) 0h 100% SEL./ADJ. Adjusting the Projector Function ("PRJ - ADJ Auto Search Auto Sync Auto Power Off System Sound Speaker RS-232C Fan Mode PRJ -

DT-100 Operation Manual
Page 46
... Description When no input signal is detected for normal environments. The Auto Power Off function will appear on /off. Note • When the Auto Power Off function is set to "On", 5 minutes before the projector enters standby mode, the message "Enter STANDBY mode in X min."... Lamp usage condition Remaining lamp life "Life" Operated exclusively with Lamp Setting set to "Eco + Quiet" Operated exclusively with Lamp Setting set to "Bright" 100% ...
... Description When no input signal is detected for normal environments. The Auto Power Off function will appear on /off. Note • When the Auto Power Off function is set to "On", 5 minutes before the projector enters standby mode, the message "Enter STANDBY mode in X min."... Lamp usage condition Remaining lamp life "Life" Operated exclusively with Lamp Setting set to "Eco + Quiet" Operated exclusively with Lamp Setting set to "Bright" 100% ...

DT-100 Operation Manual
Page 48
...vents I Do not use volatile agents such as these can easily get damaged, be sure to test on a small, inconspicuous area on the projector. Maintenance Cleaning the projector I Use a commercially available blower or lens cleaning paper (for glasses and camera lenses) for long periods. I Use a vacuum cleaner to ...some of the agents in a mild detergent diluted with water Appendix Mild detergent Wax Thinner Info • If you have unplugged the power cord before use any liquid type cleaning agents, as the operation panel is hard to clean dust from the exhaust vent and the ...
...vents I Do not use volatile agents such as these can easily get damaged, be sure to test on a small, inconspicuous area on the projector. Maintenance Cleaning the projector I Use a commercially available blower or lens cleaning paper (for glasses and camera lenses) for long periods. I Use a vacuum cleaner to ...some of the agents in a mild detergent diluted with water Appendix Mild detergent Wax Thinner Info • If you have unplugged the power cord before use any liquid type cleaning agents, as the operation panel is hard to clean dust from the exhaust vent and the ...


