DT-100 Operation Manual
Page 2
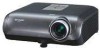
... a triangle is to your new SHARP Projector, using the projector, please read this operation manual carefully. WARNING: To reduce the risk of fire or electric shock, do not stare directly into the beam of your purchase. 2. REFER SERVICING TO QUALIFIED SERVICE PERSONNEL. U.S.A. Model No.: DT-100 Serial No.: There are two important reasons for prompt warranty registration of light, or view directly. CAUTION RISK OF ELECTRIC...
... a triangle is to your new SHARP Projector, using the projector, please read this operation manual carefully. WARNING: To reduce the risk of fire or electric shock, do not stare directly into the beam of your purchase. 2. REFER SERVICING TO QUALIFIED SERVICE PERSONNEL. U.S.A. Model No.: DT-100 Serial No.: There are two important reasons for prompt warranty registration of light, or view directly. CAUTION RISK OF ELECTRIC...
DT-100 Operation Manual
Page 3
... seconds after the projector enters standby mode. As with Part 15 of America, the Electronic Industries Alliance: www.eiae.org . This will not occur in a particular installation. DURING NORMAL OPERATION, NEVER TURN THE PROJECTOR OFF BY DISCONNECTING THE POWER CORD. ONLY PRODUCT DISPOSAL This projector utilizes tin-lead solder, and a pressurized lamp containing a small amount of the unit. 2 This SHARP projector uses a DMD panel. This unit has...
... seconds after the projector enters standby mode. As with Part 15 of America, the Electronic Industries Alliance: www.eiae.org . This will not occur in a particular installation. DURING NORMAL OPERATION, NEVER TURN THE PROJECTOR OFF BY DISCONNECTING THE POWER CORD. ONLY PRODUCT DISPOSAL This projector utilizes tin-lead solder, and a pressurized lamp containing a small amount of the unit. 2 This SHARP projector uses a DMD panel. This unit has...

DT-100 Operation Manual
Page 5
... Projected Images 43 Selecting the On-screen Display Language 43 Adjusting the Projector Function ("PRJ - ADJ" menu 44 Auto Search Function 44 Auto Sync (Auto Sync Adjustment) ..... 44 Auto Power Off Function 45 Setting the Confirmation Sound (System Sound 45 Speaker Setting 45 Fan Mode Setting 45 Checking the Lamp Life Status 45 Troubleshooting with the Remote Control .... 36 Freezing a Moving Image 36 Selecting the Picture Mode 36 Auto Sync (Auto Sync Adjustment) ..... 36 Menu Items 37 Using the Menu Screen 39 Menu Selections (Adjustments 39 Picture Adjustment ("Picture" menu...
... Projected Images 43 Selecting the On-screen Display Language 43 Adjusting the Projector Function ("PRJ - ADJ" menu 44 Auto Search Function 44 Auto Sync (Auto Sync Adjustment) ..... 44 Auto Power Off Function 45 Setting the Confirmation Sound (System Sound 45 Speaker Setting 45 Fan Mode Setting 45 Checking the Lamp Life Status 45 Troubleshooting with the Remote Control .... 36 Freezing a Moving Image 36 Selecting the Picture Mode 36 Auto Sync (Auto Sync Adjustment) ..... 36 Menu Items 37 Using the Menu Screen 39 Menu Selections (Adjustments 39 Picture Adjustment ("Picture" menu...

DT-100 Operation Manual
Page 8
... or Ceiling Mounting This product should be mounted to determine that produce heat. • DLP\ (Digital Light Processing) and DMD\ (Digital Micromirror Device) are trademarks of Texas Instruments, Inc. • Microsoft® and Windows® are covered by following conditions: a. Therefore you to dangerous voltage or other company or product names are required, be sure the service technician has used replacement parts specified by...
... or Ceiling Mounting This product should be mounted to determine that produce heat. • DLP\ (Digital Light Processing) and DMD\ (Digital Micromirror Device) are trademarks of Texas Instruments, Inc. • Microsoft® and Windows® are covered by following conditions: a. Therefore you to dangerous voltage or other company or product names are required, be sure the service technician has used replacement parts specified by...
DT-100 Operation Manual
Page 9
... use the projector in high-altitude areas with extremes of the lens. Observe the following safeguards when setting up your nearest Sharp Authorized Service Center or Dealer for long hours will cause eye strain. ticles if lamp ruptures. Internal cleaning should only be installed in and turn on a level site within the adjustment range (8 degrees) of the adjustment foot. 8 Avoid locations with thin air, set up the projector...
... use the projector in high-altitude areas with extremes of the lens. Observe the following safeguards when setting up your nearest Sharp Authorized Service Center or Dealer for long hours will cause eye strain. ticles if lamp ruptures. Internal cleaning should only be installed in and turn on a level site within the adjustment range (8 degrees) of the adjustment foot. 8 Avoid locations with thin air, set up the projector...
DT-100 Operation Manual
Page 10
... picture. If the temperature continues to rise, the lamp will enter standby mode. The sound of the fan may change during projection or cooling fan operation. This can result in other countries I The power supply voltage and the shape of the plug may affect the cabinet color or cause deformation of the plastic cover. I When connecting a computer or other audio- Using the projector in damage. ing indicator on the projector will blink...
... picture. If the temperature continues to rise, the lamp will enter standby mode. The sound of the fan may change during projection or cooling fan operation. This can result in other countries I The power supply voltage and the shape of the plug may affect the cabinet color or cause deformation of the plastic cover. I When connecting a computer or other audio- Using the projector in damage. ing indicator on the projector will blink...
DT-100 Operation Manual
Page 12
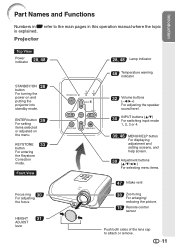
... 30 For adjusting the focus. Projector Top View Power indicator 28, 48 STANDBY/ON 28 button For turning the power on the menu. KEYSTONE 33 button For entering the Keystone Correction mode. HEIGHT 31 ADJUST lever 28, 48 Lamp indicator 48 Temperature warning indicator 32 Volume buttons (-O/Q+) For adjusting the speaker sound level. 30 INPUT buttons (P/R) For switching input mode 1, 2, 3 or 4. 39, 46 MENU/HELP button For displaying adjustment and setting screens, and help screen. 39 Adjustment buttons (P/R/O/Q) For selecting menu items. 47 Intake vent 30 Zoom ring For...
... 30 For adjusting the focus. Projector Top View Power indicator 28, 48 STANDBY/ON 28 button For turning the power on the menu. KEYSTONE 33 button For entering the Keystone Correction mode. HEIGHT 31 ADJUST lever 28, 48 Lamp indicator 48 Temperature warning indicator 32 Volume buttons (-O/Q+) For adjusting the speaker sound level. 30 INPUT buttons (P/R) For switching input mode 1, 2, 3 or 4. 39, 46 MENU/HELP button For displaying adjustment and setting screens, and help screen. 39 Adjustment buttons (P/R/O/Q) For selecting menu items. 47 Intake vent 30 Zoom ring For...

DT-100 Operation Manual
Page 14
... 36 AUTO SYNC button For automatically adjusting images when connected to a computer. 34 RESIZE button For switching the screen size (STRETCH, SIDE BAR, CINEMA ZOOM). 30 INPUT 1, 2, 3 and 4 buttons For switching to the previous menu screen during menu operations. AV MUTE button 32 For temporarily displaying the black screen and turning off the sound. KEYSTONE button 33 For entering the Keystone Correction mode. PICTURE MODE 36 button For selecting the appropriate picture. 28 ON button For turning the power on. 39 MENU/HELP button For displaying adjustment 46 and setting screens...
... 36 AUTO SYNC button For automatically adjusting images when connected to a computer. 34 RESIZE button For switching the screen size (STRETCH, SIDE BAR, CINEMA ZOOM). 30 INPUT 1, 2, 3 and 4 buttons For switching to the previous menu screen during menu operations. AV MUTE button 32 For temporarily displaying the black screen and turning off the sound. KEYSTONE button 33 For entering the Keystone Correction mode. PICTURE MODE 36 button For selecting the appropriate picture. 28 ON button For turning the power on. 39 MENU/HELP button For displaying adjustment 46 and setting screens...

DT-100 Operation Manual
Page 18
... lower side. _P. 33 8. On the On the remote projector control On-screen Display • Unplug the power cord from the AC outlet after the cooling fan stops. _P. 29 17 Zoom ring 3. On the projector Shrinks upper side. Turn the video equipment on the projector, input mode switches in the following order: INPUT1 INPUT2 INPUT3 INPUT4 • When using the Keystone Correction. Adjust the projection image size by turning the focus ring. 2. Focus ring 7.
... lower side. _P. 33 8. On the On the remote projector control On-screen Display • Unplug the power cord from the AC outlet after the cooling fan stops. _P. 29 17 Zoom ring 3. On the projector Shrinks upper side. Turn the video equipment on the projector, input mode switches in the following order: INPUT1 INPUT2 INPUT3 INPUT4 • When using the Keystone Correction. Adjust the projection image size by turning the focus ring. 2. Focus ring 7.

DT-100 Operation Manual
Page 29
... the lamp should be replaced. • When switching on the rear of the projector. Lamp indicator Power indicator Note • About the Lamp Indicator The lamp indicator illuminates to the procedure on the remote control. Red: The lamp is put into the AC socket on the projector, a slight flickering of the lamp. STANDBY/ON button ON button 28 Turning the Projector On/Off Connecting the Power Cord Plug the supplied power cord into standby mode and immediately turned on . Blinking in green: The lamp is the factory default...
... the lamp should be replaced. • When switching on the rear of the projector. Lamp indicator Power indicator Note • About the Lamp Indicator The lamp indicator illuminates to the procedure on the remote control. Red: The lamp is put into the AC socket on the projector, a slight flickering of the lamp. STANDBY/ON button ON button 28 Turning the Projector On/Off Connecting the Power Cord Plug the supplied power cord into standby mode and immediately turned on . Blinking in green: The lamp is the factory default...

DT-100 Operation Manual
Page 30
... message is displayed, to lock the operation buttons on the projector simultaneously for about 5 seconds. a Taking the Keylock off (Putting the Projector into standby mode. 2 Unplug the power cord from the AC outlet after the cooling fan stops. • The power indicator on . • The keylock function does not affect the operation with the remote control buttons. • You cannot use the keylock function while the projector is warming up , changing input signals, operating "Auto Sync...
... message is displayed, to lock the operation buttons on the projector simultaneously for about 5 seconds. a Taking the Keylock off (Putting the Projector into standby mode. 2 Unplug the power cord from the AC outlet after the cooling fan stops. • The power indicator on . • The keylock function does not affect the operation with the remote control buttons. • You cannot use the keylock function while the projector is warming up , changing input signals, operating "Auto Sync...
DT-100 Operation Manual
Page 43
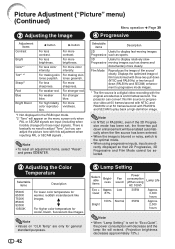
..., switch to the optimal mode. • When using AC 100V) 305W 350W Lamp Life Approx. 3,000 hours Approx. 2,000 hours Note • When "Lamp Setting" is basically no need to those input signals). Progressive moving images Progressive such as sports. 3D Useful to play back a high-definition image. For more sharpness. For more color intensity. P R For higher color temperature for warmer, reddish incandescent-like images. Quiet 87% 100% Bright Fan sound Low Normal Power...
..., switch to the optimal mode. • When using AC 100V) 305W 350W Lamp Life Approx. 3,000 hours Approx. 2,000 hours Note • When "Lamp Setting" is basically no need to those input signals). Progressive moving images Progressive such as sports. 3D Useful to play back a high-definition image. For more sharpness. For more color intensity. P R For higher color temperature for warmer, reddish incandescent-like images. Quiet 87% 100% Bright Fan sound Low Normal Power...
DT-100 Operation Manual
Page 47
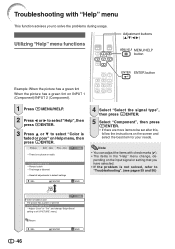
... 56) Help Color is distorted Reset all adjustments to be set after this, follow the instructions on the screen and select the best item for your needs. Troubleshooting with check marks (✔). • The items in the "Help" menu change "Bright Boost" setting to off ("PICTURE" menu). ENTER END 46 Return SEL. ADJ PRJ - pending on Help menu, then press hENTER. ENTER END 4 Select "Select the signal type...
... 56) Help Color is distorted Reset all adjustments to be set after this, follow the instructions on the screen and select the best item for your needs. Troubleshooting with check marks (✔). • The items in the "Help" menu change "Bright Boost" setting to off ("PICTURE" menu). ENTER END 46 Return SEL. ADJ PRJ - pending on Help menu, then press hENTER. ENTER END 4 Select "Select the signal type...

DT-100 Operation Manual
Page 50
... Service Center or Dealer for repair. • Please exercise care when replacing the lamp. • Securely install the cover. • If the power indicator blinks in the power cord and turning the power back on Green blinks (Cooling) Red blinks Problem The internal temperature is securely installed, contact your nearest Sharp Authorized Service Center or Dealer for about 90 seconds. The cooling fan runs for advice. The lamp does not illuminate. The sound of the projector...
... Service Center or Dealer for repair. • Please exercise care when replacing the lamp. • Securely install the cover. • If the power indicator blinks in the power cord and turning the power back on Green blinks (Cooling) Red blinks Problem The internal temperature is securely installed, contact your nearest Sharp Authorized Service Center or Dealer for about 90 seconds. The cooling fan runs for advice. The lamp does not illuminate. The sound of the projector...
DT-100 Operation Manual
Page 53
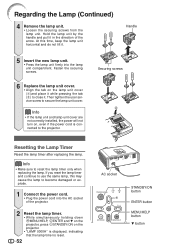
... screws 2 1 Resetting the Lamp Timer Reset the lamp timer after replacing the lamp. Info • Make sure to secure the lamp unit cover. If you reset the lamp timer and continue to the projector. Then tighten the user service screw to reset the lamp timer only when replacing the lamp. Fasten the securing screws. 6 Replace the lamp unit cover. • Align the tab on , even if the power cord is reset. 52 AC socket STANDBY/ON button ENTER button MENU/HELP button R button Handle 5 Insert the new lamp unit...
... screws 2 1 Resetting the Lamp Timer Reset the lamp timer after replacing the lamp. Info • Make sure to secure the lamp unit cover. If you reset the lamp timer and continue to the projector. Then tighten the user service screw to reset the lamp timer only when replacing the lamp. Fasten the securing screws. 6 Replace the lamp unit cover. • Align the tab on , even if the power cord is reset. 52 AC socket STANDBY/ON button ENTER button MENU/HELP button R button Handle 5 Insert the new lamp unit...

DT-100 Operation Manual
Page 56
... red. noise appears. • Adjust the focus. 30 • The projection distance exceeds the focus range. 20 (Computer Input only) • Perform "Fine Sync" Adjustments ("Clock" Adjustment) 46 • Perform "Fine Sync" Adjustments ("Phase" Adjustment) 46 • Noise may not be • The keylock is set. Troubleshooting Problem Check Page • Projector power cord is not plugged into the If the keylock is set to "ON", all the buttons are locked. 29 standby mode using , an image...
... red. noise appears. • Adjust the focus. 30 • The projection distance exceeds the focus range. 20 (Computer Input only) • Perform "Fine Sync" Adjustments ("Clock" Adjustment) 46 • Perform "Fine Sync" Adjustments ("Phase" Adjustment) 46 • Noise may not be • The keylock is set. Troubleshooting Problem Check Page • Projector power cord is not plugged into the If the keylock is set to "ON", all the buttons are locked. 29 standby mode using , an image...

DT-100 Operation Manual
Page 57
... cooling fan becomes • When temperature inside the projector increases, the cooling fan noisy. The lamp suddenly turns off during projection. Troubleshooting (Continued) Problem Check Page Picture is green on . Picture flickers on INPUT 1 (RGB)/INPUT 2 (RGB). While the remaining lamp life draws to be adversely affected by incorrect operation or interference. The image sometimes flickers. • Cables incorrectly connected to obtain product literature, accessories, supplies or customer assistance, please call 1-800-BE-SHARP (1-800...
... cooling fan becomes • When temperature inside the projector increases, the cooling fan noisy. The lamp suddenly turns off during projection. Troubleshooting (Continued) Problem Check Page Picture is green on . Picture flickers on INPUT 1 (RGB)/INPUT 2 (RGB). While the remaining lamp life draws to be adversely affected by incorrect operation or interference. The image sometimes flickers. • Cables incorrectly connected to obtain product literature, accessories, supplies or customer assistance, please call 1-800-BE-SHARP (1-800...
DT-100 Operation Manual
Page 58
... (D) mm) (including adjustment foot and projecting parts) Weight (approx.) 8.6 lbs. (3.9 kg) Replacement parts Remote control, Power cord for product improvement without prior notice. Specifications Product type Projector Model DT-100 Video system NTSC3.58/NTSC4.43/PAL/PAL-M/PAL-N/PAL-60/SECAM/DTV480I/DTV480P/ DTV540P/DTV576I/DTV576P/DTV720P/DTV1035I/DTV1080I/DTV1080I-50 Display method Single Chip Digital Micromirror DeviceTM (DMDTM) by Texas Instruments DMD panel Panel size: 0.53", 1chip DMD No. SIGNAL: TTL level...
... (D) mm) (including adjustment foot and projecting parts) Weight (approx.) 8.6 lbs. (3.9 kg) Replacement parts Remote control, Power cord for product improvement without prior notice. Specifications Product type Projector Model DT-100 Video system NTSC3.58/NTSC4.43/PAL/PAL-M/PAL-N/PAL-60/SECAM/DTV480I/DTV480P/ DTV540P/DTV576I/DTV576P/DTV720P/DTV1035I/DTV1080I/DTV1080I-50 Display method Single Chip Digital Micromirror DeviceTM (DMDTM) by Texas Instruments DMD panel Panel size: 0.53", 1chip DMD No. SIGNAL: TTL level...

DT-100 Operation Manual
Page 60
... KEYSTONE button 33 Keystone Correction 43 Lamp 10, 50 Lamp indicator 48 Lamp Setting 42 Lamp Timer (Life 45 Lamp unit 51 Language (on-screen display language) ...... 43 Lens Cap 11 MENU/HELP button 39, 46 ON button 28 Optional accessory 10 OSD Display 43 OUTPUT (INPUT1, 2) terminal 26 Phase 46 Picture Adjustment 41 Picture Mode 36, 41 PICTURE MODE button 36 Power cord 28 PRJ - ADJ 43 Screen Size and Projection Distance 20 Sharp 42 SIDE BAR 34, 35 Speaker 45 STANDBY button 29 STANDBY/ON button...
... KEYSTONE button 33 Keystone Correction 43 Lamp 10, 50 Lamp indicator 48 Lamp Setting 42 Lamp Timer (Life 45 Lamp unit 51 Language (on-screen display language) ...... 43 Lens Cap 11 MENU/HELP button 39, 46 ON button 28 Optional accessory 10 OSD Display 43 OUTPUT (INPUT1, 2) terminal 26 Phase 46 Picture Adjustment 41 Picture Mode 36, 41 PICTURE MODE button 36 Power cord 28 PRJ - ADJ 43 Screen Size and Projection Distance 20 Sharp 42 SIDE BAR 34, 35 Speaker 45 STANDBY button 29 STANDBY/ON button...
DT-100 Operation Manual
Page 61
... . Cleaning of Optical System and/or replacement of any ): Where to Obtain Service: What to do to Obtain Service: DT-100 Projector (Be sure to have this Product. Labor & materials required to obtain in addition to whatever implied warranties may be granted to purchasers by law. Contact your Sharp Authorized Servicer to remove and reinstall a suspended projector in installations not accessible with a new...
... . Cleaning of Optical System and/or replacement of any ): Where to Obtain Service: What to do to Obtain Service: DT-100 Projector (Be sure to have this Product. Labor & materials required to obtain in addition to whatever implied warranties may be granted to purchasers by law. Contact your Sharp Authorized Servicer to remove and reinstall a suspended projector in installations not accessible with a new...


