

CD-ES77 | CD-ES700 Operation Manual
Page 2
... alert the user to Part 15 of important operating and maintenance (servicing) instructions in full compliance with the instructions, may cause harmful interference to the presence of the FCC Rules. Explanation of Graphical Symbols: The lightning flash with the limits for help. WARNING FCC Regulations state that to which can radiate radio frequency energy and, if not installed and used in the...
... alert the user to Part 15 of important operating and maintenance (servicing) instructions in full compliance with the instructions, may cause harmful interference to the presence of the FCC Rules. Explanation of Graphical Symbols: The lightning flash with the limits for help. WARNING FCC Regulations state that to which can radiate radio frequency energy and, if not installed and used in the...

CD-ES77 | CD-ES700 Operation Manual
Page 3
... plug. 13 Power-Cord Protection - If you are unable to insert the plug into the outlet, try reversing the plug. See Instruction Manual for future reference. 3 Heed Warnings - IMPORTANT SAFETY INSTRUCTIONS CD-ES700 CD-ES77 Important Instruction 1 Read Instructions - Do not use this product on the marking label. Do not use liquid cleaners or aerosol cleaners. All the safety and operating instructions should be sure the service technician has used a replacement plug...
... plug. 13 Power-Cord Protection - If you are unable to insert the plug into the outlet, try reversing the plug. See Instruction Manual for future reference. 3 Heed Warnings - IMPORTANT SAFETY INSTRUCTIONS CD-ES700 CD-ES77 Important Instruction 1 Read Instructions - Do not use this product on the marking label. Do not use liquid cleaners or aerosol cleaners. All the safety and operating instructions should be sure the service technician has used a replacement plug...

CD-ES77 | CD-ES700 Operation Manual
Page 4
... electrode. This will often require extensive work by the operating instructions as they may result in fire, electric shock, or other products (including amplifiers) that are required, be sure the antenna or cable system is connected to the product, be sure the service technician has used replacement parts specified by following conditions: a) When the power-supply cord or plug is damaged, b) If liquid has...
... electrode. This will often require extensive work by the operating instructions as they may result in fire, electric shock, or other products (including amplifiers) that are required, be sure the antenna or cable system is connected to the product, be sure the service technician has used replacement parts specified by following conditions: a) When the power-supply cord or plug is damaged, b) If liquid has...

CD-ES77 | CD-ES700 Operation Manual
Page 5
... than two million cars. lent to a cassette tape (TAPE 1 or TAPE 2 23, 24 ! Radio Listening to global warming. Preparation for Use System connections 10 - 12 Remote control 13 ! registered mark. 0209 Contents CD-ES700 CD-ES77 Important Instruction Page ! Basic Operation General control 14 Setting the clock 15 ! ENERGY STAR® Program Information As an ENERGY STAR® Partner, SHARP has determined that this will mean more...
... than two million cars. lent to a cassette tape (TAPE 1 or TAPE 2 23, 24 ! Radio Listening to global warming. Preparation for Use System connections 10 - 12 Remote control 13 ! registered mark. 0209 Contents CD-ES700 CD-ES77 Important Instruction Page ! Basic Operation General control 14 Setting the clock 15 ! ENERGY STAR® Program Information As an ENERGY STAR® Partner, SHARP has determined that this will mean more...

CD-ES77 | CD-ES700 Operation Manual
Page 6
... power plug by the head when removing it from use of an electrical storm, unplug the unit for any damage resulting from the AC outlet, as this unit with the volume control setting up high, or while continually listening at least 4" (10 cm) of free space along the sides, top and back of accident causing damage. CD-ES700 CD-ES77...
... power plug by the head when removing it from use of an electrical storm, unplug the unit for any damage resulting from the AC outlet, as this unit with the volume control setting up high, or while continually listening at least 4" (10 cm) of free space along the sides, top and back of accident causing damage. CD-ES700 CD-ES77...

CD-ES77 | CD-ES700 Operation Manual
Page 7
... Button 14 4. CD Direct Play Button 18 15. CD or Tape Stop Button 17, 24 20. Game/Video Button 31 General Information CD-ES700 CD-ES77 7 Clock/Timer Button 15, 27, 30 6. Extra Bass/Demo Mode Button 12, 14 21. CD Button 16 25. Tape 1 Cassette Compartment 23 11. Volume Control 14 22. Tape (1 2) Button 23 26. CD Track Up or Fast Forward, Tape 2 Fast Forward, Tuner Preset Up, Time Up Button 15, 17, 22, 24 5. Tuning Up Button 21 7. Headphone Jack 32 12. Disc Number Select Buttons...
... Button 14 4. CD Direct Play Button 18 15. CD or Tape Stop Button 17, 24 20. Game/Video Button 31 General Information CD-ES700 CD-ES77 7 Clock/Timer Button 15, 27, 30 6. Extra Bass/Demo Mode Button 12, 14 21. CD Button 16 25. Tape 1 Cassette Compartment 23 11. Volume Control 14 22. Tape (1 2) Button 23 26. CD Track Up or Fast Forward, Tape 2 Fast Forward, Tuner Preset Up, Time Up Button 15, 17, 22, 24 5. Tuning Up Button 21 7. Headphone Jack 32 12. Disc Number Select Buttons...
CD-ES77 | CD-ES700 Operation Manual
Page 8
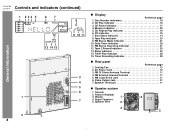
Display Reference page 1. CD Play Indicator 16 3. Rear panel Reference page 1. AC Power Cord 12 3. FM Antenna Ground Terminal 11 5. Woofer 1 4 4. Memory Indicator 20 5. Tape 2 Record Indicator 25 13. FM 75 Ohms Antenna Terminal 11 4. Speaker Terminals 11 ! Daily Timer Indicator 28 11. CD Repeat Play Indicator 19 6. Extra Bass Indicator 14 8. FM Stereo Receiving Indicator 21 12. Timer Recording Indicator 28 ! Cooling Fan 12 2. Passive Radiator 3. CD Indicator 16...
Display Reference page 1. CD Play Indicator 16 3. Rear panel Reference page 1. AC Power Cord 12 3. FM Antenna Ground Terminal 11 5. Woofer 1 4 4. Memory Indicator 20 5. Tape 2 Record Indicator 25 13. FM 75 Ohms Antenna Terminal 11 4. Speaker Terminals 11 ! Daily Timer Indicator 28 11. CD Repeat Play Indicator 19 6. Extra Bass Indicator 14 8. FM Stereo Receiving Indicator 21 12. Timer Recording Indicator 28 ! Cooling Fan 12 2. Passive Radiator 3. CD Indicator 16...

CD-ES77 | CD-ES700 Operation Manual
Page 9
... Buttons 14 21 11 12 9 Remote Control Transmitter 13 2. CD Clear/Dimmer Button 14, 20 5. Memory/Set Button 15, 20, 22, 27, 30 2 13 6. Tape 2 Record Pause Button 25, 26 9. CD Button 16 11. Game/Video Button 31 13. CD or Tape Stop Button 17 18. CD Play or Repeat, Tape Play Button 16, 19 19 19. CD-ES700 CD-ES77 General Information ! Disc Number Select Buttons 16 3. CD Track Up or Fast Forward, Tape 2 Fast Forward, 6 17 Tuner Preset Up, Time Up Button...
... Buttons 14 21 11 12 9 Remote Control Transmitter 13 2. CD Clear/Dimmer Button 14, 20 5. Memory/Set Button 15, 20, 22, 27, 30 2 13 6. Tape 2 Record Pause Button 25, 26 9. CD Button 16 11. Game/Video Button 31 13. CD or Tape Stop Button 17 18. CD Play or Repeat, Tape Play Button 16, 19 19 19. CD-ES700 CD-ES77 General Information ! Disc Number Select Buttons 16 3. CD Track Up or Fast Forward, Tape 2 Fast Forward, 6 17 Tuner Preset Up, Time Up Button...

CD-ES77 | CD-ES700 Operation Manual
Page 11
... the antenna on the right side when you face the unit. Speaker connection Connect the black wire to the minus (-) terminal, and the red wire to the diagram below. Preparation for Use Red Black Caution: " Use speakers with screws (not supplied). The right speaker is the one on the unit or near the AC power cord may be placed in the direction where the strongest signal can...
... the antenna on the right side when you face the unit. Speaker connection Connect the black wire to the minus (-) terminal, and the red wire to the diagram below. Preparation for Use Red Black Caution: " Use speakers with screws (not supplied). The right speaker is the one on the unit or near the AC power cord may be placed in the direction where the strongest signal can...

CD-ES77 | CD-ES700 Operation Manual
Page 12
... power stand-by mode, press the X-BASS/ DEMO button again. To cancel the demonstration mode: When the unit is in the power standby mode (demonstration mode), press the X-BASS/DEMO button. Outdoor FM antenna Use an outdoor FM antenna if you plug in use for Use Cooling fan: This product is on . To return to the AC outlet. CD-ES700 CD-ES77 System connections (continued) ! Outdoor FM antenna 75 ohm coaxial cable Note: When an outdoor FM antenna...
... power stand-by mode, press the X-BASS/ DEMO button again. To cancel the demonstration mode: When the unit is in the power standby mode (demonstration mode), press the X-BASS/DEMO button. Outdoor FM antenna Use an outdoor FM antenna if you plug in use for Use Cooling fan: This product is on . To return to the AC outlet. CD-ES700 CD-ES77 System connections (continued) ! Outdoor FM antenna 75 ohm coaxial cable Note: When an outdoor FM antenna...

CD-ES77 | CD-ES700 Operation Manual
Page 14
... change to enter the power stand-by mode. CLASSIC Treble little. To turn the power on , light illuminates around the display. When it is turned on . FLAT The sound is slightly emphasized. JAZZ Treble is not modified. Illumination light control When the power is turned counterclockwise, the volume will be displayed. To cancel the extra bass mode, press the X-BASS/DEMO (XBASS) button. 0 ..... 30 MAXIMUM Basic Operation ! FLAT The sound is sized. CD-ES700 CD-ES77 General control ! Remote control operation...
... change to enter the power stand-by mode. CLASSIC Treble little. To turn the power on , light illuminates around the display. When it is turned on . FLAT The sound is slightly emphasized. JAZZ Treble is not modified. Illumination light control When the power is turned counterclockwise, the volume will be displayed. To cancel the extra bass mode, press the X-BASS/DEMO (XBASS) button. 0 ..... 30 MAXIMUM Basic Operation ! FLAT The sound is sized. CD-ES700 CD-ES77 General control ! Remote control operation...

CD-ES77 | CD-ES700 Operation Manual
Page 15
... set with the remote control. 15 "AM 12:00" "AM 0:00" "0:00" The 12-hour display will appear. (AM 0:00 - To change the time in the stand-by 1 hour. Setting the clock CD-ES700 CD-ES77 5 Press the or button to "Clearing all the programmed contents. [Refer to adjust the hour and then press the MEMORY/SET button. Within 10 seconds, press the or button to adjust...
... set with the remote control. 15 "AM 12:00" "AM 0:00" "0:00" The 12-hour display will appear. (AM 0:00 - To change the time in the stand-by 1 hour. Setting the clock CD-ES700 CD-ES77 5 Press the or button to "Clearing all the programmed contents. [Refer to adjust the hour and then press the MEMORY/SET button. Within 10 seconds, press the or button to adjust...
CD-ES77 | CD-ES700 Operation Manual
Page 22
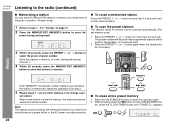
...-by mode. 2 While pressing down the button and the X-BASS/DEMO but- To scan the preset stations The stations saved in memory can store 40 AM and FM stations in memory and recall them at the push of a button. (Preset tuning) 1 Perform steps 1 - 3 in memory. ! To erase entire preset memory 1 Press the ON/STAND-BY button to select the preset channel number. CD-ES700 CD-ES77 Listening to the radio (continued...
...-by mode. 2 While pressing down the button and the X-BASS/DEMO but- To scan the preset stations The stations saved in memory can store 40 AM and FM stations in memory and recall them at the push of a button. (Preset tuning) 1 Perform steps 1 - 3 in memory. ! To erase entire preset memory 1 Press the ON/STAND-BY button to select the preset channel number. CD-ES700 CD-ES77 Listening to the radio (continued...
CD-ES77 | CD-ES700 Operation Manual
Page 27
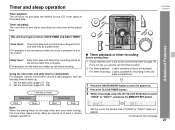
... timer to record a radio program, and use the timer function. 2 For timer playback: Load a cassette or discs to the correct time if "ONCE" or "DAILY" does not appear. CD-ES700 CD-ES77 This unit has 2 types of at the preset time. Daily timer: Daily timer play and once timer recording works for one time only at the same preset time everyday. If it is set , you are...
... timer to record a radio program, and use the timer function. 2 For timer playback: Load a cassette or discs to the correct time if "ONCE" or "DAILY" does not appear. CD-ES700 CD-ES77 This unit has 2 types of at the preset time. Daily timer: Daily timer play and once timer recording works for one time only at the same preset time everyday. If it is set , you are...
CD-ES77 | CD-ES700 Operation Manual
Page 28
... timer mode. 7 Press the or button to adjust the minutes and then press the MEMORY/SET button. 8 Set the time to se- To select the timer playback source: CD, TUNER, TAPE 1 or TAPE 2. lect "ONCE SET" or "DAILY SET", and press the MEMORY/ SET button. 5 Press the or button to adjust the hour and then press the MEMORY/SET button. 9 Switch input with the or button, and then press the MEMORY/SET button. Do not turn the volume...
... timer mode. 7 Press the or button to adjust the minutes and then press the MEMORY/SET button. 8 Set the time to se- To select the timer playback source: CD, TUNER, TAPE 1 or TAPE 2. lect "ONCE SET" or "DAILY SET", and press the MEMORY/ SET button. 5 Press the or button to adjust the hour and then press the MEMORY/SET button. 9 Switch input with the or button, and then press the MEMORY/SET button. Do not turn the volume...
CD-ES77 | CD-ES700 Operation Manual
Page 29
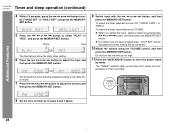
... reaches the preset volume. 13When the timer end time is reached, the system will continue until it is not used. Note: When performing timer playback or recording using another unit connected to the timer stand-by mode after displaying the settings in the timer stand-by mode. Checking the timer setting in step 9. ton. The unit returns to the GAME INPUT jacks, select "GAME...
... reaches the preset volume. 13When the timer end time is reached, the system will continue until it is not used. Note: When performing timer playback or recording using another unit connected to the timer stand-by mode after displaying the settings in the timer stand-by mode. Checking the timer setting in step 9. ton. The unit returns to the GAME INPUT jacks, select "GAME...
CD-ES77 | CD-ES700 Operation Manual
Page 30
Sleep operation The radio, compact disc and cassette tape can fall asleep listening to perform both functions. To use timer and sleep operation together Sleep and timer playback: For example, you can all be turned down 1 minute before the sleep operation finishes. If you can change the remaining sleep time while it is displayed for about 10 seconds. ton. CD-ES700 CD-ES77 Timer and sleep operation (continued...
Sleep operation The radio, compact disc and cassette tape can fall asleep listening to perform both functions. To use timer and sleep operation together Sleep and timer playback: For example, you can all be turned down 1 minute before the sleep operation finishes. If you can change the remaining sleep time while it is displayed for about 10 seconds. ton. CD-ES700 CD-ES77 Timer and sleep operation (continued...

CD-ES77 | CD-ES700 Operation Manual
Page 32
..., reset it back on. CD-ES700 CD-ES77 ! Troubleshooting chart Many potential problems can be resolved by mode and then turn it . (Refer to the " Did a power failure occur? Reset correct time. " Is the disc loaded upside down? properly. " Be sure your authorized SHARP dealer or service center. ! Advanced Features ! " Playback stops in the vibrations? " Is the volume level set to page 33.) " No sound is heard. Adjust the volume using the VOLUME control...
..., reset it back on. CD-ES700 CD-ES77 ! Troubleshooting chart Many potential problems can be resolved by mode and then turn it . (Refer to the " Did a power failure occur? Reset correct time. " Is the disc loaded upside down? properly. " Be sure your authorized SHARP dealer or service center. ! Advanced Features ! " Playback stops in the vibrations? " Is the volume level set to page 33.) " No sound is heard. Adjust the volume using the VOLUME control...

CD-ES77 | CD-ES700 Operation Manual
Page 33
... cause " Is the AC power cord of the unit plugged in? ton, press the PRESET button until "CLEAR AL" appears. " Cannot hear treble. " Sound fluctuation. " Is the tape stretched? " Are the capstans, pinch rollers, or heads dirty? " If a power failure occurs during playback, the heads remain engaged with the tape. Remote control Symptom " The remote control does not operate. " Does the remote control sensor receive strong light? CD-ES700 CD-ES77 ! References !
... cause " Is the AC power cord of the unit plugged in? ton, press the PRESET button until "CLEAR AL" appears. " Cannot hear treble. " Sound fluctuation. " Is the tape stretched? " Are the capstans, pinch rollers, or heads dirty? " If a power failure occurs during playback, the heads remain engaged with the tape. Remote control Symptom " The remote control does not operate. " Does the remote control sensor receive strong light? CD-ES700 CD-ES77 ! References !

CD-ES77 | CD-ES700 Operation Manual
Page 35
... Signal readout D/A converter Frequency response Dynamic range 5-disc multi-play compact disc player Non-contact, 3-beam semiconductor laser pickup 1-bit D/A converter 20 - 20,000 Hz 90 dB (1 kHz) ! Specifications As part of our policy of production units. General Power source Power consumption Dimensions Weight AC 120 V, 60 Hz 135 W Width: 10-1/4" (260 mm) Height: 13" (330 mm) Depth: 12-7/8" (326 mm) 18.5 lbs. (8.4 kg) ! Amplifier Output power Output...
... Signal readout D/A converter Frequency response Dynamic range 5-disc multi-play compact disc player Non-contact, 3-beam semiconductor laser pickup 1-bit D/A converter 20 - 20,000 Hz 90 dB (1 kHz) ! Specifications As part of our policy of production units. General Power source Power consumption Dimensions Weight AC 120 V, 60 Hz 135 W Width: 10-1/4" (260 mm) Height: 13" (330 mm) Depth: 12-7/8" (326 mm) 18.5 lbs. (8.4 kg) ! Amplifier Output power Output...


