
CD-DH899N Operation Manual
Page 1
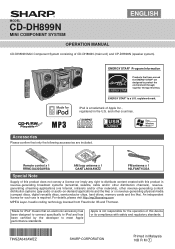
... OPERATION MANUAL CD-DH899N Mini Component System consisting of Apple Inc., registered in the U.S. and other revenue-generating content distribution systems (pay-audio or audio-on-demand applications and the like) or on revenue-generating physical media (compact discs, digital versatile discs, semiconductor chips, hard drives, memory cards and the like). registered mark. iPod is a trademark of CD-DH899N (main unit) and CP-DH899N (speaker system). CDUSB TAPE Remote control...
... OPERATION MANUAL CD-DH899N Mini Component System consisting of Apple Inc., registered in the U.S. and other revenue-generating content distribution systems (pay-audio or audio-on-demand applications and the like) or on revenue-generating physical media (compact discs, digital versatile discs, semiconductor chips, hard drives, memory cards and the like). registered mark. iPod is a trademark of CD-DH899N (main unit) and CP-DH899N (speaker system). CDUSB TAPE Remote control...
CD-DH899N Operation Manual
Page 2
... Sharp Authorized Servicer, call Sharp toll free at least (4") 10 cm of free space along the sides, top and back of the equipment. (4") 10 cm (4") 10 cm 4" (10 cm) MINI COMPONENT SYSTEM CD-DH899 POWER ON/STAND-BY FUNCTION VOL AUDIO IN PHONES PUSH OPEN (4") 10 cm ● Connect the black wire to the minus (-) terminal, and the red wire to the plus (+) terminal. ● Use speakers...
... Sharp Authorized Servicer, call Sharp toll free at least (4") 10 cm of free space along the sides, top and back of the equipment. (4") 10 cm (4") 10 cm 4" (10 cm) MINI COMPONENT SYSTEM CD-DH899 POWER ON/STAND-BY FUNCTION VOL AUDIO IN PHONES PUSH OPEN (4") 10 cm ● Connect the black wire to the minus (-) terminal, and the red wire to the plus (+) terminal. ● Use speakers...

CD-DH899N Operation Manual
Page 3
...: ● Replace all old batteries with operation. TV AM loop antenna Installing the AM loop antenna < Assembling > < Attaching to unplug the AC power cord before making any connections. Change the lighting or the direction of time. System connections (continued) Make sure to the wall > To video input jack Video cable (not supplied) wall screws (not supplied) FM antenna Right speaker Left speaker Red Black AC outlet (AC 120 V ~ 60 Hz) Remote control Battery installation Use 2 "AAA...
...: ● Replace all old batteries with operation. TV AM loop antenna Installing the AM loop antenna < Assembling > < Attaching to unplug the AC power cord before making any connections. Change the lighting or the direction of time. System connections (continued) Make sure to the wall > To video input jack Video cable (not supplied) wall screws (not supplied) FM antenna Right speaker Left speaker Red Black AC outlet (AC 120 V ~ 60 Hz) Remote control Battery installation Use 2 "AAA...

CD-DH899N Operation Manual
Page 4
... be displayed. Volume auto fade-in If you press any of these buttons during stand-by mode. Bass control 1 Press the BASS/TREBLE button to select "BASS". 2 Within 5 seconds, press the VOLUME (+ or -) button to increase or decrease the volume. FLAT NNooeqeuqauliazalitzioanti.on the remote control for 2 seconds or more. Equalizer When the EQUALIZER MODE button is pressed, the current mode setting will start (iPod, CD, TUNER, USB, TAPE, AUDIO IN). ● iPod button on the remote control : The unit turns on and iPod function...
... be displayed. Volume auto fade-in If you press any of these buttons during stand-by mode. Bass control 1 Press the BASS/TREBLE button to select "BASS". 2 Within 5 seconds, press the VOLUME (+ or -) button to increase or decrease the volume. FLAT NNooeqeuqauliazalitzioanti.on the remote control for 2 seconds or more. Equalizer When the EQUALIZER MODE button is pressed, the current mode setting will start (iPod, CD, TUNER, USB, TAPE, AUDIO IN). ● iPod button on the remote control : The unit turns on and iPod function...
CD-DH899N Operation Manual
Page 5
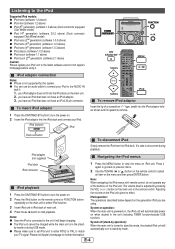
... back to previous menu. 2 Use the TUNING ( or ) button on the remote control to select an item on iPod unit. iPod adaptor (not supplied) Navigating the iPod menus iPod dock iPod connector 1 Press the MENU button to the latest software version from the iPod dock. iPod playback 1 Press the ON/STAND-BY button to turn to stand-by this system. ● You can use an audio cable to connect your iPod unit to...
... back to previous menu. 2 Use the TUNING ( or ) button on the remote control to select an item on iPod unit. iPod adaptor (not supplied) Navigating the iPod menus iPod dock iPod connector 1 Press the MENU button to the latest software version from the iPod dock. iPod playback 1 Press the ON/STAND-BY button to turn to stand-by this system. ● You can use an audio cable to connect your iPod unit to...
CD-DH899N Operation Manual
Page 6
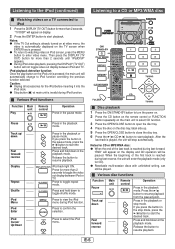
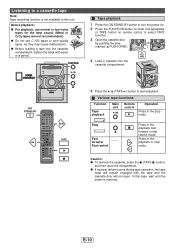
POWER ON/STAND-BY MINI COMPONENT SYSTEM CD-DH899 POWER ON/STAND-BY FUNCTION VOL CD USB TAPE Disc playback 1 Press the ON/STAND-BY button to turn the power on. 2 Press the CD button on the remote control or FUNCTION button repeatedly on the main unit to select CD function. 3 Press the OPEN/CLOSE button to open the disc tray. 4 Place the disc on display. 2 Press the ENTER button to start playback. Various disc functions Function Pause Track up...
POWER ON/STAND-BY MINI COMPONENT SYSTEM CD-DH899 POWER ON/STAND-BY FUNCTION VOL CD USB TAPE Disc playback 1 Press the ON/STAND-BY button to turn the power on. 2 Press the CD button on the remote control or FUNCTION button repeatedly on the main unit to select CD function. 3 Press the OPEN/CLOSE button to open the disc tray. 4 Place the disc on display. 2 Press the ENTER button to start playback. Various disc functions Function Pause Track up...
CD-DH899N Operation Manual
Page 7
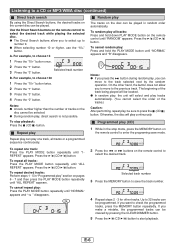
... will play one track: Press the PLAY MODE button repeatedly until "ALL REPEAT" appears. Up to 32 tracks can be selected. ● During random play , be programmed. If you to select up to number 9. ● When selecting number 10 or higher, use the "10+" button. Listening to a CD or MP3/WMA disc (continued) Direct track search By using the Direct Search buttons, the desired tracks on the remote control to select the...
... will play one track: Press the PLAY MODE button repeatedly until "ALL REPEAT" appears. Up to 32 tracks can be selected. ● During random play , be programmed. If you to select up to number 9. ● When selecting number 10 or higher, use the "10+" button. Listening to a CD or MP3/WMA disc (continued) Direct track search By using the Direct Search buttons, the desired tracks on the remote control to select the...
CD-DH899N Operation Manual
Page 8
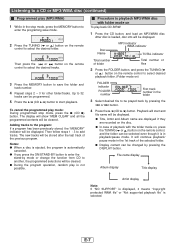
... Total number of folder Total number of the selected folder. ● Display content can be played back by pressing the DISPLAY button. It will start playback. Procedure to be changed by pressing the or button. 4 Press the / (CD / ) button. Playback will continue playback/ pause mode in the 1st track of files 2 Press the FOLDER button, and press the TUNING ( or ) button on the remote control to select desired...
... Total number of folder Total number of the selected folder. ● Display content can be played back by pressing the DISPLAY button. It will start playback. Procedure to be changed by pressing the or button. 4 Press the / (CD / ) button. Playback will continue playback/ pause mode in the 1st track of files 2 Press the FOLDER button, and press the TUNING ( or ) button on the remote control to select desired...
CD-DH899N Operation Manual
Page 9
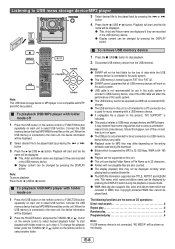
... in WMA files. Copyright protected WMA files cannot be played back. To playback USB/MP3 player with folder mode on the display. To change the playback folder, press the TUNING ( or ) button on main unit to select USB function. The following functions are the same as CD operations: Direct track search 6 Repeat play 6 Random play 6 Programmed play 6 Note: If USB memory device is connected to the main unit, the...
... in WMA files. Copyright protected WMA files cannot be played back. To playback USB/MP3 player with folder mode on the display. To change the playback folder, press the TUNING ( or ) button on main unit to select USB function. The following functions are the same as CD operations: Direct track search 6 Repeat play 6 Random play 6 Programmed play 6 Note: If USB memory device is connected to the main unit, the...
CD-DH899N Operation Manual
Page 10
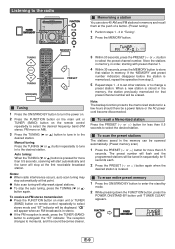
... with preset channel 1. 4 Within 30 seconds, press the MEMORY button to store that point. ● Auto scan tuning will be a power failure or the AC power cord become disconnected. Note: The backup function protects the memorized stations for more than 0.5 seconds. CD USB TAPE Tuning 1 Press the ON/STAND-BY button to turn the power on. 2 Press the FUNCTION button on the main unit or TUNER (BAND) button on remote control repeatedly to select stereo mode...
... with preset channel 1. 4 Within 30 seconds, press the MEMORY button to store that point. ● Auto scan tuning will be a power failure or the AC power cord become disconnected. Note: The backup function protects the memorized stations for more than 0.5 seconds. CD USB TAPE Tuning 1 Press the ON/STAND-BY button to turn the power on. 2 Press the FUNCTION button on the main unit or TUNER (BAND) button on remote control repeatedly to select stereo mode...
CD-DH899N Operation Manual
Page 11
... until the power is restored. POWER ON/STAND-BY MINI COMPONENT SYSTEM CD-DH899 POWER ON/STAND-BY FUNCTION VOL AUDIO IN PHONES PUSH OPEN CD USB TAPE TAPE Tape playback 1 Press the ON/STAND-BY button to turn the power on. 2 Press the FUNCTION button on main unit repeatedly or TAPE button on remote control to start playback. Before playback: ● For playback, use normal or low-noise tapes for the best sound. (Metal or...
... until the power is restored. POWER ON/STAND-BY MINI COMPONENT SYSTEM CD-DH899 POWER ON/STAND-BY FUNCTION VOL AUDIO IN PHONES PUSH OPEN CD USB TAPE TAPE Tape playback 1 Press the ON/STAND-BY button to turn the power on. 2 Press the FUNCTION button on main unit repeatedly or TAPE button on remote control to start playback. Before playback: ● For playback, use normal or low-noise tapes for the best sound. (Metal or...

CD-DH899N Operation Manual
Page 12
... playback source (CD, TUNER, USB, iPod, TAPE or AUDIO IN), press the or button. To readjust the clock: Perform "Setting the clock" from step 1 onwards. To change the 12-hour or 24-hour display: 1 Clear all the programmed contents. [Refer to "Factory reset, clearing all memory" on page 14 for timer playback. Do not turn the volume up call every morning. The "TIMER" indicator lights up...
... playback source (CD, TUNER, USB, iPod, TAPE or AUDIO IN), press the or button. To readjust the clock: Perform "Setting the clock" from step 1 onwards. To change the 12-hour or 24-hour display: 1 Clear all the programmed contents. [Refer to "Factory reset, clearing all memory" on page 14 for timer playback. Do not turn the volume up call every morning. The "TIMER" indicator lights up...
CD-DH899N Operation Manual
Page 13
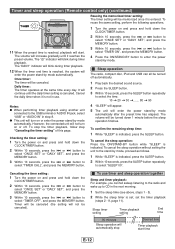
... can all be turned off . It will continue until it is canceled. Cancel the daily timer when it reaches the preset volume. Sleep operation The radio, compact disc, iPod and USB can fall asleep listening to the radio and wake up to the USB terminal or AUDIO IN jack, select "USB" or "AUDIO IN" in the next morning. 1 Set the sleep time (see above, steps...
... can all be turned off . It will continue until it is canceled. Cancel the daily timer when it reaches the preset volume. Sleep operation The radio, compact disc, iPod and USB can fall asleep listening to the radio and wake up to the USB terminal or AUDIO IN jack, select "USB" or "AUDIO IN" in the next morning. 1 Set the sleep time (see above, steps...
CD-DH899N Operation Manual
Page 14
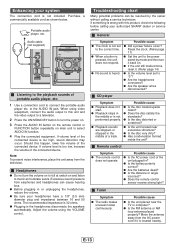
...; Is the FM antenna or AM loop antenna placed properly? Move the antenna away from the AC power cord if it . (Refer page 14) ● Is the volume level set to select AUDIO IN function. 4 Play the connected equipment. Adjust the volume using video equipment, connect the audio output to connect the portable audio player etc. Possible cause ● Did a power failure occur? Tuner Symptom ● The radio makes unusual noises continuously. E-13 Portable audio player, etc. down...
...; Is the FM antenna or AM loop antenna placed properly? Move the antenna away from the AC power cord if it . (Refer page 14) ● Is the volume level set to select AUDIO IN function. 4 Play the connected equipment. Adjust the volume using video equipment, connect the audio output to connect the portable audio player etc. Possible cause ● Did a power failure occur? Tuner Symptom ● The radio makes unusual noises continuously. E-13 Portable audio player, etc. down...
CD-DH899N Operation Manual
Page 15
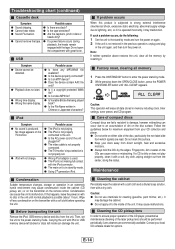
... power cord of the laser pickup lens) should be detected. ● Playback does not start. ● Wrong time display. ● Wrong file name display. Factory reset, clearing all memory 1 Press the ON/STAND-BY button to ensure proper operation of the CD player, preventative maintenance (cleaning of the unit plugged in? ● The video cable is not properly connected. ● The TV/monitor's input selection is not properly set...
... power cord of the laser pickup lens) should be detected. ● Playback does not start. ● Wrong time display. ● Wrong file name display. Factory reset, clearing all memory 1 Press the ON/STAND-BY button to ensure proper operation of the CD player, preventative maintenance (cleaning of the unit plugged in? ● The video cable is not properly connected. ● The TV/monitor's input selection is not properly set...
CD-DH899N Operation Manual
Page 16
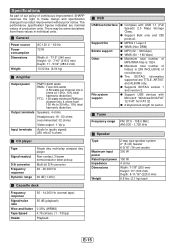
Output terminals Speakers: 4 ohms Headphones: 16 - 50 ohms (recommended: 32 ohms) Video output : 1 Vp-p Input terminals Audio In (audio signal): 250 mV/47 k ohms CD player Type Signal readout D/A converter Frequency response Dynamic range Single disc multi-play compact disc player Non-contact, 3-beam semiconductor laser pickup Multi bit D/A converter 20 - 20,000 Hz 90 dB (1 kHz) Cassette deck Frequency response Signal/noise ratio Wow and flutter Tape Speed Heads 50 - 14,000 Hz (normal tape) 50 dB (playback) 0.35...
Output terminals Speakers: 4 ohms Headphones: 16 - 50 ohms (recommended: 32 ohms) Video output : 1 Vp-p Input terminals Audio In (audio signal): 250 mV/47 k ohms CD player Type Signal readout D/A converter Frequency response Dynamic range Single disc multi-play compact disc player Non-contact, 3-beam semiconductor laser pickup Multi bit D/A converter 20 - 20,000 Hz 90 dB (1 kHz) Cassette deck Frequency response Signal/noise ratio Wow and flutter Tape Speed Heads 50 - 14,000 Hz (normal tape) 50 dB (playback) 0.35...


