
CDCH1500 Operation Manual
Page 2
... user to the presence of important operating and maintenance (servicing) instructions in accordance with the instructions, may cause harmful interference to radio or television reception, which can radiate radio frequency energy and, if not installed and used in case of loss or theft, please record below the model number and serial number which are designed to which the receiver is encouraged to try to operate...
... user to the presence of important operating and maintenance (servicing) instructions in accordance with the instructions, may cause harmful interference to radio or television reception, which can radiate radio frequency energy and, if not installed and used in case of loss or theft, please record below the model number and serial number which are designed to which the receiver is encouraged to try to operate...
CDCH1500 Operation Manual
Page 3
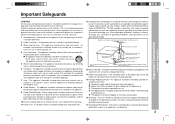
.... 9 Power-Cord Protection - Power-supply cords should be taken so that may block the ventilation openings; Use a damp cloth for a long period of the lead-in the operating instructions. Care should be situated so that produce heat. 8 Power Sources - Improper use and servicing. 1 Heed Warnings - The appliance should be used only with care. G R O U N D CLAMP ELECTRIC SERVICE EQUIPMENT NEC - NATIONAL ELECTRICAL CODE S2898A ANTENNA LEAD IN WIRE ANTENNA DISCHARGE...
.... 9 Power-Cord Protection - Power-supply cords should be taken so that may block the ventilation openings; Use a damp cloth for a long period of the lead-in the operating instructions. Care should be situated so that produce heat. 8 Power Sources - Improper use and servicing. 1 Heed Warnings - The appliance should be used only with care. G R O U N D CLAMP ELECTRIC SERVICE EQUIPMENT NEC - NATIONAL ELECTRICAL CODE S2898A ANTENNA LEAD IN WIRE ANTENNA DISCHARGE...
CDCH1500 Operation Manual
Page 4
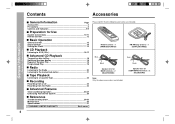
... antenna × 1 (QANTL0007AWZZ) Red Black Speaker wire for Use System Connections 10-11 Remote Control 12 s Basic Operation General Control 13 Sound Control 14 Setting the Clock 15 s CD Playback Listening to a CD (CDs 16-17 s Advanced CD Playback To specify a disc to Play 18 Switching the time display 18 Repeat or Random Play 18 Programmed Play 19 s Radio Listening to the Radio 20 Listening to the memorized station 21 s Tape Playback Listening to a Cassette Tape 22 s Recording Recording from a CD...
... antenna × 1 (QANTL0007AWZZ) Red Black Speaker wire for Use System Connections 10-11 Remote Control 12 s Basic Operation General Control 13 Sound Control 14 Setting the Clock 15 s CD Playback Listening to a CD (CDs 16-17 s Advanced CD Playback To specify a disc to Play 18 Switching the time display 18 Repeat or Random Play 18 Programmed Play 19 s Radio Listening to the Radio 20 Listening to the memorized station 21 s Tape Playback Listening to a Cassette Tape 22 s Recording Recording from a CD...
CDCH1500 Operation Manual
Page 5
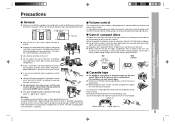
... dirty or does not play properly, clean it from direct sunlight, strong magnetic fields, excessive dust, humidity and electronic/ electrical equipment (home computers, facsimiles, etc.) which is specified is specified. q If your local SHARP service facility. Plug the AC power cord back in electric shock. s Volume control The sound level at high volumes. s Care of compact discs Compact discs are not recommended.) For recording, use of this product...
... dirty or does not play properly, clean it from direct sunlight, strong magnetic fields, excessive dust, humidity and electronic/ electrical equipment (home computers, facsimiles, etc.) which is specified is specified. q If your local SHARP service facility. Plug the AC power cord back in electric shock. s Volume control The sound level at high volumes. s Care of compact discs Compact discs are not recommended.) For recording, use of this product...
CDCH1500 Operation Manual
Page 6
... s Front panel Reference page 01. Volume Down Button 14 04. CD Direct Play Buttons (with Indicator 17, 20, 22, 28 27. Disc Trays 16 08. Control Panel Open/Close Button 13 10. CD Play Mode Select Button 18 11. Equalizer Mode Select Button 14 12. Extra Bass Button 14 13. Menu Button 15, 25, 27 9 15. Auxiliary Button 28 21. Clear Button 19, 21 23. Stop Button (with Indicator 17, 22, 23, 24 6 CD Play or Pause, Tape Forward Play Button (with...
... s Front panel Reference page 01. Volume Down Button 14 04. CD Direct Play Buttons (with Indicator 17, 20, 22, 28 27. Disc Trays 16 08. Control Panel Open/Close Button 13 10. CD Play Mode Select Button 18 11. Equalizer Mode Select Button 14 12. Extra Bass Button 14 13. Menu Button 15, 25, 27 9 15. Auxiliary Button 28 21. Clear Button 19, 21 23. Stop Button (with Indicator 17, 22, 23, 24 6 CD Play or Pause, Tape Forward Play Button (with...

CDCH1500 Operation Manual
Page 7
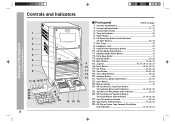
... Antenna Jack 10 02. Controls and Indicators - 1 2 3 4 5 6 7 10 11 12 89 13 1 2 15 16 17 18 19 14 3 4 5 s Multi-function LCD display 01. Auxiliary Input Jacks 28 03. General Information - Function Indicator 02. Memory Indicator 05. Speaker Terminals 10 04. Timer Recording Indicator 12. CD Play Indicator 18. Timer Play Indicator 08. CD Pause Indicator 17. All Disc Play Indicator 13. FM Stereo Indicator 19. Tape Reverse Mode Indicator s Rear panel...
... Antenna Jack 10 02. Controls and Indicators - 1 2 3 4 5 6 7 10 11 12 89 13 1 2 15 16 17 18 19 14 3 4 5 s Multi-function LCD display 01. Auxiliary Input Jacks 28 03. General Information - Function Indicator 02. Memory Indicator 05. Speaker Terminals 10 04. Timer Recording Indicator 12. CD Play Indicator 18. Timer Play Indicator 08. CD Pause Indicator 17. All Disc Play Indicator 13. FM Stereo Indicator 19. Tape Reverse Mode Indicator s Rear panel...

CDCH1500 Operation Manual
Page 8
... - Controls and Indicators - Controls and Indicators (continued) 1 13 2 14 3 15 ✱ 4 16 ✱ 5 17 6 18 ✱ 7 19 8 20 9 21 22 10 23 11 24 12 25 26 8 s Remote control Reference page 01. CD Button 04. CD Direct Play Buttons 06. Clear Button 08. Enter Button 10. Control Panel Open/Close Button 13. Tape Button 14. Power Button 15. Time Button 18 16. FM Stereo Mode Button 20 17. Dimmer Button 13 19. Tape Reverse Mode Select Button 24. Equalizer Mode Select Button 25...
... - Controls and Indicators - Controls and Indicators (continued) 1 13 2 14 3 15 ✱ 4 16 ✱ 5 17 6 18 ✱ 7 19 8 20 9 21 22 10 23 11 24 12 25 26 8 s Remote control Reference page 01. CD Button 04. CD Direct Play Buttons 06. Clear Button 08. Enter Button 10. Control Panel Open/Close Button 13. Tape Button 14. Power Button 15. Time Button 18 16. FM Stereo Mode Button 20 17. Dimmer Button 13 19. Tape Reverse Mode Select Button 24. Equalizer Mode Select Button 25...

CDCH1500 Operation Manual
Page 9
... frequency range). s Speaker system Speaker grilles are used. Subwoofer Terminals 5. By amplifying separately the two frequency bands, clearer sound is no distinction between the right and Left speaker the left speakers. Bass Reflex Duct Placing the speaker system: There is achieved. Main Speaker Terminals 6. Two independent amplifiers which is driven separately from the woofer and tweeter (mid-to -high range (200 Hz - 20 kHz) Woofer Tweeter Subwoofer Power amplifier Pre-amplifier L-ch Pre-amplifier Power amplifier Ultra-low range...
... frequency range). s Speaker system Speaker grilles are used. Subwoofer Terminals 5. By amplifying separately the two frequency bands, clearer sound is no distinction between the right and Left speaker the left speakers. Bass Reflex Duct Placing the speaker system: There is achieved. Main Speaker Terminals 6. Two independent amplifiers which is driven separately from the woofer and tweeter (mid-to -high range (200 Hz - 20 kHz) Woofer Tweeter Subwoofer Power amplifier Pre-amplifier L-ch Pre-amplifier Power amplifier Ultra-low range...

CDCH1500 Operation Manual
Page 15
... the ENTER button. 4. To change automatically to "PM". 6 Turn the jog dial to adjust the minutes and within 10 seconds, press the ENTER button. Clear all the programmed contents. [Refer to "Clearing all the memory (reset)" on the remote control. The time display will flash at the push of the DISPLAY button when the AC power supply is in the stand-by mode] Press the DISPLAY button on...
... the ENTER button. 4. To change automatically to "PM". 6 Turn the jog dial to adjust the minutes and within 10 seconds, press the ENTER button. Clear all the programmed contents. [Refer to "Clearing all the memory (reset)" on the remote control. The time display will flash at the push of the DISPLAY button when the AC power supply is in the stand-by mode] Press the DISPLAY button on...

CDCH1500 Operation Manual
Page 18
... played and stopped automatically. Switching the time display Each time the TIME button on the remote control is not a disc on all discs. DISC 6 buttons, repeat or random play that disc. To specify a disc to select the playback mode. "Repeat play", "Random play" and "Normal play : Press the PLAY MODE button repeatedly to Play You can select one of the DISC 1 - q If playback is started by pressing the 06 button, repeat or random play , the CD player will be displayed. Otherwise, the disc...
... played and stopped automatically. Switching the time display Each time the TIME button on the remote control is not a disc on all discs. DISC 6 buttons, repeat or random play that disc. To specify a disc to select the playback mode. "Repeat play", "Random play" and "Normal play : Press the PLAY MODE button repeatedly to Play You can select one of the DISC 1 - q If playback is started by pressing the 06 button, repeat or random play , the CD player will be displayed. Otherwise, the disc...

CDCH1500 Operation Manual
Page 20
...-by mode. Notes: q When radio interference occurs, auto scan tuning may stop the auto tuning, press the TUNING (X or W) button again. After use: Press the POWER button to monaural, and the sound becomes clearer. q "j" will skip weak signal stations. Radio - The "ST" indicator goes out. Listening to display the "ST" indicator. Listening to the Radio 20 s Sound Control (See page 14.) 1 Press the POWER button to turn the power on the remote control to the Radio -
...-by mode. Notes: q When radio interference occurs, auto scan tuning may stop the auto tuning, press the TUNING (X or W) button again. After use: Press the POWER button to monaural, and the sound becomes clearer. q "j" will skip weak signal stations. Radio - The "ST" indicator goes out. Listening to display the "ST" indicator. Listening to the Radio 20 s Sound Control (See page 14.) 1 Press the POWER button to turn the power on the remote control to the Radio -

CDCH1500 Operation Manual
Page 21
... displayed, press the ENTER button. The preset number will flash and the programmed stations will be tuned in order, starting with preset channel 1. Listening to select the desired station. If the "MEMORY" and preset number indicators go out before the station is stored in memory, the station previously memorized will be erased. When a new station is memorized, repeat the operation from step 2. 5 Repeat steps 1 - 4 to set other stations, or to change a preset station...
... displayed, press the ENTER button. The preset number will flash and the programmed stations will be tuned in order, starting with preset channel 1. Listening to select the desired station. If the "MEMORY" and preset number indicators go out before the station is stored in memory, the station previously memorized will be erased. When a new station is memorized, repeat the operation from step 2. 5 Repeat steps 1 - 4 to set other stations, or to change a preset station...
CDCH1500 Operation Manual
Page 23
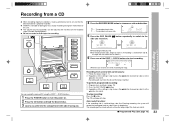
... recording is switched from side A to B during recording, the system will record the interrupted track on . Regardless of the setting in step 5, press the 06 button to side A.) 6 Press one of the track on the recorded signal (Variable Sound Monitor). Program discs and tracks (page 19). 2. The CD and tape will stop . DISC 6 buttons. 1 Press the POWER button to turn the power on. 2 Press the CD button and...
... recording is switched from side A to B during recording, the system will record the interrupted track on . Regardless of the setting in step 5, press the 06 button to side A.) 6 Press one of the track on the recorded signal (Variable Sound Monitor). Program discs and tracks (page 19). 2. The CD and tape will stop . DISC 6 buttons. 1 Press the POWER button to turn the power on. 2 Press the CD button and...
CDCH1500 Operation Manual
Page 25
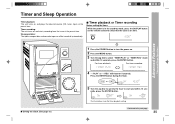
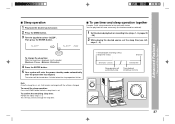
... time. Sleep operation: The radio, compact disc and cassette tape can all be turned off automatically. s Setting the Clock (See page 15.) 1 Press the POWER button to turn the power on. 2 Press the MENU button. 3 Turn the jog dial to start and within 10 seconds, press the ENTER button. The illustrations show the timer playback setting. Timer and Sleep Operation Timer playback: The unit turns on and plays the desired source (CD, tuner, tape...
... time. Sleep operation: The radio, compact disc and cassette tape can all be turned off automatically. s Setting the Clock (See page 15.) 1 Press the POWER button to turn the power on. 2 Press the MENU button. 3 Turn the jog dial to start and within 10 seconds, press the ENTER button. The illustrations show the timer playback setting. Timer and Sleep Operation Timer playback: The unit turns on and plays the desired source (CD, tuner, tape...
CDCH1500 Operation Manual
Page 26
... the ENTER button. 8 Turn the jog dial to stop and within 10 sec- Start time End time 9 Adjust the volume using another unit connected to the AUX IN jacks, select "AUX" in step 10. To select the timer recording source : TUNER (BAND). Notes: q Once the time is set, the setting will not be retained until it reaches the volume you press any button during timer operation, the timer mode is canceled and...
... the ENTER button. 8 Turn the jog dial to stop and within 10 sec- Start time End time 9 Adjust the volume using another unit connected to the AUX IN jacks, select "AUX" in step 10. To select the timer recording source : TUNER (BAND). Notes: q Once the time is set, the setting will not be retained until it reaches the volume you press any button during timer operation, the timer mode is canceled and...
CDCH1500 Operation Manual
Page 27
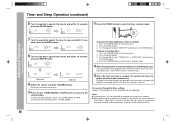
... set, it will automatically stop. The volume will enter the power stand-by mode automatically after the preset time has elapsed. Timer and Sleep Operation (Continued) s Sleep operation 1 Play back the desired sound source. 2 Press the MENU button. 3 Turn the jog dial to the same radio station You can also change the sleep time: While the sleep time is changed. This time you can play back the same source only (the function cannot be turned...
... set, it will automatically stop. The volume will enter the power stand-by mode automatically after the preset time has elapsed. Timer and Sleep Operation (Continued) s Sleep operation 1 Play back the desired sound source. 2 Press the MENU button. 3 Turn the jog dial to the same radio station You can also change the sleep time: While the sleep time is changed. This time you can play back the same source only (the function cannot be turned...

CDCH1500 Operation Manual
Page 28
..., DVD, etc. 5. The "OVER" indicator should not light at the maximum level. -2 0 +4 6. The recommended impedance is not included. Enhancing Your Stereo System - Use a connection cable to connect the unit to turn the power on. 3. Press the POWER button to the AUX IN jacks. using the VOLUME buttons. 28 Insert a cassette in or unplugging the headphones, reduce the volume. using video equipment, connect the audio output to a television. 2. Advanced Features - Enhancing Your Stereo System The connection cord is...
..., DVD, etc. 5. The "OVER" indicator should not light at the maximum level. -2 0 +4 6. The recommended impedance is not included. Enhancing Your Stereo System - Use a connection cable to connect the unit to turn the power on. 3. Press the POWER button to the AUX IN jacks. using the VOLUME buttons. 28 Insert a cassette in or unplugging the headphones, reduce the volume. using video equipment, connect the audio output to a television. 2. Advanced Features - Enhancing Your Stereo System The connection cord is...

CDCH1500 Operation Manual
Page 29
... malfunctions, reset it. (Refer to page 30.) q Is the volume level set to malfunction. s CD player Symptom q Playback does not start. Possible cause q Is the disc loaded upside-down? s Cassette deck Symptom q Cannot record. q Sound fluctuation. s Remote control Symptom q The remote control does not operate. q Is the battery polarity correct? q Does the remote control sensor receive strong light? If this happens, leave the power on the remote control. q No sound is possible...
... malfunctions, reset it. (Refer to page 30.) q Is the volume level set to malfunction. s CD player Symptom q Playback does not start. Possible cause q Is the disc loaded upside-down? s Cassette deck Symptom q Cannot record. q Sound fluctuation. s Remote control Symptom q The remote control does not operate. q Is the battery polarity correct? q Does the remote control sensor receive strong light? If this happens, leave the power on the remote control. q No sound is possible...
CDCH1500 Operation Manual
Page 30
... voltages. Press the POWER button to ensure proper operation of the CD player, preventative maintenance (cleaning of this product is not restored in the previous operation, unplug and plug in memory including clock, timer settings, tuner preset and CD program. Insert the transport safety screw into the back of playing/recording time by mode. Set the unit to enter the stand-by using a commercial tape head demagnetizer. A Erase...
... voltages. Press the POWER button to ensure proper operation of the CD player, preventative maintenance (cleaning of this product is not restored in the previous operation, unplug and plug in memory including clock, timer settings, tuner preset and CD program. Insert the transport safety screw into the back of playing/recording time by mode. Set the unit to enter the stand-by using a commercial tape head demagnetizer. A Erase...
CDCH1500 Operation Manual
Page 31
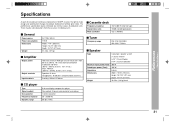
... Maximum input power (Total) Rated input power (Total) Impedance Dimensions Weight 3-way type speaker system 2" (5 cm) Tweeter 5-1/4" (13 cm) Woofer 5-1/4" (13 cm) Subwoofer 200 W 100 W 6 ohms Width: 7-5/16" (185 mm) Height: 16-7/16" (417 mm) Depth: 12-1/4" (311 mm) 10.6 lbs. (4.8 kg)/each 31 Specifications - References - Specifications As part of our policy of production units. s General Power source Power consumption Dimensions Weight s Amplifier Output power Output terminals Input terminals s CD player Type Signal...
... Maximum input power (Total) Rated input power (Total) Impedance Dimensions Weight 3-way type speaker system 2" (5 cm) Tweeter 5-1/4" (13 cm) Woofer 5-1/4" (13 cm) Subwoofer 200 W 100 W 6 ohms Width: 7-5/16" (185 mm) Height: 16-7/16" (417 mm) Depth: 12-1/4" (311 mm) 10.6 lbs. (4.8 kg)/each 31 Specifications - References - Specifications As part of our policy of production units. s General Power source Power consumption Dimensions Weight s Amplifier Output power Output terminals Input terminals s CD player Type Signal...


