
CDBA300 Operation Manual
Page 2
... used in accordance with arrowhead symbol, within the product's enclosure that any unauthorized changes or modifications to radio communications. q Connect the equipment into an outlet on the rear of Graphical Symbols: The lightning flash with the instructions, may be obtained from that interference will not occur in a residential installation. NO USER-SERVICEABLE PARTS INSIDE. q Increase the separation between the equipment and receiver. Model number...
... used in accordance with arrowhead symbol, within the product's enclosure that any unauthorized changes or modifications to radio communications. q Connect the equipment into an outlet on the rear of Graphical Symbols: The lightning flash with the instructions, may be obtained from that interference will not occur in a residential installation. NO USER-SERVICEABLE PARTS INSIDE. q Increase the separation between the equipment and receiver. Model number...

CDBA300 Operation Manual
Page 3
.... 9 Power-Cord Protection - The appliance should be sure the antenna system is recommended by the manufacturer. 6 Ventilation - or, placed in a built-in the operating instructions should be moved with a cart or stand that objects do not fall and liquids are not likely to . 2 Follow Instructions - The appliance should be adhered to be used only with care. The power cord of time...
.... 9 Power-Cord Protection - The appliance should be sure the antenna system is recommended by the manufacturer. 6 Ventilation - or, placed in a built-in the operating instructions should be moved with a cart or stand that objects do not fall and liquids are not likely to . 2 Follow Instructions - The appliance should be adhered to be used only with care. The power cord of time...
CDBA300 Operation Manual
Page 4
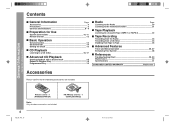
... 5 Controls and Indicators 6 - 9 s Preparation for Use System Connections 10, 11 Remote Control 12 s Basic Operation General Control 13 Sound Control 14 Setting the Clock 15 s CD Playback Listening to a CD (CDs 16, 17 s Advanced CD Playback Starting playback with a desired track 18 Repeat or Random Play 18 Programmed Play 19 s Radio Page Listening to the Radio 20 Listening to the memorized station 21 s Tape Playback Listening to a Cassette Tape (TAPE 1 or TAPE 2 22 s Tape Recording...
... 5 Controls and Indicators 6 - 9 s Preparation for Use System Connections 10, 11 Remote Control 12 s Basic Operation General Control 13 Sound Control 14 Setting the Clock 15 s CD Playback Listening to a CD (CDs 16, 17 s Advanced CD Playback Starting playback with a desired track 18 Repeat or Random Play 18 Programmed Play 19 s Radio Page Listening to the Radio 20 Listening to the memorized station 21 s Tape Playback Listening to a Cassette Tape (TAPE 1 or TAPE 2 22 s Tape Recording...
CDBA300 Operation Manual
Page 5
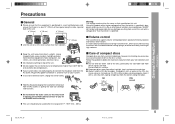
... occur due to high volume levels, which occur while turning the unit on with a soft, dry cloth, wiping straight out from the AC outlet. q If your CD collection and player. s Care of compact discs Compact discs are read. Follow the guidelines below for maximum enjoyment from your system does not work properly, disconnect the AC power cord from the center, along the sides...
... occur due to high volume levels, which occur while turning the unit on with a soft, dry cloth, wiping straight out from the AC outlet. q If your CD collection and player. s Care of compact discs Compact discs are read. Follow the guidelines below for maximum enjoyment from your system does not work properly, disconnect the AC power cord from the center, along the sides...
CDBA300 Operation Manual
Page 6
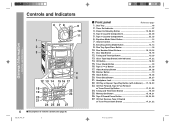
... Jack 28 22. Controls and Indicators - 4 5 12 13 14 15 16 17 18 19 22 23 20 21 24 25 26 27 6 s Description of remote control (See page 8) *BA300_P04_09 6 s Front panel Reference page 01. Equalizer Mode Select Button 14 07. Tuning and Time Up Button 15, 20 13. CD Fast Reverse, Tape 2 Rewind or Tuner Preset Down Button 17, 21, 22 00.11.16, 2:48 PM CD Play or...
... Jack 28 22. Controls and Indicators - 4 5 12 13 14 15 16 17 18 19 22 23 20 21 24 25 26 27 6 s Description of remote control (See page 8) *BA300_P04_09 6 s Front panel Reference page 01. Equalizer Mode Select Button 14 07. Tuning and Time Up Button 15, 20 13. CD Fast Reverse, Tape 2 Rewind or Tuner Preset Down Button 17, 21, 22 00.11.16, 2:48 PM CD Play or...

CDBA300 Operation Manual
Page 9
.... Placing the speaker system: Left speaker 5 The left and right speakers have individual frequency characteristics are removable: Make sure nothing comes into contact with the speaker diaphragms when you remove the speaker grilles. Two independent amplifiers which is achieved. Woofer 05. Speaker Wire for MAIN Terminals *BA300_P04_09 9 Speaker grilles are used. Mid-to-high range (200 Hz - 20 kHz) Tweeter Woofer Power amplifier Subwoofer Pre-amplifier L-ch Pre-amplifier Power amplifier Ultra-low range (60...
.... Placing the speaker system: Left speaker 5 The left and right speakers have individual frequency characteristics are removable: Make sure nothing comes into contact with the speaker diaphragms when you remove the speaker grilles. Two independent amplifiers which is achieved. Woofer 05. Speaker Wire for MAIN Terminals *BA300_P04_09 9 Speaker grilles are used. Mid-to-high range (200 Hz - 20 kHz) Tweeter Woofer Power amplifier Subwoofer Pre-amplifier L-ch Pre-amplifier Power amplifier Ultra-low range (60...

CDBA300 Operation Manual
Page 11
..., trouble may cause noise pickup. Note: Unplug the unit if it to the SUBWOOFER(+) terminal. Place the AM loop antenna on the unit or near the AC power cord may occur. q Do not let the bare speaker wires touch each other units. Incorrect s Connecting the AC power cord After checking all the connections have been made correctly, plug the AC power cord of time. s Demonstration mode...
..., trouble may cause noise pickup. Note: Unplug the unit if it to the SUBWOOFER(+) terminal. Place the AM loop antenna on the unit or near the AC power cord may occur. q Do not let the bare speaker wires touch each other units. Incorrect s Connecting the AC power cord After checking all the connections have been made correctly, plug the AC power cord of time. s Demonstration mode...

CDBA300 Operation Manual
Page 13
..., 2:49 PM 13 Basic Operation - General Control *BA300_P13_15 13 s Demonstration mode The first time the unit is on, the X-BASS/DEMO button can switch the display brightness by pressing the DIMMER button. You will disappear. To return to select the extra bass mode. General Control - To cancel the demonstration mode: When the unit is in the power stand-by mode, press the X-BASS/DEMO button again. s Display brightness (2 levels) You can be...
..., 2:49 PM 13 Basic Operation - General Control *BA300_P13_15 13 s Demonstration mode The first time the unit is on, the X-BASS/DEMO button can switch the display brightness by pressing the DIMMER button. You will disappear. To return to select the extra bass mode. General Control - To cancel the demonstration mode: When the unit is in the power stand-by mode, press the X-BASS/DEMO button again. s Display brightness (2 levels) You can be...

CDBA300 Operation Manual
Page 14
... cancel the extra bass mode, press the X-BASS/DEMO (X-BASS) button. Treble is reduced a lot. Treble is cut a little. Vocals (midrange tones) are emphasized. When it is turned clockwise, the volume will be displayed. Sound Control - 14 *BA300_P13_15 14 s Volume control Main unit operation: When the VOLUME control is turned counterclockwise, the volume will appear. Remote control operation: Press the VOLUME „ button to a different mode, press the EQUALIZER (EQUALIZER MODE) button repeatedly until the desired sound mode appears. Bass and treble are emphasized. 00...
... cancel the extra bass mode, press the X-BASS/DEMO (X-BASS) button. Treble is reduced a lot. Treble is cut a little. Vocals (midrange tones) are emphasized. When it is turned clockwise, the volume will be displayed. Sound Control - 14 *BA300_P13_15 14 s Volume control Main unit operation: When the VOLUME control is turned counterclockwise, the volume will appear. Remote control operation: Press the VOLUME „ button to a different mode, press the EQUALIZER (EQUALIZER MODE) button repeatedly until the desired sound mode appears. Bass and treble are emphasized. 00...

CDBA300 Operation Manual
Page 15
... 1 minute. Clear all the programmed contents. [Refer to adjust the hour and then press the MEMORY/SET button. q Press the TUNING/TIME (X or W) button once to "00". Hold it has been reset (see page 30). Basic Operation - "AM 12:00"→ The 12-hour display will disappear after unplugging the unit. q Press the TUNING/TIME (X or W) button once to change the 12-hour or...
... 1 minute. Clear all the programmed contents. [Refer to adjust the hour and then press the MEMORY/SET button. q Press the TUNING/TIME (X or W) button once to "00". Hold it has been reset (see page 30). Basic Operation - "AM 12:00"→ The 12-hour display will disappear after unplugging the unit. q Press the TUNING/TIME (X or W) button once to change the 12-hour or...
CDBA300 Operation Manual
Page 20
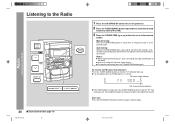
... to tune in stereo. q Auto scan tuning will stop at that point. After use: Press the ON/STAND-BY button to the desired station. Listening to the Radio - 20 s Sound Control (See page 14) *BA300_P20_21 20 1 Press the ON/STAND-BY button to turn the power on. 2 Press the TUNER (BAND) button repeatedly to select the desired frequency band (FM or AM). 3 Press the TUNING/TIME (X or W) button to tune in...
... to tune in stereo. q Auto scan tuning will stop at that point. After use: Press the ON/STAND-BY button to the desired station. Listening to the Radio - 20 s Sound Control (See page 14) *BA300_P20_21 20 1 Press the ON/STAND-BY button to turn the power on. 2 Press the TUNER (BAND) button repeatedly to select the desired frequency band (FM or AM). 3 Press the TUNING/TIME (X or W) button to tune in...

CDBA300 Operation Manual
Page 21
... there be tuned in sequentially, for more than 0.5 seconds to select the desired station. Listening to the memorized station - 3 Within 30 seconds, press the 5 3 PRESET X or W PRESET 2 4 button to enter the stand-by mode. 2. q The preset number will flash and the programmed stations will be operated by pressing the PRESET (X or W) button on the remote control. Press the ON/STAND-BY button to select the preset channel number. s To scan the preset stations The stations saved...
... there be tuned in sequentially, for more than 0.5 seconds to select the desired station. Listening to the memorized station - 3 Within 30 seconds, press the 5 3 PRESET X or W PRESET 2 4 button to enter the stand-by mode. 2. q The preset number will flash and the programmed stations will be operated by pressing the PRESET (X or W) button on the remote control. Press the ON/STAND-BY button to select the preset channel number. s To scan the preset stations The stations saved...
CDBA300 Operation Manual
Page 24
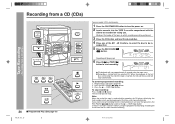
..., the CD player will start recording. q Recording is started from a CD (CDs) - 24 s Programmed Play (See page 19) *BA300_P23_25 24 You can record 3 CDs continuously. 1 Press the ON/STAND-BY button to be recorded on which was being played at that time, and stop recording: Press the s (CD s) button. Recording from the selected CD. Program discs and tracks (page 19). 2. q CD playback will display the track number which recording...
..., the CD player will start recording. q Recording is started from a CD (CDs) - 24 s Programmed Play (See page 19) *BA300_P23_25 24 You can record 3 CDs continuously. 1 Press the ON/STAND-BY button to be recorded on which was being played at that time, and stop recording: Press the s (CD s) button. Recording from the selected CD. Program discs and tracks (page 19). 2. q CD playback will display the track number which recording...
CDBA300 Operation Manual
Page 26
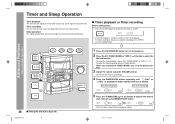
Advanced Features - Sleep operation: The radio, compact disc and cassette tape can all be played. Press the CLOCK button to the desired station. 3 Adjust the volume using the VOLUME control. When you selected the TUNER (BAND), tune in to check that the clock is on . 2 Press the CD, TUNER (BAND) or TAPE (1 V 2) button to turn the volume up too high. 4 Press the TIMER/SLEEP button repeatedly until "f PLAY" or "f REC" is displayed in the TAPE 2 cassette compartment...
Advanced Features - Sleep operation: The radio, compact disc and cassette tape can all be played. Press the CLOCK button to the desired station. 3 Adjust the volume using the VOLUME control. When you selected the TUNER (BAND), tune in to check that the clock is on . 2 Press the CD, TUNER (BAND) or TAPE (1 V 2) button to turn the volume up too high. 4 Press the TIMER/SLEEP button repeatedly until "f PLAY" or "f REC" is displayed in the TAPE 2 cassette compartment...

CDBA300 Operation Manual
Page 27
... a new time is changed. If you select TUNER or VIDEO/AUX, it reaches the volume you were listening at before the sleep operation finishes. q When performing timer playback or recording using another unit connected to specify the minute, then press the MEMORY/SET button. Timer and Sleep Operation (continued) Advanced Features - s Sleep operation 1 Play back the desired sound source. 2 Press the TIMER/SLEEP button repeatedly until the setting is...
... a new time is changed. If you select TUNER or VIDEO/AUX, it reaches the volume you were listening at before the sleep operation finishes. q When performing timer playback or recording using another unit connected to specify the minute, then press the MEMORY/SET button. Timer and Sleep Operation (continued) Advanced Features - s Sleep operation 1 Play back the desired sound source. 2 Press the TIMER/SLEEP button repeatedly until the setting is...
CDBA300 Operation Manual
Page 28
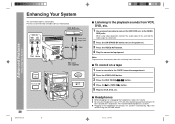
.../STAND-BY button to the VIDEO/ AUX jacks. Adjust the volume using video equipment, connect the audio output to this unit away from VCR, DVD, etc. 1 Use a connection cable to connect the VCR, DVD, etc. s To record on . 3 Press the VIDEO/AUX button. 4 Play the connected equipment. The recommended impedance is not included. Red White White To the line output jack Red RCA cord (not supplied) Advanced Features - Purchase a commercially available cable as shown below. to turn the power on a tape 1 Insert...
.../STAND-BY button to the VIDEO/ AUX jacks. Adjust the volume using video equipment, connect the audio output to this unit away from VCR, DVD, etc. 1 Use a connection cable to connect the VCR, DVD, etc. s To record on . 3 Press the VIDEO/AUX button. 4 Play the connected equipment. The recommended impedance is not included. Red White White To the line output jack Red RCA cord (not supplied) Advanced Features - Purchase a commercially available cable as shown below. to turn the power on a tape 1 Insert...
CDBA300 Operation Manual
Page 29
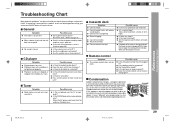
... the power on time. Possible cause q Is the disc loaded upside-down? q Is the disc distorted or scratched? q Does the remote control sensor receive strong light? s CD player Symptom q Playback does not start. q Is the disc very dirty? q Is the tape stretched? If this unit to malfunction. Troubleshooting Chart Many potential "problems" can cause the unit to the power stand-by the owner without calling a service technician...
... the power on time. Possible cause q Is the disc loaded upside-down? q Is the disc distorted or scratched? q Does the remote control sensor receive strong light? s CD player Symptom q Playback does not start. q Is the disc very dirty? q Is the tape stretched? If this unit to malfunction. Troubleshooting Chart Many potential "problems" can cause the unit to the power stand-by the owner without calling a service technician...
CDBA300 Operation Manual
Page 30
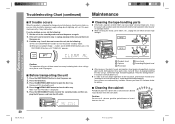
...-BY button to turn the power on . 3. Remove all data stored in the unit, and then turn the power on again. 2. Press the ON/STAND-BY button to ensure proper operation of the CD player, preventative maintenance (cleaning of playing/recording time by mode. ™ While pressing down the 0 / R button and X-BASS/DEMO button, press the ON/STAND-BY button until "CLEAR AL" appears. plug the AC power cord from...
...-BY button to turn the power on . 3. Remove all data stored in the unit, and then turn the power on again. 2. Press the ON/STAND-BY button to ensure proper operation of the CD player, preventative maintenance (cleaning of playing/recording time by mode. ™ While pressing down the 0 / R button and X-BASS/DEMO button, press the ON/STAND-BY button until "CLEAR AL" appears. plug the AC power cord from...

CDBA300 Operation Manual
Page 31
... (200 Hz - 20 kHz, 6 ohms, 10 % T.H.D.) Speakers: 6 ohms Headphones: 16-50 ohms (recommended; 32 ohms) Video/Auxiliary (audio signal): 500 mV/47 kohms s CD player Type Signal readout D/A converter Frequency response Dynamic range 3-disc multi-play compact disc player Non-contact, 3-beam semiconductor laser pickup 1-bit D/A converter 20 - 20,000 Hz 90 dB (1 kHz) s Tuner Frequency range FM: 87.5-108 MHz AM: 530-1,720 kHz s Cassette deck Frequency response Signal/noise ratio Wow and flutter...
... (200 Hz - 20 kHz, 6 ohms, 10 % T.H.D.) Speakers: 6 ohms Headphones: 16-50 ohms (recommended; 32 ohms) Video/Auxiliary (audio signal): 500 mV/47 kohms s CD player Type Signal readout D/A converter Frequency response Dynamic range 3-disc multi-play compact disc player Non-contact, 3-beam semiconductor laser pickup 1-bit D/A converter 20 - 20,000 Hz 90 dB (1 kHz) s Tuner Frequency range FM: 87.5-108 MHz AM: 530-1,720 kHz s Cassette deck Frequency response Signal/noise ratio Wow and flutter...

CDBA300 Operation Manual
Page 32
... authorized servicer. Be sure to have this Sharp brand product (the "Product"), when shipped in its option, either repair the defect or replace the defective Product or part thereof ... FOR USE ARE LIMITED TO THE PERIOD(S) FROM THE DATE OF PURCHASE SET FORTH BELOW. Model Specific Section Your Product Model Number & Description: CD-BA300 Mini Component System (Be sure to have Proof of Sharp. What... Sharp and shall be free from the date of any warranties beyond the time period described herein on contract, negligence, strict liability or otherwise. CONSUMER LIMITED WARRANTY SHARP ...
... authorized servicer. Be sure to have this Sharp brand product (the "Product"), when shipped in its option, either repair the defect or replace the defective Product or part thereof ... FOR USE ARE LIMITED TO THE PERIOD(S) FROM THE DATE OF PURCHASE SET FORTH BELOW. Model Specific Section Your Product Model Number & Description: CD-BA300 Mini Component System (Be sure to have Proof of Sharp. What... Sharp and shall be free from the date of any warranties beyond the time period described herein on contract, negligence, strict liability or otherwise. CONSUMER LIMITED WARRANTY SHARP ...


