User Guide
Page 6
...'t have to use this guide: s Commands you choose from the File menu. User Guide i This guide will help you set up your SLP 100, 200 or 240 install the software, and use your SLP. About This Guide As you'll soon realize, the Smart Label Printer® is easy to set up and use.
...'t have to use this guide: s Commands you choose from the File menu. User Guide i This guide will help you set up your SLP 100, 200 or 240 install the software, and use your SLP. About This Guide As you'll soon realize, the Smart Label Printer® is easy to set up and use.

User Guide
Page 7
... a label roll and taking care of questions and answers that can help . ii Smart Label Printer Models 100, 200 and 240 This guide has three chapters and three appendices: s Chapter 1, Introduction, provides some general information about the SLP 100/200/240 and the Smart Label program. s Chapter 2, Getting Started, provides instructions for ordering SmartLabels...
... a label roll and taking care of questions and answers that can help . ii Smart Label Printer Models 100, 200 and 240 This guide has three chapters and three appendices: s Chapter 1, Introduction, provides some general information about the SLP 100/200/240 and the Smart Label program. s Chapter 2, Getting Started, provides instructions for ordering SmartLabels...
User Guide
Page 8
... 2 Getting Started What You Need 2-2 A Word About Labels 2-3 Caring for Labels 2-3 Installing the SLP 100, 200 or 240 2-4 Unpacking the SLP 2-4 Connecting the SLP to a Power Outlet 2-5 Connecting the SLP to an IBM-compatible PC 2-6 Loading a Roll of Labels 2-7 Testing the Printer 2-9 Installing the Smart Label Software 2-10 Using On-Line Help 2-11 Chapter 3 Changing Labels...
... 2 Getting Started What You Need 2-2 A Word About Labels 2-3 Caring for Labels 2-3 Installing the SLP 100, 200 or 240 2-4 Unpacking the SLP 2-4 Connecting the SLP to a Power Outlet 2-5 Connecting the SLP to an IBM-compatible PC 2-6 Loading a Roll of Labels 2-7 Testing the Printer 2-9 Installing the Smart Label Software 2-10 Using On-Line Help 2-11 Chapter 3 Changing Labels...
User Guide
Page 11
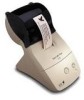
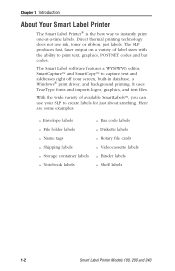
The SLP produces fast, laser output on a variety of available SmartLabels™, you can use ink, toner or ribbon,..., SmartCapture™ and SmartCopy™ to capture text and addresses right off your SLP to create labels for just about anything. Chapter 1 Introduction About Your Smart Label Printer The Smart Label Printer® is the best way to print text, graphics, POSTNET codes and bar codes... labels n Notebook labels n Bar code labels n Diskette labels n Rotary file cards n Videocassette labels n Binder labels n Shelf labels 1-2 Smart Label Printer Models 100, 200 and 240
The SLP produces fast, laser output on a variety of available SmartLabels™, you can use ink, toner or ribbon,..., SmartCapture™ and SmartCopy™ to capture text and addresses right off your SLP to create labels for just about anything. Chapter 1 Introduction About Your Smart Label Printer The Smart Label Printer® is the best way to print text, graphics, POSTNET codes and bar codes... labels n Notebook labels n Bar code labels n Diskette labels n Rotary file cards n Videocassette labels n Binder labels n Shelf labels 1-2 Smart Label Printer Models 100, 200 and 240

User Guide
Page 14
Windows 98 or Windows 2000 is required to connect the Smart Label Printer to have the following: n An IBM PC or 100% compatible computer n An 80386 or higher processor n 4 MB of available Random Access Memory (RAM) n An available USB or RS-232C serial (COM) port n 5 MB available hard disk space n VGA or higher resolution graphics card n A mouse or other pointing device n Microsoft Windows 95, 98, Windows NT 4.0 or Windows 2000 Note... Chapter 2 Getting Started What You Need In order to use your SLP and software, you need to a USB port. 2-2 Smart Label Printer Models 100, 200 and 240
Windows 98 or Windows 2000 is required to connect the Smart Label Printer to have the following: n An IBM PC or 100% compatible computer n An 80386 or higher processor n 4 MB of available Random Access Memory (RAM) n An available USB or RS-232C serial (COM) port n 5 MB available hard disk space n VGA or higher resolution graphics card n A mouse or other pointing device n Microsoft Windows 95, 98, Windows NT 4.0 or Windows 2000 Note... Chapter 2 Getting Started What You Need In order to use your SLP and software, you need to a USB port. 2-2 Smart Label Printer Models 100, 200 and 240
User Guide
Page 15
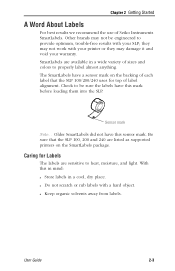
SmartLabels are available in a cool, dry place. Caring for top of Seiko Instruments SmartLabels. User Guide 2-3 they may not work with your printer or they may not be sure the labels have this sensor mark. Check to be engineered to provide optimum, trouble-free results with a hard... Other brands may damage it and void your SLP; With this mark before loading them into the SLP. The SmartLabels have a sensor mark on the SmartLabels package. Be sure that the SLP 100/200/240 uses for Labels The labels are listed as supported printers on the backing of sizes and colors to ...
SmartLabels are available in a cool, dry place. Caring for top of Seiko Instruments SmartLabels. User Guide 2-3 they may not work with your printer or they may not be sure the labels have this sensor mark. Check to be engineered to provide optimum, trouble-free results with a hard... Other brands may damage it and void your SLP; With this mark before loading them into the SLP. The SmartLabels have a sensor mark on the SmartLabels package. Be sure that the SLP 100/200/240 uses for Labels The labels are listed as supported printers on the backing of sizes and colors to ...
User Guide
Page 16
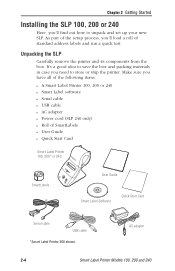
...SmartLabels User Guide Smart Label Software Quick Start Card Serial cable USB cable *Smart Label Printer 200 shown. Make sure you need to unpack and set up your new SLP. Chapter 2 Getting Started Installing the SLP 100, 200 or 240 Here, you 'll load a roll of standard address labels ...and run a quick test. Unpacking the SLP Carefully remove the printer and its components from the box. AC adapter 2-4 Smart Label Printer Models 100, 200 and 240 ...
...SmartLabels User Guide Smart Label Software Quick Start Card Serial cable USB cable *Smart Label Printer 200 shown. Make sure you need to unpack and set up your new SLP. Chapter 2 Getting Started Installing the SLP 100, 200 or 240 Here, you 'll load a roll of standard address labels ...and run a quick test. Unpacking the SLP Carefully remove the printer and its components from the box. AC adapter 2-4 Smart Label Printer Models 100, 200 and 240 ...
User Guide
Page 18
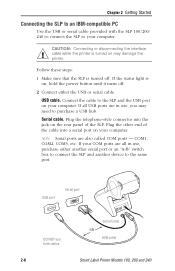
... port on your COM ports are all USB ports are also called COM ports - USB port Serial port DO NOT use , you may damage the printer. Serial ports are in use, purchase either the USB or serial cable. CAUTION: Connecting or disconnecting the interface cable while the... a USB hub. Chapter 2 Getting Started Connecting the SLP to an IBM-compatible PC Use the USB or serial cable provided with the SLP 100/200/ 240 to connect the SLP to your computer. If all in use both cables 2-6 Serial Cable OR USB cable Smart Label Printer Models 100, 200 and 240 Plug the other end...
... port on your COM ports are all USB ports are also called COM ports - USB port Serial port DO NOT use , you may damage the printer. Serial ports are in use, purchase either the USB or serial cable. CAUTION: Connecting or disconnecting the interface cable while the... a USB hub. Chapter 2 Getting Started Connecting the SLP to an IBM-compatible PC Use the USB or serial cable provided with the SLP 100/200/ 240 to connect the SLP to your computer. If all in use both cables 2-6 Serial Cable OR USB cable Smart Label Printer Models 100, 200 and 240 Plug the other end...
User Guide
Page 20
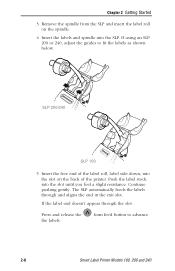
Chapter 2 Getting Started 3 Remove the spindle from the SLP and insert the label roll on the back of the printer. The SLP automatically feeds the labels through the slot: Press and release the the labels. Continue pushing gently. SLP 200/240 SLP 100 5 Insert the free end of the label roll, label side down, into the slot... end doesn't appear through and aligns the end in the exit slot. form feed button to fit the labels as shown below. If using an SLP 200 or 240, adjust the guides to advance 2-8 Smart Label Printer Models 100, 200 and 240 Push the label stock into the...
Chapter 2 Getting Started 3 Remove the spindle from the SLP and insert the label roll on the back of the printer. The SLP automatically feeds the labels through the slot: Press and release the the labels. Continue pushing gently. SLP 200/240 SLP 100 5 Insert the free end of the label roll, label side down, into the slot... end doesn't appear through and aligns the end in the exit slot. form feed button to fit the labels as shown below. If using an SLP 200 or 240, adjust the guides to advance 2-8 Smart Label Printer Models 100, 200 and 240 Push the label stock into the...
User Guide
Page 21
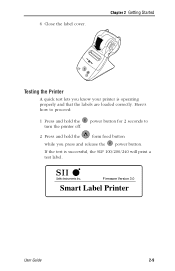
If the test is operating properly and that the labels are loaded correctly. Firmware Version 3.0 Smart Label Printer User Guide 2-9 Here's how to proceed: 1 Press and hold the power button for 2 seconds to turn the printer off. 2 Press and hold the form feed button while you know your printer is successful, the SLP 100/200/240 will print a test label. Chapter 2 Getting Started Testing the Printer A quick test lets you press and release the power button. 6 Close the label cover.
If the test is operating properly and that the labels are loaded correctly. Firmware Version 3.0 Smart Label Printer User Guide 2-9 Here's how to proceed: 1 Press and hold the power button for 2 seconds to turn the printer off. 2 Press and hold the form feed button while you know your printer is successful, the SLP 100/200/240 will print a test label. Chapter 2 Getting Started Testing the Printer A quick test lets you press and release the power button. 6 Close the label cover.
User Guide
Page 22
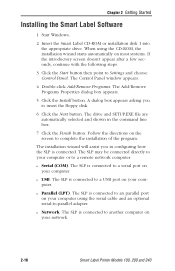
... you in the command line box. 7 Click the Finish button. The installation wizard will assist you to a USB port on your computer. The SLP is connected to insert the floppy disk. 6 Click the Next button. n USB. Follow the directions on the screen to a serial port on ... and shown in configuring how the SLP is connected to a remote network computer. n Parallel (LPT). When using the serial cable and an optional serial-to Settings and choose Control Panel. The SLP may be connected directly to your network. 2-10 Smart Label Printer Models 100, 200 and 240 The...
... you in the command line box. 7 Click the Finish button. The installation wizard will assist you to a USB port on your computer. The SLP is connected to insert the floppy disk. 6 Click the Next button. n USB. Follow the directions on the screen to a serial port on ... and shown in configuring how the SLP is connected to a remote network computer. n Parallel (LPT). When using the serial cable and an optional serial-to Settings and choose Control Panel. The SLP may be connected directly to your network. 2-10 Smart Label Printer Models 100, 200 and 240 The...
User Guide
Page 26
...that 's designed for use of Seiko Instruments SmartLabels. Other brands may damage it and void your SLP; The SLP 100/200/240 is a high-precision device that they may not be engineered to provide optimum, trouble-free results with your printer or they don't curl under the.... Chapter 3 Changing Labels and Printer Care Overview The SLP 100/200/240 uses advanced thermal print technology to replace. they may damage the printer. s Keep the printer out of improper labels may not work with your warranty. Caring for Your Printer Your SLP 100/200/240 is designed for trouble...
...that 's designed for use of Seiko Instruments SmartLabels. Other brands may damage it and void your SLP; The SLP 100/200/240 is a high-precision device that they may not be engineered to provide optimum, trouble-free results with your printer or they don't curl under the.... Chapter 3 Changing Labels and Printer Care Overview The SLP 100/200/240 uses advanced thermal print technology to replace. they may damage the printer. s Keep the printer out of improper labels may not work with your warranty. Caring for Your Printer Your SLP 100/200/240 is designed for trouble...

User Guide
Page 28
...slot. 6 Insert the tabs on the lower edge of the cover. 2 Release the pressure on the SLP and push the top edge forward until the cover snaps into place. 3-4 Smart Label Printer Models 100, 200 and 240 Follow these steps: 1 Swivel the label cover open and remove the print engine cover... by moving the platen release lever forward. Chapter 3 Changing Labels and Printer Care Adjusting the Position of Labels If you find the...
...slot. 6 Insert the tabs on the lower edge of the cover. 2 Release the pressure on the SLP and push the top edge forward until the cover snaps into place. 3-4 Smart Label Printer Models 100, 200 and 240 Follow these steps: 1 Swivel the label cover open and remove the print engine cover... by moving the platen release lever forward. Chapter 3 Changing Labels and Printer Care Adjusting the Position of Labels If you find the...

User Guide
Page 31
.../mm) Max. Developer information can be converted to a bitmap image by a host computer or device for label printing applications. Appendix A Specifications Smart Label Printer 100/200/240 Specifications The SLP is a compact printing device ideally suited for printing on our website at www.seikosmart.com. There are no built-in . (58mm) Max. Printable...
.../mm) Max. Developer information can be converted to a bitmap image by a host computer or device for label printing applications. Appendix A Specifications Smart Label Printer 100/200/240 Specifications The SLP is a compact printing device ideally suited for printing on our website at www.seikosmart.com. There are no built-in . (58mm) Max. Printable...

User Guide
Page 36
Appendix C Technical Support and Service Please refer to the "Troubleshooting" topic in on-line Help for information on how to determine if your SLP needs service and how to contact Seiko Instruments for Technical Support and repairs. C-2 Smart Label Printer Models 100, 200 and 240
Appendix C Technical Support and Service Please refer to the "Troubleshooting" topic in on-line Help for information on how to determine if your SLP needs service and how to contact Seiko Instruments for Technical Support and repairs. C-2 Smart Label Printer Models 100, 200 and 240
User Guide
Page 38
... on ordering replacement parts and accessories, please refer to your warranty. D-2 Smart Label Printer Models 100, 200 and 240 Ordering Parts For information on -line Help. they may damage it and void your SLP model in the "Troubleshooting" topic in on the Help menu or refer to provide... optimum, trouble-free results with your SLP; Appendix D Ordering Labels and Parts Ordering Labels For best results we recommend the use of Seiko Instruments SmartLabels.
... on ordering replacement parts and accessories, please refer to your warranty. D-2 Smart Label Printer Models 100, 200 and 240 Ordering Parts For information on -line Help. they may damage it and void your SLP model in the "Troubleshooting" topic in on the Help menu or refer to provide... optimum, trouble-free results with your SLP; Appendix D Ordering Labels and Parts Ordering Labels For best results we recommend the use of Seiko Instruments SmartLabels.
User Guide
Page 39
... connecting, 2-6 Common questions, B-2 D Developer information, A-2 F Features, 1-3 Find feature, 1-3 H Help, 2-11 I Installation SLP 100/200/240, 2-4 Smart Label software, 2-10 L Labels caring for, 2-3 ordering, D-2 recommended, 2-3, 3-2 Loading labels, 2-7, ...labels, 3-3 stop printing, 3-3 S Serial cable, 2-4, 2-6 SLP adjusting labels, 3-4 caring for, 3-2 form feed button, 2-5 installation, 2-4 off-line mode, 3-3 on-line mode, 3-3 power button, 2-5, 3-3 removing stuck labels, 3-5 status light, 2-5, 2-7, 3-3 testing printer, 2-9 thermal print engine, 3-2 Smart Label software installing, 2-10...
... connecting, 2-6 Common questions, B-2 D Developer information, A-2 F Features, 1-3 Find feature, 1-3 H Help, 2-11 I Installation SLP 100/200/240, 2-4 Smart Label software, 2-10 L Labels caring for, 2-3 ordering, D-2 recommended, 2-3, 3-2 Loading labels, 2-7, ...labels, 3-3 stop printing, 3-3 S Serial cable, 2-4, 2-6 SLP adjusting labels, 3-4 caring for, 3-2 form feed button, 2-5 installation, 2-4 off-line mode, 3-3 on-line mode, 3-3 power button, 2-5, 3-3 removing stuck labels, 3-5 status light, 2-5, 2-7, 3-3 testing printer, 2-9 thermal print engine, 3-2 Smart Label software installing, 2-10...


