User Guide
Page 1
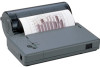
Keep this user's guide carefully before using the printer. Seiko Instruments Inc. USER'S GUIDE Thermal Printer DPU-3445-20 Read this user's guide in a place where it can be accessed quickly.
Keep this user's guide carefully before using the printer. Seiko Instruments Inc. USER'S GUIDE Thermal Printer DPU-3445-20 Read this user's guide in a place where it can be accessed quickly.
User Guide
Page 2
...by SII personnel, licensees, and customers. BHT Ir is a trademark of SII. Applicable EC Directives and Standards Product: Thermal Printer DPU-3445-10A,DPU-3445-20A, AC Adapter PW-3009-W2 Directives Title 89/336/EEC EC Electromagnetic Compatibility Directive Standards EMI: EN50081-1/1997 EN55022/1994+... contained herein and shall not be reproduced in whole or in part without the prior written approval of Seiko Instruments Inc. DPU-3445-20 THERMAL PRINTER USER'S GUIDE Document Number U00018388105 First Edition May 1999 Second Edition January 2000 Third Edition April 2000 Fourth...
...by SII personnel, licensees, and customers. BHT Ir is a trademark of SII. Applicable EC Directives and Standards Product: Thermal Printer DPU-3445-10A,DPU-3445-20A, AC Adapter PW-3009-W2 Directives Title 89/336/EEC EC Electromagnetic Compatibility Directive Standards EMI: EN50081-1/1997 EN55022/1994+... contained herein and shall not be reproduced in whole or in part without the prior written approval of Seiko Instruments Inc. DPU-3445-20 THERMAL PRINTER USER'S GUIDE Document Number U00018388105 First Edition May 1999 Second Edition January 2000 Third Edition April 2000 Fourth...
User Guide
Page 4
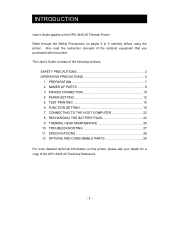
Also read the instruction manuals of the following sections. The User's Guide consists of the optional equipment that you purchased with the printer. SAFETY PRECAUTIONS 2 OPERATING PRECAUTIONS 5 1 PREPARATION 7 2 NAMES OF PARTS 8 3 POWER CONNECTION 10 4 PAPER SETTING 12 5 TEST PRINTING... AND CONSUMABLE PARTS 29 For more detailed technical information on pages 2 to the DPU-3445-20 Thermal Printer. Read through the Safety Precautions on this printer, please ask your dealer for a copy of the DPU-3445-20 Technical Reference. - 1 - INTRODUCTION User's Guide applies to 6 carefully...
Also read the instruction manuals of the following sections. The User's Guide consists of the optional equipment that you purchased with the printer. SAFETY PRECAUTIONS 2 OPERATING PRECAUTIONS 5 1 PREPARATION 7 2 NAMES OF PARTS 8 3 POWER CONNECTION 10 4 PAPER SETTING 12 5 TEST PRINTING... AND CONSUMABLE PARTS 29 For more detailed technical information on pages 2 to the DPU-3445-20 Thermal Printer. Read through the Safety Precautions on this printer, please ask your dealer for a copy of the DPU-3445-20 Technical Reference. - 1 - INTRODUCTION User's Guide applies to 6 carefully...

User Guide
Page 5
... marked with the symbol. Symbol Examples The symbol indicates caution (including danger and warning). The example on the left means prohibition of the printer properly and prevent the printer from being damaged. The symbol indicates requirement or what must be done. The example on the left indicates warning or caution. SAFETY PRECAUTIONS...
... marked with the symbol. Symbol Examples The symbol indicates caution (including danger and warning). The example on the left means prohibition of the printer properly and prevent the printer from being damaged. The symbol indicates requirement or what must be done. The example on the left indicates warning or caution. SAFETY PRECAUTIONS...

User Guide
Page 7
... the power cable or interface cable when disconnecting the cable. N A piece of the following cases: N The printer does not recover from the printer. Using the printer in any liquids get into the printer. CAUTION This printer is cool before clearing a paper jam or cleaning the thermal head. Never use the... printer in any metallic objects or liquids, such as water or coffee, into the printer, it was designed may cause it can possibly be dust-proof or water-proof. Pulling on the cable ...
... the power cable or interface cable when disconnecting the cable. N A piece of the following cases: N The printer does not recover from the printer. Using the printer in any liquids get into the printer. CAUTION This printer is cool before clearing a paper jam or cleaning the thermal head. Never use the... printer in any metallic objects or liquids, such as water or coffee, into the printer, it was designed may cause it can possibly be dust-proof or water-proof. Pulling on the cable ...
User Guide
Page 8
...the paper outlet. X The AC adapter, the battery charger and the battery pack may occur and the sound during printing. Q Using the Printer X Be careful not to enjoy and maintain the full performance of paper used may not be shortened. X When printing with devices that ...generate strong electromagnetic fields such as a copy machine. X DO NOT install the printer in use , always clean the terminals using soft, lint-free cloth. X DO NOT remove or reinstall the interface cable during printing. X Before ...
...the paper outlet. X The AC adapter, the battery charger and the battery pack may occur and the sound during printing. Q Using the Printer X Be careful not to enjoy and maintain the full performance of paper used may not be shortened. X When printing with devices that ...generate strong electromagnetic fields such as a copy machine. X DO NOT install the printer in use , always clean the terminals using soft, lint-free cloth. X DO NOT remove or reinstall the interface cable during printing. X Before ...

User Guide
Page 9
... followed may lead to a malfunction or to a deterioration of performance. HINT • Items To Remember This box contains helpful hints to remember when using the printer. - 6 - X Always use chemical glue. type copies. X Do not leave the paper near organic solvents.
... followed may lead to a malfunction or to a deterioration of performance. HINT • Items To Remember This box contains helpful hints to remember when using the printer. - 6 - X Always use chemical glue. type copies. X Do not leave the paper near organic solvents.

User Guide
Page 10
The AC adapter and the battery charger is not bundled with an AC cable. An AC cable should be ordered separately. - 7 - Printer Printer User's Guide (this document) The following are available as options: AC cable AC adapter Battery pack Paper holder Battery charger Keep the package and packing materials for future transportation or long-term storage. 1 PREPARATION Once you have opened the carton, make sure it contains the printer and all accessories.
The AC adapter and the battery charger is not bundled with an AC cable. An AC cable should be ordered separately. - 7 - Printer Printer User's Guide (this document) The following are available as options: AC cable AC adapter Battery pack Paper holder Battery charger Keep the package and packing materials for future transportation or long-term storage. 1 PREPARATION Once you have opened the carton, make sure it contains the printer and all accessories.

User Guide
Page 11
... the small amount of IrDA (Ver1.0) by IrDA. lamp lights. When the physical layer of paper is pressed once, a in accordance with the printer. turns on , hold down the POWER button until the POWER Display on the next page for details. 2 NAMES OF PARTS (3) (4) (2) (1)... (9) (7) (8) ERROR POWER (10) (11) Front (5) (6) (12) Back (13) Bottom (14) (1) POWER button (4) ERROR lamp The POWER button turns the printer ON The ERROR lamp lights when something or OFF. button is held down is fed continuously. (6) Interface connector (3) POWER lamp Connects with the host device...
... the small amount of IrDA (Ver1.0) by IrDA. lamp lights. When the physical layer of paper is pressed once, a in accordance with the printer. turns on , hold down the POWER button until the POWER Display on the next page for details. 2 NAMES OF PARTS (3) (4) (2) (1)... (9) (7) (8) ERROR POWER (10) (11) Front (5) (6) (12) Back (13) Bottom (14) (1) POWER button (4) ERROR lamp The POWER button turns the printer ON The ERROR lamp lights when something or OFF. button is held down is fed continuously. (6) Interface connector (3) POWER lamp Connects with the host device...

User Guide
Page 12
... this cover to remove paper Battery connection terminal or perform head cleaning. (14) Battery release button Releases the battery pack from the top of the printer. (10) Platen roller The platen roller brings the paper in contact with a paper cutter. It is opened, the thermal head moves away from the (13... - 9 - printing. (12) Paper slot (9) Platen cover Paper inlet When the platen cover is very hot immediately after connector. The platen roller is discharged from the printer.
... this cover to remove paper Battery connection terminal or perform head cleaning. (14) Battery release button Releases the battery pack from the top of the printer. (10) Platen roller The platen roller brings the paper in contact with a paper cutter. It is opened, the thermal head moves away from the (13... - 9 - printing. (12) Paper slot (9) Platen cover Paper inlet When the platen cover is very hot immediately after connector. The platen roller is discharged from the printer.

User Guide
Page 13
... details on the recharging method. Hold down the battery release button and slide the battery pack in the direction of the arrow. 3 POWER CONNECTION The printer can be fully recharged. Q Installing a Battery Pack The battery pack should be powered with the battery pack to use it correctly. • If the ...battery pack starts to run out soon, it means that the printer connection terminal touches the connection terminal of the battery pack. NOTE ‹ Before installing or removing the battery pack, turn the...
... details on the recharging method. Hold down the battery release button and slide the battery pack in the direction of the arrow. 3 POWER CONNECTION The printer can be fully recharged. Q Installing a Battery Pack The battery pack should be powered with the battery pack to use it correctly. • If the ...battery pack starts to run out soon, it means that the printer connection terminal touches the connection terminal of the battery pack. NOTE ‹ Before installing or removing the battery pack, turn the...

User Guide
Page 14
... not used for a long time, unplug the AC cable from the outlet. HINT • If the auto power off function is enabled, the printer turns off . ‹ If the printer is not operated for details on settings. - 11 - Q Connecting the AC Adapter (1) Connect the AC cable to the AC adapter. (2) Insert the... DC jack of the AC adapter to the power connector of the printer. (3) Insert the AC plug of the AC cable to save the battery...
... not used for a long time, unplug the AC cable from the outlet. HINT • If the auto power off function is enabled, the printer turns off . ‹ If the printer is not operated for details on settings. - 11 - Q Connecting the AC Adapter (1) Connect the AC cable to the AC adapter. (2) Insert the... DC jack of the AC adapter to the power connector of the printer. (3) Insert the AC plug of the AC cable to save the battery...
User Guide
Page 15
..., a paper feed error occurs. ‹ DO NOT block the paper outlet or hold down the FEED button. Press the FEED button once or turn the printer off and on the back of Parts) before setting the cut sheet. (3) Insert a cut sheets and roll paper. See Section 6, Function Setting, for cut... sheets is being loaded. If it automatically. (5) To discharge the paper from the printer, hold the paper that is different from that for paper position detection are printed on again to get your fingers caught in the...
..., a paper feed error occurs. ‹ DO NOT block the paper outlet or hold down the FEED button. Press the FEED button once or turn the printer off and on the back of Parts) before setting the cut sheet. (3) Insert a cut sheets and roll paper. See Section 6, Function Setting, for cut... sheets is being loaded. If it automatically. (5) To discharge the paper from the printer, hold the paper that is different from that for paper position detection are printed on again to get your fingers caught in the...

User Guide
Page 16
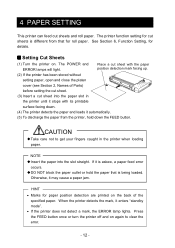
... cover is unlocked and can be opened. (5) Set the roll paper in the paper holder as shown in the figure at the right. When the printer detects the paper, it loads it in the direction of Parts) before setting the roll paper. Paper holder Paper cover (4) Turn the... printer over, push the center of (3) until it clicks. CAUTION ‹ Take care not to feed roll paper. Close the paper cover and slide it in ...
... cover is unlocked and can be opened. (5) Set the roll paper in the paper holder as shown in the figure at the right. When the printer detects the paper, it loads it in the direction of Parts) before setting the roll paper. Paper holder Paper cover (4) Turn the... printer over, push the center of (3) until it clicks. CAUTION ‹ Take care not to feed roll paper. Close the paper cover and slide it in ...
User Guide
Page 17
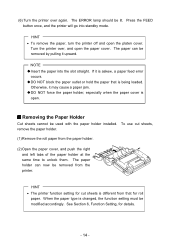
...paper outlet or hold the paper that for roll paper. NOTE ‹ Insert the paper into standby mode. remove the paper holder. HINT • The printer function setting for details. - 14 - See Section 6, Function Setting, for cut sheets, (1) Remove the roll paper from the paper holder. (2) Open ... open the paper cover. The ERROR lamp should be used with the paper holder installed. When the paper type is different from the printer. Turn the printer over again. Otherwise, it may cause a paper jam. ‹ DO NOT force the paper holder, especially when the paper cover is...
...paper outlet or hold the paper that for roll paper. NOTE ‹ Insert the paper into standby mode. remove the paper holder. HINT • The printer function setting for details. - 14 - See Section 6, Function Setting, for cut sheets, (1) Remove the roll paper from the paper holder. (2) Open ... open the paper cover. The ERROR lamp should be used with the paper holder installed. When the paper type is different from the printer. Turn the printer over again. Otherwise, it may cause a paper jam. ‹ DO NOT force the paper holder, especially when the paper cover is...
User Guide
Page 18
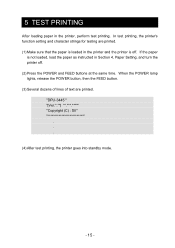
... sure that the paper is loaded in the printer and the printer is not loaded, load the paper as instructed in the printer, perform test printing. In test printing, the printer's function setting and character strings for testing are printed. "DPU-3445 " "[Ver Copyright (C) : SII . . . (4) After test printing, the printer goes into standby mode. - 15 - 5 TEST PRINTING...
... sure that the paper is loaded in the printer and the printer is not loaded, load the paper as instructed in the printer, perform test printing. In test printing, the printer's function setting and character strings for testing are printed. "DPU-3445 " "[Ver Copyright (C) : SII . . . (4) After test printing, the printer goes into standby mode. - 15 - 5 TEST PRINTING...
User Guide
Page 19
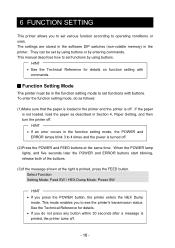
...• If you do as described in the function setting mode to set by using buttons or by using buttons. 6 FUNCTION SETTING This printer allows you to set functions by entering commands. To enter the function setting mode, do not press any button within 30 seconds after a ... (3) If the message shown at the same time. See the Technical Reference for details on function setting with buttons. Q Function Setting Mode The printer must be set functions with commands. This mode enables you to operating conditions or uses. They can be in Section 4, Paper Setting, and then...
...• If you do as described in the function setting mode to set by using buttons or by using buttons. 6 FUNCTION SETTING This printer allows you to set functions by entering commands. To enter the function setting mode, do not press any button within 30 seconds after a ... (3) If the message shown at the same time. See the Technical Reference for details on function setting with buttons. Q Function Setting Mode The printer must be set functions with commands. This mode enables you to operating conditions or uses. They can be in Section 4, Paper Setting, and then...
User Guide
Page 20
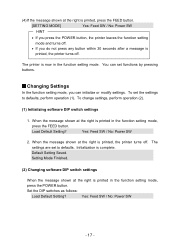
...Default Setting Saved. Q Changing Settings In the function setting mode, you do not press any button within 30 seconds after a message is printed, the printer turns off . The printer is complete. (4) If the message shown at the right is printed, press the FEED button. [SETTING MODE] Yes: Feed SW / No: ...Power SW HINT • If you press the POWER button, the printer leaves the function setting mode and turns off. • If you can set to defaults, perform operation (1). When the message shown at the right is...
...Default Setting Saved. Q Changing Settings In the function setting mode, you do not press any button within 30 seconds after a message is printed, the printer turns off . The printer is complete. (4) If the message shown at the right is printed, press the FEED button. [SETTING MODE] Yes: Feed SW / No: ...Power SW HINT • If you press the POWER button, the printer leaves the function setting mode and turns off. • If you can set to defaults, perform operation (1). When the message shown at the right is...

User Guide
Page 22
... DIP switch. The leftmost bit is the most significant bit (bit 8) to the least significant bit (bit 1). Setting Mode Finished. DIP Switch setting mode. The printer leaves the function setting mode and turns off. HINT • You can select the next DIP switch (operation 1). For example, to operation (1) and set the...
... DIP switch. The leftmost bit is the most significant bit (bit 8) to the least significant bit (bit 1). Setting Mode Finished. DIP Switch setting mode. The printer leaves the function setting mode and turns off. HINT • You can select the next DIP switch (operation 1). For example, to operation (1) and set the...
User Guide
Page 24
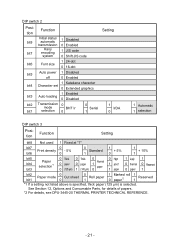
... not listed above is specified, thick paper (125 µm) is selected. See Section 12, Options and Consumable Parts, for details of papers. *2 For details, see DPU-3445-20 THERMAL PRINTER TECHNICAL REFERENCE. - 21 -
... not listed above is specified, thick paper (125 µm) is selected. See Section 12, Options and Consumable Parts, for details of papers. *2 For details, see DPU-3445-20 THERMAL PRINTER TECHNICAL REFERENCE. - 21 -


