User Guide
Page 1
Keep this user's guide carefully before using the printer. Seiko Instruments Inc. USER'S GUIDE Thermal Printer DPU-3445-20 Read this user's guide in a place where it can be accessed quickly.
Keep this user's guide carefully before using the printer. Seiko Instruments Inc. USER'S GUIDE Thermal Printer DPU-3445-20 Read this user's guide in a place where it can be accessed quickly.
User Guide
Page 2
....3/1995+Amd.4/1996 Product: Battery Charger BC-3008-W1 Directives Title 89/336/EEC EC Electromagnetic Compatibility Directive 73/23/EEC EC Low Voltage Directive Standards EMI: EN50081-1, EN55022/1995 class B, EN61000-3-2/1995, EN61000-3-3/1995 EMS: EN55024/1998 LVD: EN60950 +Amd.1 +Amd.2, IEC950/1991 +Amd.1/1992 +Amd.2/1993 DPU-3445-20 THERMAL PRINTER USER'S GUIDE Document Number U00018388105 First Edition May...
....3/1995+Amd.4/1996 Product: Battery Charger BC-3008-W1 Directives Title 89/336/EEC EC Electromagnetic Compatibility Directive 73/23/EEC EC Low Voltage Directive Standards EMI: EN50081-1, EN55022/1995 class B, EN61000-3-2/1995, EN61000-3-3/1995 EMS: EN55024/1998 LVD: EN60950 +Amd.1 +Amd.2, IEC950/1991 +Amd.1/1992 +Amd.2/1993 DPU-3445-20 THERMAL PRINTER USER'S GUIDE Document Number U00018388105 First Edition May...
User Guide
Page 4
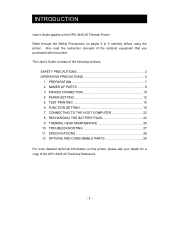
... the instruction manuals of the following sections. SAFETY PRECAUTIONS 2 OPERATING PRECAUTIONS 5 1 PREPARATION 7 2 NAMES OF PARTS 8 3 POWER CONNECTION 10 4 PAPER SETTING 12 5 TEST PRINTING 15 6 FUNCTION SETTING 16 7 CONNECTING TO THE HOST COMPUTER 22 8 RECHARGING THE BATTERY PACK 24 9 THERMAL HEAD MAINTENANCE 26 10 TROUBLESCHOOTING 27 11 SPECIFICATIONS 28 12 OPTIONS AND CONSUMABLE PARTS 29 For more detailed technical information on pages 2 to the DPU-3445-20 Thermal Printer...
... the instruction manuals of the following sections. SAFETY PRECAUTIONS 2 OPERATING PRECAUTIONS 5 1 PREPARATION 7 2 NAMES OF PARTS 8 3 POWER CONNECTION 10 4 PAPER SETTING 12 5 TEST PRINTING 15 6 FUNCTION SETTING 16 7 CONNECTING TO THE HOST COMPUTER 22 8 RECHARGING THE BATTERY PACK 24 9 THERMAL HEAD MAINTENANCE 26 10 TROUBLESCHOOTING 27 11 SPECIFICATIONS 28 12 OPTIONS AND CONSUMABLE PARTS 29 For more detailed technical information on pages 2 to the DPU-3445-20 Thermal Printer...

User Guide
Page 7
... accidents. Power OFF the printer, unplug the power cable from the power outlet, and remove the battery pack in any of the power cable or interface cable when disconnecting the cable. N A piece of metal or any liquid touches the internal parts or slot of extreme humidity or any place where it can possibly be dust-proof or water-proof. Make sure that the thermal head is not...
... accidents. Power OFF the printer, unplug the power cable from the power outlet, and remove the battery pack in any of the power cable or interface cable when disconnecting the cable. N A piece of metal or any liquid touches the internal parts or slot of extreme humidity or any place where it can possibly be dust-proof or water-proof. Make sure that the thermal head is not...
User Guide
Page 8
... outlet with the paper cutter installed in use . X The AC adapter, the battery charger and the battery pack may occur and the sound during printing. Q Using the Printer X Be careful not to the cutter. X Clean the printer using a dry, soft, lint-free cloth. If the terminals are dirty, it is not a malfunction. However, since this instruction may cause a cutting error or make the cutting edge dull due to label paper adhesive sticking...
... outlet with the paper cutter installed in use . X The AC adapter, the battery charger and the battery pack may occur and the sound during printing. Q Using the Printer X Be careful not to the cutter. X Clean the printer using a dry, soft, lint-free cloth. If the terminals are dirty, it is not a malfunction. However, since this instruction may cause a cutting error or make the cutting edge dull due to label paper adhesive sticking...

User Guide
Page 11
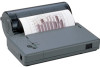
... paper is fed continuously. (6) Interface connector (3) POWER lamp Connects with the standards of the small amount of IrDA (Ver1.0) by IrDA. Open the rubber cover and insert the The POWER lamp lights when the printer connector. turns on the next page for details. 2 NAMES OF PARTS (3) (4) (2) (1) (9) (7) (8) ERROR POWER (10) (11) Front (5) (6) (12) Back (13) Bottom (14) (1) POWER button (4) ERROR lamp The POWER button turns the printer ON The ERROR...
... paper is fed continuously. (6) Interface connector (3) POWER lamp Connects with the standards of the small amount of IrDA (Ver1.0) by IrDA. Open the rubber cover and insert the The POWER lamp lights when the printer connector. turns on the next page for details. 2 NAMES OF PARTS (3) (4) (2) (1) (9) (7) (8) ERROR POWER (10) (11) Front (5) (6) (12) Back (13) Bottom (14) (1) POWER button (4) ERROR lamp The POWER button turns the printer ON The ERROR...

User Guide
Page 12
... roller is discharged from the printer. (7) Paper outlet Paper port with the thermal head. When the platen cover is closed, paper is turned to feed the paper. (8) Thermal head (11) Power connector The thermal head prints characters on Connects the AC adapter to remove paper Battery connection terminal or perform head cleaning. (14) Battery release button Releases the battery pack from the top of the printer. (10) Platen roller The platen roller brings the paper in contact with a paper cutter.
... roller is discharged from the printer. (7) Paper outlet Paper port with the thermal head. When the platen cover is closed, paper is turned to feed the paper. (8) Thermal head (11) Power connector The thermal head prints characters on Connects the AC adapter to remove paper Battery connection terminal or perform head cleaning. (14) Battery release button Releases the battery pack from the top of the printer. (10) Platen roller The platen roller brings the paper in contact with a paper cutter.

User Guide
Page 13
... the printer is not used for details on the recharging method. Purchase a new battery pack. - 10 - See Section 8, Recharging the Battery Pack, for a long time, remove the battery pack from the battery pack. Insert the battery pack in the direction of the arrow so that the battery life has expired. Release button HINT • Read the instruction manual supplied with a battery pack or an AC adapter. 3 POWER CONNECTION The printer...
... the printer is not used for details on the recharging method. Purchase a new battery pack. - 10 - See Section 8, Recharging the Battery Pack, for a long time, remove the battery pack from the battery pack. Insert the battery pack in the direction of the arrow so that the battery life has expired. Release button HINT • Read the instruction manual supplied with a battery pack or an AC adapter. 3 POWER CONNECTION The printer...

User Guide
Page 14
HINT • If the auto power off function is enabled, the printer turns off . ‹ If the printer is not operated for 30 minutes to an electric outlet. (3) (2) (1) NOTE ‹ Before installing or removing the AC adapter, turn the printer off automatically when it is not used for a long time, unplug the AC cable from the outlet. See Section 6, Function Setting, for details on settings. - 11 - Q Connecting...
HINT • If the auto power off function is enabled, the printer turns off . ‹ If the printer is not operated for 30 minutes to an electric outlet. (3) (2) (1) NOTE ‹ Before installing or removing the AC adapter, turn the printer off automatically when it is not used for a long time, unplug the AC cable from the outlet. See Section 6, Function Setting, for details on settings. - 11 - Q Connecting...
User Guide
Page 15
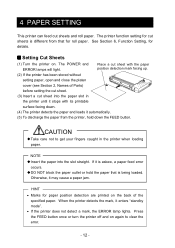
...; Insert the paper into the paper slot in the printer when loading paper. Otherwise, it enters "standby mode". • If the printer does not detect a mark, the ERROR lamp lights. When the printer detects the mark, it may cause a paper jam. Press the FEED button once or turn the printer off and on . Q Setting Cut Sheets (1) Turn the printer on again to get your fingers caught in the printer until it automatically. (5) To...
...; Insert the paper into the paper slot in the printer when loading paper. Otherwise, it enters "standby mode". • If the printer does not detect a mark, the ERROR lamp lights. When the printer detects the mark, it may cause a paper jam. Press the FEED button once or turn the printer off and on . Q Setting Cut Sheets (1) Turn the printer on again to get your fingers caught in the printer until it automatically. (5) To...
User Guide
Page 17
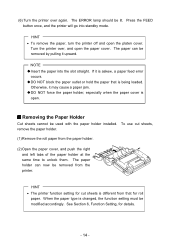
... the FEED button once, and the printer will go into the slot straight. HINT • The printer function setting for details. - 14 - The paper can now be modified accordingly. NOTE ‹ Insert the paper into standby mode. The ERROR lamp should be used with the paper holder installed. See Section 6, Function Setting, for cut sheets, (1) Remove the roll paper from the printer. (6) Turn the printer over , and open the paper cover...
... the FEED button once, and the printer will go into the slot straight. HINT • The printer function setting for details. - 14 - The paper can now be modified accordingly. NOTE ‹ Insert the paper into standby mode. The ERROR lamp should be used with the paper holder installed. See Section 6, Function Setting, for cut sheets, (1) Remove the roll paper from the printer. (6) Turn the printer over , and open the paper cover...
User Guide
Page 18
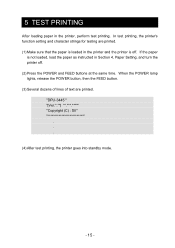
... printer's function setting and character strings for testing are printed. When the POWER lamp lights, release the POWER button, then the FEED button. (3) Several dozens of lines of text are printed. (1) Make sure that the paper is loaded in the printer and the printer is not loaded, load the paper as instructed in the printer, perform test printing. 5 TEST PRINTING After loading paper in Section 4, Paper Setting, and turn the printer off . "DPU-3445 " "[Ver Copyright (C) : SII . . . (4) After test printing, the printer goes into standby mode...
... printer's function setting and character strings for testing are printed. When the POWER lamp lights, release the POWER button, then the FEED button. (3) Several dozens of lines of text are printed. (1) Make sure that the paper is loaded in the printer and the printer is not loaded, load the paper as instructed in the printer, perform test printing. 5 TEST PRINTING After loading paper in Section 4, Paper Setting, and turn the printer off . "DPU-3445 " "[Ver Copyright (C) : SII . . . (4) After test printing, the printer goes into standby mode...
User Guide
Page 19
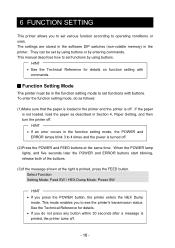
... the function setting mode to set by using buttons or by using buttons. If the paper is printed, the printer turns off. - 16 - HINT • If an error occurs in the function setting mode, the POWER and ERROR lamps blink 3 to 4 times and the power is turned off. (2) Press the POWER and FEED buttons at the right is off . Select Function Setting Mode: Feed SW / HEX Dump Mode: Power SW HINT • If you to operating conditions or uses. See...
... the function setting mode to set by using buttons or by using buttons. If the paper is printed, the printer turns off. - 16 - HINT • If an error occurs in the function setting mode, the POWER and ERROR lamps blink 3 to 4 times and the power is turned off. (2) Press the POWER and FEED buttons at the right is off . Select Function Setting Mode: Feed SW / HEX Dump Mode: Power SW HINT • If you to operating conditions or uses. See...
User Guide
Page 20
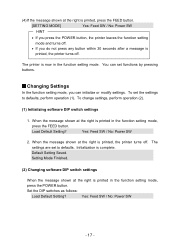
... POWER button. Set the DIP switches as follows: Load Default Setting? The printer is printed in the function setting mode. When the message shown at the right is printed, the printer turns off . (4) If the message shown at the right is printed, press the FEED button. [SETTING MODE] Yes: Feed SW / No: Power SW HINT • If you press the POWER button, the printer leaves the function setting mode and turns off. • If you can set to defaults, perform operation (1). Q Changing Settings...
... POWER button. Set the DIP switches as follows: Load Default Setting? The printer is printed in the function setting mode. When the message shown at the right is printed, the printer turns off . (4) If the message shown at the right is printed, press the FEED button. [SETTING MODE] Yes: Feed SW / No: Power SW HINT • If you press the POWER button, the printer leaves the function setting mode and turns off. • If you can set to defaults, perform operation (1). Q Changing Settings...
User Guide
Page 21
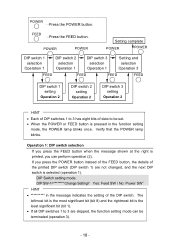
... in the message indicates the setting of the printed DIP switch (DIP switch 1) are skipped, the function setting mode can perform operation (2). FEED LPress the FEED button. DIP SW-1=******** Change Setting? POWER POWER Setting complete POWER POWER DIP switch 1 selection Operation 1 DIP switch 2 selection Operation 1 DIP switch 3 selection Operation 1 Setting end selection Operation 3 FEED FEED FEED FEED DIP switch 1 setting Operation 2 DIP switch 2 setting Operation 2 DIP switch 3 setting Operation 2 HINT • Each of DIP switches 1 to 3 has eight bits of data to...
... in the message indicates the setting of the printed DIP switch (DIP switch 1) are skipped, the function setting mode can perform operation (2). FEED LPress the FEED button. DIP SW-1=******** Change Setting? POWER POWER Setting complete POWER POWER DIP switch 1 selection Operation 1 DIP switch 2 selection Operation 1 DIP switch 3 selection Operation 1 Setting end selection Operation 3 FEED FEED FEED FEED DIP switch 1 setting Operation 2 DIP switch 2 setting Operation 2 DIP switch 3 setting Operation 2 HINT • Each of DIP switches 1 to 3 has eight bits of data to...

User Guide
Page 22
... message shown at the right is printed and the setting is printed. When you press the FEED button when the message shown at the right is not changed. DIP SW-1 Not Changed. The printer leaves the function setting mode and turns off. Operation 2: DIP switch setting (1) When the message shown at the right is the least significant bit (bit 1). HINT in the following sequence: FEED, POWER, FEED, POWER, FEED, FEED, FEED, FEED, POWER. (2) When the buttons...
... message shown at the right is printed and the setting is printed. When you press the FEED button when the message shown at the right is not changed. DIP SW-1 Not Changed. The printer leaves the function setting mode and turns off. Operation 2: DIP switch setting (1) When the message shown at the right is the least significant bit (bit 1). HINT in the following sequence: FEED, POWER, FEED, POWER, FEED, FEED, FEED, FEED, POWER. (2) When the buttons...
User Guide
Page 24
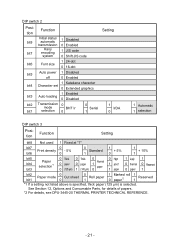
... system bit6 Font size bit5 Auto power off bit4 Character set bit3 Auto loading bit2 Transmission mode bit1 selection 1 Disabled 0 Enabled 1 JIS code 0 Shift JIS code 1 24-dot 0 16-dot 1 Disabled 0 Enabled 1 Katakana character 0 Extended graphics 1 Enabled 0 Disabled 0 BHT Ir 0 0 Serial 1 Setting 1 IrDA 0 1 Automatic 1 selection DIP switch 3 Position Function Setting bit8 Not used 1 Fixed at "1" bit7 0 Print density - 5% bit6 0 0 Standard 1 1 + 5% 0 1 + 10% 1 bit5 bit4 Paper selection*1 0 Thick 0 paper 0 Thick 0 paper 0 1 Normal paper 0 High 1 proof...
... system bit6 Font size bit5 Auto power off bit4 Character set bit3 Auto loading bit2 Transmission mode bit1 selection 1 Disabled 0 Enabled 1 JIS code 0 Shift JIS code 1 24-dot 0 16-dot 1 Disabled 0 Enabled 1 Katakana character 0 Extended graphics 1 Enabled 0 Disabled 0 BHT Ir 0 0 Serial 1 Setting 1 IrDA 0 1 Automatic 1 selection DIP switch 3 Position Function Setting bit8 Not used 1 Fixed at "1" bit7 0 Print density - 5% bit6 0 0 Standard 1 1 + 5% 0 1 + 10% 1 bit5 bit4 Paper selection*1 0 Thick 0 paper 0 Thick 0 paper 0 1 Normal paper 0 High 1 proof...
User Guide
Page 25
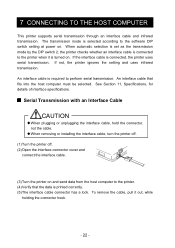
... mode is turned on. When automatic selection is set as the transmission mode by the DIP switch 2, the printer checks whether an interface cable is connected to the printer. (4) Verify that fits into the host computer must be selected. An interface cable is printed correctly. (5) The interface cable connector has a lock. To remove the cable, pull it is selected according to the software DIP switch setting at power on and send data...
... mode is turned on. When automatic selection is set as the transmission mode by the DIP switch 2, the printer checks whether an interface cable is connected to the printer. (4) Verify that fits into the host computer must be selected. An interface cable is printed correctly. (5) The interface cable connector has a lock. To remove the cable, pull it is selected according to the software DIP switch setting at power on and send data...
User Guide
Page 27
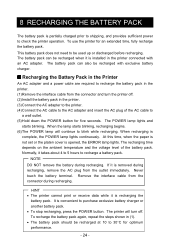
... AC adapter and insert the AC plug of the battery pack. To use the printer for five seconds. NOTE DO NOT remove the battery during recharging. The battery pack can be recharged with an AC adapter. The POWER lamp lights and starts blinking. The recharging time depends on the ambient temperature and the voltage level of the AC cable to check the printer operation. Never touch the battery terminal...
... AC adapter and insert the AC plug of the battery pack. To use the printer for five seconds. NOTE DO NOT remove the battery during recharging. The battery pack can be recharged with an AC adapter. The POWER lamp lights and starts blinking. The recharging time depends on the ambient temperature and the voltage level of the AC cable to check the printer operation. Never touch the battery terminal...
User Guide
Page 30
... oriented ? · Is the correct battery pack being used ? 10 TROUBLESHOOTING Check the following points before you make a request for the printer and the host computer correct ? · Is the recommended paper being used ? Q The ERROR lamp is lit or the POWER lamp blinks. · See the Lamp Display on . · Is the recommended AC adapter or battery pack being used ? · Is the IrDA...
... oriented ? · Is the correct battery pack being used ? 10 TROUBLESHOOTING Check the following points before you make a request for the printer and the host computer correct ? · Is the recommended paper being used ? Q The ERROR lamp is lit or the POWER lamp blinks. · See the Lamp Display on . · Is the recommended AC adapter or battery pack being used ? · Is the IrDA...


