
Manual
Page 3
ENEnGgLliIsShH CONTENTS Page TIME/DATE SETTING 6 HOW TO CHECK AND ADJUST THE CALENDAR 7 HOW TO OPERATE THE SCREW LOCK TYPE CROWN 13 BATTERY CHANGE 13 SPECIFICATIONS ...15 ✩ For the care of your watch, see "TO PRESERVE THE QUALITY OF YOUR WATCH" in the attached Worldwide Guarantee and Instruction Booklet. 3
ENEnGgLliIsShH CONTENTS Page TIME/DATE SETTING 6 HOW TO CHECK AND ADJUST THE CALENDAR 7 HOW TO OPERATE THE SCREW LOCK TYPE CROWN 13 BATTERY CHANGE 13 SPECIFICATIONS ...15 ✩ For the care of your watch, see "TO PRESERVE THE QUALITY OF YOUR WATCH" in the attached Worldwide Guarantee and Instruction Booklet. 3
Manual
Page 5
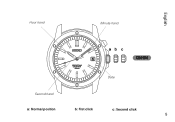
English Hour hand Minute hand Second hand a: Normal position ab c 6 CROWN Date b: First click c: Second click 5
English Hour hand Minute hand Second hand a: Normal position ab c 6 CROWN Date b: First click c: Second click 5
Manual
Page 6
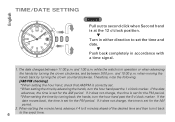
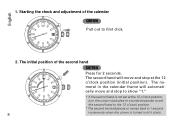
.../PM checking] *When setting the hour hand, check that AM/PM is correctly set for the PM period. *When setting the time by turning the crown clockwise, and between 11:00 p.m. If it does not change , the time is set . *When setting the time by turning the... crown counterclockwise. English TIME/DATE SETTING ➠ 6 ➠ CROWN Pull out to second click when Second hand is at the 12 o'clock position. ▼ Turn in either direction to set for the...
.../PM checking] *When setting the hour hand, check that AM/PM is correctly set for the PM period. *When setting the time by turning the crown clockwise, and between 11:00 p.m. If it does not change , the time is set . *When setting the time by turning the... crown counterclockwise. English TIME/DATE SETTING ➠ 6 ➠ CROWN Pull out to second click when Second hand is at the 12 o'clock position. ▼ Turn in either direction to set for the...
Manual
Page 7
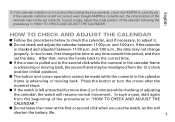
...the numeral in the calendar frame is correctly set. In such a case, start again from the 12 o'clock position (initial position). ● The button and crown operation cannot be set the date. If the calendar indication is still not correct even though AM/PM is advancing or moving back. If the... correctly set, the initial position of the calendar following the procedures in "HOW TO CHECK AND ADJUST THE CALENDAR." ● Do not leave the crown at the first or second click when you use the watch will shorten the battery life. 7 If the calendar indication is not correct after the...
...the numeral in the calendar frame is correctly set. In such a case, start again from the 12 o'clock position (initial position). ● The button and crown operation cannot be set the date. If the calendar indication is still not correct even though AM/PM is advancing or moving back. If the... correctly set, the initial position of the calendar following the procedures in "HOW TO CHECK AND ADJUST THE CALENDAR." ● Do not leave the crown at the first or second click when you use the watch will shorten the battery life. 7 If the calendar indication is not correct after the...
Manual
Page 8
...- 1 meral in the calendar frame will move and stop at the 12 o'clock position, turn the crown clockwise or counterclockwise to set at the 12 o'clock position (initial position). The initial position of the calendar ➠ 6 CROWN Pull out to the 12 o'clock position. * The second hand advances or moves back in... 1-second 8 increments when the crown is not set the second hand to first click. 2. cally move and stop to show "1." * If the second hand is turned until it clicks. The ...
...- 1 meral in the calendar frame will move and stop at the 12 o'clock position, turn the crown clockwise or counterclockwise to set at the 12 o'clock position (initial position). The initial position of the calendar ➠ 6 CROWN Pull out to the 12 o'clock position. * The second hand advances or moves back in... 1-second 8 increments when the crown is not set the second hand to first click. 2. cally move and stop to show "1." * If the second hand is turned until it clicks. The ...

Manual
Page 9
... hand will swing and stop (the numeral remains as "1"). * If the numeral is not set the numeral to the current date, turn the crown in the reverse direction until it clicks once. 9 ➡ ➡ English 3. The numeral in the calendar frame will move back and stop... the numeral, turn the crown clockwise or counterclockwise to set to "1," turn the crown clockwise or counterclockwise until "1" appears in the calendar frame, and place "1" in the calendar frame does not return to ...
... hand will swing and stop (the numeral remains as "1"). * If the numeral is not set the numeral to the current date, turn the crown in the reverse direction until it clicks once. 9 ➡ ➡ English 3. The numeral in the calendar frame will move back and stop... the numeral, turn the crown clockwise or counterclockwise to set to "1," turn the crown clockwise or counterclockwise until "1" appears in the calendar frame, and place "1" in the calendar frame does not return to ...

Manual
Page 10
The second hand will be shown in the calendar frame. * If the current year is not shown in the calendar frame, turn the crown clockwise or counterclockwise to set the numeral to confirm the last 1 or 2 digits of the current year will advance and stop at the 11 o'clock ... Press once. The second hand will be shown in the calendar frame. * If the current month is not shown in the calendar frame, turn the crown clockwise or counterclockwise until the last 1 or 2 digits of the current year are shown. * See the YEAR TABLE to the current month (the numeral changes...
The second hand will be shown in the calendar frame. * If the current year is not shown in the calendar frame, turn the crown clockwise or counterclockwise to set the numeral to confirm the last 1 or 2 digits of the current year will advance and stop at the 11 o'clock ... Press once. The second hand will be shown in the calendar frame. * If the current month is not shown in the calendar frame, turn the crown clockwise or counterclockwise until the last 1 or 2 digits of the current year are shown. * See the YEAR TABLE to the current month (the numeral changes...
Manual
Page 11
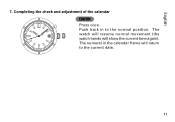
English 7. The watch will resume normal movement (the 6 watch hands will return to the normal position. Push back in the calendar frame will show the current time again). The numeral in to the current date. 11 Completing the check and adjustment of the calendar CROWN Press once.
English 7. The watch will resume normal movement (the 6 watch hands will return to the normal position. Push back in the calendar frame will show the current time again). The numeral in to the current date. 11 Completing the check and adjustment of the calendar CROWN Press once.
Manual
Page 13
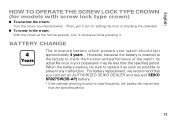
...SEIKO SR927SW(SB-AP) battery. * If the calendar checking function is inserted at the normal position, turn it clockwise while pressing it as soon as possible to check the function and performance of the watch should last approximately 4 years . English HOW TO OPERATE THE SCREW LOCK TYPE CROWN... (for models with screw lock type crown) ● To unscrew the crown: Turn the crown counterclockwise. (Then, pull it out for setting the time or checking the calendar) ● To ...
...SEIKO SR927SW(SB-AP) battery. * If the calendar checking function is inserted at the normal position, turn it clockwise while pressing it as soon as possible to check the function and performance of the watch should last approximately 4 years . English HOW TO OPERATE THE SCREW LOCK TYPE CROWN... (for models with screw lock type crown) ● To unscrew the crown: Turn the crown counterclockwise. (Then, pull it out for setting the time or checking the calendar) ● To ...
Technical Guide
Page 1
No. Movement SEIKO 6A32A Movement Outside diameter size (mm) Casing diameter Height ( Including battery portion ) Time indication Ø 27.8 Ø 27.3 3.69 3 hands (hour, minute and ..., nor for a leap year) ● Initial position adjustment (Position adjustment for calendar indication Additional mechanism Crown Operation Normal position First click position Second click position Loss/gain Regulation system Measuring gate by turning the crown either clockwise or counterclockwise) (electronic system) Hand position adjustments, Second regulation, Reset switch Monthly rate at...
No. Movement SEIKO 6A32A Movement Outside diameter size (mm) Casing diameter Height ( Including battery portion ) Time indication Ø 27.8 Ø 27.3 3.69 3 hands (hour, minute and ..., nor for a leap year) ● Initial position adjustment (Position adjustment for calendar indication Additional mechanism Crown Operation Normal position First click position Second click position Loss/gain Regulation system Measuring gate by turning the crown either clockwise or counterclockwise) (electronic system) Hand position adjustments, Second regulation, Reset switch Monthly rate at...
Technical Guide
Page 5
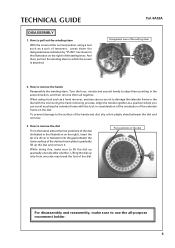
... so as shown in consideration of the orientation of the calendar frame on the right), insert the tip of the dial. How to which the crown is attached. Foot positions of the setting lever. When using a tool such as a pair of tweezers, press down the designated area indicated by "PUSH" (as... same direction, and then remove them all -purpose movement holder. 5 Turn the hour, minute and second hands to pull out the winding stem With the crown at the foot positions of the setting stem 2. Lifting the dial up gradually one side may break the foot of a driver or tweezers into the...
... so as shown in consideration of the orientation of the calendar frame on the right), insert the tip of the dial. How to which the crown is attached. Foot positions of the setting lever. When using a tool such as a pair of tweezers, press down the designated area indicated by "PUSH" (as... same direction, and then remove them all -purpose movement holder. 5 Turn the hour, minute and second hands to pull out the winding stem With the crown at the foot positions of the setting stem 2. Lifting the dial up gradually one side may break the foot of a driver or tweezers into the...

Technical Guide
Page 10
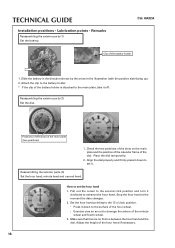
TECHNICAL GUIDE Cal. 6A32A Installation positions • Lubrication points • Remarks Reassembly (4) Lubricate the train wheel bridge. ❇ Make sure to lubricate the exact lubrication points with an adequate amount of the correct type of the rotor (AO-2) 10 normal quantity 1 Minute wheel and pinion (AO-3) 2 Pin for crown switch (AO-3) 3 Upper pivot of the rotor (AO-2) 4 Upper pivot of oil.
TECHNICAL GUIDE Cal. 6A32A Installation positions • Lubrication points • Remarks Reassembly (4) Lubricate the train wheel bridge. ❇ Make sure to lubricate the exact lubrication points with an adequate amount of the correct type of the rotor (AO-2) 10 normal quantity 1 Minute wheel and pinion (AO-3) 2 Pin for crown switch (AO-3) 3 Upper pivot of the rotor (AO-2) 4 Upper pivot of oil.
Technical Guide
Page 15
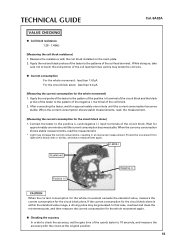
... black probe of the tester to the pattern of the negative (-) terminal of the quartz tester to 10 seconds, and measure the accuracy with the crown at the original position. 15 When the currency consumption shows stable measurements, read the measurement. [Measuring the current consumption for the circuit block alone is...
... black probe of the tester to the pattern of the negative (-) terminal of the quartz tester to 10 seconds, and measure the accuracy with the crown at the original position. 15 When the currency consumption shows stable measurements, read the measurement. [Measuring the current consumption for the circuit block alone is...
Technical Guide
Page 16
... attached to the main plate, take it clockwise to the battery holder. * If the clip of the minute wheel and fourth wheel. 3. Pull out the crown to damage the arbors of the battery holder is no friction between the hour hand and the dial. Align the dial properly and firmly press...
... attached to the main plate, take it clockwise to the battery holder. * If the clip of the minute wheel and fourth wheel. 3. Pull out the crown to damage the arbors of the battery holder is no friction between the hour hand and the dial. Align the dial properly and firmly press...
Technical Guide
Page 17
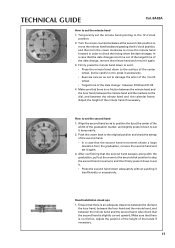
...as to position the tip at the second click position to move the minute hand backward passing the 9 o'clock position, and then turn the crown clockwise to move the minute hand forward in order to check the timing when the date changes. TECHNICAL GUIDE Cal. 6A32A How to set ...the minute hand pointing to the 12 o'clock position. 2. Temporarily set the minute hand 1. Push the crown back to set the second hand 1. Adjust the position of the height of the minute hand if necessary. Hand installation check ups 1. Also check that...
...as to position the tip at the second click position to move the minute hand backward passing the 9 o'clock position, and then turn the crown clockwise to move the minute hand forward in order to check the timing when the date changes. TECHNICAL GUIDE Cal. 6A32A How to set ...the minute hand pointing to the 12 o'clock position. 2. Temporarily set the minute hand 1. Push the crown back to set the second hand 1. Adjust the position of the height of the minute hand if necessary. Hand installation check ups 1. Also check that...
Technical Guide
Page 18
... the first click position and hold down the button for restoration. * If the watch will turn the crown to set the second hand pointing to reset the IC. * Make sure the crown is interlocked with the AC pattern of the second hand " * Make sure that the second hand and the date dial... have been stopped, turn the second hand counterclockwise. ● In the following operations in each mode, never rotate the crown while the second hand and the date dial are moving, as not to touch the circuit pattern. 2 Reset the IC (Integrated circuit.) AC pattern •...
... the first click position and hold down the button for restoration. * If the watch will turn the crown to set the second hand pointing to reset the IC. * Make sure the crown is interlocked with the AC pattern of the second hand " * Make sure that the second hand and the date dial... have been stopped, turn the second hand counterclockwise. ● In the following operations in each mode, never rotate the crown while the second hand and the date dial are moving, as not to touch the circuit pattern. 2 Reset the IC (Integrated circuit.) AC pattern •...
Technical Guide
Page 19
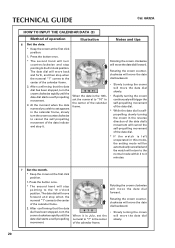
...calendar (2) (Set the date dial to the 12 o'clock position, and the date dial will move the date dial slowly. • Rapidly turning the crown continuously will trigger the self-propelling movement of the date dial. 31 1 2 ● Position of the date numeral after adjustment * While the date ...dial is selfpropelling, slowly turning the crown in the reverse direction of the date dial's movement will cancel the self-propelling movement of the date dial. * If the watch is left unoperated...
...calendar (2) (Set the date dial to the 12 o'clock position, and the date dial will move the date dial slowly. • Rapidly turning the crown continuously will trigger the self-propelling movement of the date dial. 31 1 2 ● Position of the date numeral after adjustment * While the date ...dial is selfpropelling, slowly turning the crown in the reverse direction of the date dial's movement will cancel the self-propelling movement of the date dial. * If the watch is left unoperated...
Technical Guide
Page 20
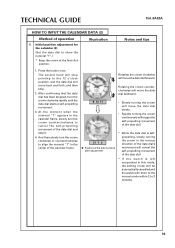
... the date dial's movement will cancel the self-propelling movement of the calendar frame. After confirming that the date dial has been stopped, turn the crown clockwise rapidly until the date dial starts a self-propelling movement. 6 7 8 When it . 9 10 11 When the date is the 10th, set the numeral to... of the date dial. * If the watch will move back and forth, and then stop pointing to 3 minutes. 7 Set the month. * Keep the crown at the first click position. 1. The date dial will move the date dial forward. Press the button once. * The second hand will turn the...
... the date dial's movement will cancel the self-propelling movement of the calendar frame. After confirming that the date dial has been stopped, turn the crown clockwise rapidly until the date dial starts a self-propelling movement. 6 7 8 When it . 9 10 11 When the date is the 10th, set the numeral to... of the date dial. * If the watch will move back and forth, and then stop pointing to 3 minutes. 7 Set the month. * Keep the crown at the first click position. 1. The date dial will move the date dial forward. Press the button once. * The second hand will turn the...
Technical Guide
Page 21
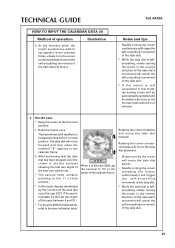
...direction of the date dial's movement will cancel the self-propelling movement of the calendar frame. • Slowly turning the crown will move the date dial backward. 2. Rotating the crown clockwise will move the date dial forward. Press the button once. TECHNICAL GUIDE HOW TO INPUT THE CALENDAR DATA (4) ... and the watch will cancel the self-propelling movement of the year; After confirming that the date dial has been stopped, turn the crown to set the numeral showing the last two digits of the year you wish to set the numeral to cancel the self-propelling movement ...
...direction of the date dial's movement will cancel the self-propelling movement of the calendar frame. • Slowly turning the crown will move the date dial backward. 2. Rotating the crown clockwise will move the date dial forward. Press the button once. TECHNICAL GUIDE HOW TO INPUT THE CALENDAR DATA (4) ... and the watch will cancel the self-propelling movement of the year; After confirming that the date dial has been stopped, turn the crown to set the numeral showing the last two digits of the year you wish to set the numeral to cancel the self-propelling movement ...
Technical Guide
Page 22
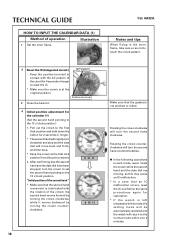
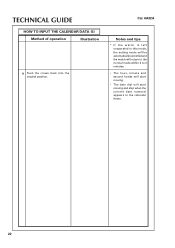
Cal. 6A32A Notes and tips * If the watch is left unoperated in this mode, the setting mode will be automatically cancelled and the watch will return to the normal mode within 2 to 3 minutes. • The hour, minute and second hands will start moving. • The date dial will start moving and stop when the current date numeral appears in the calendar frame. 22 TECHNICAL GUIDE HOW TO INPUT THE CALENDAR DATA (5) Method of operation Illustration 9 Push the crown back into the original position.
Cal. 6A32A Notes and tips * If the watch is left unoperated in this mode, the setting mode will be automatically cancelled and the watch will return to the normal mode within 2 to 3 minutes. • The hour, minute and second hands will start moving. • The date dial will start moving and stop when the current date numeral appears in the calendar frame. 22 TECHNICAL GUIDE HOW TO INPUT THE CALENDAR DATA (5) Method of operation Illustration 9 Push the crown back into the original position.


