
Manual
Page 3
ENEnGgLliIsShH CONTENTS Page TIME/DATE SETTING 6 HOW TO CHECK AND ADJUST THE CALENDAR 7 HOW TO OPERATE THE SCREW LOCK TYPE CROWN 13 BATTERY CHANGE 13 SPECIFICATIONS ...15 ✩ For the care of your watch, see "TO PRESERVE THE QUALITY OF YOUR WATCH" in the attached Worldwide Guarantee and Instruction Booklet. 3
ENEnGgLliIsShH CONTENTS Page TIME/DATE SETTING 6 HOW TO CHECK AND ADJUST THE CALENDAR 7 HOW TO OPERATE THE SCREW LOCK TYPE CROWN 13 BATTERY CHANGE 13 SPECIFICATIONS ...15 ✩ For the care of your watch, see "TO PRESERVE THE QUALITY OF YOUR WATCH" in the attached Worldwide Guarantee and Instruction Booklet. 3
Manual
Page 4
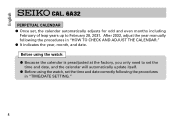
... CAL. 6A32 PERPETUAL CALENDAR ● Once set, the calendar automatically adjusts for odd and even months including February of leap years up to set the time and date, and the calendar will automatically update itself. ● Before using the watch , set the time and date correctly following the procedures in "TIME/DATE SETTING." 4 Before using the watch : ● Because the calendar is preadjusted at the factory, you only need to February 28, 2031. After 2032, adjust the year manually...
... CAL. 6A32 PERPETUAL CALENDAR ● Once set, the calendar automatically adjusts for odd and even months including February of leap years up to set the time and date, and the calendar will automatically update itself. ● Before using the watch , set the time and date correctly following the procedures in "TIME/DATE SETTING." 4 Before using the watch : ● Because the calendar is preadjusted at the factory, you only need to February 28, 2031. After 2032, adjust the year manually...
Manual
Page 6
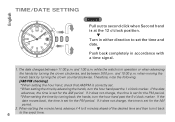
... setting the minute hand, advance it 4 to 5 minutes ahead of the desired time and then turn it does not change , the time is set for the PM period. *When setting the time by turning back the hands, turn the hour hand past the 9 o'clock marker. and 1:00 a.m. and 10:00 p.m. English TIME/DATE SETTING ➠ 6 ➠ CROWN Pull out to second click when Second hand is at the 12 o'clock position. ▼ Turn in either direction to set...
... setting the minute hand, advance it 4 to 5 minutes ahead of the desired time and then turn it does not change , the time is set for the PM period. *When setting the time by turning back the hands, turn the hour hand past the 9 o'clock marker. and 1:00 a.m. and 10:00 p.m. English TIME/DATE SETTING ➠ 6 ➠ CROWN Pull out to second click when Second hand is at the 12 o'clock position. ▼ Turn in either direction to set...
Manual
Page 7
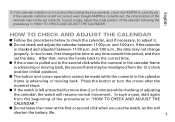
... the 12 o'clock position (initial position). ● The button and crown operation cannot be set correctly. HOW TO CHECK AND ADJUST THE CALENDAR ● Follow the procedures below to check the calendar, and if necessary, to any time outside this will resume normal movement. In such case, first change properly. After that AM/PM is advancing or moving back, the second hand may be...
... the 12 o'clock position (initial position). ● The button and crown operation cannot be set correctly. HOW TO CHECK AND ADJUST THE CALENDAR ● Follow the procedures below to check the calendar, and if necessary, to any time outside this will resume normal movement. In such case, first change properly. After that AM/PM is advancing or moving back, the second hand may be...
Manual
Page 13
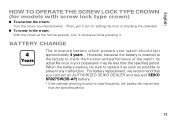
For battery replacement, we recommend that you contact an AUTHORIZED SEIKO DEALER and request SEIKO SR927SW(SB-AP) battery. * If the calendar checking function is inserted at the normal position, turn it clockwise while pressing it. BATTERY CHANGE 4 Years The miniature battery which powers your possession may be less than the specified period. However, because the battery is used frequently, the battery life may be sure to replace it...
For battery replacement, we recommend that you contact an AUTHORIZED SEIKO DEALER and request SEIKO SR927SW(SB-AP) battery. * If the calendar checking function is inserted at the normal position, turn it clockwise while pressing it. BATTERY CHANGE 4 Years The miniature battery which powers your possession may be less than the specified period. However, because the battery is used frequently, the battery life may be sure to replace it...
Manual
Page 14
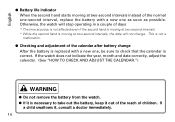
... calendar. (See "HOW TO CHECK AND ADJUST THE CALENDAR.") WARNING ● Do not remove the battery from the watch will stop operating in a couple of days * The time accuracy is not affected even if the second hand is moving at two-second intervals. * While the second hand is correct. English ● Battery life indicator When the second hand starts moving at two-second intervals instead of the normal one-second interval, replace the battery with a new...
... calendar. (See "HOW TO CHECK AND ADJUST THE CALENDAR.") WARNING ● Do not remove the battery from the watch will stop operating in a couple of days * The time accuracy is not affected even if the second hand is moving at two-second intervals. * While the second hand is correct. English ● Battery life indicator When the second hand starts moving at two-second intervals instead of the normal one-second interval, replace the battery with a new...
Technical Guide
Page 1
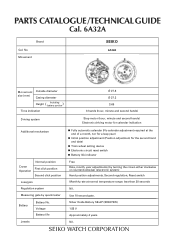
PARTS CATALOGUE /TECHNICAL GUIDE Cal. 6A32A Brand Cal. Use 10-second gate. No. Movement SEIKO 6A32A Movement Outside diameter size (mm) Casing diameter Height ( Including battery portion ) Time indication Ø 27.8 Ø 27.3 3.69 3 hands (hour, minute and second hands) Driving system Step motor (hour, minute and second hands) Electronic driving motor for the second hand and date) ● Train wheel setting device ● Electronic circuit reset switch ● Battery life indicator Free Date, month, year adjustments (by turning the crown either clockwise or counterclockwise...
PARTS CATALOGUE /TECHNICAL GUIDE Cal. 6A32A Brand Cal. Use 10-second gate. No. Movement SEIKO 6A32A Movement Outside diameter size (mm) Casing diameter Height ( Including battery portion ) Time indication Ø 27.8 Ø 27.3 3.69 3 hands (hour, minute and second hands) Driving system Step motor (hour, minute and second hands) Electronic driving motor for the second hand and date) ● Train wheel setting device ● Electronic circuit reset switch ● Battery life indicator Free Date, month, year adjustments (by turning the crown either clockwise or counterclockwise...
Technical Guide
Page 3
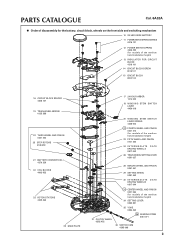
PARTS CATALOGUE Cal. 6A32A ● Order of disassembly for the battery, circuit block, wheels on the front side and switching mechanism 10 SILVER OXIDE BATTERY 11 POWER SWITCH SPRING SCREWS 0016 121 12 POWER SWITCH SPRING 4245 492 (for models of the medium hand installation height) 13 INSULATOR FOR CIRCUIT BLOCK 4216 101 14 CIRCUIT BLOCK SCREW 0016 121 15 CIRCUIT BLOCK 4004 104 16...
PARTS CATALOGUE Cal. 6A32A ● Order of disassembly for the battery, circuit block, wheels on the front side and switching mechanism 10 SILVER OXIDE BATTERY 11 POWER SWITCH SPRING SCREWS 0016 121 12 POWER SWITCH SPRING 4245 492 (for models of the medium hand installation height) 13 INSULATOR FOR CIRCUIT BLOCK 4216 101 14 CIRCUIT BLOCK SCREW 0016 121 15 CIRCUIT BLOCK 4004 104 16...

Technical Guide
Page 4
... 293 1 TOTAL NUMBER OF PARTS (TO BE ASSEMBLED) 44 4 PARTS NAME 3 DATE DIAL GUARD 4 DATE DIAL (INCOMPLETE) PARTS CODE Number of parts 0808 051 1 - 1 REMARK Refer to WATCH PARTS CATALOGUE CD-ROM. 5 INTERMEDIATE 24-HOUR WHEEL 6 24-HOUR WHEEL 7 HOUR WHEEL 0817 046 1019 001 0273 031 1 1 1 For models of the medium hand installation height 8 DATE DRIVING WHEEL 9 INTERMEDIATE DATE DRIVING WHEEL C 10 SILVER OXIDE BATTERY 11 POWER SWITCH SPRING SCREW 12 POWER SWITCH SPRING 0802...
... 293 1 TOTAL NUMBER OF PARTS (TO BE ASSEMBLED) 44 4 PARTS NAME 3 DATE DIAL GUARD 4 DATE DIAL (INCOMPLETE) PARTS CODE Number of parts 0808 051 1 - 1 REMARK Refer to WATCH PARTS CATALOGUE CD-ROM. 5 INTERMEDIATE 24-HOUR WHEEL 6 24-HOUR WHEEL 7 HOUR WHEEL 0817 046 1019 001 0273 031 1 1 1 For models of the medium hand installation height 8 DATE DRIVING WHEEL 9 INTERMEDIATE DATE DRIVING WHEEL C 10 SILVER OXIDE BATTERY 11 POWER SWITCH SPRING SCREW 12 POWER SWITCH SPRING 0802...
Technical Guide
Page 5
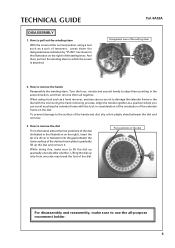
How to pull out the winding stem With the crown at the normal position, using a tool such as a hand remover, exercise care so as shown in the same direction, and then remove them pointing in the illustration on the right) of the setting lever. Turn the hour, minute and second hands to lift the dial up gradually one side may break the foot of the...
How to pull out the winding stem With the crown at the normal position, using a tool such as a hand remover, exercise care so as shown in the same direction, and then remove them pointing in the illustration on the right) of the setting lever. Turn the hour, minute and second hands to lift the dial up gradually one side may break the foot of the...
Technical Guide
Page 8
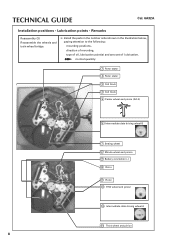
.... ❇ Install the parts in the number order shown in the illustration below, paying attention to the following: mounting positions, direction of mounting, type of oil, lubrication point(s) and amount of lubrication. normal quantity 1 Rotor stator 2 Rotor stator 3 Coil block 4 Coil block 5 Center wheel and pinion (AO-3) 6 Intermediate date driving wheel B 7 Setting wheel 8 Minute wheel and pinion 9 Battery connection (-) 10...
.... ❇ Install the parts in the number order shown in the illustration below, paying attention to the following: mounting positions, direction of mounting, type of oil, lubrication point(s) and amount of lubrication. normal quantity 1 Rotor stator 2 Rotor stator 3 Coil block 4 Coil block 5 Center wheel and pinion (AO-3) 6 Intermediate date driving wheel B 7 Setting wheel 8 Minute wheel and pinion 9 Battery connection (-) 10...
Technical Guide
Page 15
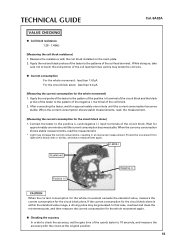
... circuit block alone] 1. If the current consumption for approximately one minute until the current consumption becomes stable. In that case, overhaul and clean the movement parts, and then measure the current consumption for the whole movement again. ● Checking the accuracy In order to check the accuracy, set the gate time of the quartz tester to 10 seconds, and measure the accuracy with a black...
... circuit block alone] 1. If the current consumption for approximately one minute until the current consumption becomes stable. In that case, overhaul and clean the movement parts, and then measure the current consumption for the whole movement again. ● Checking the accuracy In order to check the accuracy, set the gate time of the quartz tester to 10 seconds, and measure the accuracy with a black...
Technical Guide
Page 16
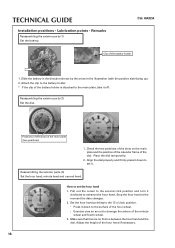
... battery in the direction shown by the arrow in the illustration (with the positive side facing up.) 2. Reassembling the exterior parts (2) Set the dial. Pull out the crown to the second click position and turn it down to set it. Stop the hour hand at the moment the date changes. 2. Adjust the height of the battery holder 1. Reassembling the exterior parts (3) Set the hour hand, minute hand and second hand. Cal. 6A32A Clip of the hour hand...
... battery in the direction shown by the arrow in the illustration (with the positive side facing up.) 2. Reassembling the exterior parts (2) Set the dial. Pull out the crown to the second click position and turn it down to set it. Stop the hour hand at the moment the date changes. 2. Adjust the height of the battery holder 1. Reassembling the exterior parts (3) Set the hour hand, minute hand and second hand. Cal. 6A32A Clip of the hour hand...
Technical Guide
Page 17
... the hour hand, between the hour hand and the minute hand, and between 23:00 and 01:00 4. TECHNICAL GUIDE Cal. 6A32A How to set the second hand 1. Firmly press the minute hand down to set it again. 3. Ensure that the second hand movement shows a large deviation from the graduation, remove the second hand and set it again. 3. How to set it temporarily. 2. Turn the crown counterclockwise at a time out of the target time of the date change , remove the minute hand...
... the hour hand, between the hour hand and the minute hand, and between 23:00 and 01:00 4. TECHNICAL GUIDE Cal. 6A32A How to set the second hand 1. Firmly press the minute hand down to set it again. 3. Ensure that the second hand movement shows a large deviation from the graduation, remove the second hand and set it again. 3. How to set it temporarily. 2. Turn the crown counterclockwise at a time out of the target time of the date change , remove the minute hand...
Technical Guide
Page 18
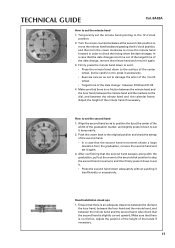
... the gasket is not pinched or rolled. "Initial position of the second hand " * Make sure that the second hand movement is left unoperated in this point onward. 2. Rotating the crown clockwise will return to the normal mode within 2 to the 12 o'clock position.) 1. TECHNICAL GUIDE HOW TO INPUT THE CALENDAR DATA (1) Method of the circuit for restoration. * If the watch will turn clockwise and stop . * Keep the crown...
... the gasket is not pinched or rolled. "Initial position of the second hand " * Make sure that the second hand movement is left unoperated in this point onward. 2. Rotating the crown clockwise will return to the normal mode within 2 to the 12 o'clock position.) 1. TECHNICAL GUIDE HOW TO INPUT THE CALENDAR DATA (1) Method of the circuit for restoration. * If the watch will turn clockwise and stop . * Keep the crown...
Technical Guide
Page 19
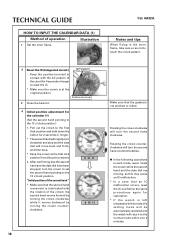
... second hand will cancel the self-propelling movement of the calendar frame. Press the button once. After confirming that the date dial has been stopped, turn the crown counterclockwise to cancel the self-propelling movement of operation 5 Initial position adjustment for the calendar (2) (Set the date dial to the 12 o'clock position, and the date dial will return to the normal mode within 2 to 3 minutes. 19 Rotating the crown clockwise will move the date dial...
... second hand will cancel the self-propelling movement of the calendar frame. Press the button once. After confirming that the date dial has been stopped, turn the crown counterclockwise to cancel the self-propelling movement of operation 5 Initial position adjustment for the calendar (2) (Set the date dial to the 12 o'clock position, and the date dial will return to the normal mode within 2 to 3 minutes. 19 Rotating the crown clockwise will move the date dial...
Technical Guide
Page 20
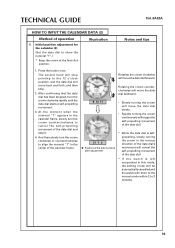
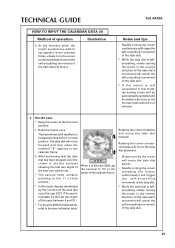
... until the date dial starts a self-propelling movement. 6 7 8 When it . 9 10 11 When the date is left unoperated in the reverse direction of the date dial's movement will move the date dial forward. TECHNICAL GUIDE Cal. 6A32A HOW TO INPUT THE CALENDAR DATA (3) Method of operation Illustration Notes and tips 6 Set the date. * Keep the crown at the first click position. 1. Press the button once. * The second hand will stop pointing to 3 minutes. 7 Set the...
... until the date dial starts a self-propelling movement. 6 7 8 When it . 9 10 11 When the date is left unoperated in the reverse direction of the date dial's movement will move the date dial forward. TECHNICAL GUIDE Cal. 6A32A HOW TO INPUT THE CALENDAR DATA (3) Method of operation Illustration Notes and tips 6 Set the date. * Keep the crown at the first click position. 1. Press the button once. * The second hand will stop pointing to 3 minutes. 7 Set the...
Technical Guide
Page 21
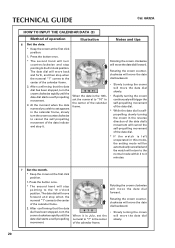
... date dial. * While the date dial is selfpropelling, slowly turning the crown in the reverse direction of the date dial's movement will cancel the self-propelling movement of the date dial. * If the watch is selfpropelling, slowly turning the crown in this mode, the year is indicated by the last two digits of the calendar frame. • Slowly turning the crown will move the date dial forward. TECHNICAL GUIDE HOW TO INPUT THE CALENDAR DATA (4) Method of the date dial and stop...
... date dial. * While the date dial is selfpropelling, slowly turning the crown in the reverse direction of the date dial's movement will cancel the self-propelling movement of the date dial. * If the watch is selfpropelling, slowly turning the crown in this mode, the year is indicated by the last two digits of the calendar frame. • Slowly turning the crown will move the date dial forward. TECHNICAL GUIDE HOW TO INPUT THE CALENDAR DATA (4) Method of the date dial and stop...
Technical Guide
Page 22
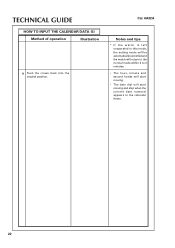
Cal. 6A32A Notes and tips * If the watch is left unoperated in this mode, the setting mode will be automatically cancelled and the watch will return to the normal mode within 2 to 3 minutes. • The hour, minute and second hands will start moving. • The date dial will start moving and stop when the current date numeral appears in the calendar frame. 22 TECHNICAL GUIDE HOW TO INPUT THE CALENDAR DATA (5) Method of operation Illustration 9 Push the crown back into the original position.
Cal. 6A32A Notes and tips * If the watch is left unoperated in this mode, the setting mode will be automatically cancelled and the watch will return to the normal mode within 2 to 3 minutes. • The hour, minute and second hands will start moving. • The date dial will start moving and stop when the current date numeral appears in the calendar frame. 22 TECHNICAL GUIDE HOW TO INPUT THE CALENDAR DATA (5) Method of operation Illustration 9 Push the crown back into the original position.
Technical Guide
Page 24
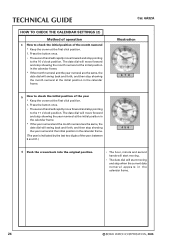
... the first click position. 1. TECHNICAL GUIDE HOW TO CHECK THE CALENDAR SETTINGS (2) Method of operation 4 How to check the initial position of the year: between 5 and 31.) 4 5 6 6 Push the crown back into the original position. • The hour, minute and second hands will start moving. • The date dial will start moving and stop when the current date numeral appears in the calendar frame. 24 ©...
... the first click position. 1. TECHNICAL GUIDE HOW TO CHECK THE CALENDAR SETTINGS (2) Method of operation 4 How to check the initial position of the year: between 5 and 31.) 4 5 6 6 Push the crown back into the original position. • The hour, minute and second hands will start moving. • The date dial will start moving and stop when the current date numeral appears in the calendar frame. 24 ©...


