
Installation Guide (Mac)
Page 16
... warranty statement. This warranty covers any misuse contrary to www.seagate.com for Macintosh If Seagate authorizes you 16 Getting Started Guide for more information regarding the location of this warranty. If you to return your product to Seagate. abuse; malfunctions caused by calling +1-800-SEAGATE. Seagate Technology Limited Consumer Warranty What Does This Warranty Cover?
... warranty statement. This warranty covers any misuse contrary to www.seagate.com for Macintosh If Seagate authorizes you 16 Getting Started Guide for more information regarding the location of this warranty. If you to return your product to Seagate. abuse; malfunctions caused by calling +1-800-SEAGATE. Seagate Technology Limited Consumer Warranty What Does This Warranty Cover?
Installation Guide (Windows)
Page 16
... neglect; electrostatic discharge; The warranty period is caused by calling +1-800-SEAGATE. accident; improper installation; Also, consequential damages; Seagate may not be prompted for more information regarding the location of the original product to a separate storage medium on...labels; abuse; Once an authorized service center or Seagate determines that is 1 year from an authorized Seagate retailer may obtain information regarding customer support within your claim is in the new Seagate productaccompanied by this warranty and is required, you...
... neglect; electrostatic discharge; The warranty period is caused by calling +1-800-SEAGATE. accident; improper installation; Also, consequential damages; Seagate may not be prompted for more information regarding the location of the original product to a separate storage medium on...labels; abuse; Once an authorized service center or Seagate determines that is 1 year from an authorized Seagate retailer may obtain information regarding customer support within your claim is in the new Seagate productaccompanied by this warranty and is required, you...
User Guide (Mac)
Page 2
...Keong TAN All rights reserved. No part of the Software, and to permit persons to whom the Software is available on your Mirra PC software CD. Permission is hereby granted, free of charge, to any person obtaining a copy of this permission notice appear in any form or by any... for the open source software used in this publication or the Seagate Mirra software, in source code or object code form, may be reproduced, stored in a retrieval system, or transmitted in supporting documentation. Contact information is furnished to the Debian Free Software Guidelines (http://www.debian.org/...
...Keong TAN All rights reserved. No part of the Software, and to permit persons to whom the Software is available on your Mirra PC software CD. Permission is hereby granted, free of charge, to any person obtaining a copy of this permission notice appear in any form or by any... for the open source software used in this publication or the Seagate Mirra software, in source code or object code form, may be reproduced, stored in a retrieval system, or transmitted in supporting documentation. Contact information is furnished to the Debian Free Software Guidelines (http://www.debian.org/...
User Guide (Mac)
Page 3
... this product or included in the product design without reservation and without notice. Trademarks Seagate™ and the Mirra logo are trademarks of Seagate Technology LLC, which may fall, causing serious damage to make changes in this document, or from the use . 2. ...COULD RESULT IN DAMAGES OR OTHER REMEDIES. Follow all of these instructions for later use of fire, electric shock, or bodily injury. Mirra Manual for information only and is for Macintosh Release 2.2 ii Patent 6,928,476 U.S. Save these instructions carefully. 1. The product may be registered in ...
... this product or included in the product design without reservation and without notice. Trademarks Seagate™ and the Mirra logo are trademarks of Seagate Technology LLC, which may fall, causing serious damage to make changes in this document, or from the use . 2. ...COULD RESULT IN DAMAGES OR OTHER REMEDIES. Follow all of these instructions for later use of fire, electric shock, or bodily injury. Mirra Manual for information only and is for Macintosh Release 2.2 ii Patent 6,928,476 U.S. Save these instructions carefully. 1. The product may be registered in ...

User Guide (Mac)
Page 4
... Seagate Technology LLC can safely repair your product near water. 5. Opening the Mirra or attempting to recover and restore your warranty. See details on your Mirra Sync and Share Personal Server will void your data. Mirra Limited Warranty One year parts and labor. 052407 Mirra Manual for cleaning. Never push objects of any kind on the product's information...
... Seagate Technology LLC can safely repair your product near water. 5. Opening the Mirra or attempting to recover and restore your warranty. See details on your Mirra Sync and Share Personal Server will void your data. Mirra Limited Warranty One year parts and labor. 052407 Mirra Manual for cleaning. Never push objects of any kind on the product's information...
User Guide (Mac)
Page 10
... shipping container should include the following components: • Seagate Mirra Sync and Share Personal Server • AC power cable • Ethernet cable • Mirra software CD (contains this electronic Mirra Manual) • Mirra license key sticker (affixed to connect your Mirra™ Personal Server and install, set up, and use the Mirra software. Intel Core Duo or Core Solo processor running...
... shipping container should include the following components: • Seagate Mirra Sync and Share Personal Server • AC power cable • Ethernet cable • Mirra software CD (contains this electronic Mirra Manual) • Mirra license key sticker (affixed to connect your Mirra™ Personal Server and install, set up, and use the Mirra software. Intel Core Duo or Core Solo processor running...
User Guide (Mac)
Page 23
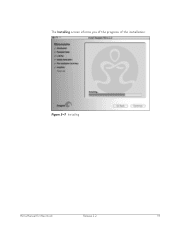
The Installing screen informs you of the progress of the installation: Figure 3~7 Installing Mirra Manual for Macintosh Release 2.2 14
The Installing screen informs you of the progress of the installation: Figure 3~7 Installing Mirra Manual for Macintosh Release 2.2 14
User Guide (Mac)
Page 33
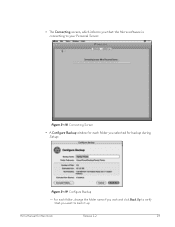
For each folder, change the folder name if you selected for backup during Setup: Figure 3~19 Configure Backup - Mirra Manual for Macintosh Release 2.2 24 • The Connecting screen, which informs you that you want to your Personal Server: Figure 3~18 Connecting Screen • A Configure Backup window for each folder you wish and click Back Up to verify that the Mirra software is connecting to back it up.
For each folder, change the folder name if you selected for backup during Setup: Figure 3~19 Configure Backup - Mirra Manual for Macintosh Release 2.2 24 • The Connecting screen, which informs you that you want to your Personal Server: Figure 3~18 Connecting Screen • A Configure Backup window for each folder you wish and click Back Up to verify that the Mirra software is connecting to back it up.
User Guide (Mac)
Page 34
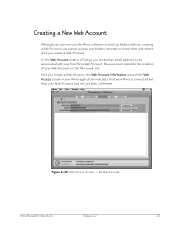
...In the Web Account window of the Web Access screen in your Mirra application indicates that your Mirra is connected but that your Web Account on the Mirra web site. Until you create a Web Account, the Web Account Information area of Setup, you entered an email address to back up ...folders without creating a Web Account, you must complete the creation of your Web Account has not yet been confirmed: Figure 3~20 Web Access Screen - No Web Account Mirra Manual for Macintosh Release 2.2 ...
...In the Web Account window of the Web Access screen in your Mirra application indicates that your Mirra is connected but that your Web Account on the Mirra web site. Until you create a Web Account, the Web Account Information area of Setup, you entered an email address to back up ...folders without creating a Web Account, you must complete the creation of your Web Account has not yet been confirmed: Figure 3~20 Web Access Screen - No Web Account Mirra Manual for Macintosh Release 2.2 ...
User Guide (Mac)
Page 42
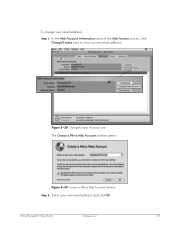
Mirra Manual for Macintosh Release 2.2 33 To change your email address, Step 1: In the Web Account Information area of the Web Access screen, click Change/Create next to your current email address: Figure 3~28 Change/Create Account Link The Create a Mirra Web Account window opens: Figure 3~29 Create a Mirra Web Account Window Step 2: Enter your new email address and click OK.
Mirra Manual for Macintosh Release 2.2 33 To change your email address, Step 1: In the Web Account Information area of the Web Access screen, click Change/Create next to your current email address: Figure 3~28 Change/Create Account Link The Create a Mirra Web Account window opens: Figure 3~29 Create a Mirra Web Account Window Step 2: Enter your new email address and click OK.
User Guide (Mac)
Page 46
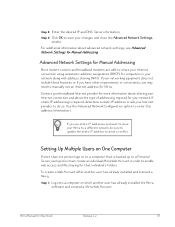
... your broadband Internet provider for more than one person logs on which another user has already installed the Mirra software and created a Mirra Web Account. To create a Web Account after another user has already installed and licensed a Mirra, Step 1: Log onto a computer on to...If static IP addressing is backed up to a Personal Server, each person must create an individual Mirra Web Account in your Internet connection and about advanced network settings, see Advanced Network Settings for Mirra. For additional information about the type of addressing required for Macintosh Release...
... your broadband Internet provider for more than one person logs on which another user has already installed the Mirra software and created a Mirra Web Account. To create a Web Account after another user has already installed and licensed a Mirra, Step 1: Log onto a computer on to...If static IP addressing is backed up to a Personal Server, each person must create an individual Mirra Web Account in your Internet connection and about advanced network settings, see Advanced Network Settings for Mirra. For additional information about the type of addressing required for Macintosh Release...

User Guide (Mac)
Page 47
The Create a Mirra Web Account window opens: Figure 3~35 Create a Mirra Web Account Window Step 4: Enter the email address you have not yet created a Mirra Web Account. Step 2: Open the Mirra application and click the Web Access tab: Figure 3~34 Web Access Screen - Mirra Manual for Macintosh Release 2.2 38 Step 3: Click Change/Create next to associate with your Web Account and click OK. No Web Account The Web Account Information area indicates that the Personal Server is connected and operating, but that you want to Account.
The Create a Mirra Web Account window opens: Figure 3~35 Create a Mirra Web Account Window Step 4: Enter the email address you have not yet created a Mirra Web Account. Step 2: Open the Mirra application and click the Web Access tab: Figure 3~34 Web Access Screen - Mirra Manual for Macintosh Release 2.2 38 Step 3: Click Change/Create next to associate with your Web Account and click OK. No Web Account The Web Account Information area indicates that the Personal Server is connected and operating, but that you want to Account.
User Guide (Mac)
Page 53
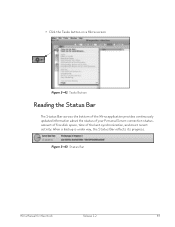
Figure 3~43 Status Bar Mirra Manual for Macintosh Release 2.2 44 • Click the Tasks button on a Mirra screen: Figure 3~42 Tasks Button Reading the Status Bar The Status Bar across the bottom of the Mirra application provides continuously updated information about the status of your Personal Server: connection status, amount of free disk space, time of the last synchronization, and most recent activity. When a backup is under way, the Status Bar reflects its progress.
Figure 3~43 Status Bar Mirra Manual for Macintosh Release 2.2 44 • Click the Tasks button on a Mirra screen: Figure 3~42 Tasks Button Reading the Status Bar The Status Bar across the bottom of the Mirra application provides continuously updated information about the status of your Personal Server: connection status, amount of free disk space, time of the last synchronization, and most recent activity. When a backup is under way, the Status Bar reflects its progress.
User Guide (Mac)
Page 54
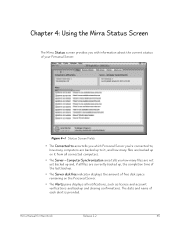
... you 're connected to, how many computers are backed up on the Personal Server. • The Alerts pane displays all connected computers. • The Server - Chapter 4: Using the Mirra Status Screen The Mirra Status screen provides you with information about the current status of your Personal Server: Figure 4~1 Status Screen Fields • The Connected to area tells you...
... you 're connected to, how many computers are backed up on the Personal Server. • The Alerts pane displays all connected computers. • The Server - Chapter 4: Using the Mirra Status Screen The Mirra Status screen provides you with information about the current status of your Personal Server: Figure 4~1 Status Screen Fields • The Connected to area tells you...
User Guide (Mac)
Page 59
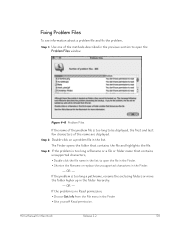
...problem is too long a filename or a file or folder name that contains the file and highlights the file. OR - Fixing Problem Files To see information about a problem file and fix the problem, Step 1: Use one of the methods described in the previous section to be displayed, the first and last...the folder higher up in the list to open the Problem Files window: Figure 4~8 Problem Files If the name of the name are displayed. OR - Mirra Manual for Macintosh Release 2.2 50 Step 2: Double-click on a problem file in the Finder • Give yourself Read permission. If the problem is ...
...problem is too long a filename or a file or folder name that contains the file and highlights the file. OR - Fixing Problem Files To see information about a problem file and fix the problem, Step 1: Use one of the methods described in the previous section to be displayed, the first and last...the folder higher up in the list to open the Problem Files window: Figure 4~8 Problem Files If the name of the name are displayed. OR - Mirra Manual for Macintosh Release 2.2 50 Step 2: Double-click on a problem file in the Finder • Give yourself Read permission. If the problem is ...
User Guide (Mac)
Page 60
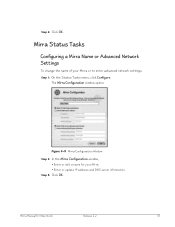
The Mirra Configuration window opens: Figure 4~9 Mirra Configuration Window Step 2: In the Mirra Configuration window, • Enter or edit a name for Macintosh Release 2.2 51 Mirra Manual for your Mirra or to enter advanced network settings, Step 1: On the Status Tasks menu, click Configure. Mirra Status Tasks Configuring a Mirra Name or Advanced Network Settings To change the name of your Mirra. • Enter or update IP address and DNS server information. Step 4: Click OK. Step 3: Click OK.
The Mirra Configuration window opens: Figure 4~9 Mirra Configuration Window Step 2: In the Mirra Configuration window, • Enter or edit a name for Macintosh Release 2.2 51 Mirra Manual for your Mirra or to enter advanced network settings, Step 1: On the Status Tasks menu, click Configure. Mirra Status Tasks Configuring a Mirra Name or Advanced Network Settings To change the name of your Mirra. • Enter or update IP address and DNS server information. Step 4: Click OK. Step 3: Click OK.
User Guide (Mac)
Page 62
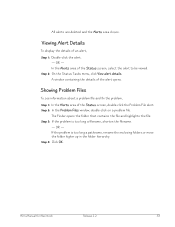
... too long a filename, shorten the filename. - A window containing the details of the Status screen, double-click the Problem File alert. Showing Problem Files To see information about a problem file and fix the problem, Step 1: In the Alerts area of the alert opens. Step 2: In the Problem Files window, double-click on... alerts are deleted and the Alerts area closes. Viewing Alert Details To display the details of the Status screen, select the alert to be viewed. Mirra Manual for Macintosh Release 2.2 53
... too long a filename, shorten the filename. - A window containing the details of the Status screen, double-click the Problem File alert. Showing Problem Files To see information about a problem file and fix the problem, Step 1: In the Alerts area of the alert opens. Step 2: In the Problem Files window, double-click on... alerts are deleted and the Alerts area closes. Viewing Alert Details To display the details of the Status screen, select the alert to be viewed. Mirra Manual for Macintosh Release 2.2 53
User Guide (Mac)
Page 63
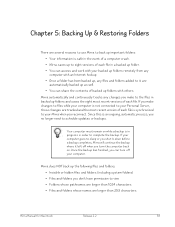
...an ongoing, automatic process, you make changes to files while your computer is not connected to your Personal Server, those changes are tracked and the most recent versions of each file. Mirra automatically and continuously tracks any files and folders added to the files in backed up folders and ...to complete the backup. Chapter 5: Backing Up & Restoring Folders There are several reasons to use Mirra to back up important folders: • Your information is safe in the event of a computer crash. • Mirra saves up to eight versions of each file in a backed up folder. • You can...
...an ongoing, automatic process, you make changes to files while your computer is not connected to your Personal Server, those changes are tracked and the most recent versions of each file. Mirra automatically and continuously tracks any files and folders added to the files in backed up folders and ...to complete the backup. Chapter 5: Backing Up & Restoring Folders There are several reasons to use Mirra to back up important folders: • Your information is safe in the event of a computer crash. • Mirra saves up to eight versions of each file in a backed up folder. • You can...
User Guide (Mac)
Page 68
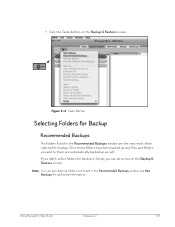
... window; • Click the Tasks button on the Backup & Restore screen. see New Backups for Macintosh Release 2.2 59 If you didn't select folders for backup. Mirra Manual for additional information. Once these folders have been backed up, any files and folders you can also back up as well.
... window; • Click the Tasks button on the Backup & Restore screen. see New Backups for Macintosh Release 2.2 59 If you didn't select folders for backup. Mirra Manual for additional information. Once these folders have been backed up, any files and folders you can also back up as well.
User Guide (Mac)
Page 81
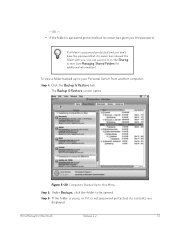
... if it on the Sharing screen (see Managing Shared Folders for Macintosh Release 2.2 72 - Mirra Manual for additional information). The Backup & Restore screen opens Figure 5~20 Computers Backed Up to this Mirra Step 2: Under Backups, click the folder to your Personal Server from another computer, Step 1: Click the Backup & Restore tab. OR - • if the...
... if it on the Sharing screen (see Managing Shared Folders for Macintosh Release 2.2 72 - Mirra Manual for additional information). The Backup & Restore screen opens Figure 5~20 Computers Backed Up to this Mirra Step 2: Under Backups, click the folder to your Personal Server from another computer, Step 1: Click the Backup & Restore tab. OR - • if the...


