Installation Guide (Mac)
Page 2
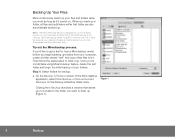
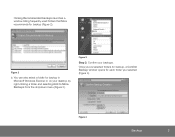
...1 Clicking New Backup launches a window that folder are being backed up at once. Subsequent backups take less time. Try out the Mirra backup process. Step 1: Select folders for how a Mirra backup works before you work as long as it up. Backing Up Your Files Mirra continuously backs up your folders. ...Backups on . Once you want to back it 's turned on the Backup & Restore Tasks menu. a. When you back up . Note: The Mirra Personal Server is designed to run in the background, so you can keep working during the initial backup if you 'd like to the folder you 're comfortable...
...1 Clicking New Backup launches a window that folder are being backed up at once. Subsequent backups take less time. Try out the Mirra backup process. Step 1: Select folders for how a Mirra backup works before you work as long as it up. Backing Up Your Files Mirra continuously backs up your folders. ...Backups on . Once you want to back it 's turned on the Backup & Restore Tasks menu. a. When you back up . Note: The Mirra Personal Server is designed to run in the background, so you can keep working during the initial backup if you 'd like to the folder you 're comfortable...
Installation Guide (Mac)
Page 3
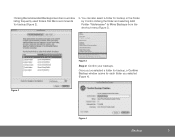
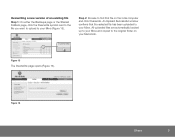
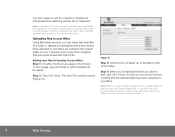
Once you've selected a folder for backup, a Confirm Backup window opens for backup in the Finder by Control-clicking the folder and selecting Add Folder "foldername" to Mirra Backups from the shortcut menu (Figure 3). b. You can also select a folder for each folder you selected (Figure 4). Figure 4 Backup 3 Figure 2 Figure 3 Step 2: Confirm your backups. Clicking Recommended Backups launches a window listing frequently used folders that Mirra recommends for backup (Figure 2).
Once you've selected a folder for backup, a Confirm Backup window opens for backup in the Finder by Control-clicking the folder and selecting Add Folder "foldername" to Mirra Backups from the shortcut menu (Figure 3). b. You can also select a folder for each folder you selected (Figure 4). Figure 4 Backup 3 Figure 2 Figure 3 Step 2: Confirm your backups. Clicking Recommended Backups launches a window listing frequently used folders that Mirra recommends for backup (Figure 2).
Installation Guide (Mac)
Page 8
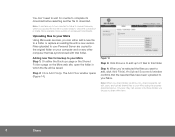
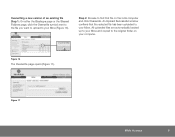
...save, and upload shared files to add, click Add File(s). Adding new files for backup to your Mirra Using Mirra web services, you want to your Mirra. Files uploaded to your Personal Server are copied to the original folder on your computer and on any other computer that has synchronized with... to this folder. Step 4: When you've selected the files you can take up to 5 files to your Mirra using the process described above. An Upload Successful window confirms that folder. Note: It can either the Backups page or the Shared Folders page on subsequent downloads. Step ...
...save, and upload shared files to add, click Add File(s). Adding new files for backup to your Mirra Using Mirra web services, you want to your Mirra. Files uploaded to your Personal Server are copied to the original folder on your computer and on any other computer that has synchronized with... to this folder. Step 4: When you've selected the files you can take up to 5 files to your Mirra using the process described above. An Upload Successful window confirms that folder. Note: It can either the Backups page or the Shared Folders page on subsequent downloads. Step ...
Installation Guide (Mac)
Page 9
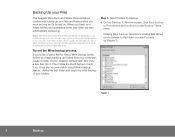
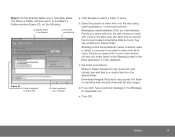
Step 2: Browse to find that the selected file has been uploaded to your Macintosh. An Upload Successful window confirms that file on your Mirra. Figure 15 The Overwrite page opens (Figure 16). Figure 16 Share 9 Overwriting a new version of an existing file Step 1: On either the Backups page or the Shared Folders page, click the Overwrite symbol next to the file you want to upload to your Mirra and copied to the original folder on the local computer and click Overwrite. All uploaded files are automatically backed up to your Mirra (Figure 15).
Step 2: Browse to find that the selected file has been uploaded to your Macintosh. An Upload Successful window confirms that file on your Mirra. Figure 15 The Overwrite page opens (Figure 16). Figure 16 Share 9 Overwriting a new version of an existing file Step 1: On either the Backups page or the Shared Folders page, click the Overwrite symbol next to the file you want to upload to your Mirra and copied to the original folder on the local computer and click Overwrite. All uploaded files are automatically backed up to your Mirra (Figure 15).
Installation Guide (Mac)
Page 10
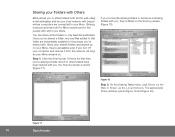
... On the Sharing Tasks menu, click Share via the Web or Share via your local network with people whose computers are immediately available to your Mirra. Once you've shared a folder, any new files added to that folder are connected to the people you've shared with. If this...Click the Sharing tab. You can share entire folders or only selected subfolders. The appropriate Share window opens (Figure 19 and Figure 20). Sharing your Folders with Others Mirra allows you to share folders both for Mirra owners and for the people with whom you , the Sharing screen is empty (Figure 17...
... On the Sharing Tasks menu, click Share via the Web or Share via your local network with people whose computers are immediately available to your Mirra. Once you've shared a folder, any new files added to that folder are connected to the people you've shared with. If this...Click the Sharing tab. You can share entire folders or only selected subfolders. The appropriate Share window opens (Figure 19 and Figure 20). Sharing your Folders with Others Mirra allows you to share folders both for Mirra owners and for the people with whom you , the Sharing screen is empty (Figure 17...
Installation Guide (Mac)
Page 11
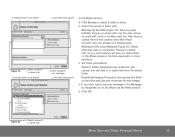
... the Share via the Web (Figure 19): Enter an email address. If you share with Mirra Sync and Share Personal Server 11 Set folder permissions In the Share window, a. People you wish, type a personal message in the Message to the Mirra web site. Select recipients to be shared c. Download images: Recipients may download, edit, upload, and...
... the Share via the Web (Figure 19): Enter an email address. If you share with Mirra Sync and Share Personal Server 11 Set folder permissions In the Share window, a. People you wish, type a personal message in the Message to the Mirra web site. Select recipients to be shared c. Download images: Recipients may download, edit, upload, and...
Installation Guide (Windows)
Page 2
Then follow the steps below to the folder you 're comfortable using Mirra's backup feature, delete the test folder and begin backing up folders from your folders. Backing Up your Files The Seagate Mirra Sync and Share Personal Server continuously backs up your files and folders while you back up a folder, ... are being backed up (Figure 1). If you'd like to back up at once. Step 1: Select folders for how a Mirra backup works before you choose. Once you want to get a feel for backup. Clicking New backup launches a window that allows you to browse to back it 's turned on.
Then follow the steps below to the folder you 're comfortable using Mirra's backup feature, delete the test folder and begin backing up folders from your folders. Backing Up your Files The Seagate Mirra Sync and Share Personal Server continuously backs up your files and folders while you back up a folder, ... are being backed up (Figure 1). If you'd like to back up at once. Step 1: Select folders for how a Mirra backup works before you choose. Once you want to get a feel for backup. Clicking New backup launches a window that allows you to browse to back it 's turned on.
Installation Guide (Windows)
Page 3
Figure 4 Backup 3 Clicking Recommended backups launches a window listing frequently used folders that Mirra recommends for each folder you 've selected folders for backup, a Confirm Backup window opens for backup (Figure 2). Figure 3 Step 2: Confirm your desktop by right-clicking a folder and selecting Add to Mirra Backups from the dropdown menu (Figure 3). Figure 2 b. Once you selected (Figure 4). You can also select a folder for backup in Microsoft Windows Explorer or on your backups.
Figure 4 Backup 3 Clicking Recommended backups launches a window listing frequently used folders that Mirra recommends for each folder you 've selected folders for backup, a Confirm Backup window opens for backup (Figure 2). Figure 3 Step 2: Confirm your desktop by right-clicking a folder and selecting Add to Mirra Backups from the dropdown menu (Figure 3). Figure 2 b. Once you selected (Figure 4). You can also select a folder for backup in Microsoft Windows Explorer or on your backups.
Installation Guide (Windows)
Page 8
... the process described above. Figure 15 Step 3: Click Browse to select up to two minutes for the Mirra Sync and Share Personal Server to this folder. You don't need to wait for one file to complete its download before selecting another file to add, click Add File(s). However,...you access the first file in which the files will be saved. An Upload Successful window confirms that folder. The Add Files window opens (Figure 15). Step 4: When you've selected the files you share folders through Mirra.com, share recipients can either the Backups page or the Shared Folders page, open ...
... the process described above. Figure 15 Step 3: Click Browse to select up to two minutes for the Mirra Sync and Share Personal Server to this folder. You don't need to wait for one file to complete its download before selecting another file to add, click Add File(s). However,...you access the first file in which the files will be saved. An Upload Successful window confirms that folder. The Add Files window opens (Figure 15). Step 4: When you've selected the files you share folders through Mirra.com, share recipients can either the Backups page or the Shared Folders page, open ...
Installation Guide (Windows)
Page 9
Figure 17 Web Access 9 An Upload Successful window confirms that file on your computer. Figure 16 The Overwrite page opens (Figure 17). All uploaded files are automatically backed up to your Mirra and copied to your Mirra (Figure 16). Overwriting a new version of an existing file Step 1: On either the Backups page or the Shared Folders page, click the Overwrite symbol next to the file you want to upload to find that the selected file has been uploaded to the original folder on the local computer and click Overwrite. Step 2: Browse to your Mirra.
Figure 17 Web Access 9 An Upload Successful window confirms that file on your computer. Figure 16 The Overwrite page opens (Figure 17). All uploaded files are automatically backed up to your Mirra and copied to your Mirra (Figure 16). Overwriting a new version of an existing file Step 1: On either the Backups page or the Shared Folders page, click the Overwrite symbol next to the file you want to upload to find that the selected file has been uploaded to the original folder on the local computer and click Overwrite. Step 2: Browse to your Mirra.
Installation Guide (Windows)
Page 11
b. c. If you wish, type a personal message in the Mirra application on the Mirra web site and download full-size images. Click OK. Identify folder to recipients box. Send recipients your shared folder. e. Click Browse to select a folder to ... access this folder on their desktops. After they've clicked the link and created a free Mirra Web Account, they can access your message a. In the Share a Folder window (Figure 20), do the following: a. The Share a Folder window opens. People you share with over the web receive an email with over the web using...
b. c. If you wish, type a personal message in the Mirra application on the Mirra web site and download full-size images. Click OK. Identify folder to recipients box. Send recipients your shared folder. e. Click Browse to select a folder to ... access this folder on their desktops. After they've clicked the link and created a free Mirra Web Account, they can access your message a. In the Share a Folder window (Figure 20), do the following: a. The Share a Folder window opens. People you share with over the web receive an email with over the web using...
Installation Guide (Windows)
Page 14
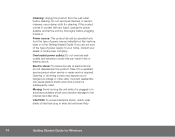
... the internal hard disk drive. Take it to wide slot and insert fully. 14 Getting Started Guide for cleaning. Do not use a damp cloth for Windows Overloaded power outlets: Do not overload wall outlets and extension cords; this can cause electric shock when this product. Opening or removing covers may expose...
... the internal hard disk drive. Take it to wide slot and insert fully. 14 Getting Started Guide for cleaning. Do not use a damp cloth for Windows Overloaded power outlets: Do not overload wall outlets and extension cords; this can cause electric shock when this product. Opening or removing covers may expose...
Installation Guide (Windows)
Page 16
...original packaging) and shipped, with a product that a repair is not part of this warranty statement. Data recovery is in the new Seagate productaccompanied by dialing +1-405-324-4700. or any warranty coverage unless your name, address, phone number, e-mail and product serial number ... data loss-back-up your jurisdiction. Callers outside the US can reach this warranty. By sending product for Windows operation; Once an authorized service center or Seagate determines that was previously used, repaired and tested to a separate storage medium on a regular basis. Product ...
...original packaging) and shipped, with a product that a repair is not part of this warranty statement. Data recovery is in the new Seagate productaccompanied by dialing +1-405-324-4700. or any warranty coverage unless your name, address, phone number, e-mail and product serial number ... data loss-back-up your jurisdiction. Callers outside the US can reach this warranty. By sending product for Windows operation; Once an authorized service center or Seagate determines that was previously used, repaired and tested to a separate storage medium on a regular basis. Product ...
Installation Guide (Windows)
Page 18
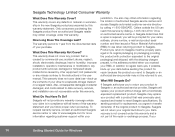
... implied warranty lasts, so the above limitation may not apply to you . This warranty gives you . SEAGATE'S RESPONSIBILITY FOR MALFUNCTIONS AND DEFECTS IN MIRRA SYNC AND SHARE PERSONAL SERVERS IS LIMITED TO REPAIR AND REPLACEMENT AS SET FORTH IN THIS LIMITED WARRANTY. Some states (or jurisdictions)...limitation may have other rights which vary from state to state (or jurisdiction to the duration of merchantability and fitness for Windows SEAGATE DOES NOT ACCEPT LIABILITY BEYOND THE REMEDIES SET FORTH IN THIS LIMITED WARRANTY OR LIABILITY FOR INCIDENTAL OR CONSEQUENTIAL DAMAGES, INCLUDING ...
... implied warranty lasts, so the above limitation may not apply to you . This warranty gives you . SEAGATE'S RESPONSIBILITY FOR MALFUNCTIONS AND DEFECTS IN MIRRA SYNC AND SHARE PERSONAL SERVERS IS LIMITED TO REPAIR AND REPLACEMENT AS SET FORTH IN THIS LIMITED WARRANTY. Some states (or jurisdictions)...limitation may have other rights which vary from state to state (or jurisdiction to the duration of merchantability and fitness for Windows SEAGATE DOES NOT ACCEPT LIABILITY BEYOND THE REMEDIES SET FORTH IN THIS LIMITED WARRANTY OR LIABILITY FOR INCIDENTAL OR CONSEQUENTIAL DAMAGES, INCLUDING ...
Product Information
Page 2
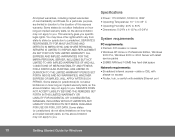
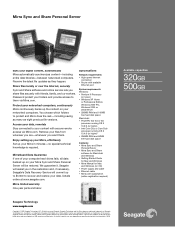
... Contents • Mirra Sync and Share Personal Server • Mirra Sync and Share software for Macintosh and Windows • Getting Started Guide for Mac and Windows • Mirra Manual for Mac and Windows (on operating environment and formatting. 06/06 Available capacities 320GB 500GB Mirra Sync and Share Personal Server Sync your Mirra in the restoration and, if necessary, Seagate's Data Recovery Service...
... Contents • Mirra Sync and Share Personal Server • Mirra Sync and Share software for Macintosh and Windows • Getting Started Guide for Mac and Windows • Mirra Manual for Mac and Windows (on operating environment and formatting. 06/06 Available capacities 320GB 500GB Mirra Sync and Share Personal Server Sync your Mirra in the restoration and, if necessary, Seagate's Data Recovery Service...
Setup Guide
Page 4
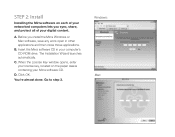
...your digital content. D. C. Go to step 3. Windows: Mac: B. Before you sync, share, and protect all of your networked computers lets you install the Mirra Windows or Mac software, save any work open in your Mirra software CD. The Installation Wizard launches automatically. Click... OK. You're almost done. STEP 2: Install Installing the Mirra software on the paper sleeve containing your ...
...your digital content. D. C. Go to step 3. Windows: Mac: B. Before you sync, share, and protect all of your networked computers lets you install the Mirra Windows or Mac software, save any work open in your Mirra software CD. The Installation Wizard launches automatically. Click... OK. You're almost done. STEP 2: Install Installing the Mirra software on the paper sleeve containing your ...
Setup Guide
Page 5
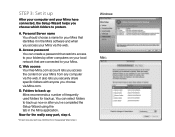
... for backup. It also lets you securely share specific folders with anyone you access your Mirra via the web. B. Personal Server name You should choose a name for your Mirra have connected, the Setup Wizard helps you access the content on the appropriate Wizard screen.) Windows: Mac: D. Access password You can select folders to back up...
... for backup. It also lets you securely share specific folders with anyone you access your Mirra via the web. B. Personal Server name You should choose a name for your Mirra have connected, the Setup Wizard helps you access the content on the appropriate Wizard screen.) Windows: Mac: D. Access password You can select folders to back up...
User Guide (Mac)
Page 6
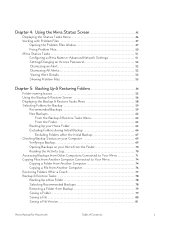
... Screen 45 Displaying the Status Tasks Menu 46 Working with Problem Files 47 Opening the Problem Files Window 47 Fixing Problem Files 50 Mirra Status Tasks 51 Configuring a Mirra Name or Advanced Network Settings 51 Setting/Changing an Access Password 52 Dismissing an Alert 52 Dismissing... the Finder 70 Reading the Activity Log 70 Accessing Backups from Other Computers Connected to Your Mirra 71 Copying Files from Another Computer Connected to Your Mirra 74 Copying a Folder from Another Computer 74 Copying a File from Another Computer 76 Restoring Folders After a Crash 77 Backup ...
... Screen 45 Displaying the Status Tasks Menu 46 Working with Problem Files 47 Opening the Problem Files Window 47 Fixing Problem Files 50 Mirra Status Tasks 51 Configuring a Mirra Name or Advanced Network Settings 51 Setting/Changing an Access Password 52 Dismissing an Alert 52 Dismissing... the Finder 70 Reading the Activity Log 70 Accessing Backups from Other Computers Connected to Your Mirra 71 Copying Files from Another Computer Connected to Your Mirra 74 Copying a Folder from Another Computer 74 Copying a File from Another Computer 76 Restoring Folders After a Crash 77 Backup ...
User Guide (Mac)
Page 7
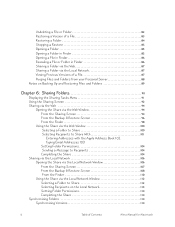
... Previous Versions of a File 87 Purging Files and Folders from your Personal Server 88 Notes on Backing Up and Restoring Files and Folders 89 Chapter...Web 94 Opening the Share via the Web Window 94 From the Sharing Screen 94 From the Backup & Restore...the Finder 98 Using the Share via the Web Window 100 Selecting a Folder to Share 100 Selecting Recipients ...Network 106 Opening the Share via the Local Network Window 106 From the Sharing Screen 107 From the Backup & Restore... Finder 110 Using the Share via the Local Network Window 112 Selecting a Folder to Share 112 Selecting Recipients on...
... Previous Versions of a File 87 Purging Files and Folders from your Personal Server 88 Notes on Backing Up and Restoring Files and Folders 89 Chapter...Web 94 Opening the Share via the Web Window 94 From the Sharing Screen 94 From the Backup & Restore...the Finder 98 Using the Share via the Web Window 100 Selecting a Folder to Share 100 Selecting Recipients ...Network 106 Opening the Share via the Local Network Window 106 From the Sharing Screen 107 From the Backup & Restore... Finder 110 Using the Share via the Local Network Window 112 Selecting a Folder to Share 112 Selecting Recipients on...
User Guide (Mac)
Page 18
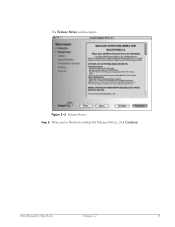
Mirra Manual for Macintosh Release 2.2 9 The Release Notes window opens: Figure 3~2 Release Notes Step 3: When you've finished reading the Release Notes, click Continue.
Mirra Manual for Macintosh Release 2.2 9 The Release Notes window opens: Figure 3~2 Release Notes Step 3: When you've finished reading the Release Notes, click Continue.


