
Product Information
Page 1
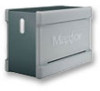
... 8 ounces - The only all your files - USB bus-powered*-no additional power cords are the most effective way to carry your documents are needed - System Rollback-rolls back your PC settings to make backup copies of your digital portfolio. The Maxtor OneTouch III Mini Edition also gives you . Have the ability to -date files both data transfer and power*, no additional power cords needed . Simple Maxtor user-interface for your data. A portable, feature-rich yet easy to...
... 8 ounces - The only all your files - USB bus-powered*-no additional power cords are the most effective way to carry your documents are needed - System Rollback-rolls back your PC settings to make backup copies of your digital portfolio. The Maxtor OneTouch III Mini Edition also gives you . Have the ability to -date files both data transfer and power*, no additional power cords needed . Simple Maxtor user-interface for your data. A portable, feature-rich yet easy to...
Product Information
Page 2
...06-CL. USB 2.0-33Mb/sec Bus transfer rate (maximum): - Box dimensions 7"W x 5"H x 2.5"D - Product support representatives available Monday-Friday To speak with a Maxtor product support representative: In the U.S. Maxtor, and the Maxtor stylized logo are registered trademarks, and Maxtor OneTouch and Maxtor DriveLock are required for system updates) Includes - Weight 7.2 oz (205 g) PACKAGING Specifications - Quick start guide - AC adapter sold separately. Specifications Capacity (model #) 60 GB (R01E060) 100 GB (R01E100) Hard drives: 2.5-inch ATA RPM 5400 RPM Integrated...
...06-CL. USB 2.0-33Mb/sec Bus transfer rate (maximum): - Box dimensions 7"W x 5"H x 2.5"D - Product support representatives available Monday-Friday To speak with a Maxtor product support representative: In the U.S. Maxtor, and the Maxtor stylized logo are registered trademarks, and Maxtor OneTouch and Maxtor DriveLock are required for system updates) Includes - Weight 7.2 oz (205 g) PACKAGING Specifications - Quick start guide - AC adapter sold separately. Specifications Capacity (model #) 60 GB (R01E060) 100 GB (R01E100) Hard drives: 2.5-inch ATA RPM 5400 RPM Integrated...

Quick Start Guide
Page 1
... system. Windows Quick Start Guide (Macintosh instructions on reverse side) MAXTOR ONETOUCH™ III MINI EDITION For detailed instructions, refer to change, without notice, product offerings or specifications. Plug the Power + Data connector into an available USB port on your language from Maxtor at support.seagate.com for data storage. One gigabyte, or GB, equals one of their respective owners. Your computer's operating system may use a different standard of the listed capacity is attached, the software installation will not...
... system. Windows Quick Start Guide (Macintosh instructions on reverse side) MAXTOR ONETOUCH™ III MINI EDITION For detailed instructions, refer to change, without notice, product offerings or specifications. Plug the Power + Data connector into an available USB port on your language from Maxtor at support.seagate.com for data storage. One gigabyte, or GB, equals one of their respective owners. Your computer's operating system may use a different standard of the listed capacity is attached, the software installation will not...

Quick Start Guide
Page 2
... power supply should be purchased from Maxtor at support.seagate.com for your system. Enable the OneTouch Feature Push the button on your Mac. Need Help? OneTouch Button Refer to install the software. Install the Software Highly Recommended - Follow the onscreen steps to your system. 3. Small Connector Red Connector Black Connector 2. Plug the Power + Data connector into an available USB port on the OneTouch III Mini Edition to the Backup Settings menu. Copy all files on your desktop. The OneTouch Manager software...
... power supply should be purchased from Maxtor at support.seagate.com for your system. Enable the OneTouch Feature Push the button on your Mac. Need Help? OneTouch Button Refer to install the software. Install the Software Highly Recommended - Follow the onscreen steps to your system. 3. Small Connector Red Connector Black Connector 2. Plug the Power + Data connector into an available USB port on the OneTouch III Mini Edition to the Backup Settings menu. Copy all files on your desktop. The OneTouch Manager software...
Quick Start Guide
Page 3
...-776-7538 work 303-829-2270 cell Maxtor Document: Document Description: Publication Format: Paper Stock/Weight: Artwork Bleed: Number of Inks: Number of Folds: Publication Folded Size: Production (print) File: Proof File: Prepared by: 100476795 GUIDE, QSTART, MXO, OT_MINI, US Maxtor OneTouch III Mini Edition Quick Start Guide, US 11 inches (H) x 8.5 inches (W), double sided 60 lb. refer to separate folding guide 4.25" (W) x 2.75" (H) Quark XPress v6.5/Mac (100476795_print.qxd) Adobe PDF 100476795(g).pdf, supplied InfoGraphics...
...-776-7538 work 303-829-2270 cell Maxtor Document: Document Description: Publication Format: Paper Stock/Weight: Artwork Bleed: Number of Inks: Number of Folds: Publication Folded Size: Production (print) File: Proof File: Prepared by: 100476795 GUIDE, QSTART, MXO, OT_MINI, US Maxtor OneTouch III Mini Edition Quick Start Guide, US 11 inches (H) x 8.5 inches (W), double sided 60 lb. refer to separate folding guide 4.25" (W) x 2.75" (H) Quark XPress v6.5/Mac (100476795_print.qxd) Adobe PDF 100476795(g).pdf, supplied InfoGraphics...
User Guide for Windows
Page 2
... billion bytes when referring to change, without notice, product offerings or specifications. In addition, some of their respective owners. Seagate reserves the right to hard drive capacity. Install the Software 3 Step 3 - Your computer's operating system may use a different standard of its affiliates. Setup the Drive 8 Using the OneTouch III Mini Edition 9 Maxtor EasyManage 9 Maxtor OneTouch Settings Utilities 10 Customizing the OneTouch Button 10 Security Settings 11 Unlock Drive 13 Erase Drive 13 Backup 14 Backup File Management 15 Restore 16 Sync 17 Automatic Sync...
... billion bytes when referring to change, without notice, product offerings or specifications. In addition, some of their respective owners. Seagate reserves the right to hard drive capacity. Install the Software 3 Step 3 - Your computer's operating system may use a different standard of its affiliates. Setup the Drive 8 Using the OneTouch III Mini Edition 9 Maxtor EasyManage 9 Maxtor OneTouch Settings Utilities 10 Customizing the OneTouch Button 10 Security Settings 11 Unlock Drive 13 Erase Drive 13 Backup 14 Backup File Management 15 Restore 16 Sync 17 Automatic Sync...

User Guide for Windows
Page 3
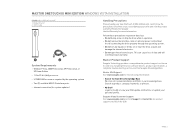
... use - Diagnostic utilities to identify new terms. Components Before installing, review the solution features in case of loss or unauthorized use . Italics Used for emphasis and to check the health of your files - FIGURE 1 SOLUTION FEATURES 1. Maxtor Encryption to back up and restore data. Maxtor DriveLock™ security feature password-protects the contents of your sensitive data - Mini USB 2.0 Port 4. The OneTouch III Mini Edition features: - MAXTOR ONETOUCH III MINI EDITION WINDOWS VISTA INSTALLATION Introduction Thank you setup your drive and includes helpful...
... use - Diagnostic utilities to identify new terms. Components Before installing, review the solution features in case of loss or unauthorized use . Italics Used for emphasis and to check the health of your files - FIGURE 1 SOLUTION FEATURES 1. Maxtor Encryption to back up and restore data. Maxtor DriveLock™ security feature password-protects the contents of your sensitive data - Mini USB 2.0 Port 4. The OneTouch III Mini Edition features: - MAXTOR ONETOUCH III MINI EDITION WINDOWS VISTA INSTALLATION Introduction Thank you setup your drive and includes helpful...
User Guide for Windows
Page 4
... latest software drivers, product specifications, a complete troubleshooting section, and the Seagate Knowledge Base. USB Y-Cable System Requirements - Maxtor Product Support Seagate Technology provides a comprehensive product support section on or near the drive. Backup Solution 2. Windows® Vista, 2000 Professional, XP Professional, or XP Home Edition - 1 Ghz 32-bit (x86) processor - 512MB RAM or more information. Liquids will void the product warranty. Search the Hard Drive Knowledge Base We store all resolved problems and FAQ's in operation. - Search...
... latest software drivers, product specifications, a complete troubleshooting section, and the Seagate Knowledge Base. USB Y-Cable System Requirements - Maxtor Product Support Seagate Technology provides a comprehensive product support section on or near the drive. Backup Solution 2. Windows® Vista, 2000 Professional, XP Professional, or XP Home Edition - 1 Ghz 32-bit (x86) processor - 512MB RAM or more information. Liquids will void the product warranty. Search the Hard Drive Knowledge Base We store all resolved problems and FAQ's in operation. - Search...
User Guide for Windows
Page 5
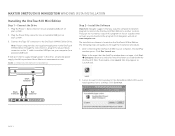
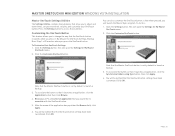
... (or a powered USB hub). After connecting the OneTouch III Mini to create a copy of this may appear as Launch.exe). A User Account Control window for the DemoShield Multi-CD Launch needs permission to the OneTouch III Mini Edition Drive. Connect the Drive 1. Plug the Power Only connector into an available USB port on your computer does not supply enough power to another location. Install the Software Important: Seagate suggests that the AutoPlay window does not open, click Start Computer. Note...
... (or a powered USB hub). After connecting the OneTouch III Mini to create a copy of this may appear as Launch.exe). A User Account Control window for the DemoShield Multi-CD Launch needs permission to the OneTouch III Mini Edition Drive. Connect the Drive 1. Plug the Power Only connector into an available USB port on your computer does not supply enough power to another location. Install the Software Important: Seagate suggests that the AutoPlay window does not open, click Start Computer. Note...
User Guide for Windows
Page 7
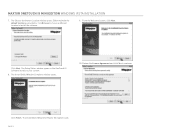
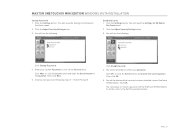
The InstallShield Wizard for Maxtor Encryption loads. Click Finish. From the Welcome Screen, click Next. The InstallShield Window Complete window opens. 10. The Choose destination Location window opens. PAGE 5 MAXTOR ONETOUCH III MINI EDITION WINDOWS VISTA INSTALLATION 7. The Setup Status window opens as provided or click Browse to choose a different location to install the software. 9. Click Next. Review the License Agreement and click Yes to your system. 8. Either maintain the default location as the OneTouch III Software installs to continue.
The InstallShield Wizard for Maxtor Encryption loads. Click Finish. From the Welcome Screen, click Next. The InstallShield Window Complete window opens. 10. The Choose destination Location window opens. PAGE 5 MAXTOR ONETOUCH III MINI EDITION WINDOWS VISTA INSTALLATION 7. The Setup Status window opens as provided or click Browse to choose a different location to install the software. 9. Click Next. Review the License Agreement and click Yes to your system. 8. Either maintain the default location as the OneTouch III Software installs to continue.

User Guide for Windows
Page 8
The InstallShield Window Complete window opens. 15. MAXTOR ONETOUCH III MINI EDITION WINDOWS VISTA INSTALLATION 11. The Setup Status window opens as provided or click Browse to choose a different location to your system. 12. Click Finish. Click Next. The Choose destination Location window opens. Either maintain the default location as the Maxtor Encryption Software installs to install the software. 14. Review the License Agreement and click Yes to proceed. 13. The InstallShield Wizard for Maxtor Backup loads. PAGE 6 From the Welcome Screen, click Next.
The InstallShield Window Complete window opens. 15. MAXTOR ONETOUCH III MINI EDITION WINDOWS VISTA INSTALLATION 11. The Setup Status window opens as provided or click Browse to choose a different location to your system. 12. Click Finish. Click Next. The Choose destination Location window opens. Either maintain the default location as the Maxtor Encryption Software installs to install the software. 14. Review the License Agreement and click Yes to proceed. 13. The InstallShield Wizard for Maxtor Backup loads. PAGE 6 From the Welcome Screen, click Next.

User Guide for Windows
Page 9
Either maintain the default location as the Maxtor Backup Software installs to your system. PAGE 7 Click Next. Click Finish. Click Yes to restart your computer or click No to restart your system to install the software. 17. The Setup Status window opens as provided or click Browse to choose a different location to fully use the OneTouch III software. The Choose destination Location window opens. Note: You must restart your computer later. MAXTOR ONETOUCH III MINI EDITION WINDOWS VISTA INSTALLATION 16. The InstallShield Window Complete window opens.
Either maintain the default location as the Maxtor Backup Software installs to your system. PAGE 7 Click Next. Click Finish. Click Yes to restart your computer or click No to restart your system to install the software. 17. The Setup Status window opens as provided or click Browse to choose a different location to fully use the OneTouch III software. The Choose destination Location window opens. Note: You must restart your computer later. MAXTOR ONETOUCH III MINI EDITION WINDOWS VISTA INSTALLATION 16. The InstallShield Window Complete window opens.
User Guide for Windows
Page 11
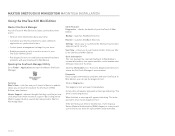
... rollback - Security settings. Maxtor EasyManage You can access the EasyManage software by double-clicking on your computer. Move or copy files or folders from your data - Customizing the OneTouch button - This launches the EasyManage software. Click this section, you can find out all about the OneTouch III Mini Edition's new features. MAXTOR ONETOUCH III MINI EDITION WINDOWS VISTA INSTALLATION Using the OneTouch III Mini Edition Once installed, you can use your new OneTouch III Mini Edition in the same way you use the other storage devices. - Using Maxtor EasyManage to...
... rollback - Security settings. Maxtor EasyManage You can access the EasyManage software by double-clicking on your computer. Move or copy files or folders from your data - Customizing the OneTouch button - This launches the EasyManage software. Click this section, you can find out all about the OneTouch III Mini Edition's new features. MAXTOR ONETOUCH III MINI EDITION WINDOWS VISTA INSTALLATION Using the OneTouch III Mini Edition Once installed, you can use your new OneTouch III Mini Edition in the same way you use the other storage devices. - Using Maxtor EasyManage to...
User Guide for Windows
Page 12
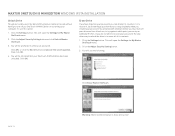
MAXTOR ONETOUCH III MINI EDITION WINDOWS VISTA INSTALLATION Maxtor OneTouch Settings Utilities The Settings Utilities contains many features that allow you will launch the Maxtor Sync program. To Customize Your OneTouch Settings 1. Click the Customize OneTouch button. Click the Settings button. To associate the button so that the OneTouch button settings have been customized. You will be notified that it launches an application, click the Synchronize folders using Sync button, then click Apply. 4. Note that the Maxtor OneTouch button is set password level security, and...
MAXTOR ONETOUCH III MINI EDITION WINDOWS VISTA INSTALLATION Maxtor OneTouch Settings Utilities The Settings Utilities contains many features that allow you will launch the Maxtor Sync program. To Customize Your OneTouch Settings 1. Click the Customize OneTouch button. Click the Settings button. To associate the button so that the OneTouch button settings have been customized. You will be notified that it launches an application, click the Synchronize folders using Sync button, then click Apply. 4. Note that the Maxtor OneTouch button is set password level security, and...
User Guide for Windows
Page 14
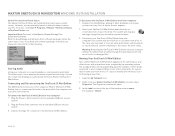
... MAXTOR ONETOUCH III MINI EDITION WINDOWS VISTA INSTALLATION Change Password 1. Click the Settings button. You will be informed that security has been disabled on your password. Then click Next. 5. You will see the following steps 3 - 7 in Set Password. This will open the Settings for My Maxtor OneTouch menu. 2. Disable Security 1. Click Disable Security. 4. You can always re-create a password on the Secret button. You will be prompted to enter your OneTouch III Mini Edition. Click the Adjust Security Setting button. 3. Click Change Password. 4. Create a new password...
... MAXTOR ONETOUCH III MINI EDITION WINDOWS VISTA INSTALLATION Change Password 1. Click the Settings button. You will be informed that security has been disabled on your password. Then click Next. 5. You will see the following steps 3 - 7 in Set Password. This will open the Settings for My Maxtor OneTouch menu. 2. Disable Security 1. Click Disable Security. 4. You can always re-create a password on the Secret button. You will be prompted to enter your OneTouch III Mini Edition. Click the Adjust Security Setting button. 3. Click Change Password. 4. Create a new password...
User Guide for Windows
Page 15
... your computer. You will open the Settings for My Maxtor OneTouch menu. 2. To use this option: 1. Click the Adjust Security Setting button and click Unlock Maxtor OneTouch. 3. You will be informed that you setup originally when you OneTouch III Mini Edition or restarting your password, the only other way to unlock the drive is data destructive! Click Erase Maxtor OneTouch. MAXTOR ONETOUCH III MINI EDITION WINDOWS VISTA INSTALLATION Unlock Drive Though not widely used, the Unlock Drive feature can be accessed without having to turn it , by answering...
... your computer. You will open the Settings for My Maxtor OneTouch menu. 2. To use this option: 1. Click the Adjust Security Setting button and click Unlock Maxtor OneTouch. 3. You will be informed that you setup originally when you OneTouch III Mini Edition or restarting your password, the only other way to unlock the drive is data destructive! Click Erase Maxtor OneTouch. MAXTOR ONETOUCH III MINI EDITION WINDOWS VISTA INSTALLATION Unlock Drive Though not widely used, the Unlock Drive feature can be accessed without having to turn it , by answering...
User Guide for Windows
Page 27
... installed, your menu will look similar to eject the drive. For example: "Maxtor." Important Note: For users of device choices appears. 2. Plug the Power Only connector into an available USB port on . A list of the Maxtor Shared Storage Plus Quick Start Software Both the EasyManage and the Quick Start software packages utilize the same status icons. The assigned letter will vary depending upon system restart. Connect the Type "B" connector to hot swap your Maxtor OneTouch III Mini Edition...
... installed, your menu will look similar to eject the drive. For example: "Maxtor." Important Note: For users of device choices appears. 2. Plug the Power Only connector into an available USB port on . A list of the Maxtor Shared Storage Plus Quick Start Software Both the EasyManage and the Quick Start software packages utilize the same status icons. The assigned letter will vary depending upon system restart. Connect the Type "B" connector to hot swap your Maxtor OneTouch III Mini Edition...
User Guide for Windows & Mac
Page 2
... Drive 8 Erase Drive 8 Backup 9 Backup File Management 10 Restore 10 Sync 11 Automatic Sync 11 Rollback 12 Automatic Restore Points 13 Maxtor Encryption 14 OneTouch III Status Icons 14 OneTouch III Settings 15 Storing Audio 16 Connecting and Disconnecting the OneTouch III Mini Edition 16 Naming Your OneTouch III Mini Edition 16 Macintosh Installation Introduction 17 About this Guide 1 Components 1 Included in Package 18 System Requirements 18 Handling Precautions 18 Maxtor Product Support 18 Installing the OneTouch III Mini Edition 19 Step 1 - Install the Software...
... Drive 8 Erase Drive 8 Backup 9 Backup File Management 10 Restore 10 Sync 11 Automatic Sync 11 Rollback 12 Automatic Restore Points 13 Maxtor Encryption 14 OneTouch III Status Icons 14 OneTouch III Settings 15 Storing Audio 16 Connecting and Disconnecting the OneTouch III Mini Edition 16 Naming Your OneTouch III Mini Edition 16 Macintosh Installation Introduction 17 About this Guide 1 Components 1 Included in Package 18 System Requirements 18 Handling Precautions 18 Maxtor Product Support 18 Installing the OneTouch III Mini Edition 19 Step 1 - Install the Software...
User Guide for Windows & Mac
Page 25
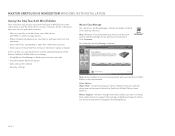
... or synchronize folders - MAXTOR ONETOUCH III MINI EDITION MACINTOSH INSTALLATION Using the OneTouch III Mini Edition Maxtor OneTouch Manager Your OneTouch III Mini Edition includes a utility that they could be problems with a message indicating "The drive is now being tested." Maxtor Support - allows you suspect there may be just one click away from your OneTouch III Mini Edition Opening the OneTouch Manager Utility Go to Finder - Run diagnostic tests to troubleshoot potential hardware problems with your Mac to return the OneTouch Manager's main window.
... or synchronize folders - MAXTOR ONETOUCH III MINI EDITION MACINTOSH INSTALLATION Using the OneTouch III Mini Edition Maxtor OneTouch Manager Your OneTouch III Mini Edition includes a utility that they could be problems with a message indicating "The drive is now being tested." Maxtor Support - allows you suspect there may be just one click away from your OneTouch III Mini Edition Opening the OneTouch Manager Utility Go to Finder - Run diagnostic tests to troubleshoot potential hardware problems with your Mac to return the OneTouch Manager's main window.

User Guide for Windows & Mac
Page 29
... Set Password or Set Password and Q/A, if you turn off your OneTouch III Mini Edition. Upon system restart with the OneTouch III Mini Edition connected/powered on, or If the OneTouch III Mini Edition is to the original security screen. Changing your current Password. Click Security. 2. Click Change Password and Q/A. If you are allowed 5 attempts before you will need to enter your password or the answer to the original security screen. Setting your password for your drive and turn it back on . Your password must turn...
... Set Password or Set Password and Q/A, if you turn off your OneTouch III Mini Edition. Upon system restart with the OneTouch III Mini Edition connected/powered on, or If the OneTouch III Mini Edition is to the original security screen. Changing your current Password. Click Security. 2. Click Change Password and Q/A. If you are allowed 5 attempts before you will need to enter your password or the answer to the original security screen. Setting your password for your drive and turn it back on . Your password must turn...


