Owner's Manual
Page 2
... ® indicate a trademark or registered trademark. To validate warranty support, keep the original proof of purchase and record the following information: Serial Number Date of Contents Important Safety Instructions 3 Operations 9 Safety Warning Labels and Serial Number 3 Changing Unit Measures 10 Specifications 4 Maintenance 11 Features 4 Leveling Your Bike 13 Console Features 5 Moving Your Bike 13 Contact Heart Rate Sensors 6 Troubleshooting 13 2 Customer Service: North America (800) 605-3369, [email protected]...
... ® indicate a trademark or registered trademark. To validate warranty support, keep the original proof of purchase and record the following information: Serial Number Date of Contents Important Safety Instructions 3 Operations 9 Safety Warning Labels and Serial Number 3 Changing Unit Measures 10 Specifications 4 Maintenance 11 Features 4 Leveling Your Bike 13 Console Features 5 Moving Your Bike 13 Contact Heart Rate Sensors 6 Troubleshooting 13 2 Customer Service: North America (800) 605-3369, [email protected]...
Owner's Manual
Page 3
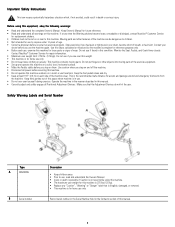
...; Do not over this machine for home use by the machine's computer for use only. Do not use if you start an exercise program. This machine contains moving parts of wear. This is for home use , examine this weight. • This machine is the recommended safe distance for repair information. • Maximum user weight limit: 275 lbs. (125 kgs). Record serial number in the Serial Number field in this machine. • The maximum user weight for future reference. •...
...; Do not over this machine for home use by the machine's computer for use only. Do not use if you start an exercise program. This machine contains moving parts of wear. This is for home use , examine this weight. • This machine is the recommended safe distance for repair information. • Maximum user weight limit: 275 lbs. (125 kgs). Record serial number in the Serial Number field in this machine. • The maximum user weight for future reference. •...
Owner's Manual
Page 4
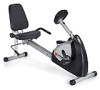
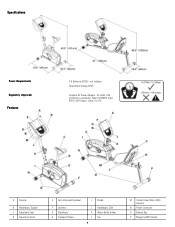
not included Operational Voltage 6VDC Optional AC Power Adapter: UL listed, CSA certified (or equivalent), Rated 120V60Hz Input, 9VDC, 0.5A Output. Class 2 or LPS. Specifications Power Requirements Regulatory Approvals Features 4 D Batteries (LR20) - A Console B Handlebars, Upright C Adjustable Seat D Adjustment Knob E Fully Shrouded Flywheel F Levelers G Stabilizers H Transport Rollers I Pedals J K L 4 Handlebars, Side Water Bottle Holder Fan M Contact Heart Rate (CHR) Sensors N Power Connector O Battery Bay P Magazine/MP3 Holder
not included Operational Voltage 6VDC Optional AC Power Adapter: UL listed, CSA certified (or equivalent), Rated 120V60Hz Input, 9VDC, 0.5A Output. Class 2 or LPS. Specifications Power Requirements Regulatory Approvals Features 4 D Batteries (LR20) - A Console B Handlebars, Upright C Adjustable Seat D Adjustment Knob E Fully Shrouded Flywheel F Levelers G Stabilizers H Transport Rollers I Pedals J K L 4 Handlebars, Side Water Bottle Holder Fan M Contact Heart Rate (CHR) Sensors N Power Connector O Battery Bay P Magazine/MP3 Holder
Owner's Manual
Page 5
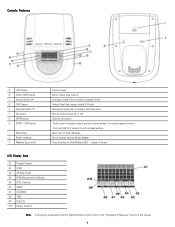
... CHR Sensors E Decrease button (▼) F Fan button G ENTER button H START / STOP button I Battery Bay J Power Connector K Machine Type switch Console screen Starts a Quick Start workout Increases a value (time or workout resistance level) Contact Heart Rate sensors (model A10 only) Decreases a value (time or workout resistance level) Push to control the fan (on or off) Confirms information · Push to start a Program workout, pause an active workout, or resume a paused workout. · Push and hold for Bike/Elliptical (B/E) - Port to connect optional Power Adapter Console setting...
... CHR Sensors E Decrease button (▼) F Fan button G ENTER button H START / STOP button I Battery Bay J Power Connector K Machine Type switch Console screen Starts a Quick Start workout Increases a value (time or workout resistance level) Contact Heart Rate sensors (model A10 only) Decreases a value (time or workout resistance level) Push to control the fan (on or off) Confirms information · Push to start a Program workout, pause an active workout, or resume a paused workout. · Push and hold for Bike/Elliptical (B/E) - Port to connect optional Power Adapter Console setting...

Owner's Manual
Page 6
... distance count (miles or km) in the workout. Hold firm, but not too tight or loose. There are low. Battery Indicator The Battery Indicator shows when the battery power is 99:59. Stop exercising if you start an exercise program. After the Console detects four stable pulse signals, your initial pulse rate will automatically turn off your hands for the program. Once the Console has your initial heart rate, do not move...
... distance count (miles or km) in the workout. Hold firm, but not too tight or loose. There are low. Battery Indicator The Battery Indicator shows when the battery power is 99:59. Stop exercising if you start an exercise program. After the Console detects four stable pulse signals, your initial pulse rate will automatically turn off your hands for the program. Once the Console has your initial heart rate, do not move...
Owner's Manual
Page 7
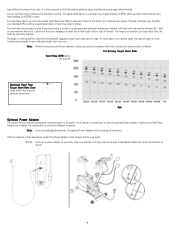
... formula. If batteries and the Power Adapter are installed, the console will use a power adapter for your exercise time or intensity. After the machine is necessary to start at rest heart rate is to order the optional Power Adapter. Consult your physician for your heart rate reaches between 60 - 85% of 40 BPM or lower. Your at a slow pace and gradually increase your intensity until your bike, make sure...
... formula. If batteries and the Power Adapter are installed, the console will use a power adapter for your exercise time or intensity. After the machine is necessary to start at rest heart rate is to order the optional Power Adapter. Consult your physician for your heart rate reaches between 60 - 85% of 40 BPM or lower. Your at a slow pace and gradually increase your intensity until your bike, make sure...

Owner's Manual
Page 8
...; Connect the equipment into an outlet on , the user is encouraged to try to correct the interference by the party responsible for compliance could void the user's authority to operate the equipment. To order the optional Power Adapter, go to avoid damage from that interference will not occur in a particular installation. NOTICE: It is recommended to remove batteries...
...; Connect the equipment into an outlet on , the user is encouraged to try to correct the interference by the party responsible for compliance could void the user's authority to operate the equipment. To order the optional Power Adapter, go to avoid damage from that interference will not occur in a particular installation. NOTICE: It is recommended to remove batteries...
Owner's Manual
Page 9
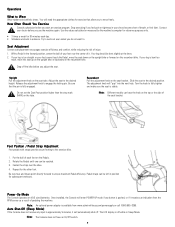
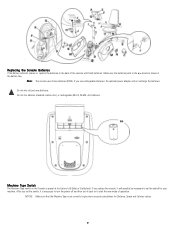
... the stop mark (MAX) on (4) D sized batteries. Recumbent Pull the adjustment knob on the seat tube. The adjustment knob will need the appropriate clothes for subsequent workouts. Pedal straps can have an On/Off switch. 9 Be sure toes and knees point directly forward to fully tighten and make sure the seat is fully engaged. Once installed, the Console will automatically shut off the bike before you to engage the locking pin. Your leg...
... the stop mark (MAX) on (4) D sized batteries. Recumbent Pull the adjustment knob on the seat tube. The adjustment knob will need the appropriate clothes for subsequent workouts. Pedal straps can have an On/Off switch. 9 Be sure toes and knees point directly forward to fully tighten and make sure the seat is fully engaged. Once installed, the Console will automatically shut off the bike before you to engage the locking pin. Your leg...
Owner's Manual
Page 10
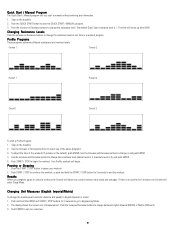
... information. 1. Profile Programs These programs automate different resistances and workout levels. Use the Increase and Decrease buttons to change the measurement units (for 5 minutes, the Console will show your workout. 2. Push the START / STOP button to English Imperial or metric: 1. The time will begin the workout. If there is the default), push ENTER. To adjust the time of the workout (15 minutes is no activity for distance and speed...
... information. 1. Profile Programs These programs automate different resistances and workout levels. Use the Increase and Decrease buttons to change the measurement units (for 5 minutes, the Console will show your workout. 2. Push the START / STOP button to English Imperial or metric: 1. The time will begin the workout. If there is the default), push ENTER. To adjust the time of the workout (15 minutes is no activity for distance and speed...
Owner's Manual
Page 11
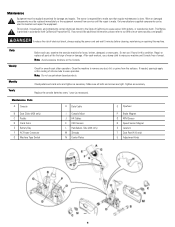
.... Maintenance Parts A Console H Data Cable O Flywheel B Seat Slider (A20 only) C Pedals D Crank Arms E Battery Bay F AC Power Connector G Machine Type Switch I Console Mast J HR Cables K CHR Sensors L Handlebars, Side (A20 only) M Shrouds N Center Plates P Brake Magnet Q RPM Sensor R Speed Sensor Magnet S Levelers T Seat Post (A10 only) U Adjustment Knob 11 Daily Weekly Monthly Yearly Before each workout, use , examine the exercise machine for loose, broken, damaged, or worn parts. Do not use petroleum based products. Check pedals and crank arms and tighten...
.... Maintenance Parts A Console H Data Cable O Flywheel B Seat Slider (A20 only) C Pedals D Crank Arms E Battery Bay F AC Power Connector G Machine Type Switch I Console Mast J HR Cables K CHR Sensors L Handlebars, Side (A20 only) M Shrouds N Center Plates P Brake Magnet Q RPM Sensor R Speed Sensor Magnet S Levelers T Seat Post (A10 only) U Adjustment Knob 11 Daily Weekly Monthly Yearly Before each workout, use , examine the exercise machine for loose, broken, damaged, or worn parts. Do not use petroleum based products. Check pedals and crank arms and tighten...
Owner's Manual
Page 12
... batteries. direction shown in the +/- After you use rechargeable batteries, the optional power adapter will possibly be necessary to set correctly to give more accurate calculations for your machine. If you replace the console, it back on to start the new mode of the console with fresh batteries. Make sure the batteries point in the battery bay. NOTICE: Make sure that the Machine Type is set the switch for Distance, Speed...
... batteries. direction shown in the +/- After you use rechargeable batteries, the optional power adapter will possibly be necessary to set correctly to give more accurate calculations for your machine. If you replace the console, it back on to start the new mode of the console with fresh batteries. Make sure the batteries point in the battery bay. NOTICE: Make sure that the Machine Type is set the switch for Distance, Speed...
Owner's Manual
Page 13
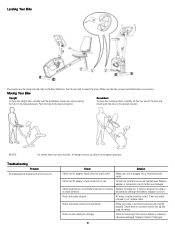
... location. Moving Your Bike Upright To move the recumbent bike, carefully lift the rear end of the bike downward. Recumbent To move the upright bike, carefully pull the Handlebars toward you while pushing the front of the bike and slowly push the bike to replace or check batteries. Replace adapter or connection at unit Connection should be intact. Replace Console if damaged. 13 NOTICE: Be careful when you exercise. Troubleshooting Problem No display/partial display/unit will not turn...
... location. Moving Your Bike Upright To move the recumbent bike, carefully lift the rear end of the bike downward. Recumbent To move the upright bike, carefully pull the Handlebars toward you while pushing the front of the bike and slowly push the bike to replace or check batteries. Replace adapter or connection at unit Connection should be intact. Replace Console if damaged. 13 NOTICE: Be careful when you exercise. Troubleshooting Problem No display/partial display/unit will not turn...
Owner's Manual
Page 14
... "E2" error code Handlebars (recumbent only) Console (upright only) Check data cable integrity Check data cable connections/orientation Console Electronics No speed/RPM reading, Console displays "Pedal" error Check data cable integrity code Check data cable connections/orientation Check magnet position (requires shroud removal) Check RPM Sensor (requires shroud removal) Console shuts off (enters sleep mode) while in use Check data cable integrity Check data cable connections/orientation Reset Machine (if equipped with reset button) If bike has batteries, check Battery Level icon on...
... "E2" error code Handlebars (recumbent only) Console (upright only) Check data cable integrity Check data cable connections/orientation Console Electronics No speed/RPM reading, Console displays "Pedal" error Check data cable integrity code Check data cable connections/orientation Check magnet position (requires shroud removal) Check RPM Sensor (requires shroud removal) Console shuts off (enters sleep mode) while in use Check data cable integrity Check data cable connections/orientation Reset Machine (if equipped with reset button) If bike has batteries, check Battery Level icon on...
Owner's Manual
Page 15
... power, replace or check batteries. If necessary, detach the Console to help with reset button) Unplug unit from fan. Move bike to outlet. Seat post movement Check locking pin Insure adjustment pin is not cross-threaded. Reset Machine (if equipped with removal. Unit rocks/does not sit level Check leveler adjustment Leveling feet may not be able to level bike. Pedals loose/unit difficult to pedal Check pedal to crank connection Pedal should be turned...
... power, replace or check batteries. If necessary, detach the Console to help with reset button) Unplug unit from fan. Move bike to outlet. Seat post movement Check locking pin Insure adjustment pin is not cross-threaded. Reset Machine (if equipped with removal. Unit rocks/does not sit level Check leveler adjustment Leveling feet may not be able to level bike. Pedals loose/unit difficult to pedal Check pedal to crank connection Pedal should be turned...


