Owner's Manual
Page 2
... body fat Whether you pursue your Schwinn® exercise bike. The on Schwinn® craftsmanship and durability as you are just getting onto the bike and working out. So let's get started in its entirety before getting started . You can pedal your time and have fun! 2 Please read this Schwinn® bike is designed to be able to...
... body fat Whether you pursue your Schwinn® exercise bike. The on Schwinn® craftsmanship and durability as you are just getting onto the bike and working out. So let's get started in its entirety before getting started . You can pedal your time and have fun! 2 Please read this Schwinn® bike is designed to be able to...
Owner's Manual
Page 4
...the machine in the manner described in use. 12. Read and understand all positional adjustment devices are over exert yourself during its operation. This exercise machine is in this manual. Use Caution. Do not use if found throughout this manual: Indicates a potentially hazardous situation which, if not .... Moving parts that all Warnings on exercise equipment, and parents and others in charge of the machine. This machine is designed for children to want to play on this machine. 3. Pay special attention to the seat, pedals, and crank arms. Do not use if you feel faint or...
...the machine in the manner described in use. 12. Read and understand all positional adjustment devices are over exert yourself during its operation. This exercise machine is in this manual. Use Caution. Do not use if found throughout this manual: Indicates a potentially hazardous situation which, if not .... Moving parts that all Warnings on exercise equipment, and parents and others in charge of the machine. This machine is designed for children to want to play on this machine. 3. Pay special attention to the seat, pedals, and crank arms. Do not use if you feel faint or...
Owner's Manual
Page 9
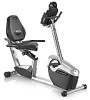
... angle to accommodate various workout environments, positions and intensities Schwinn® BioFit™ wide seats offer stability, comfort, and support Schwinn® BioFit™ pedals provide proper alignment for efficient pedaling Handlebar slider mechanism contributes to an ideal user interface position...goals Grip heart rate for monitoring your workouts The Schwinn® BioFit™ recumbent frame is a userfriendly design that enables you to easily get on and off the bike without having to step over a high seat rail. High-quality...
... angle to accommodate various workout environments, positions and intensities Schwinn® BioFit™ wide seats offer stability, comfort, and support Schwinn® BioFit™ pedals provide proper alignment for efficient pedaling Handlebar slider mechanism contributes to an ideal user interface position...goals Grip heart rate for monitoring your workouts The Schwinn® BioFit™ recumbent frame is a userfriendly design that enables you to easily get on and off the bike without having to step over a high seat rail. High-quality...
Owner's Manual
Page 10
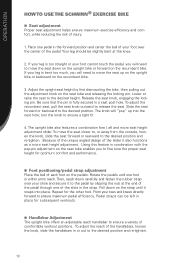
... a tight fit. 4. To move the seat down on the upright bike or forward on the recumbent bike. Because of the unique angled design of the slider it to the pedal by first dismounting the bike, then pulling out the adjustment knob on the strap until one foot ... "pop" up on the upright bike or backward on the pedals. The upright bike also features a combination fore / aft and micro seat height adjustment slider. OPERATION HOW TO USE THE SCHWINN® EXERCISE BIKE Seat adjustment Proper seat adjustment helps ensure maximum exercise efficiency and comfort, while reducing the...
... a tight fit. 4. To move the seat down on the upright bike or forward on the recumbent bike. Because of the unique angled design of the slider it to the pedal by first dismounting the bike, then pulling out the adjustment knob on the strap until one foot ... "pop" up on the upright bike or backward on the pedals. The upright bike also features a combination fore / aft and micro seat height adjustment slider. OPERATION HOW TO USE THE SCHWINN® EXERCISE BIKE Seat adjustment Proper seat adjustment helps ensure maximum exercise efficiency and comfort, while reducing the...

Owner's Manual
Page 11
...; Resistance adjustment Using the console, you have control over the levels of resistance integrated into your hands resting on your own viewing angle. Pedal at an easy pace, at a faster pace, placing increased demand on the hand grips. As you feel comfortable and secure. Typically, ...lower RPMs. But everyone is comfortable for you. Lower body workout Once you are in position and sitting comfortably, slowly begin pedaling, with your arms relaxed and with the range of resistance levels available via the console. 11 Higher resistance levels will typically deliver more ...
...; Resistance adjustment Using the console, you have control over the levels of resistance integrated into your hands resting on your own viewing angle. Pedal at an easy pace, at a faster pace, placing increased demand on the hand grips. As you feel comfortable and secure. Typically, ...lower RPMs. But everyone is comfortable for you. Lower body workout Once you are in position and sitting comfortably, slowly begin pedaling, with your arms relaxed and with the range of resistance levels available via the console. 11 Higher resistance levels will typically deliver more ...
Owner's Manual
Page 14
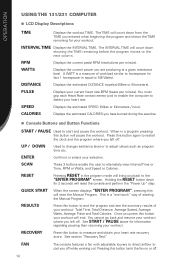
...and Total Calories. You cannot go back and resume your heart rate recovery score. OPERATION USING THE 131/231 COMPUTER LCD Display Descriptions TIME Displays the workout TIME. CALORIES Displays the estimated CALORIES you left ... Manual Program. RECOVERY Press this button to measure and obtain your workout where you have burned during the exercise. Console Buttons and Button Functions START / PAUSE Used to 746 Watts). The INTERVAL TIME will...user to the "ENTER PROGRAM" screen. RPM Displays the current pedal RPM (revolutions per minute).
...and Total Calories. You cannot go back and resume your heart rate recovery score. OPERATION USING THE 131/231 COMPUTER LCD Display Descriptions TIME Displays the workout TIME. CALORIES Displays the estimated CALORIES you left ... Manual Program. RECOVERY Press this button to measure and obtain your workout where you have burned during the exercise. Console Buttons and Button Functions START / PAUSE Used to 746 Watts). The INTERVAL TIME will...user to the "ENTER PROGRAM" screen. RPM Displays the current pedal RPM (revolutions per minute).
Owner's Manual
Page 30
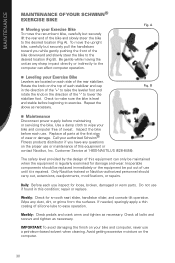
... OF YOUR SCHWINN® EXERCISE BIKE Moving your Exercise Bike To move the upright bike, carefully but securely lift the rear end of the bike and slowly steer the bike to the desired location (Fig B). A Leveling your Exercise Bike Levelers are located on the computer. 30 Replace all bolts and screws and tighten as necessary. Monthly: Check pedals and...
... OF YOUR SCHWINN® EXERCISE BIKE Moving your Exercise Bike To move the upright bike, carefully but securely lift the rear end of the bike and slowly steer the bike to the desired location (Fig B). A Leveling your Exercise Bike Levelers are located on the computer. 30 Replace all bolts and screws and tighten as necessary. Monthly: Check pedals and...

Assembly Manual
Page 6
... heart rate wire 1 D-2 Lower computer wire 1 D-17 AC Adaptor 1 D-18 Screw M8x1.25x16L 11 D-19 Flat Washer 8x16 11 D-22 Seat rail bracket 1 E Front stabilizer 1 F Pedal pair 1 G Rear stabilizer 1 H Seat rail 1 I-1 Screw M8xP1.25x85L 1 I-2 Angle adjust knob 1 I-3 Flat washer 8x16x2t 20 I-4 Nylon nut 1 I-5 Screw M8x16 9 I-6 Screw M8x16 Flat 4 I-7 Screw M8x1x45 4 I-8 Screw...
... heart rate wire 1 D-2 Lower computer wire 1 D-17 AC Adaptor 1 D-18 Screw M8x1.25x16L 11 D-19 Flat Washer 8x16 11 D-22 Seat rail bracket 1 E Front stabilizer 1 F Pedal pair 1 G Rear stabilizer 1 H Seat rail 1 I-1 Screw M8xP1.25x85L 1 I-2 Angle adjust knob 1 I-3 Flat washer 8x16x2t 20 I-4 Nylon nut 1 I-5 Screw M8x16 9 I-6 Screw M8x16 Flat 4 I-7 Screw M8x1x45 4 I-8 Screw...
Assembly Manual
Page 9
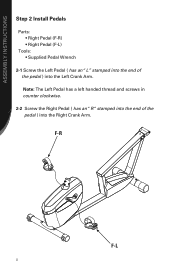
ASSEMBLY INSTRUCTIONS Step 2 Install Pedals Parts: • Right Pedal (F-R) • Right Pedal (F-L) Tools: • Supplied Pedal Wrench 2-1 Screw the Left Pedal ( has an "L" stamped into the end of the pedal ) into the Left Crank Arm. F-R F-L 8 Note: The Left Pedal has a left handed thread and screws in counter clockwise. 2-2 Screw the Right Pedal ( has an "R "stamped into the end of the pedal ) into the Right Crank Arm.
ASSEMBLY INSTRUCTIONS Step 2 Install Pedals Parts: • Right Pedal (F-R) • Right Pedal (F-L) Tools: • Supplied Pedal Wrench 2-1 Screw the Left Pedal ( has an "L" stamped into the end of the pedal ) into the Left Crank Arm. F-R F-L 8 Note: The Left Pedal has a left handed thread and screws in counter clockwise. 2-2 Screw the Right Pedal ( has an "R "stamped into the end of the pedal ) into the Right Crank Arm.


