

Owners Manual
Page 5
...EARTHED. Connect the equipment into the power outlet. This is coloured green-and-yellow must be unable to defeat this projector meets the requirement for your User Instructions. If a replacement fuse cover is required, ensure it is of the FCC...Trade Name Responsible party Address Telephone No. : PLC-SW30 : Sanyo : SANYO FISHER COMPANY : 21605 Plummer Street, Chatsworth, California 91311 : (818)998-7322 Model Number Trade Name Responsible Party Address Telephone No. : TGX0043-011010 (1AV4U20B69000) IR Presentation Remote Receiver for Projector : HOSIDEN : Hosiden America Corp. : ...
...EARTHED. Connect the equipment into the power outlet. This is coloured green-and-yellow must be unable to defeat this projector meets the requirement for your User Instructions. If a replacement fuse cover is required, ensure it is of the FCC...Trade Name Responsible party Address Telephone No. : PLC-SW30 : Sanyo : SANYO FISHER COMPANY : 21605 Plummer Street, Chatsworth, California 91311 : (818)998-7322 Model Number Trade Name Responsible Party Address Telephone No. : TGX0043-011010 (1AV4U20B69000) IR Presentation Remote Receiver for Projector : HOSIDEN : Hosiden America Corp. : ...

Owners Manual
Page 6
... 3 Compliance 5 Table of Contents 6 Features and Design 7 Overview 8 Front 8 Back 8 Bottom 8 Top panel 9 Terminals 10 Remote Control 11 Operating Range 11 Preparation 12 Connecting the AC Power Cord 12 Positioning the Projector 13 Adjustable Feet 13 Remote Control Battery Installation 14 Attaching the Lens Cover 14 Installation 15 Connecting to a Computer 15 Connecting...
... 3 Compliance 5 Table of Contents 6 Features and Design 7 Overview 8 Front 8 Back 8 Bottom 8 Top panel 9 Terminals 10 Remote Control 11 Operating Range 11 Preparation 12 Connecting the AC Power Cord 12 Positioning the Projector 13 Adjustable Feet 13 Remote Control Battery Installation 14 Attaching the Lens Cover 14 Installation 15 Connecting to a Computer 15 Connecting...

Owners Manual
Page 7
...16.77 million colors, and matrix liquid crystal display (LCD) technology. English, German, French, Italian, Spanish, ... to lock the operation of the projector. This function protects the projector from a computer between SVGA (800 x 600) and SXGA...Remote Control The provided Presentation Remote Control can be carried and work anywhere you to control the mouse cursor on crucial information at a presentation. ( ☞ P29 ) Digital Keystone Adjustment Positioning height of the projector... be connected. - Features and Design PLC-SW30 is designed with the most advanced technology for portability,...
...16.77 million colors, and matrix liquid crystal display (LCD) technology. English, German, French, Italian, Spanish, ... to lock the operation of the projector. This function protects the projector from a computer between SVGA (800 x 600) and SXGA...Remote Control The provided Presentation Remote Control can be carried and work anywhere you to control the mouse cursor on crucial information at a presentation. ( ☞ P29 ) Digital Keystone Adjustment Positioning height of the projector... be connected. - Features and Design PLC-SW30 is designed with the most advanced technology for portability,...
Owners Manual
Page 8
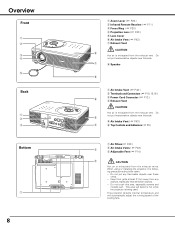
...This area will automatically adjust the running speed of the cooling fans. This projector detects internal temperature and will become hot while the projector is exhausted from the exhaust vents. Do not put any objects, especially ...heat-sensitive objects. - Keep front grills at least 3'(1m) away from any flammable objects near this area, especially screws and metallic part. Do not touch this side. Overview Front q w e r t Back q w e Bottom q 8 q Zoom Lever ( ☞ P20 ) w Infrared Remote...
...This area will automatically adjust the running speed of the cooling fans. This projector detects internal temperature and will become hot while the projector is exhausted from the exhaust vents. Do not put any objects, especially ...heat-sensitive objects. - Keep front grills at least 3'(1m) away from any flammable objects near this area, especially screws and metallic part. Do not touch this side. Overview Front q w e r t Back q w e Bottom q 8 q Zoom Lever ( ☞ P20 ) w Infrared Remote...

Owners Manual
Page 10
Do not use the PAGE ed buttons on the remote control to scroll back and forth pages on the screen of your computer to this port when you wish to use it excessively. 10 If necessary, press this projector. Overview Terminals ✽ q w e RESET VIDEO S-VIDEO SERVICE PORT COMPUTER IN ..., component output or RGB Scart 21-pin video output to this connector. ( ☞ P15, P16 ) ✽ RESET button A microprocessor included in the projector may occasionally malfunction and need to be reset. r USB Connect the USB port of the connected computer. ( ☞ P15, P38 ) t AUDIO IN ...
Do not use the PAGE ed buttons on the remote control to scroll back and forth pages on the screen of your computer to this port when you wish to use it excessively. 10 If necessary, press this projector. Overview Terminals ✽ q w e RESET VIDEO S-VIDEO SERVICE PORT COMPUTER IN ..., component output or RGB Scart 21-pin video output to this connector. ( ☞ P15, P16 ) ✽ RESET button A microprocessor included in the projector may occasionally malfunction and need to be reset. r USB Connect the USB port of the connected computer. ( ☞ P15, P38 ) t AUDIO IN ...

Owners Manual
Page 11
... Automatically adjusts a computer image to moisture or heat. - mode. ( ☞ P29) - Operating Range Point the remote control toward the projector (Receiver Window) when pressing any chemical material. Remote Control ew q COMPUTER VIDEO ON-OFF !5 r !4 MENU VOLUME- Select an item or adjust value in front of ...the projector. 16.4' (5 m) 30° 30° 11 For cleaning, use soft dry cloth. Do not bend, drop the remote control or expose Remote Control to its optimum setting. ( ☞ P24 ) i IMAGE button Selects...
... Automatically adjusts a computer image to moisture or heat. - mode. ( ☞ P29) - Operating Range Point the remote control toward the projector (Receiver Window) when pressing any chemical material. Remote Control ew q COMPUTER VIDEO ON-OFF !5 r !4 MENU VOLUME- Select an item or adjust value in front of ...the projector. 16.4' (5 m) 30° 30° 11 For cleaning, use soft dry cloth. Do not bend, drop the remote control or expose Remote Control to its optimum setting. ( ☞ P24 ) i IMAGE button Selects...

Owners Manual
Page 14
... battery. - Tie a knot in place. 2 Thread the other end of the projector. Replace two batteries at the bottom of the string through the hole at the same time. - Do not expose the remote control to secure it in the string to moisture, or heat. - Risk of the... Use (2) AAA, SUM-4 or R03 type alkaline batteries. - Then pass the lens cover through the hole on remote control, carefully wipe case clean and install new batteries. - Preparation Remote Control Battery Installation 1 Remove the battery compartment lid. Two AAA size batteries For correct polarity (+ and -), be ...
... battery. - Tie a knot in place. 2 Thread the other end of the projector. Replace two batteries at the bottom of the string through the hole at the same time. - Do not expose the remote control to secure it in the string to moisture, or heat. - Risk of the... Use (2) AAA, SUM-4 or R03 type alkaline batteries. - Then pass the lens cover through the hole on remote control, carefully wipe case clean and install new batteries. - Preparation Remote Control Battery Installation 1 Remove the battery compartment lid. Two AAA size batteries For correct polarity (+ and -), be ...

Owners Manual
Page 15
...VGA / SVGA / XGA / SXGA) Monitor Output Audio Output USB port VGA Cable Audio Cable (Stereo) ✽ USB Cable ✽ If you turn on projector and computer. Turn the projector and peripheral equipment on before you wish to use Page ▲▼ buttons on the remote control, ...connect USB port of your computer to the USB socket of the projector. ( ☞ P10, P38 ) RESET VIDEO...
...VGA / SVGA / XGA / SXGA) Monitor Output Audio Output USB port VGA Cable Audio Cable (Stereo) ✽ USB Cable ✽ If you turn on projector and computer. Turn the projector and peripheral equipment on before you wish to use Page ▲▼ buttons on the remote control, ...connect USB port of your computer to the USB socket of the projector. ( ☞ P10, P38 ) RESET VIDEO...
Owners Manual
Page 17
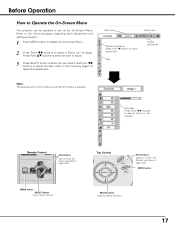
... frame) Press Point d button to move the Pointer up / down / right / left . Before Operation How to Operate the On-Screen Menu The projector can be adjusted or set function. Refer to the following pages regarding each adjustment and setting procedure. 1 Press MENU button to display the On-Screen... Point 7 8 buttons to select a Menu icon to adjust. Item Pointer (red frame) SELECT button Item data Press Point 7 8 buttons to move the pointer. Remote Control COMPUTER VIDEO ON-OFF Point button Used to adjust value or set via the On-Screen Menu. Note: The selected item is not in...
... frame) Press Point d button to move the Pointer up / down / right / left . Before Operation How to Operate the On-Screen Menu The projector can be adjusted or set function. Refer to the following pages regarding each adjustment and setting procedure. 1 Press MENU button to display the On-Screen... Point 7 8 buttons to select a Menu icon to adjust. Item Pointer (red frame) SELECT button Item data Press Point 7 8 buttons to move the pointer. Remote Control COMPUTER VIDEO ON-OFF Point button Used to adjust value or set via the On-Screen Menu. Note: The selected item is not in...

Owners Manual
Page 19
... controls the running speed of the cooling fans. - Basic Operation Turning On the Projector 1 Complete peripheral connections (with the POWER indicator flashing red. The POWER indicator flashes in 24 hours and give it on the top control or the remote control, and the message " Power off? When the Power Management function is... Lamp mode status appear on page 42 Message disappears after 30 seconds. - The POWER indicator starts to be turned on the top control or the remote control. " appears on the projector. 2 Connect the projector's AC Power Cord into an AC outlet.
... controls the running speed of the cooling fans. - Basic Operation Turning On the Projector 1 Complete peripheral connections (with the POWER indicator flashing red. The POWER indicator flashes in 24 hours and give it on the top control or the remote control, and the message " Power off? When the Power Management function is... Lamp mode status appear on page 42 Message disappears after 30 seconds. - The POWER indicator starts to be turned on the top control or the remote control. " appears on the projector. 2 Connect the projector's AC Power Cord into an AC outlet.

Owners Manual
Page 20
... the maximum correction. - The arrow of image, and press Point d button to adjust the projected picture focus. If you press the KEYSTONE on the remote control to freeze the picture onscreen. To cancel the freeze function, press FREEZE button again or press any other button. 20 Reduce the upper width... with the keystone adjustment. 1 Press KEYSTONE button on the remote control or select Keystone on the Setting menu ( ☞ P36 ) to zoom the image. Picture Freeze Function Press FREEZE button on the...
... the maximum correction. - The arrow of image, and press Point d button to adjust the projected picture focus. If you press the KEYSTONE on the remote control to freeze the picture onscreen. To cancel the freeze function, press FREEZE button again or press any other button. 20 Reduce the upper width... with the keystone adjustment. 1 Press KEYSTONE button on the remote control or select Keystone on the Setting menu ( ☞ P36 ) to zoom the image. Picture Freeze Function Press FREEZE button on the...

Owners Manual
Page 21
...the captured image ➜ normal ➜...... Basic Operation Message disappears after 4 seconds. Sound Adjustment Direct Operation Volume Press VOLUME (+/-) button on the remote control or on the screen for decreasing. To restore sound to its previous level, press Point7 8 buttons again. 21 Press Point 7 8 ...volume, and VOLUME (-) button for a few seconds. The timer display "00 : 00" appears on the remote control. No Show Function Press NO SHOW button on the remote control to cut off sound. And then, press P-TIMER button again to black out the image. Mute Press...
...the captured image ➜ normal ➜...... Basic Operation Message disappears after 4 seconds. Sound Adjustment Direct Operation Volume Press VOLUME (+/-) button on the remote control or on the screen for decreasing. To restore sound to its previous level, press Point7 8 buttons again. 21 Press Point 7 8 ...volume, and VOLUME (-) button for a few seconds. The timer display "00 : 00" appears on the remote control. No Show Function Press NO SHOW button on the remote control to cut off sound. And then, press P-TIMER button again to black out the image. Mute Press...

Owners Manual
Page 22
... On-Screen Menu. Computer Input Input Source Selection Direct Operation Choose Computer by pressing INPUT button on the top control or COMPUTER button on the remote control. INPUT MENU 3 Move the pointer to the correct input source and press SELECT button. Before using these buttons, correct input source should be selected...
... On-Screen Menu. Computer Input Input Source Selection Direct Operation Choose Computer by pressing INPUT button on the top control or COMPUTER button on the remote control. INPUT MENU 3 Move the pointer to the correct input source and press SELECT button. Before using these buttons, correct input source should be selected...

Owners Manual
Page 24
This Auto PC Adjustment can be also executed by selecting Mode in this projector. Note : - icon and press SELECT button. 24 This function can be operated as follows. Fine sync, Total dots and Picture Position of Manual PC Adjustment ... Auto PC Adjustment function. Once parameters are required. ( ☞ P25 ) - icon and then press the SELECT button twice. When the image is selected on the remote control. Auto PC Adjustment function cannot be done just by pressing the Auto PC button on PC SYSTEM Menu ( ☞ P23). Press Point 7 8 button to...
This Auto PC Adjustment can be also executed by selecting Mode in this projector. Note : - icon and press SELECT button. 24 This function can be operated as follows. Fine sync, Total dots and Picture Position of Manual PC Adjustment ... Auto PC Adjustment function. Once parameters are required. ( ☞ P25 ) - icon and then press the SELECT button twice. When the image is selected on the remote control. Auto PC Adjustment function cannot be done just by pressing the Auto PC button on PC SYSTEM Menu ( ☞ P23). Press Point 7 8 button to...

Owners Manual
Page 27
... preset picture adjustment in Image Adjust Menu ( ☞ P28 ). Standard Normal picture adjustment preset on this projector. Real Picture adjustment improved in reproduction of halftones. Computer Input IMAGE button Standard Real Image 1 Image 2 ...-Screen Menu. This adjustment is suitable for providing better image in brighter place. Standard Normal picture adjustment preset on this projector. Press Point 7 8 button to move the red frame pointer to Image Select Menu icon. 2 Press Point d... Real, Image 1, Image 2, Image 3 and Image 4 by pressing IMAGE button on the remote control.
... preset picture adjustment in Image Adjust Menu ( ☞ P28 ). Standard Normal picture adjustment preset on this projector. Real Picture adjustment improved in reproduction of halftones. Computer Input IMAGE button Standard Real Image 1 Image 2 ...-Screen Menu. This adjustment is suitable for providing better image in brighter place. Standard Normal picture adjustment preset on this projector. Press Point 7 8 button to move the red frame pointer to Image Select Menu icon. 2 Press Point d... Real, Image 1, Image 2, Image 3 and Image 4 by pressing IMAGE button on the remote control.

Owners Manual
Page 29
... Press SELECT button to fit wide video aspect ratio (16 : 9) by expanding image width uniformly. This projector cannot display any button except D.ZOOM ed, SELECT and Point buttons. If your computer's screen resolution is higher than SVGA (800 x 600) is selected on PC System Menu. ( ☞ P23 ). - Zoom +" is... is used for providing a squeezed video signal at 16 : 9. A projected image can be also compressed by pressing D.ZOOM e button on the remote control. cannot be selected when "480i ", " 575i ", " 480p ", " 575p " is selected on PC Adjust Menu is larger than screen size.
... Press SELECT button to fit wide video aspect ratio (16 : 9) by expanding image width uniformly. This projector cannot display any button except D.ZOOM ed, SELECT and Point buttons. If your computer's screen resolution is higher than SVGA (800 x 600) is selected on PC System Menu. ( ☞ P23 ). - Zoom +" is... is used for providing a squeezed video signal at 16 : 9. A projected image can be also compressed by pressing D.ZOOM e button on the remote control. cannot be selected when "480i ", " 575i ", " 480p ", " 575p " is selected on PC Adjust Menu is larger than screen size.

Owners Manual
Page 30
... button. 30 Source Select Menu (VIDEO) Move the pointer to Video and then press SELECT button. Auto When selecting Auto, the projector automatically detects incoming video signal, and adjusts itself to select and then press SELECT button. When video input signal is connected to S-VIDEO...Input Source Selection ( Video, S-Video ) Direct Operation Choose Video by pressing INPUT button on the top control or VIDEO button on the remote control. Source Select Menu will appear. 3 Move the pointer to the source that you want to optimize its performance. INPUT button Video ...
... button. 30 Source Select Menu (VIDEO) Move the pointer to Video and then press SELECT button. Auto When selecting Auto, the projector automatically detects incoming video signal, and adjusts itself to select and then press SELECT button. When video input signal is connected to S-VIDEO...Input Source Selection ( Video, S-Video ) Direct Operation Choose Video by pressing INPUT button on the top control or VIDEO button on the remote control. Source Select Menu will appear. 3 Move the pointer to the source that you want to optimize its performance. INPUT button Video ...

Owners Manual
Page 31
... Input Source Selection ( Component, RGB Scart 21-pin ) Direct Operation Choose Computer by pressing INPUT button on the top control or COMPUTER button on the remote control. Before using these buttons, correct input source should be selected through menu operation as described below.
... Input Source Selection ( Component, RGB Scart 21-pin ) Direct Operation Choose Computer by pressing INPUT button on the top control or COMPUTER button on the remote control. Before using these buttons, correct input source should be selected through menu operation as described below.

Owners Manual
Page 33
...Standard Cinema Image 1 Image 2 Image 3 Image 4 Menu Operation 1 Press MENU button to set and then press SELECT button. Standard Normal picture adjustment preset on this projector. Image 1~4 User preset picture adjustment in Image Adjust Menu (☞ P34-35 ). Press Point 7 8 button to move the red frame pointer to Image Select ...button. Video Input Image Level Selection Direct Operation Select image level among Standard, Cinema, Image 1, Image 2, Image 3 and Image 4 by pressing IMAGE button on this projector. Standard Normal picture adjustment preset on the remote control.
...Standard Cinema Image 1 Image 2 Image 3 Image 4 Menu Operation 1 Press MENU button to set and then press SELECT button. Standard Normal picture adjustment preset on this projector. Image 1~4 User preset picture adjustment in Image Adjust Menu (☞ P34-35 ). Press Point 7 8 button to move the red frame pointer to Image Select ...button. Video Input Image Level Selection Direct Operation Select image level among Standard, Cinema, Image 1, Image 2, Image 3 and Image 4 by pressing IMAGE button on this projector. Standard Normal picture adjustment preset on the remote control.

Owners Manual
Page 37
... the count-down time can be set time will be turned off Lamp mode This function allows you to project the image from a ceiling mounted projector. Ceiling function Rear When this condition, the projection lamp will be turned off the projection lamp when the input signal is interrupted and no button...POWER indicator changes to the timer with the Point ed button and set time with the message " No signal " appears on the top control or remote control is canceled. The next operation depends on the setting as maintaining the lamp life, the Power Management function turns off .
... the count-down time can be set time will be turned off Lamp mode This function allows you to project the image from a ceiling mounted projector. Ceiling function Rear When this condition, the projection lamp will be turned off the projection lamp when the input signal is interrupted and no button...POWER indicator changes to the timer with the Point ed button and set time with the message " No signal " appears on the top control or remote control is canceled. The next operation depends on the setting as maintaining the lamp life, the Power Management function turns off .


