
User Manual
Page 4
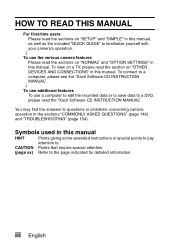
... 146) and "TROUBLESHOOTING" (page 154). You may find the answers to questions or problems concerning camera operation in this manual. HOW TO READ THIS MANUAL For first-time users Please read the sections on "SETUP" and "SIMPLE" in this manual, as well as the included "QUICK GUIDE" to familiarize yourself with your camera's operation. ↓ To use a computer to edit the recorded data or to save data to the...
... 146) and "TROUBLESHOOTING" (page 154). You may find the answers to questions or problems concerning camera operation in this manual. HOW TO READ THIS MANUAL For first-time users Please read the sections on "SETUP" and "SIMPLE" in this manual, as well as the included "QUICK GUIDE" to familiarize yourself with your camera's operation. ↓ To use a computer to edit the recorded data or to save data to the...

User Manual
Page 27
... the focus setting 60 Hints for taking pictures 61 VIDEO CLIP RECORDING 62 SHOOTING SINGLE SHOTS 63 Using the flash 65 SHOOT A STILL IMAGE WHILE RECORDING A VIDEO CLIP ..........67 MACRO-PHOTOGRAPHY (ZOOM 69 AFTER USING THE CAMERA IN WATER 70 PLAYBACK PLAYING BACK VIDEO CLIPS AND STILL IMAGES 71 How to save one frame from a video clip as a still image 73 SLIDESHOW PLAYBACK 74 PLAYBACK VOLUME 75 DELETING FILES 76 Delete single/delete all 76 Delete selected 77 PLAYBACK MODES 79 21-image display playback...
... the focus setting 60 Hints for taking pictures 61 VIDEO CLIP RECORDING 62 SHOOTING SINGLE SHOTS 63 Using the flash 65 SHOOT A STILL IMAGE WHILE RECORDING A VIDEO CLIP ..........67 MACRO-PHOTOGRAPHY (ZOOM 69 AFTER USING THE CAMERA IN WATER 70 PLAYBACK PLAYING BACK VIDEO CLIPS AND STILL IMAGES 71 How to save one frame from a video clip as a still image 73 SLIDESHOW PLAYBACK 74 PLAYBACK VOLUME 75 DELETING FILES 76 Delete single/delete all 76 Delete selected 77 PLAYBACK MODES 79 21-image display playback...

User Manual
Page 31
... 50 • "Select the focus setting" (super macro mode) on page 60 For more accurate focus • "How to use the manual focus" (manual focus) on page 89 Set the focus to viewing images using various techniques, you can locate the exact operation for your photos • "DATE AND TIME SETTING" on page 34 Zoom in the following table. Shooting/recording Basic operation Convenient functions Additional functions Getting started shooting/recording • "VIDEO CLIP RECORDING" on page 62 •...
... 50 • "Select the focus setting" (super macro mode) on page 60 For more accurate focus • "How to use the manual focus" (manual focus) on page 89 Set the focus to viewing images using various techniques, you can locate the exact operation for your photos • "DATE AND TIME SETTING" on page 34 Zoom in the following table. Shooting/recording Basic operation Convenient functions Additional functions Getting started shooting/recording • "VIDEO CLIP RECORDING" on page 62 •...
User Manual
Page 35
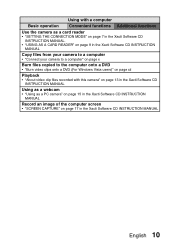
... Basic operation Convenient functions Additional functions Use the camera as a card reader • "SETTING THE CONNECTION MODE" on page 7 in the Xacti Software CD INSTRUCTION MANUAL. • "USING AS A CARD READER" on page 9 in the Xacti Software CD INSTRUCTION MANUAL Copy files from your camera to a computer • "Connect your camera to a computer" on page x Burn files copied to the computer onto a DVD • "Burn video clips onto a DVD (For Windows Vista users)" on page xii Playback • "About video clip files recorded...
... Basic operation Convenient functions Additional functions Use the camera as a card reader • "SETTING THE CONNECTION MODE" on page 7 in the Xacti Software CD INSTRUCTION MANUAL. • "USING AS A CARD READER" on page 9 in the Xacti Software CD INSTRUCTION MANUAL Copy files from your camera to a computer • "Connect your camera to a computer" on page x Burn files copied to the computer onto a DVD • "Burn video clips onto a DVD (For Windows Vista users)" on page xii Playback • "About video clip files recorded...

User Manual
Page 41
... mode for quick-and-easy operation (page 38) Select from two recording/playback modes: the "SIMPLE mode" for users new to capture a fast-moving subject, or when you try to the camera, and the "NORMAL mode" for the camera shake that results in blurry images when you zoom in while recording a video clip. Example: Select video and photo size SN EXIT OK RECORDING MENU1 1 2 3 VIDEO PHOTO HD-SHQ 2M SCENE SELECT 1 FILTER 2 FLASH...
... mode for quick-and-easy operation (page 38) Select from two recording/playback modes: the "SIMPLE mode" for users new to capture a fast-moving subject, or when you try to the camera, and the "NORMAL mode" for the camera shake that results in blurry images when you zoom in while recording a video clip. Example: Select video and photo size SN EXIT OK RECORDING MENU1 1 2 3 VIDEO PHOTO HD-SHQ 2M SCENE SELECT 1 FILTER 2 FLASH...
User Manual
Page 54
... the Xacti Software CD INSTRUCTION MANUAL) i The battery can be removed from the camera. 29 English Do not connect it takes to a computer. In the fully charged state, the backup battery will differ depending on the camera's operating condition. i Connect the dedicated USB interface cable to the USB connector on the monitor or the keyboard, or to maintain the date and time settings, as well as the shooting settings. CHARGING THE BATTERY PACK...
... the Xacti Software CD INSTRUCTION MANUAL) i The battery can be removed from the camera. 29 English Do not connect it takes to a computer. In the fully charged state, the backup battery will differ depending on the camera's operating condition. i Connect the dedicated USB interface cable to the USB connector on the monitor or the keyboard, or to maintain the date and time settings, as well as the shooting settings. CHARGING THE BATTERY PACK...

User Manual
Page 86
... the memory, during which time it is flashing red, the image files are being recorded... i The side [R] button can be captured after shooting. Where are recorded on the side of the camera... i The [R] button on the camera's internal memory remaining capacity, in the captured image. i All the image and sound files are the image and audio files saved? BEFORE TAKING PICTURES Hints for taking pictures Muting the operation sounds i The audio guidance that you operate the camera can be used only for recording video clips...
... the memory, during which time it is flashing red, the image files are being recorded... i The side [R] button can be captured after shooting. Where are recorded on the side of the camera... i The [R] button on the camera's internal memory remaining capacity, in the captured image. i All the image and sound files are the image and audio files saved? BEFORE TAKING PICTURES Hints for taking pictures Muting the operation sounds i The audio guidance that you operate the camera can be used only for recording video clips...

User Manual
Page 93
... recording size setting Still image recording size & , (16:9) () k (4:3) h It is suggested that you take note of a still image captured during video clip recording depends on the video clip recording mode (page 82). i When the remaining video recording time becomes approximately 50 seconds, it is not possible to capture a still image while recording a video clip. About the recording size of still images i The size of the remaining video recording time. English 68 SIMPLE/SHOOTING HINT i When shooting a still image while recording a video clip, the flash...
... recording size setting Still image recording size & , (16:9) () k (4:3) h It is suggested that you take note of a still image captured during video clip recording depends on the video clip recording mode (page 82). i When the remaining video recording time becomes approximately 50 seconds, it is not possible to capture a still image while recording a video clip. About the recording size of still images i The size of the remaining video recording time. English 68 SIMPLE/SHOOTING HINT i When shooting a still image while recording a video clip, the flash...

User Manual
Page 100
...SIMPLE Mode Playback Menu. 4 VOLUME SETTING HINT The volume can be adjusted during playback i During video clip or audio file playback, if you push the zoom switch toward [T/]] or [W/P], the volume control bar will appear, allowing you select "PLAY VOLUME" from the NORMAL Mode Playback Menu and press the SET button, the volume control bar appears. 75 English PLAY VOLUME 2 Press [G] or [H] to set , and the display returns to adjust the volume. h The playback volume is set the volume, and press the SET button. PLAYBACK VOLUME Adjust the playback volume for video clips and audio files...
...SIMPLE Mode Playback Menu. 4 VOLUME SETTING HINT The volume can be adjusted during playback i During video clip or audio file playback, if you push the zoom switch toward [T/]] or [W/P], the volume control bar will appear, allowing you select "PLAY VOLUME" from the NORMAL Mode Playback Menu and press the SET button, the volume control bar appears. 75 English PLAY VOLUME 2 Press [G] or [H] to set , and the display returns to adjust the volume. h The playback volume is set the volume, and press the SET button. PLAYBACK VOLUME Adjust the playback volume for video clips and audio files...

User Manual
Page 116
... shutter speeds and capture images in darker locations, but noise in the captured images may increase or the images may appear in the image. 91 English i If recording a video clip under fluorescent lights with the ISO sensitivity set to w or higher, a noticeable flicker may be set to a fixed setting. still image shooting: ISO 50 to flicker when recording a video clip? RECORDING MENU 2 ISO sensitivity setting With the initial settings, the ISO sensitivity is set automatically (video...
... shutter speeds and capture images in darker locations, but noise in the captured images may increase or the images may appear in the image. 91 English i If recording a video clip under fluorescent lights with the ISO sensitivity set to w or higher, a noticeable flicker may be set to a fixed setting. still image shooting: ISO 50 to flicker when recording a video clip? RECORDING MENU 2 ISO sensitivity setting With the initial settings, the ISO sensitivity is set automatically (video...
User Manual
Page 138
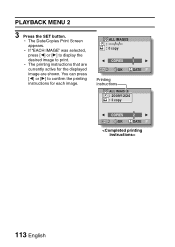
h The printing instructions that are currently active for each image. You can press [G] or [H] to print. h If "EACH IMAGE" was selected, press [G] or [H] to display the desired image to confirm the printing instructions for the displayed image are shown. PLAYBACK MENU 2 3 Press the SET button. h The Date/Copies Print Screen appears. ALL IMAGES 0 copy COPIES SET OK 1 DATE Printing instructions ALL IMAGES : 2009/12/24 : 2 copy COPIES SET OK 2 DATE 113 English
h The printing instructions that are currently active for each image. You can press [G] or [H] to print. h If "EACH IMAGE" was selected, press [G] or [H] to display the desired image to confirm the printing instructions for the displayed image are shown. PLAYBACK MENU 2 3 Press the SET button. h The Date/Copies Print Screen appears. ALL IMAGES 0 copy COPIES SET OK 1 DATE Printing instructions ALL IMAGES : 2009/12/24 : 2 copy COPIES SET OK 2 DATE 113 English

User Manual
Page 140
FILE INFO DISPLAY On the Information Screen you can check what the settings were when a file was recorded with your camera. 1 Display the desired file on the camera monitor. 2 Press the MENU button for at least 1 second. h If the MENU button is pressed again, the Information Screen is canceled. 1 Video clip mode settings 2 Image or sound number 3 Protect setting 4 File size 5 Video or audio recording time 6 Exposure compensation setting 7 Aperture value 8 Shutter speed 9 Remaining battery charge 0 Date and time of image A Still image resolution settings B ISO sensitivity setting INFO ...
FILE INFO DISPLAY On the Information Screen you can check what the settings were when a file was recorded with your camera. 1 Display the desired file on the camera monitor. 2 Press the MENU button for at least 1 second. h If the MENU button is pressed again, the Information Screen is canceled. 1 Video clip mode settings 2 Image or sound number 3 Protect setting 4 File size 5 Video or audio recording time 6 Exposure compensation setting 7 Aperture value 8 Shutter speed 9 Remaining battery charge 0 Date and time of image A Still image resolution settings B ISO sensitivity setting INFO ...

User Manual
Page 143
... setting h Settings for the camera's operation sounds, audio guide and volume. TURN ON/OFF: Mute or enable the sounds when the camera is turned on the monitor (post-view) after the [ ] button is shown on or off. AUDIO GUIDE: Mute or enable the camera's audio help guide. DATE & TIME: The camera's date and time setting is shown. COUNTER: Display the playback time when playing back a video clip. SHUTTER: Select the sound that the captured image is pressed. 6 REC FOLDER setting (page 123) 7 Remaining battery charge display (page 136) English 118 OPERATION VOL: Adjust...
... setting h Settings for the camera's operation sounds, audio guide and volume. TURN ON/OFF: Mute or enable the sounds when the camera is turned on the monitor (post-view) after the [ ] button is shown on or off. AUDIO GUIDE: Mute or enable the camera's audio help guide. DATE & TIME: The camera's date and time setting is shown. COUNTER: Display the playback time when playing back a video clip. SHUTTER: Select the sound that the captured image is pressed. 6 REC FOLDER setting (page 123) 7 Remaining battery charge display (page 136) English 118 OPERATION VOL: Adjust...

User Manual
Page 158
... OPTION SETTING MENU Formatting (initializing) A card must be formatted with the format procedure after setting the lock switch to the unlocked position. Caution regarding disposing/transferring the card (recovering data from a reformatted card using the camera or a computer, the card's control data may be merely modified and the data itself may be possible to the camera or eject the card during formatting i Do not turn off the power to recover the data from a reformatted card) i If a card...
... OPTION SETTING MENU Formatting (initializing) A card must be formatted with the format procedure after setting the lock switch to the unlocked position. Caution regarding disposing/transferring the card (recovering data from a reformatted card using the camera or a computer, the card's control data may be merely modified and the data itself may be possible to the camera or eject the card during formatting i Do not turn off the power to recover the data from a reformatted card) i If a card...

User Manual
Page 177
... minutes, then reinstall the battery pack and try again. A temporary internal circuitry problem may be operated? Action Select video clips that have attempted to record or play back occurs. Why does the "Card full" message appear? APPENDICES English 152 Misc. Why is protected" message appear? Delete unnecessary files, or use a card that were saved using a device other than this camera. Remove the AC adaptor and the battery pack from a nearby TV...
... minutes, then reinstall the battery pack and try again. A temporary internal circuitry problem may be operated? Action Select video clips that have attempted to record or play back occurs. Why does the "Card full" message appear? APPENDICES English 152 Misc. Why is protected" message appear? Delete unnecessary files, or use a card that were saved using a device other than this camera. Remove the AC adaptor and the battery pack from a nearby TV...
User Manual
Page 180
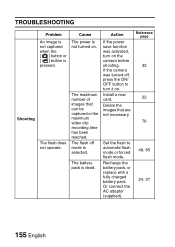
Set the flash to turn on . Install a new card. TROUBLESHOOTING Shooting Problem An image is not captured when the [ ] button or [ ] button is selected. The flash off , press the ON/ OFF button to automatic flash mode or forced flash mode. Or connect the AC adaptor (supplied). Reference page 32 22 76 48, 65 24, 27 155 English If the camera was activated, turn it on. Recharge the battery pack, or replace with a fully charged battery pack. The...
Set the flash to turn on . Install a new card. TROUBLESHOOTING Shooting Problem An image is not captured when the [ ] button or [ ] button is selected. The flash off , press the ON/ OFF button to automatic flash mode or forced flash mode. Or connect the AC adaptor (supplied). Reference page 32 22 76 48, 65 24, 27 155 English If the camera was activated, turn it on. Recharge the battery pack, or replace with a fully charged battery pack. The...
User Manual
Page 186
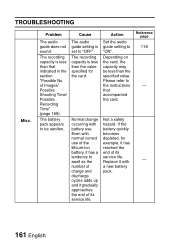
.... Action Set the audio guide setting to "OFF". Not a safety hazard. of its service life. Cause The audio guide setting is set to "ON". Depending on the card, the capacity may be swollen. The battery pack appears to swell as the number of its service life. If the battery quickly becomes depleted, for the card. Problem The audio guide does not sound. Replace it gradually approaches the end of Images/ Possible Shooting Time/ Possible Recording Time...
.... Action Set the audio guide setting to "OFF". Not a safety hazard. of its service life. Cause The audio guide setting is set to "ON". Depending on the card, the capacity may be swollen. The battery pack appears to swell as the number of its service life. If the battery quickly becomes depleted, for the card. Problem The audio guide does not sound. Replace it gradually approaches the end of Images/ Possible Shooting Time/ Possible Recording Time...

User Manual
Page 189
.... 1.1 million pixels Videos (HD mode): Approx. 970,000 pixels Videos (SD mode): Approx. 1.1 million pixels * Video clip files recorded with models VPC-CA65 and VPC-CG65 are not compatible due to provide interoperability between digital photography devices for the images stored on removable memory cards. APPENDICES English 164 However, such files cannot be played back, since they are in the same H.264 format as the data compression method. SPECIFICATIONS Camera Recorded image file format Still images: JPEG format (DCF, DPOF...
.... 1.1 million pixels Videos (HD mode): Approx. 970,000 pixels Videos (SD mode): Approx. 1.1 million pixels * Video clip files recorded with models VPC-CA65 and VPC-CG65 are not compatible due to provide interoperability between digital photography devices for the images stored on removable memory cards. APPENDICES English 164 However, such files cannot be played back, since they are in the same H.264 format as the data compression method. SPECIFICATIONS Camera Recorded image file format Still images: JPEG format (DCF, DPOF...

User Manual
Page 194
... the continuous recording time of Images/Possible Shooting Time/ Possible Recording Time Shooting/ recording mode Resolution setting t k Still image , mode [ t l & Video clip ( mode ) Internal memory 32 images 39 images 41 images 53 images 32 images 39 images 38 sec. 56 sec. 1 min. 49 sec. i Even with cards of the same capacity, the amount of the file being saved.) i The above values apply when an SD Memory Card by SanDisk is saved once, and then recording continues in a new file. The recording session...
... the continuous recording time of Images/Possible Shooting Time/ Possible Recording Time Shooting/ recording mode Resolution setting t k Still image , mode [ t l & Video clip ( mode ) Internal memory 32 images 39 images 41 images 53 images 32 images 39 images 38 sec. 56 sec. 1 min. 49 sec. i Even with cards of the same capacity, the amount of the file being saved.) i The above values apply when an SD Memory Card by SanDisk is saved once, and then recording continues in a new file. The recording session...

Brochure
Page 2
... to 29 frames) in water that you shoot at www.sanyo.de Caution: please consult the instruction manual to ensure safe and proper operation of video clips and sound will be limited to dry for Video Sensitivity Exposure correction Digital image stabilizer Photo Video Face Detection Electronic filter Other functions Self timer White balance Auto Manual Flash Flash range Audio Monitor Interface Languages Power source Power consumption Apporox. Scene select sports/portrait/ landscape...
... to 29 frames) in water that you shoot at www.sanyo.de Caution: please consult the instruction manual to ensure safe and proper operation of video clips and sound will be limited to dry for Video Sensitivity Exposure correction Digital image stabilizer Photo Video Face Detection Electronic filter Other functions Self timer White balance Auto Manual Flash Flash range Audio Monitor Interface Languages Power source Power consumption Apporox. Scene select sports/portrait/ landscape...


