
User Manual
Page 6
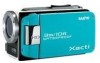
SHOOT, PLAY BACK AND SAVE Shooting 1 Press the ON/OFF button for at least 1 second to begin recording a video clip. To record a video clip: h Press the [ ] button to turn the camera on. To take a photo: h Press the [ ] button. h Press the [ ] button again to cancel it. ON/OFF button [ ] button [] button MENU button 2M 1031 HD-SHQ 00:55:58 v English h If the screen to set the date and time, see page 34. 2 Record. h A still image is captured. For how to set the date and time appears, press the MENU button 2 times to end the recording.
SHOOT, PLAY BACK AND SAVE Shooting 1 Press the ON/OFF button for at least 1 second to begin recording a video clip. To record a video clip: h Press the [ ] button to turn the camera on. To take a photo: h Press the [ ] button. h Press the [ ] button again to cancel it. ON/OFF button [ ] button [] button MENU button 2M 1031 HD-SHQ 00:55:58 v English h If the screen to set the date and time, see page 34. 2 Record. h A still image is captured. For how to set the date and time appears, press the MENU button 2 times to end the recording.

User Manual
Page 8
Press the ON/OFF button for at least 1 second to the next operation... To continue to turn the camera off. vii English When you are finished using the camera... h Playback begins. h Press the REC/PLAY button. Please confirm that your computer is connected to the Internet. SHOOT, PLAY BACK AND SAVE 3 Press the SET button.
Press the ON/OFF button for at least 1 second to the next operation... To continue to turn the camera off. vii English When you are finished using the camera... h Playback begins. h Press the REC/PLAY button. Please confirm that your computer is connected to the Internet. SHOOT, PLAY BACK AND SAVE 3 Press the SET button.
User Manual
Page 12
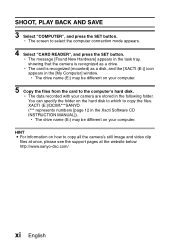
...", and press the SET button. XACTI (E:)\DCIM\***SANYO (*** represents numbers [page 12 in the following folder. h The card is recognized as a disk, and the [XACTI (E:)] icon appears in the task tray, showing that the camera is recognized (mounted) as a drive...camera are stored in the Xacti Software CD INSTRUCTION MANUAL]). h The data recorded with your computer. SHOOT, PLAY BACK AND SAVE 3 Select "COMPUTER", and press the SET button. h The screen to copy all the camera's still image and video clip files at once, please see the support pages at the website below: http://www.sanyo...
...", and press the SET button. XACTI (E:)\DCIM\***SANYO (*** represents numbers [page 12 in the following folder. h The card is recognized as a disk, and the [XACTI (E:)] icon appears in the task tray, showing that the camera is recognized (mounted) as a drive...camera are stored in the Xacti Software CD INSTRUCTION MANUAL]). h The data recorded with your computer. SHOOT, PLAY BACK AND SAVE 3 Select "COMPUTER", and press the SET button. h The screen to copy all the camera's still image and video clip files at once, please see the support pages at the website below: http://www.sanyo...

User Manual
Page 22
How was that? xxi English The convenient accessories not only let you immediately view images captured with the camera, but you can also upload images to find out how you can fully enjoy your original DVDs. Read the following explanations to your computer and create your camera's digital video feature.
How was that? xxi English The convenient accessories not only let you immediately view images captured with the camera, but you can also upload images to find out how you can fully enjoy your original DVDs. Read the following explanations to your computer and create your camera's digital video feature.

User Manual
Page 27
...setting 60 Hints for taking pictures 61 VIDEO CLIP RECORDING 62 SHOOTING SINGLE SHOTS 63 Using the flash 65 SHOOT A STILL IMAGE WHILE RECORDING A VIDEO CLIP ..........67 MACRO-PHOTOGRAPHY (ZOOM 69 AFTER USING THE CAMERA IN WATER 70 PLAYBACK PLAYING BACK VIDEO CLIPS AND STILL IMAGES 71 How to... save one frame from a video clip as a still image 73 SLIDESHOW PLAYBACK 74 PLAYBACK VOLUME...
...setting 60 Hints for taking pictures 61 VIDEO CLIP RECORDING 62 SHOOTING SINGLE SHOTS 63 Using the flash 65 SHOOT A STILL IMAGE WHILE RECORDING A VIDEO CLIP ..........67 MACRO-PHOTOGRAPHY (ZOOM 69 AFTER USING THE CAMERA IN WATER 70 PLAYBACK PLAYING BACK VIDEO CLIPS AND STILL IMAGES 71 How to... save one frame from a video clip as a still image 73 SLIDESHOW PLAYBACK 74 PLAYBACK VOLUME...

User Manual
Page 31
... photo quality • "Select the recording size" on pages 44 and 59. • "Video setting" on pages 48 and 82 • "Still image setting" on pages 48 and 85 Set the camera's color/contrast characteristics • "Image quality setting" on page 120 Capture fast-moving subjects ...• "Scene select" (sports mode) on page 48 Suppress camera shake effect • "Video stabilizer (motion compensation) setting" on page 34 Zoom in the following table. PHOTOGRAPHY (ZOOM)" on page 69 Close-up photography • ...
... photo quality • "Select the recording size" on pages 44 and 59. • "Video setting" on pages 48 and 82 • "Still image setting" on pages 48 and 85 Set the camera's color/contrast characteristics • "Image quality setting" on page 120 Capture fast-moving subjects ...• "Scene select" (sports mode) on page 48 Suppress camera shake effect • "Video stabilizer (motion compensation) setting" on page 34 Zoom in the following table. PHOTOGRAPHY (ZOOM)" on page 69 Close-up photography • ...
User Manual
Page 35
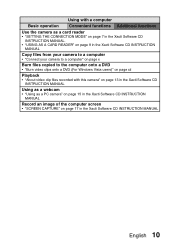
...; "USING AS A CARD READER" on page 9 in the Xacti Software CD INSTRUCTION MANUAL Copy files from your camera to a computer • "Connect your camera to a computer" on page x Burn files copied to the computer onto a DVD • "Burn video clips onto a DVD (For Windows Vista users)" on page xii... Playback • "About video clip files recorded with this camera" on page 13 in the Xacti Software CD INSTRUCTION MANUAL Using as a webcam • "Using as a PC camera" on page 15 in the Xacti Software CD INSTRUCTION MANUAL Record an image of the computer screen...
...; "USING AS A CARD READER" on page 9 in the Xacti Software CD INSTRUCTION MANUAL Copy files from your camera to a computer • "Connect your camera to a computer" on page x Burn files copied to the computer onto a DVD • "Burn video clips onto a DVD (For Windows Vista users)" on page xii... Playback • "About video clip files recorded with this camera" on page 13 in the Xacti Software CD INSTRUCTION MANUAL Using as a webcam • "Using as a PC camera" on page 15 in the Xacti Software CD INSTRUCTION MANUAL Record an image of the computer screen...

User Manual
Page 39
Waterproof capability The camera is equipped to safely be used in High Definition. English 14 You can easily create your original DVDs. It includes an operation mode that lets even novice shutterbugs record and play back without getting flustered, as well as software with which you can enjoy taking pictures at a depth of less than 3.0 m (9.84 ft.), for up to approximately 60 minutes. GETTING THE MOST OUT OF YOUR CAMERA Your dual camera can record video clips in water at a temperature of less than 40 °C (104°F), at the beach or by the pool.
Waterproof capability The camera is equipped to safely be used in High Definition. English 14 You can easily create your original DVDs. It includes an operation mode that lets even novice shutterbugs record and play back without getting flustered, as well as software with which you can enjoy taking pictures at a depth of less than 3.0 m (9.84 ft.), for up to approximately 60 minutes. GETTING THE MOST OUT OF YOUR CAMERA Your dual camera can record video clips in water at a temperature of less than 40 °C (104°F), at the beach or by the pool.

User Manual
Page 40
You get both compact file size and high picture quality in one high-performance camera. 15 English Also, the H.264/MPEG-4 AVC standard is used for formatting video files. GETTING THE MOST OUT OF YOUR CAMERA High-quality images with "High Definition" (pages 48, 59 and 82) Your camera can capture high definition (HD) 1280 × 720-pixel video clips.
You get both compact file size and high picture quality in one high-performance camera. 15 English Also, the H.264/MPEG-4 AVC standard is used for formatting video files. GETTING THE MOST OUT OF YOUR CAMERA High-quality images with "High Definition" (pages 48, 59 and 82) Your camera can capture high definition (HD) 1280 × 720-pixel video clips.

User Manual
Page 41
... EXIT OK RECORDING MENU1 1 2 3 VIDEO PHOTO HD-SHQ 2M SCENE SELECT 1 FILTER 2 FLASH 3 SELF-TIMER EXIT OK Image stabilizer for sharp pictures (pages 50 and 88) Your camera can compensate for the camera shake that results in blurry images when you try to the camera, and the "NORMAL mode" for users... new to capture a fast-moving subject, or when you zoom in while recording a video clip. Includes SIMPLE mode for quick-and...
... EXIT OK RECORDING MENU1 1 2 3 VIDEO PHOTO HD-SHQ 2M SCENE SELECT 1 FILTER 2 FLASH 3 SELF-TIMER EXIT OK Image stabilizer for sharp pictures (pages 50 and 88) Your camera can compensate for the camera shake that results in blurry images when you try to the camera, and the "NORMAL mode" for users... new to capture a fast-moving subject, or when you zoom in while recording a video clip. Includes SIMPLE mode for quick-and...

User Manual
Page 55
SETUP About recharging Recharging takes place only when the camera is lit; Please wait until the temperature has dropped before shutdown. h During video recording, a countdown indicator will start to record and play back even when the \ icon is turned off automatically. When the indicator shows 0 seconds, recording stops. k ...
SETUP About recharging Recharging takes place only when the camera is lit; Please wait until the temperature has dropped before shutdown. h During video recording, a countdown indicator will start to record and play back even when the \ icon is turned off automatically. When the indicator shows 0 seconds, recording stops. k ...

User Manual
Page 69
... a range of 1 cm (0.39 in.) to 1 m (3.28 ft.) (super macro). 3 Flash (page 65) h Specify how the flash will operate. 9: The camera detects the subject brightness and uses the flash only when necessary. :: The flash operates with every image captured regardless of the conditions. ;: The flash does ...not operate even in dark situations. 4 S N (page 38) h Set to record. r: The video clip size is 640 × 480 pixels, recorded at 30 frames/sec. i: The video clip size is 1280 × 720 pixels, recorded at 30 frames/sec. SETUP 1 Recording size (page 59) h Select ...
... a range of 1 cm (0.39 in.) to 1 m (3.28 ft.) (super macro). 3 Flash (page 65) h Specify how the flash will operate. 9: The camera detects the subject brightness and uses the flash only when necessary. :: The flash operates with every image captured regardless of the conditions. ;: The flash does ...not operate even in dark situations. 4 S N (page 38) h Set to record. r: The video clip size is 640 × 480 pixels, recorded at 30 frames/sec. i: The video clip size is 1280 × 720 pixels, recorded at 30 frames/sec. SETUP 1 Recording size (page 59) h Select ...

User Manual
Page 73
... 2 seconds after the [ ] or [ ] button is pressed. l: The flash will detect the subject brightness and use the flash only when necessary. SETUP 1 Video clip settings (page 82) &: Record at 1280 × 720 pixels, 30 fps (30p). (: Record at 640 × 480 pixels, 60 fps (60 p).... [ Underwater mode +: Fireworks mode Q: Lamp mode 4 Filter (page 86) &: No filter %: Cosmetic filter W: Monochrome filter ,: Sepia filter 5 Flash k: The camera will not operate even in dark situations. 6 Self-timer (page 87) N: Self-timer is off. m: The flash will operate with every image captured regardless of...
... 2 seconds after the [ ] or [ ] button is pressed. l: The flash will detect the subject brightness and use the flash only when necessary. SETUP 1 Video clip settings (page 82) &: Record at 1280 × 720 pixels, 30 fps (30p). (: Record at 640 × 480 pixels, 60 fps (60 p).... [ Underwater mode +: Fireworks mode Q: Lamp mode 4 Filter (page 86) &: No filter %: Cosmetic filter W: Monochrome filter ,: Sepia filter 5 Flash k: The camera will not operate even in dark situations. 6 Self-timer (page 87) N: Self-timer is off. m: The flash will operate with every image captured regardless of...
User Manual
Page 75
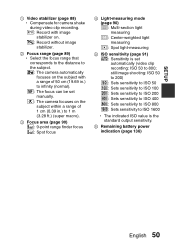
... (page 88) h Compensate for camera shake during video clip recording. \: Record with image stabilizer on. ]: Record without image stabilizer. 2 Focus range (page 89) h Select the focus range that corresponds to the distance to the subject. *: The camera automatically focuses on the subject with a range of 50 cm...to ISO 200 w: Sets sensitivity to ISO 400 6: Sets sensitivity to ISO 800 -: Sets sensitivity to ISO 1600 h The indicated ISO value is set automatically (video clip recording: ISO 50 to 1 m (3.28 ft.) (super macro). 3 Focus area (page 90) B: 9-point range finder focus C: Spot focus 4 ...
... (page 88) h Compensate for camera shake during video clip recording. \: Record with image stabilizer on. ]: Record without image stabilizer. 2 Focus range (page 89) h Select the focus range that corresponds to the distance to the subject. *: The camera automatically focuses on the subject with a range of 50 cm...to ISO 200 w: Sets sensitivity to ISO 400 6: Sets sensitivity to ISO 800 -: Sets sensitivity to ISO 1600 h The indicated ISO value is set automatically (video clip recording: ISO 50 to 1 m (3.28 ft.) (super macro). 3 Focus area (page 90) B: 9-point range finder focus C: Spot focus 4 ...

User Manual
Page 79
SETUP 1 PLAYBACK MENU2 EDIT PHOTO 1 2 EDIT VIDEO 2 1 2 PRINT INSTRUCTIONS SELECT FOLDER 3 4 3 COPY 5 EXIT OK 6 1 Edit photo (page 101) h Repair the "red-eye" caused by the flash, reduce the blur from camera shake, or enhance the contrast. 2 Video clip edit (page 102) h Edit video clips. 3 Printing instructions (page 111) h Specify the printing instructions (DPOF settings). 4 Select folder (page 80) h Select a folder to play back. 5 Copy h Copy files from the card to the internal memory, or vice versa. 6 Remaining battery power indication (page 136) English 54
SETUP 1 PLAYBACK MENU2 EDIT PHOTO 1 2 EDIT VIDEO 2 1 2 PRINT INSTRUCTIONS SELECT FOLDER 3 4 3 COPY 5 EXIT OK 6 1 Edit photo (page 101) h Repair the "red-eye" caused by the flash, reduce the blur from camera shake, or enhance the contrast. 2 Video clip edit (page 102) h Edit video clips. 3 Printing instructions (page 111) h Specify the printing instructions (DPOF settings). 4 Select folder (page 80) h Select a folder to play back. 5 Copy h Copy files from the card to the internal memory, or vice versa. 6 Remaining battery power indication (page 136) English 54

User Manual
Page 86
...pictures Muting the operation sounds i The audio guidance that you operate the camera can be muted (page 118). For capturing still images, please use the video clip recording button ([R] button) on the card installed in the camera, or in the captured image. To use the [O] button. Where are... being written to the characteristics of the camera... While the image files are the image and audio...
...pictures Muting the operation sounds i The audio guidance that you operate the camera can be muted (page 118). For capturing still images, please use the video clip recording button ([R] button) on the card installed in the camera, or in the captured image. To use the [O] button. Where are... being written to the characteristics of the camera... While the image files are the image and audio...

User Manual
Page 87
h When the remaining recording time available for the currently recording clip becomes little, a countdown of the remaining recording time appears on the camera (page 31), and set it to stop recording. [ ] button Recording time REC 00:00:09 5 Available recording time remaining English 62 h Press the [ ] button again to the recording mode (page 37). 2 Press the [ ] button. SIMPLE/SHOOTING VIDEO CLIP RECORDING 1 Turn on the display. 3 End the recording. h Recording begins. h It is not necessary to keep the [ ] button pressed while recording.
h When the remaining recording time available for the currently recording clip becomes little, a countdown of the remaining recording time appears on the camera (page 31), and set it to stop recording. [ ] button Recording time REC 00:00:09 5 Available recording time remaining English 62 h Press the [ ] button again to the recording mode (page 37). 2 Press the [ ] button. SIMPLE/SHOOTING VIDEO CLIP RECORDING 1 Turn on the display. 3 End the recording. h Recording begins. h It is not necessary to keep the [ ] button pressed while recording.

User Manual
Page 92
SHOOT A STILL IMAGE WHILE RECORDING A VIDEO CLIP You can capture a still image (a single-shot) while recording a video clip. 1 Turn on the camera (page 31), and set it to the recording mode (page 37). 2 Press the [ ] button. [ ] button [] button 3 When you see a scene you'd like to capture as a still image, press the [ ] button. 4 Press the [ ] button to end the video clip recording. 0.9M REC 00 : 00 : 09 67 English
SHOOT A STILL IMAGE WHILE RECORDING A VIDEO CLIP You can capture a still image (a single-shot) while recording a video clip. 1 Turn on the camera (page 31), and set it to the recording mode (page 37). 2 Press the [ ] button. [ ] button [] button 3 When you see a scene you'd like to capture as a still image, press the [ ] button. 4 Press the [ ] button to end the video clip recording. 0.9M REC 00 : 00 : 09 67 English

User Manual
Page 94
... that you use a tripod to stabilize the camera when recording video clips at a high magnification. 69 English For shooting sequential shots, see page 62. MACRO-PHOTOGRAPHY (ZOOM) Your camera has two zoom functions: optical zoom and digital zoom. 1 Point the camera lens at the subject. 2 Push the zoom... switch toward the [T/]] side again, the mode changes to the digital zoom mode and zooming continues (NORMAL mode). When the zoom switch is not a malfunction. For video clip recording, see page 85. HINT...
... that you use a tripod to stabilize the camera when recording video clips at a high magnification. 69 English For shooting sequential shots, see page 62. MACRO-PHOTOGRAPHY (ZOOM) Your camera has two zoom functions: optical zoom and digital zoom. 1 Point the camera lens at the subject. 2 Push the zoom... switch toward the [T/]] side again, the mode changes to the digital zoom mode and zooming continues (NORMAL mode). When the zoom switch is not a malfunction. For video clip recording, see page 85. HINT...

User Manual
Page 96
PLAYBACK SIMPLE/PLAYBACK PLAYING BACK VIDEO CLIPS AND STILL IMAGES 1 Set the camera to the playback mode (page 37). 2 Select the image to play back. h If a video clip was selected, playback begins. h Use the arrow keys to move the orange frame to play back. h The image information for the framed image is displayed fullscreen. Orange frame 2009.12.25 20:58 HD-SHQ 10.2MB OK 100-0006 00:00:08 71 English SET button Arrow keys h The image you wish to the file you selected in step 2 is shown at the bottom of the screen. 3 Press the SET button. Press [J].
PLAYBACK SIMPLE/PLAYBACK PLAYING BACK VIDEO CLIPS AND STILL IMAGES 1 Set the camera to the playback mode (page 37). 2 Select the image to play back. h If a video clip was selected, playback begins. h Use the arrow keys to move the orange frame to play back. h The image information for the framed image is displayed fullscreen. Orange frame 2009.12.25 20:58 HD-SHQ 10.2MB OK 100-0006 00:00:08 71 English SET button Arrow keys h The image you wish to the file you selected in step 2 is shown at the bottom of the screen. 3 Press the SET button. Press [J].


