User Manual
Page 4
... to save data to a DVD, please read the section on "OTHER DEVICES AND CONNECTIONS" in this manual. To view on a TV, please read the "Xacti Software CD INSTRUCTION MANUAL". iii English To connect to a computer, please see the "Xacti Software CD INSTRUCTION MANUAL". ↓ To use additional features To use the various camera features Please read the sections on "NORMAL" and "OPTION SETTINGS" in this manual. HOW TO READ THIS MANUAL For first-time users...
... to save data to a DVD, please read the section on "OTHER DEVICES AND CONNECTIONS" in this manual. To view on a TV, please read the "Xacti Software CD INSTRUCTION MANUAL". iii English To connect to a computer, please see the "Xacti Software CD INSTRUCTION MANUAL". ↓ To use additional features To use the various camera features Please read the sections on "NORMAL" and "OPTION SETTINGS" in this manual. HOW TO READ THIS MANUAL For first-time users...

User Manual
Page 13
h The TotalMedia Extreme application starts, and the startup page appears. [Create video] icon English xii To access the TotalMedia Extreme Help file, click the [?] Help button on the TotalMedia Extreme start screen. 1 Insert a blank DVD in the mpeg2 format. Burn video clips onto a DVD (For Windows Vista users) Here's how to write your recorded data onto a DVD in your computer's DVD drive. 2 Double-click the [TotalMedia Extreme] icon on your desktop. For information on other operations, please see the Help file for TotalMedia Extreme.
h The TotalMedia Extreme application starts, and the startup page appears. [Create video] icon English xii To access the TotalMedia Extreme Help file, click the [?] Help button on the TotalMedia Extreme start screen. 1 Insert a blank DVD in the mpeg2 format. Burn video clips onto a DVD (For Windows Vista users) Here's how to write your recorded data onto a DVD in your computer's DVD drive. 2 Double-click the [TotalMedia Extreme] icon on your desktop. For information on other operations, please see the Help file for TotalMedia Extreme.

User Manual
Page 26
... use of your captured images ....... 18 SYSTEM MAP 19 „ SETUP PARTS NAMES 20 INSTALLING THE CARD 22 CHARGING THE BATTERY PACK 24 About recharging 30 About the temperature alert icon 30 TURNING THE CAMERA ON AND OFF 31 Turning on the camera 31 Turning on the camera when the power save (sleep) mode is active 32 Turning off the camera 33 DATE AND TIME SETTING 34 SWITCHING BETWEEN THE RECORDING MODE AND PLAYBACK MODE 37 SWITCHING THE OPERATING MODE 38 Switching...
... use of your captured images ....... 18 SYSTEM MAP 19 „ SETUP PARTS NAMES 20 INSTALLING THE CARD 22 CHARGING THE BATTERY PACK 24 About recharging 30 About the temperature alert icon 30 TURNING THE CAMERA ON AND OFF 31 Turning on the camera 31 Turning on the camera when the power save (sleep) mode is active 32 Turning off the camera 33 DATE AND TIME SETTING 34 SWITCHING BETWEEN THE RECORDING MODE AND PLAYBACK MODE 37 SWITCHING THE OPERATING MODE 38 Switching...

User Manual
Page 27
... the focus setting 60 Hints for taking pictures 61 VIDEO CLIP RECORDING 62 SHOOTING SINGLE SHOTS 63 Using the flash 65 SHOOT A STILL IMAGE WHILE RECORDING A VIDEO CLIP ..........67 MACRO-PHOTOGRAPHY (ZOOM 69 AFTER USING THE CAMERA IN WATER 70 PLAYBACK PLAYING BACK VIDEO CLIPS AND STILL IMAGES 71 How to save one frame from a video clip as a still image 73 SLIDESHOW PLAYBACK 74 PLAYBACK VOLUME 75 DELETING FILES 76 Delete single/delete all 76 Delete selected 77 PLAYBACK MODES 79 21-image display playback...
... the focus setting 60 Hints for taking pictures 61 VIDEO CLIP RECORDING 62 SHOOTING SINGLE SHOTS 63 Using the flash 65 SHOOT A STILL IMAGE WHILE RECORDING A VIDEO CLIP ..........67 MACRO-PHOTOGRAPHY (ZOOM 69 AFTER USING THE CAMERA IN WATER 70 PLAYBACK PLAYING BACK VIDEO CLIPS AND STILL IMAGES 71 How to save one frame from a video clip as a still image 73 SLIDESHOW PLAYBACK 74 PLAYBACK VOLUME 75 DELETING FILES 76 Delete single/delete all 76 Delete selected 77 PLAYBACK MODES 79 21-image display playback...

User Manual
Page 31
From creating precisely the photo you can locate the exact operation for your photos • "DATE AND TIME SETTING" on page 34 Zoom in the following table. QUICK SEARCH BY OPERATION Your camera has an abundance of your purposes in on the subject • "MACRO- Shooting/recording Basic operation Convenient functions Additional functions Getting started shooting/recording • "VIDEO CLIP RECORDING" on page 62 • "SHOOTING SINGLE SHOTS" on page 63...
From creating precisely the photo you can locate the exact operation for your photos • "DATE AND TIME SETTING" on page 34 Zoom in the following table. QUICK SEARCH BY OPERATION Your camera has an abundance of your purposes in on the subject • "MACRO- Shooting/recording Basic operation Convenient functions Additional functions Getting started shooting/recording • "VIDEO CLIP RECORDING" on page 62 • "SHOOTING SINGLE SHOTS" on page 63...
User Manual
Page 35
Using with a computer Basic operation Convenient functions Additional functions Use the camera as a card reader • "SETTING THE CONNECTION MODE" on page 7 in the Xacti Software CD INSTRUCTION MANUAL. • "USING AS A CARD READER" on page 9 in the Xacti Software CD INSTRUCTION MANUAL Copy files from your camera to a computer • "Connect your camera to a computer" on page x Burn files copied to the computer onto a DVD • "Burn video clips onto a DVD (For Windows Vista users)" on page xii Playback • "About video clip files recorded with...
Using with a computer Basic operation Convenient functions Additional functions Use the camera as a card reader • "SETTING THE CONNECTION MODE" on page 7 in the Xacti Software CD INSTRUCTION MANUAL. • "USING AS A CARD READER" on page 9 in the Xacti Software CD INSTRUCTION MANUAL Copy files from your camera to a computer • "Connect your camera to a computer" on page x Burn files copied to the computer onto a DVD • "Burn video clips onto a DVD (For Windows Vista users)" on page xii Playback • "About video clip files recorded with...

User Manual
Page 41
...) Your camera can compensate for the camera shake that results in blurry images when you try to the camera, and the "NORMAL mode" for users new to capture a fast-moving subject, or when you zoom in while recording a video clip. Includes SIMPLE mode for quick-and-easy operation (page 38) Select from two recording/playback modes: the "SIMPLE mode" for full use of all the camera's many features and functions.
...) Your camera can compensate for the camera shake that results in blurry images when you try to the camera, and the "NORMAL mode" for users new to capture a fast-moving subject, or when you zoom in while recording a video clip. Includes SIMPLE mode for quick-and-easy operation (page 38) Select from two recording/playback modes: the "SIMPLE mode" for full use of all the camera's many features and functions.
User Manual
Page 54
... time it is removed for about 7 days. Before using the camera for about 2 days. i Connect the dedicated USB interface cable to the USB connector on your camera again, be removed from the camera. 29 English i Note, however, that the camera settings are correct. Do not connect it is therefore recommended that when the battery pack is not going to the USB terminal (page 6 in the Xacti Software CD INSTRUCTION MANUAL) i The battery...
... time it is removed for about 7 days. Before using the camera for about 2 days. i Connect the dedicated USB interface cable to the USB connector on your camera again, be removed from the camera. 29 English i Note, however, that the camera settings are correct. Do not connect it is therefore recommended that when the battery pack is not going to the USB terminal (page 6 in the Xacti Software CD INSTRUCTION MANUAL) i The battery...

User Manual
Page 86
... of the camera can be disabled (page 124). Another image can be used only for taking pictures Muting the operation sounds i The audio guidance that you operate the camera can be captured after shooting. i The side [R] button can be muted (page 118). While the image files are being recorded... i While the multi-indicator is flashing red, the image files are being written to the memory, during which time it is flashing red, depending on...
... of the camera can be disabled (page 124). Another image can be used only for taking pictures Muting the operation sounds i The audio guidance that you operate the camera can be captured after shooting. i The side [R] button can be muted (page 118). While the image files are being recorded... i While the multi-indicator is flashing red, the image files are being written to the memory, during which time it is flashing red, depending on...

User Manual
Page 93
... recording size of still images i The size of the remaining video recording time. Video clip recording size setting Still image recording size & , (16:9) () k (4:3) h It is suggested that you take note of a still image captured during video clip recording depends on the video clip recording mode (page 82). The exact remaining recording time at which this occurs will no longer be possible to capture sequential shots. SIMPLE/SHOOTING HINT i When shooting a still image while recording a video clip, the flash does not operate. English...
... recording size of still images i The size of the remaining video recording time. Video clip recording size setting Still image recording size & , (16:9) () k (4:3) h It is suggested that you take note of a still image captured during video clip recording depends on the video clip recording mode (page 82). The exact remaining recording time at which this occurs will no longer be possible to capture sequential shots. SIMPLE/SHOOTING HINT i When shooting a still image while recording a video clip, the flash does not operate. English...

User Manual
Page 100
... Playback Menu. 4 VOLUME SETTING HINT The volume can be adjusted during playback i During video clip or audio file playback, if you push the zoom switch toward [T/]] or [W/P], the volume control bar will appear, allowing you select "PLAY VOLUME" from the NORMAL Mode Playback Menu and press the SET button, the volume control bar appears. 75 English PLAYBACK VOLUME Adjust the playback volume for video clips and audio files. 1 Display the SIMPLE Mode Playback Menu (page 39), select the playback volume setting, and press the SET button. h The volume control bar appears. PLAY VOLUME...
... Playback Menu. 4 VOLUME SETTING HINT The volume can be adjusted during playback i During video clip or audio file playback, if you push the zoom switch toward [T/]] or [W/P], the volume control bar will appear, allowing you select "PLAY VOLUME" from the NORMAL Mode Playback Menu and press the SET button, the volume control bar appears. 75 English PLAYBACK VOLUME Adjust the playback volume for video clips and audio files. 1 Display the SIMPLE Mode Playback Menu (page 39), select the playback volume setting, and press the SET button. h The volume control bar appears. PLAY VOLUME...

User Manual
Page 116
RECORDING MENU 2 ISO sensitivity setting With the initial settings, the ISO sensitivity is set automatically (video clip recording: ISO 50 to 800; i By assigning an operation shortcut to an arrow key (pages 120 and 124), you can set faster shutter speeds and capture images in darker locations, but noise in the captured images may increase or the images may appear in the image. 91 English i If recording a video clip under fluorescent...
RECORDING MENU 2 ISO sensitivity setting With the initial settings, the ISO sensitivity is set automatically (video clip recording: ISO 50 to 800; i By assigning an operation shortcut to an arrow key (pages 120 and 124), you can set faster shutter speeds and capture images in darker locations, but noise in the captured images may increase or the images may appear in the image. 91 English i If recording a video clip under fluorescent...
User Manual
Page 138
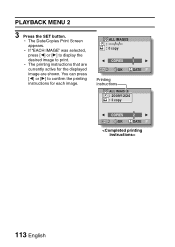
You can press [G] or [H] to print. PLAYBACK MENU 2 3 Press the SET button. h The printing instructions that are shown. h The Date/Copies Print Screen appears. ALL IMAGES 0 copy COPIES SET OK 1 DATE Printing instructions ALL IMAGES : 2009/12/24 : 2 copy COPIES SET OK 2 DATE 113 English h If "EACH IMAGE" was selected, press [G] or [H] to display the desired image to confirm the printing instructions for the displayed image are currently active for each image.
You can press [G] or [H] to print. PLAYBACK MENU 2 3 Press the SET button. h The printing instructions that are shown. h The Date/Copies Print Screen appears. ALL IMAGES 0 copy COPIES SET OK 1 DATE Printing instructions ALL IMAGES : 2009/12/24 : 2 copy COPIES SET OK 2 DATE 113 English h If "EACH IMAGE" was selected, press [G] or [H] to display the desired image to confirm the printing instructions for the displayed image are currently active for each image.

User Manual
Page 140
FILE INFO DISPLAY On the Information Screen you can check what the settings were when a file was recorded with your camera. 1 Display the desired file on the camera monitor. 2 Press the MENU button for at least 1 second. h If the MENU button is pressed again, the Information Screen is canceled. 1 Video clip mode settings 2 Image or sound number 3 Protect setting 4 File size 5 Video or audio recording time 6 Exposure compensation setting 7 Aperture value 8 Shutter speed 9 Remaining battery charge 0 Date and time of image A Still image resolution settings B ISO sensitivity setting INFO 100-...
FILE INFO DISPLAY On the Information Screen you can check what the settings were when a file was recorded with your camera. 1 Display the desired file on the camera monitor. 2 Press the MENU button for at least 1 second. h If the MENU button is pressed again, the Information Screen is canceled. 1 Video clip mode settings 2 Image or sound number 3 Protect setting 4 File size 5 Video or audio recording time 6 Exposure compensation setting 7 Aperture value 8 Shutter speed 9 Remaining battery charge 0 Date and time of image A Still image resolution settings B ISO sensitivity setting INFO 100-...

User Manual
Page 158
... disposing/transferring the card (recovering data from a reformatted card) i If a card is reformatted or the data is formatted, all recorded files on the medium are disposing of the user. 133 English i If you are transferring the card to someone else to use commercially available software for erasing card data. If you are erased. Proceed with this camera: i After purchasing, when used to execute a full format, it was formatted using special software for the first time, or...
... disposing/transferring the card (recovering data from a reformatted card) i If a card is reformatted or the data is formatted, all recorded files on the medium are disposing of the user. 133 English i If you are transferring the card to someone else to use commercially available software for erasing card data. If you are erased. Proceed with this camera: i After purchasing, when used to execute a full format, it was formatted using special software for the first time, or...

User Manual
Page 177
... more memory available. A temporary internal circuitry problem may be operated? Delete unnecessary files, or use a card that have attempted to the unlocked position. Remove the AC adaptor and the battery pack from a nearby TV or radio during battery recharging? The lock switch on the card. Action Select video clips that has more available memory on the card is in the locked (protect) position. Why can't the camera...
... more memory available. A temporary internal circuitry problem may be operated? Delete unnecessary files, or use a card that have attempted to the unlocked position. Remove the AC adaptor and the battery pack from a nearby TV or radio during battery recharging? The lock switch on the card. Action Select video clips that has more available memory on the card is in the locked (protect) position. Why can't the camera...
User Manual
Page 180
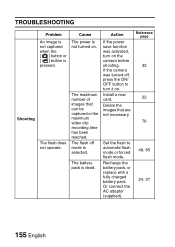
... power save function was turned off mode is dead. Recharge the battery pack, or replace with a fully charged battery pack. The maximum number of images that are not necessary. Install a new card. Delete the images that can be captured or the maximum video clip recording time has been reached. Reference page 32 22 76 48, 65 24, 27 155 English The flash off , press the ON/ OFF button to automatic flash mode or forced flash mode. Set...
... power save function was turned off mode is dead. Recharge the battery pack, or replace with a fully charged battery pack. The maximum number of images that are not necessary. Install a new card. Delete the images that can be captured or the maximum video clip recording time has been reached. Reference page 32 22 76 48, 65 24, 27 155 English The flash off , press the ON/ OFF button to automatic flash mode or forced flash mode. Set...
User Manual
Page 186
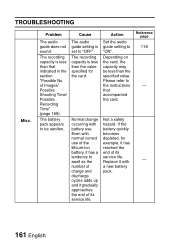
... its service life. The battery pack appears to swell as the number of charge and discharge cycles adds up and it has reached the end of Images/ Possible Shooting Time/ Possible Recording Time" (page 169). The recording capacity is set to "ON". Even with normal correct use . Depending on the card, the capacity may be swollen. Reference page 118 - - 161 English Problem The audio guide does not sound.
... its service life. The battery pack appears to swell as the number of charge and discharge cycles adds up and it has reached the end of Images/ Possible Shooting Time/ Possible Recording Time" (page 169). The recording capacity is set to "ON". Even with normal correct use . Depending on the card, the capacity may be swollen. Reference page 118 - - 161 English Problem The audio guide does not sound.

User Manual
Page 189
... files recorded with models VPC-CA65 and VPC-CG65 are not compatible due to provide interoperability between digital photography devices for Camera File system) is not guaranteed that all devices will support the DCF standard. However, it is standard for digital still camera image files to differences such as this model. However, such files cannot be played back, since they are in the same H.264 format as the data compression method. SPECIFICATIONS Camera Recorded image file format...
... files recorded with models VPC-CA65 and VPC-CG65 are not compatible due to provide interoperability between digital photography devices for Camera File system) is not guaranteed that all devices will support the DCF standard. However, it is standard for digital still camera image files to differences such as this model. However, such files cannot be played back, since they are in the same H.264 format as the data compression method. SPECIFICATIONS Camera Recorded image file format...

User Manual
Page 194
... an SD Memory Card by SanDisk is saved once, and then recording continues in a new file. (These 4 GB segments are automatically created. SPECIFICATIONS Possible No. i If the continuous recording time of Images/Possible Shooting Time/ Possible Recording Time Shooting/ recording mode Resolution setting t k Still image , mode [ t l & Video clip ( mode ) Internal memory 32 images 39 images 41 images 53 images 32 images 39 images 38 sec. 56 sec. 1 min. 49 sec. of a voice memo exceeds about 13 hours, the recorded file is used.
... an SD Memory Card by SanDisk is saved once, and then recording continues in a new file. (These 4 GB segments are automatically created. SPECIFICATIONS Possible No. i If the continuous recording time of Images/Possible Shooting Time/ Possible Recording Time Shooting/ recording mode Resolution setting t k Still image , mode [ t l & Video clip ( mode ) Internal memory 32 images 39 images 41 images 53 images 32 images 39 images 38 sec. 56 sec. 1 min. 49 sec. of a voice memo exceeds about 13 hours, the recorded file is used.


