
Instruction Manual, VPC-TH1EX
Page 10
SHOOT, PLAY BACK AND SAVE Connect your camera to a computer Connect your camera to a computer, and copy the desired files to the computer. 1 Use the supplied dedicated USB interface cable to connect your camera to the computer. 2 Turn on the computer ix English USB CONNECTION COMPUTER PRINTER CANCEL CANCEL OK Supplied dedicated USB interface cable To USB/AV terminal To USB connector on the camera. h The USB Connection Screen appears on the camera's monitor.
SHOOT, PLAY BACK AND SAVE Connect your camera to a computer Connect your camera to a computer, and copy the desired files to the computer. 1 Use the supplied dedicated USB interface cable to connect your camera to the computer. 2 Turn on the computer ix English USB CONNECTION COMPUTER PRINTER CANCEL CANCEL OK Supplied dedicated USB interface cable To USB/AV terminal To USB connector on the camera. h The USB Connection Screen appears on the camera's monitor.

Instruction Manual, VPC-TH1EX
Page 32
CHECKING THE INCLUDED ACCESSORIES i Xacti Software CD (CD-ROM) (page 4 in the Xacti Software CD INSTRUCTION MANUAL): 1 i Grip belt (page 13): 1 i Dedicated USB interface cable (page 7 in the Xacti Software CD INSTRUCTION MANUAL): 1 i Li-ion battery pack (page 26): 1 i AC adaptor and power card (page 27): 1 i Dedicated AV interface cable (page 142): 1 i Lens cap (page 14): 1 11 English
CHECKING THE INCLUDED ACCESSORIES i Xacti Software CD (CD-ROM) (page 4 in the Xacti Software CD INSTRUCTION MANUAL): 1 i Grip belt (page 13): 1 i Dedicated USB interface cable (page 7 in the Xacti Software CD INSTRUCTION MANUAL): 1 i Li-ion battery pack (page 26): 1 i AC adaptor and power card (page 27): 1 i Dedicated AV interface cable (page 142): 1 i Lens cap (page 14): 1 11 English

Instruction Manual, VPC-TH1EX
Page 41
Internet Dedicated USB interface cable Computer Printer Dedicated AV interface cable TV Mini HDMI cable (optional) Commercially available SD Memory Card i Card reader i DPOF-compatible printer i Photo shop English 20 SYSTEM MAP You can connect the camera to various devices to expand its capabilities.
Internet Dedicated USB interface cable Computer Printer Dedicated AV interface cable TV Mini HDMI cable (optional) Commercially available SD Memory Card i Card reader i DPOF-compatible printer i Photo shop English 20 SYSTEM MAP You can connect the camera to various devices to expand its capabilities.

Instruction Manual, VPC-TH1EX
Page 163
CONNECTING TO A TV English 142 Connecting to a standard video input terminal Supplied dedicated AV interface cable Yellow plug: To Video Input terminal To USB/AV terminal White plug: To Audio Input (L) terminal Red plug: To Audio Input (R) terminal Set the input to "VIDEO".
CONNECTING TO A TV English 142 Connecting to a standard video input terminal Supplied dedicated AV interface cable Yellow plug: To Video Input terminal To USB/AV terminal White plug: To Audio Input (L) terminal Red plug: To Audio Input (R) terminal Set the input to "VIDEO".
Instruction Manual, VPC-TH1EX
Page 164
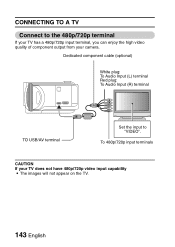
CONNECTING TO A TV Connect to "VIDEO". Dedicated component cable (optional) White plug: To Audio Input (L) terminal Red plug: To Audio Input (R) terminal TO USB/AV terminal Set the input to the 480p/720p terminal If your TV has a 480p/720p input terminal, you can enjoy the high video quality of component output from your TV does not have 480p/720p video input capability i The images will not appear on the TV. 143 English To 480p/720p input terminals CAUTION If your camera.
CONNECTING TO A TV Connect to "VIDEO". Dedicated component cable (optional) White plug: To Audio Input (L) terminal Red plug: To Audio Input (R) terminal TO USB/AV terminal Set the input to the 480p/720p terminal If your TV has a 480p/720p input terminal, you can enjoy the high video quality of component output from your TV does not have 480p/720p video input capability i The images will not appear on the TV. 143 English To 480p/720p input terminals CAUTION If your camera.

Instruction Manual, VPC-TH1EX
Page 167
... unit to turn on the camera, and turn on the printer English 146 USB CONNECTION COMPUTER PRINTER CANCEL CANCEL OK Supplied dedicated USB omterface cable CONNECTING TO A PRINTER To USB/AV terminal To USB connector on the printer. 2 Use the supplied dedicated USB interface cable to connect the camera to the printer. CONNECTING TO A PRINTER CONNECTING TO A PRINTER...
... unit to turn on the camera, and turn on the printer English 146 USB CONNECTION COMPUTER PRINTER CANCEL CANCEL OK Supplied dedicated USB omterface cable CONNECTING TO A PRINTER To USB/AV terminal To USB connector on the printer. 2 Use the supplied dedicated USB interface cable to connect the camera to the printer. CONNECTING TO A PRINTER CONNECTING TO A PRINTER...

Instruction Manual, VPC-TH1EX Safety
Page 4
...40°C (32 to clean it may be used incorrectly. i Do not keep in temperature i During camera use ; i Sanyo Electric shall not be held responsible for photographic equipment to 104°F); k Caution concerning copyrights i The images you discontinue use a..., increasing the contact resistance. i When the ambient temperature changes drastically, such as the \ icon remains flashing). Dedicated USB interface cable Dedicated S-AV interface cable Core Core * The type (shape) and quantity of the battery pack. k Caution concerning magnetism (for a long period...
...40°C (32 to clean it may be used incorrectly. i Do not keep in temperature i During camera use ; i Sanyo Electric shall not be held responsible for photographic equipment to 104°F); k Caution concerning copyrights i The images you discontinue use a..., increasing the contact resistance. i When the ambient temperature changes drastically, such as the \ icon remains flashing). Dedicated USB interface cable Dedicated S-AV interface cable Core Core * The type (shape) and quantity of the battery pack. k Caution concerning magnetism (for a long period...

Instruction Manual, VPC-TH1EX Software
Page 9
SETTING THE CONNECTION MODE 1 Start your computer, and use the supplied USB interface cable to connect the camera to the computer's USB connector. 2 Turn on the camera (see page 30 in the camera's instruction manual). h Connect the camera's USB/AV terminal to the computer. h The USB Connection Screen appears on the computer 7 English USB CONNECTION COMPUTER PRINTER CANCEL CANCEL OK Supplied dedicated USB interface cable To USB/AV terminal To USB connector on the camera's monitor.
SETTING THE CONNECTION MODE 1 Start your computer, and use the supplied USB interface cable to connect the camera to the computer's USB connector. 2 Turn on the camera (see page 30 in the camera's instruction manual). h Connect the camera's USB/AV terminal to the computer. h The USB Connection Screen appears on the computer 7 English USB CONNECTION COMPUTER PRINTER CANCEL CANCEL OK Supplied dedicated USB interface cable To USB/AV terminal To USB connector on the camera's monitor.

