

Instruction Manual, VPC-TH1EX
Page 3
... printed beneath the symbol mark, this chemical symbol means that electrical and electronic equipment, batteries and accumulators, at their end-of-life, should be disposed of separately from your local community waste collection/ recycling centre. English ii Your SANYO product is designed and manufactured with Canadian ICES-003. Please, dispose of the...
... printed beneath the symbol mark, this chemical symbol means that electrical and electronic equipment, batteries and accumulators, at their end-of-life, should be disposed of separately from your local community waste collection/ recycling centre. English ii Your SANYO product is designed and manufactured with Canadian ICES-003. Please, dispose of the...

Instruction Manual, VPC-TH1EX
Page 7
... 2009.12.24 18:41 HD-SHQ 6.5MB OK 100-0006 00:00:05 Orange frame Remaining battery power idication English vi h Toggle the SET button left, right, up and ready to go i Sanyo declines any claim for compensation for the framed image is shown at the bottom of photographing or recording...
... 2009.12.24 18:41 HD-SHQ 6.5MB OK 100-0006 00:00:05 Orange frame Remaining battery power idication English vi h Toggle the SET button left, right, up and ready to go i Sanyo declines any claim for compensation for the framed image is shown at the bottom of photographing or recording...

Instruction Manual, VPC-TH1EX
Page 22
... Lots of accessories for optimal use of your captured images ....... 19 SYSTEM MAP 20 „ SETUP PARTS NAMES 21 INSTALLING THE CARD 23 CHARGING THE BATTERY PACK 25 About recharging 29 About the temperature alert icon 29 TURNING THE CAMERA ON AND OFF 30 Turning on the camera 30 Turning on...
... Lots of accessories for optimal use of your captured images ....... 19 SYSTEM MAP 20 „ SETUP PARTS NAMES 21 INSTALLING THE CARD 23 CHARGING THE BATTERY PACK 25 About recharging 29 About the temperature alert icon 29 TURNING THE CAMERA ON AND OFF 30 Turning on the camera 30 Turning on...
Instruction Manual, VPC-TH1EX
Page 25
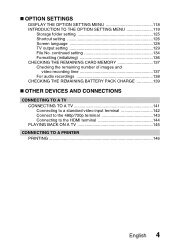
... 136 CHECKING THE REMAINING CARD MEMORY 137 Checking the remaining number of images and video recording time 137 For audio recordings 138 CHECKING THE REMAINING BATTERY PACK CHARGE 139 „ OTHER DEVICES AND CONNECTIONS CONNECTING TO A TV CONNECTING TO A TV 141 Connecting to a standard video input terminal 142 Connect to the...
... 136 CHECKING THE REMAINING CARD MEMORY 137 Checking the remaining number of images and video recording time 137 For audio recordings 138 CHECKING THE REMAINING BATTERY PACK CHARGE 139 „ OTHER DEVICES AND CONNECTIONS CONNECTING TO A TV CONNECTING TO A TV 141 Connecting to a standard video input terminal 142 Connect to the...

Instruction Manual, VPC-TH1EX
Page 26
of Images/Possible Shooting Time/ Possible Recording Time 172 Concerning the multi-indicator 173 Supplied AC adaptor 174 Supplied Li-ion battery pack 174 Others 175 Before capturing those important shots, be sure to first take a test shot to comfirm that your camera is set up and ready to go 176 HINTS FOR TAKING PICTURES 177 5 English CONTENTS „ APPENDICES COMMONLY ASKED QUESTIONS 149 TROUBLESHOOTING 157 Camera 157 Notes regarding the Scene Select feature and filters 165 SPECIFICATIONS 167 Camera 167 Camera connectors 171 Battery life 171 Possible No.
of Images/Possible Shooting Time/ Possible Recording Time 172 Concerning the multi-indicator 173 Supplied AC adaptor 174 Supplied Li-ion battery pack 174 Others 175 Before capturing those important shots, be sure to first take a test shot to comfirm that your camera is set up and ready to go 176 HINTS FOR TAKING PICTURES 177 5 English CONTENTS „ APPENDICES COMMONLY ASKED QUESTIONS 149 TROUBLESHOOTING 157 Camera 157 Notes regarding the Scene Select feature and filters 165 SPECIFICATIONS 167 Camera 167 Camera connectors 171 Battery life 171 Possible No.

Instruction Manual, VPC-TH1EX
Page 32
CHECKING THE INCLUDED ACCESSORIES i Xacti Software CD (CD-ROM) (page 4 in the Xacti Software CD INSTRUCTION MANUAL): 1 i Grip belt (page 13): 1 i Dedicated USB interface cable (page 7 in the Xacti Software CD INSTRUCTION MANUAL): 1 i Li-ion battery pack (page 26): 1 i AC adaptor and power card (page 27): 1 i Dedicated AV interface cable (page 142): 1 i Lens cap (page 14): 1 11 English
CHECKING THE INCLUDED ACCESSORIES i Xacti Software CD (CD-ROM) (page 4 in the Xacti Software CD INSTRUCTION MANUAL): 1 i Grip belt (page 13): 1 i Dedicated USB interface cable (page 7 in the Xacti Software CD INSTRUCTION MANUAL): 1 i Li-ion battery pack (page 26): 1 i AC adaptor and power card (page 27): 1 i Dedicated AV interface cable (page 142): 1 i Lens cap (page 14): 1 11 English
Instruction Manual, VPC-TH1EX
Page 36
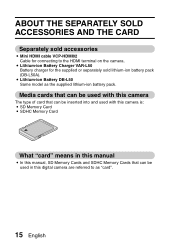
.... ABOUT THE SEPARATELY SOLD ACCESSORIES AND THE CARD Separately sold accessories i Mini HDMI cable VCP-HDMI02 Cable for the supplied or separately sold lithium-ion battery pack (DB-L50A). Media cards that can be used with this camera The type of card that can be inserted into and used with this...
.... ABOUT THE SEPARATELY SOLD ACCESSORIES AND THE CARD Separately sold accessories i Mini HDMI cable VCP-HDMI02 Cable for the supplied or separately sold lithium-ion battery pack (DB-L50A). Media cards that can be used with this camera The type of card that can be inserted into and used with this...
Instruction Manual, VPC-TH1EX
Page 42
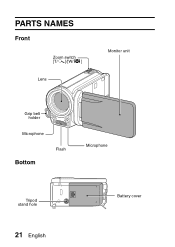
SETUP SETUP PARTS NAMES Front Zoom switch [T/]]/[W/P] Lens Monitor unit Grip belt holder Microphone Bottom Flash Microphone Tripod stand hole 21 English Battery cover
SETUP SETUP PARTS NAMES Front Zoom switch [T/]]/[W/P] Lens Monitor unit Grip belt holder Microphone Bottom Flash Microphone Tripod stand hole 21 English Battery cover

Instruction Manual, VPC-TH1EX
Page 43
Rear ON/OFF button Speaker Multi-indicator Grip belt holder SETUP Monitor USB/AV terminal HDMI terminal Card slot cover DC IN terminal cover Battery cover lock [ ] button REC/PLAY button [ ] button MENU button SET button English 22
Rear ON/OFF button Speaker Multi-indicator Grip belt holder SETUP Monitor USB/AV terminal HDMI terminal Card slot cover DC IN terminal cover Battery cover lock [ ] button REC/PLAY button [ ] button MENU button SET button English 22
Instruction Manual, VPC-TH1EX
Page 46
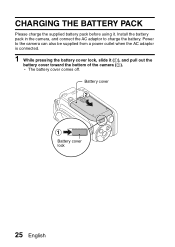
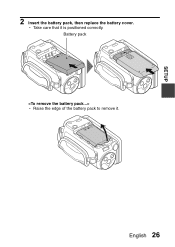
Install the battery pack in the camera, and connect the AC adaptor to the camera can also be supplied from a power outlet when the AC adaptor is connected. 1 While pressing the battery cover lock, slide it . Battery cover 2 1 Battery cover lock 25 English Power to charge the battery. CHARGING THE BATTERY PACK Please charge the supplied battery pack before using it (1), and pull out the battery cover toward the bottom of the camera (2). h The battery cover comes off.
Install the battery pack in the camera, and connect the AC adaptor to the camera can also be supplied from a power outlet when the AC adaptor is connected. 1 While pressing the battery cover lock, slide it . Battery cover 2 1 Battery cover lock 25 English Power to charge the battery. CHARGING THE BATTERY PACK Please charge the supplied battery pack before using it (1), and pull out the battery cover toward the bottom of the camera (2). h The battery cover comes off.
Instruction Manual, VPC-TH1EX
Page 47
h Take care that it . English 26 SETUP 2 Insert the battery pack, then replace the battery cover. Battery pack h Raise the edge of the battery pack to remove it is positioned correctly.
h Take care that it . English 26 SETUP 2 Insert the battery pack, then replace the battery cover. Battery pack h Raise the edge of the battery pack to remove it is positioned correctly.
Instruction Manual, VPC-TH1EX
Page 48
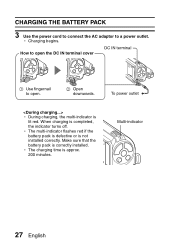
CHARGING THE BATTERY PACK 3 Use the power cord to connect the AC adaptor to open. 2 Open downwards. Multi-indicator 27 English Make sure that the battery pack is completed, the indicator turns off. When charging is correctly installed. To power outlet h During charging, the multi-indicator is approx. 200 minutes. How to open the DC IN terminal cover DC IN terminal 1 Use fingernail to a power outlet. h The charging time is lit red. h Charging begins. h The multi-indicator flashes red if the battery pack is defective or is not installed correctly.
CHARGING THE BATTERY PACK 3 Use the power cord to connect the AC adaptor to open. 2 Open downwards. Multi-indicator 27 English Make sure that the battery pack is completed, the indicator turns off. When charging is correctly installed. To power outlet h During charging, the multi-indicator is approx. 200 minutes. How to open the DC IN terminal cover DC IN terminal 1 Use fingernail to a power outlet. h The charging time is lit red. h Charging begins. h The multi-indicator flashes red if the battery pack is defective or is not installed correctly.

Instruction Manual, VPC-TH1EX
Page 49
... environment or repeatedly used, but this state, the multiindicator may flash red and it may be cleared. In the fully charged state, the backup battery will maintain the camera settings for a long time. When not using your computer. Do not connect it to the USB connector on your camera... the time it . Recharging when connected to the USB terminal (page 6 in the Xacti Software Pack INSTRUCTION MANUAL) i The battery can be sure to be used for about 2 days. SETUP CAUTION Do not charge the battery pack immediately after the camera has been in continuous use for a long time i The...
... environment or repeatedly used, but this state, the multiindicator may flash red and it may be cleared. In the fully charged state, the backup battery will maintain the camera settings for a long time. When not using your computer. Do not connect it to the USB connector on your camera... the time it . Recharging when connected to the USB terminal (page 6 in the Xacti Software Pack INSTRUCTION MANUAL) i The battery can be sure to be used for about 2 days. SETUP CAUTION Do not charge the battery pack immediately after the camera has been in continuous use for a long time i The...

Instruction Manual, VPC-TH1EX
Page 50
... icon is in the recording mode or playback mode. When the indicator shows 0 seconds, recording stops. k When the battery or internal camera (excluding battery) temperature rises during use h During camera use . The camera cannot be turned on again until the temperature has dropped (...recording, a countdown indicator will show the time starting about 15 seconds before resuming use , if the temperature of the battery or inside the camera (excluding the battery) rises, a \ icon lights on until the temperature has dropped before shutdown. About the temperature alert icon \ During...
... icon is in the recording mode or playback mode. When the indicator shows 0 seconds, recording stops. k When the battery or internal camera (excluding battery) temperature rises during use h During camera use . The camera cannot be turned on again until the temperature has dropped (...recording, a countdown indicator will show the time starting about 15 seconds before resuming use , if the temperature of the battery or inside the camera (excluding the battery) rises, a \ icon lights on until the temperature has dropped before shutdown. About the temperature alert icon \ During...

Instruction Manual, VPC-TH1EX
Page 52
...). i When the AC adaptor is connected, the power save mode will switch to set the operation sounds appears. i When the camera is connected to preserve battery pack power, the power save (sleep) function will automatically turn on the camera, the screen to the standby mode. TURNING THE CAMERA ON AND OFF...
...). i When the AC adaptor is connected, the power save mode will switch to set the operation sounds appears. i When the camera is connected to preserve battery pack power, the power save (sleep) function will automatically turn on the camera, the screen to the standby mode. TURNING THE CAMERA ON AND OFF...

Instruction Manual, VPC-TH1EX
Page 56
... to set the date and time appears. DATE AND TIME SETTING 5 Press the MENU button. h The date and time setting is being replaced, an internal battery will last for about 7 days). To correct the date and time settings 1 Turn on the camera. 2 Display the Option Setting Menu [1] (page 118). ...3 Select "CLOCK SET" and press the SET button. h The current date and time settings are still correct after replacing the battery pack and before shooting or recording of any type (follow step 1). h To display the Recording or Playback Screen, press the MENU button. h The screen ...
... to set the date and time appears. DATE AND TIME SETTING 5 Press the MENU button. h The date and time setting is being replaced, an internal battery will last for about 7 days). To correct the date and time settings 1 Turn on the camera. 2 Display the Option Setting Menu [1] (page 118). ...3 Select "CLOCK SET" and press the SET button. h The current date and time settings are still correct after replacing the battery pack and before shooting or recording of any type (follow step 1). h To display the Recording or Playback Screen, press the MENU button. h The screen ...

Instruction Manual, VPC-TH1EX
Page 65
.../sec. r: The video clip size is 1600 × 1200 (4:3) pixels. SETUP 1 Recording size (page 59) h Select the video clip size to the NORMAL mode. 5 Remaining battery power indication (page 139) English 44 The captured still image size is 1280 × 720 pixels, recorded at 30 frames/sec.
.../sec. r: The video clip size is 1600 × 1200 (4:3) pixels. SETUP 1 Recording size (page 59) h Select the video clip size to the NORMAL mode. 5 Remaining battery power indication (page 139) English 44 The captured still image size is 1280 × 720 pixels, recorded at 30 frames/sec.

Instruction Manual, VPC-TH1EX
Page 67
1 Slideshow (page 74) h Specify the slideshow settings and play the slideshow. 2 Playback volume (page 75) h Adjust the volume for video clip and audio file playback. 3 Delete (page 76) h Delete files. 4 S N (page 37) h Set to the NORMAL mode. 5 Remaining battery power indication (page 139) SETUP English 46
1 Slideshow (page 74) h Specify the slideshow settings and play the slideshow. 2 Playback volume (page 75) h Adjust the volume for video clip and audio file playback. 3 Delete (page 76) h Delete files. 4 S N (page 37) h Set to the NORMAL mode. 5 Remaining battery power indication (page 139) SETUP English 46

Instruction Manual, VPC-TH1EX
Page 69
y: Shooting begins 2 seconds after the [ ] or [ ] button is pressed. 7 Remaining battery power indication (page 139) English 48 m: The flash will detect the subject brightness and use the flash only when necessary. x: Shooting begins 10 seconds after ...
y: Shooting begins 2 seconds after the [ ] or [ ] button is pressed. 7 Remaining battery power indication (page 139) English 48 m: The flash will detect the subject brightness and use the flash only when necessary. x: Shooting begins 10 seconds after ...

Instruction Manual, VPC-TH1EX
Page 71
... mode (page 90) X: Multi-section light measuring W: Center-weighted light measuring Y: Spot light-measuring 5 ISO sensitivity (page 91) =: Sensitivity is the standard output sensitivity. 6 Remaining battery power indication (page 139) English 50 SETUP 1 Video stabilizer (page 88) h Compensate for camera shake during video clip recording. \: Record with image stabilizer on. ]: Record...
... mode (page 90) X: Multi-section light measuring W: Center-weighted light measuring Y: Spot light-measuring 5 ISO sensitivity (page 91) =: Sensitivity is the standard output sensitivity. 6 Remaining battery power indication (page 139) English 50 SETUP 1 Video stabilizer (page 88) h Compensate for camera shake during video clip recording. \: Record with image stabilizer on. ]: Record...


