
VPC-PD2 Instruction Manual
Page 8
... to set the date and time appears, press the [?] button to cancel it. h Press the [ ] button again to begin recording a video clip. To record a video clip: h Press the [ ] button to end the recording. h A still image is captured. [ ] button (Photo shooting button) Recording time 2M REC 00:09 5 Available recording time remaining vii English Shooting 1 Press the ON/OFF button for at least 1 second to set the date and time, see page 14. [ ] button (Video recording button) ON/OFF button 2 Record. h If the screen to turn the camera...
... to set the date and time appears, press the [?] button to cancel it. h Press the [ ] button again to begin recording a video clip. To record a video clip: h Press the [ ] button to end the recording. h A still image is captured. [ ] button (Photo shooting button) Recording time 2M REC 00:09 5 Available recording time remaining vii English Shooting 1 Press the ON/OFF button for at least 1 second to set the date and time, see page 14. [ ] button (Video recording button) ON/OFF button 2 Record. h If the screen to turn the camera...

VPC-PD2 Instruction Manual
Page 9
h The file you wish to play back. h Press the REC/PLAY button. REC/PLAY button SET button Arrow keys 2010.12.24 14:25 100-0011 Orange frame Remaining battery power indication English viii h The display changes to the Playback Screen. 2 Select the image to the image you selected is shown in the bottom part of the monitor. 3 Press the SET button. Playback 1 Press the REC/PLAY button. h The image information for the framed image is played back. h Use the arrow keys to move the orange frame to play back.
h The file you wish to play back. h Press the REC/PLAY button. REC/PLAY button SET button Arrow keys 2010.12.24 14:25 100-0011 Orange frame Remaining battery power indication English viii h The display changes to the Playback Screen. 2 Select the image to the image you selected is shown in the bottom part of the monitor. 3 Press the SET button. Playback 1 Press the REC/PLAY button. h The image information for the framed image is played back. h Use the arrow keys to move the orange frame to play back.
VPC-PD2 Instruction Manual
Page 12
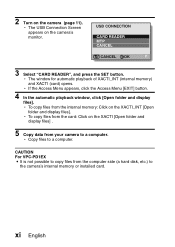
...the internal memory: Click on the camera's monitor. USB CONNECTION CARD READER MTP CANCEL CANCEL OK 3 Select "CARD READER", and press the SET button. xi English 2 Turn on the XACTI [Open folder and display files] . 5 Copy data from your camera to a computer. h Copy files to the camera's internal memory or installed card. h The window for automatic playback of XACTI_INT (internal memory) and XACTI (card) opens. h To copy files from the computer side (a hard disk, etc.) to a computer. h The USB Connection Screen appears on the XACTI_INT [Open folder and display files].
...the internal memory: Click on the camera's monitor. USB CONNECTION CARD READER MTP CANCEL CANCEL OK 3 Select "CARD READER", and press the SET button. xi English 2 Turn on the XACTI [Open folder and display files] . 5 Copy data from your camera to a computer. h Copy files to the camera's internal memory or installed card. h The window for automatic playback of XACTI_INT (internal memory) and XACTI (card) opens. h To copy files from the computer side (a hard disk, etc.) to a computer. h The USB Connection Screen appears on the XACTI_INT [Open folder and display files].
VPC-PD2 Instruction Manual
Page 13
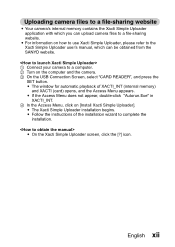
.... 2 Turn on [Install Xacti Simple Uploader]. i Follow the instructions of XACTI_INT (internal memory) and XACTI (card) opens, and the Access Menu appears. i If the Access Menu does not appear, double-click "Autorun.Exe" in XACTI_INT. 4 In the Access Menu, click on the computer and the camera. 3 On the USB Connection Screen, select "CARD READER", and press the SET button. i The Xacti Simple Uploader installation begins. i On the Xacti Simple Uploader screen, click the [?] icon. English xii Uploading camera files...
.... 2 Turn on [Install Xacti Simple Uploader]. i Follow the instructions of XACTI_INT (internal memory) and XACTI (card) opens, and the Access Menu appears. i If the Access Menu does not appear, double-click "Autorun.Exe" in XACTI_INT. 4 In the Access Menu, click on the computer and the camera. 3 On the USB Connection Screen, select "CARD READER", and press the SET button. i The Xacti Simple Uploader installation begins. i On the Xacti Simple Uploader screen, click the [?] icon. English xii Uploading camera files...

VPC-PD2 Instruction Manual
Page 14
...;Vista Windows®XP with standard with standard USB port Core 2 Duo or faster 1GB or greater (Recommended 2GB or greater) 256MB or greater - *1 In some cases, images may not show correctly on your computer, depending on your computer be connected to the Internet. To upload images, please establish an account with a file-sharing service (YouTube, for Mac OS Video playback Mac...
...;Vista Windows®XP with standard with standard USB port Core 2 Duo or faster 1GB or greater (Recommended 2GB or greater) 256MB or greater - *1 In some cases, images may not show correctly on your computer, depending on your computer be connected to the Internet. To upload images, please establish an account with a file-sharing service (YouTube, for Mac OS Video playback Mac...

VPC-PD2 Instruction Manual
Page 16
... this manual 5 „ SETUP PARTS NAMES 6 ABOUT THE BATTERY AND THE CARD 8 About recharging 8 About the temperature alert icon 9 To format a card 10 Shooting without a card installed 10 TURNING THE CAMERA ON AND OFF 11 Turning on the camera 11 Turning off the camera 11 Turning on the camera when the power save (sleep) mode is active 12 DATE AND TIME SETTING 14 ACCESSING THE SETUP MENU SCREEN 16 „ SHOOTING VIDEO CLIP RECORDING 18 SHOOTING SINGLE SHOTS 20 SHOOT A STILL IMAGE WHILE RECORDING A VIDEO CLIP...
... this manual 5 „ SETUP PARTS NAMES 6 ABOUT THE BATTERY AND THE CARD 8 About recharging 8 About the temperature alert icon 9 To format a card 10 Shooting without a card installed 10 TURNING THE CAMERA ON AND OFF 11 Turning on the camera 11 Turning off the camera 11 Turning on the camera when the power save (sleep) mode is active 12 DATE AND TIME SETTING 14 ACCESSING THE SETUP MENU SCREEN 16 „ SHOOTING VIDEO CLIP RECORDING 18 SHOOTING SINGLE SHOTS 20 SHOOT A STILL IMAGE WHILE RECORDING A VIDEO CLIP...

VPC-PD2 Instruction Manual
Page 17
„ APPENDICES FREQUENTLY ASKED QUESTIONS 34 OVERVIEW OF THE SETUP MENU SCREEN 39 SPECIFICATIONS 41 Camera 41 Camera connectors 44 Battery life 44 Possible No. of Images/Possible Shooting Time/ Possible Recording Time 45 Concerning the multi-indicator 46 Supplied Li-ion battery pack 46 Others 47 Before capturing those important shots, be sure to first take a test shot to confirm that your camera is set up and ready to go 48 About the MPEG-4 Standard license 48 English 2
„ APPENDICES FREQUENTLY ASKED QUESTIONS 34 OVERVIEW OF THE SETUP MENU SCREEN 39 SPECIFICATIONS 41 Camera 41 Camera connectors 44 Battery life 44 Possible No. of Images/Possible Shooting Time/ Possible Recording Time 45 Concerning the multi-indicator 46 Supplied Li-ion battery pack 46 Others 47 Before capturing those important shots, be sure to first take a test shot to confirm that your camera is set up and ready to go 48 About the MPEG-4 Standard license 48 English 2

VPC-PD2 Instruction Manual
Page 23
... charge the battery pack. SETUP ABOUT THE BATTERY AND THE CARD About recharging Recharging takes place only when the camera is in the recording mode or playback mode. English 8 The backup battery will maintain the camera settings for a long period, the time and date settings may expand slightly when stored in a hot environment or repeatedly used, but this case, please discontinue its use for a long time. HINT About the internal backup battery...
... charge the battery pack. SETUP ABOUT THE BATTERY AND THE CARD About recharging Recharging takes place only when the camera is in the recording mode or playback mode. English 8 The backup battery will maintain the camera settings for a long period, the time and date settings may expand slightly when stored in a hot environment or repeatedly used, but this case, please discontinue its use for a long time. HINT About the internal backup battery...

VPC-PD2 Instruction Manual
Page 24
... camera is turned off while the temperature is flashing), it is connected to a computer. i If the camera is lit; however it cannot be turned on your computer. When the indicator shows 0 seconds, recording stops. k When the battery or internal camera (excluding battery) temperature rises during use h During camera use, if the temperature of time, please disconnect the dedicated USB interface cable from the camera. HINT Recharging when connected to the USB...
... camera is turned off while the temperature is flashing), it is connected to a computer. i If the camera is lit; however it cannot be turned on your computer. When the indicator shows 0 seconds, recording stops. k When the battery or internal camera (excluding battery) temperature rises during use h During camera use, if the temperature of time, please disconnect the dedicated USB interface cable from the camera. HINT Recharging when connected to the USB...

VPC-PD2 Instruction Manual
Page 32
h To return to the Setup Menu, press the [?] button. Press [I ] or [J] to select the item you wish to change SETUP VIDEO STABILIZER OPTICAL ZOOM CLOCK SET LANGUAGE TV OUTPUT FORMAT OK Press SET button CLOCK SET DATE TIME DISP 2010/07/01 00:00 D / M / Y OK 17 English h The Setting Screen for the selected item appears. 3 Press [I ]/ [J] Select an item to change , and press the SET button.
h To return to the Setup Menu, press the [?] button. Press [I ] or [J] to select the item you wish to change SETUP VIDEO STABILIZER OPTICAL ZOOM CLOCK SET LANGUAGE TV OUTPUT FORMAT OK Press SET button CLOCK SET DATE TIME DISP 2010/07/01 00:00 D / M / Y OK 17 English h The Setting Screen for the selected item appears. 3 Press [I ]/ [J] Select an item to change , and press the SET button.

VPC-PD2 Instruction Manual
Page 33
h Recording begins. h It is not necessary to stop recording. [ ] button (Video recording button) ON/OFF button Recording time 2M REC 00:09 5 Available recording time remaining English 18 h Press the [ ] button again to keep the [ ] button pressed while recording. h When the remaining recording time available for the currently recording clip becomes little, a countdown of the remaining recording time appears on the camera (page 11). 2 Press the [ ] button. SHOOTING SHOOTING SHOOTING VIDEO CLIP RECORDING 1 Turn on the display. 3 End the recording.
h Recording begins. h It is not necessary to stop recording. [ ] button (Video recording button) ON/OFF button Recording time 2M REC 00:09 5 Available recording time remaining English 18 h Press the [ ] button again to keep the [ ] button pressed while recording. h When the remaining recording time available for the currently recording clip becomes little, a countdown of the remaining recording time appears on the camera (page 11). 2 Press the [ ] button. SHOOTING SHOOTING SHOOTING VIDEO CLIP RECORDING 1 Turn on the display. 3 End the recording.

VPC-PD2 Instruction Manual
Page 34
h The video settings are changed, and you are returned to the Recording Screen without changing the settings, press the [?] button. h To return to the recording screen. 19 English VIDEO 1920x1080 30fps SHQ 2 Use the [G] and [H] arrow keys to change the video settings 1 With the Recording Screen displayed, press the [H] arrow key. h The screen to select a setting, and press the SET button. HINT To change the video settings appears.
h The video settings are changed, and you are returned to the Recording Screen without changing the settings, press the [?] button. h To return to the recording screen. 19 English VIDEO 1920x1080 30fps SHQ 2 Use the [G] and [H] arrow keys to change the video settings 1 With the Recording Screen displayed, press the [H] arrow key. h The screen to select a setting, and press the SET button. HINT To change the video settings appears.

VPC-PD2 Instruction Manual
Page 36
... photo settings 1 With the recording screen displayed, press the [G] arrow key. h The photo settings are changed, and you are returned to the Recording Screen without changing the settings, press the [?] button. To change the flash operation 1 While the Recording Screen is kept pressed for at least 1 second. i Press the [?] button to select the flash operation appears. h To return to the Recording Screen. h The screen to cancel the Setup Menu, and then briefly press the [?] button again. 21 English FLASH AUTO 2 Use...
... photo settings 1 With the recording screen displayed, press the [G] arrow key. h The photo settings are changed, and you are returned to the Recording Screen without changing the settings, press the [?] button. To change the flash operation 1 While the Recording Screen is kept pressed for at least 1 second. i Press the [?] button to select the flash operation appears. h To return to the Recording Screen. h The screen to cancel the Setup Menu, and then briefly press the [?] button again. 21 English FLASH AUTO 2 Use...
VPC-PD2 Instruction Manual
Page 38
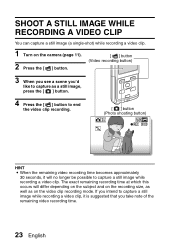
... to end the video clip recording. [ ] button (Photo shooting button) 2M REC 00:09 HINT i When the remaining video recording time becomes approximately 30 seconds, it will differ depending on the subject and on the recording size, as well as on the video clip recording mode. SHOOT A STILL IMAGE WHILE RECORDING A VIDEO CLIP You can capture a still image (a single-shot) while recording a video clip. 1 Turn on the camera (page 11). 2 Press the [ ] button. [ ] button (Video recording button) 3 When you see...
... to end the video clip recording. [ ] button (Photo shooting button) 2M REC 00:09 HINT i When the remaining video recording time becomes approximately 30 seconds, it will differ depending on the subject and on the recording size, as well as on the video clip recording mode. SHOOT A STILL IMAGE WHILE RECORDING A VIDEO CLIP You can capture a still image (a single-shot) while recording a video clip. 1 Turn on the camera (page 11). 2 Press the [ ] button. [ ] button (Video recording button) 3 When you see...

VPC-PD2 Instruction Manual
Page 41
...-timer operation appears. HINT To pause or cancel the self-timer function... SHOOTING SHOOTING WITH THE SELF-TIMER 1 While the Recording Screen is shown, press and hold the SET button for about 10 seconds, and then the image is captured. h The screen to the front lens begins blinking when the shutter button is pressed, the multi-indicator will blink for at least 1 second. i When the [ ] button or [ ] button is...
...-timer operation appears. HINT To pause or cancel the self-timer function... SHOOTING SHOOTING WITH THE SELF-TIMER 1 While the Recording Screen is shown, press and hold the SET button for about 10 seconds, and then the image is captured. h The screen to the front lens begins blinking when the shutter button is pressed, the multi-indicator will blink for at least 1 second. i When the [ ] button or [ ] button is...

VPC-PD2 Instruction Manual
Page 42
... REC/PLAY button. h The file you selected is pressed. 27 English h The image information for about 1 second or more, a slideshow playback will stop when any button is played back. h Use the arrow keys to move the orange frame to the image you press the SET button for the framed image is shown in the bottom part of the monitor. 3 Press the SET button. h Press the REC/PLAY button. h The display changes to the Playback Screen...
... REC/PLAY button. h The file you selected is pressed. 27 English h The image information for about 1 second or more, a slideshow playback will stop when any button is played back. h Use the arrow keys to move the orange frame to the image you press the SET button for the framed image is shown in the bottom part of the monitor. 3 Press the SET button. h Press the REC/PLAY button. h The display changes to the Playback Screen...
VPC-PD2 Instruction Manual
Page 44
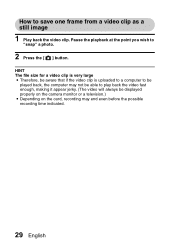
Pause the playback at the point you wish to play back the video fast enough, making it appear jerky. (The video will always be displayed properly on the camera monitor or a television.) i Depending on the card, recording may end even before the possible recording time indicated. 29 English HINT The file size for a video clip is very large i Therefore, be aware that if the video clip is uploaded to a computer to be played back, the computer may not be able to "snap" a photo. 2 Press the [ ] button. How to save one frame from a video clip as a still image 1 Play back the video clip.
Pause the playback at the point you wish to play back the video fast enough, making it appear jerky. (The video will always be displayed properly on the camera monitor or a television.) i Depending on the card, recording may end even before the possible recording time indicated. 29 English HINT The file size for a video clip is very large i Therefore, be aware that if the video clip is uploaded to a computer to be played back, the computer may not be able to "snap" a photo. 2 Press the [ ] button. How to save one frame from a video clip as a still image 1 Play back the video clip.

VPC-PD2 Instruction Manual
Page 52
... volume on the card or in the locked (protect) position. Viewing images Connecting to record or play back occurs. Why can't the camera be the cause. The card contains files that has more available memory on the TV. Why does the "Insufficient card memory" or "Insufficient internal memory" message appear? A problem such as inability to a TV Misc. There is set to the unlocked position. Delete unnecessary files, or use a card that were saved using a device...
... volume on the card or in the locked (protect) position. Viewing images Connecting to record or play back occurs. Why can't the camera be the cause. The card contains files that has more available memory on the TV. Why does the "Insufficient card memory" or "Insufficient internal memory" message appear? A problem such as inability to a TV Misc. There is set to the unlocked position. Delete unnecessary files, or use a card that were saved using a device...

VPC-PD2 Instruction Manual
Page 56
... standard MPEG-4 AVC/H.264 (.MP4) Audio: 48 kHz sampling, 16bit, 2ch, AAC compression Internal memory: Approx. 80 MB SD Memory Card SDHC Memory Card (up to 32 GB) SDXC Memory Card (up to provide interoperability between digital photography devices for the images stored on removable memory cards. SPECIFICATIONS Camera Recorded image file format Data storage media Image sensor/ camera effective number of pixels Still images: JPEG format (DCF, DPOF, Exif 2.2 compliant) Note: Designed mainly by the Japan Electronics...
... standard MPEG-4 AVC/H.264 (.MP4) Audio: 48 kHz sampling, 16bit, 2ch, AAC compression Internal memory: Approx. 80 MB SD Memory Card SDHC Memory Card (up to 32 GB) SDXC Memory Card (up to provide interoperability between digital photography devices for the images stored on removable memory cards. SPECIFICATIONS Camera Recorded image file format Data storage media Image sensor/ camera effective number of pixels Still images: JPEG format (DCF, DPOF, Exif 2.2 compliant) Note: Designed mainly by the Japan Electronics...

VPC-PD2 Instruction Manual
Page 58
....) (tele) Flash modes Auto-flash, forced flash, flash off, red-eye reduction Focus Auto (9-point AF) Self-timer Approx. 2-second delay, 10-second delay Ambient environment Temperature 0 to 40 °C (32 to 104°F) (operation) -20 to 60 °C (-4 to 140°F) (storage) Humidity 30 to 90% (operating, no condensation) 10 to 90% (storage, no condensation) Power supply Battery pack Li-ion battery pack...
....) (tele) Flash modes Auto-flash, forced flash, flash off, red-eye reduction Focus Auto (9-point AF) Self-timer Approx. 2-second delay, 10-second delay Ambient environment Temperature 0 to 40 °C (32 to 104°F) (operation) -20 to 60 °C (-4 to 140°F) (storage) Humidity 30 to 90% (operating, no condensation) 10 to 90% (storage, no condensation) Power supply Battery pack Li-ion battery pack...


